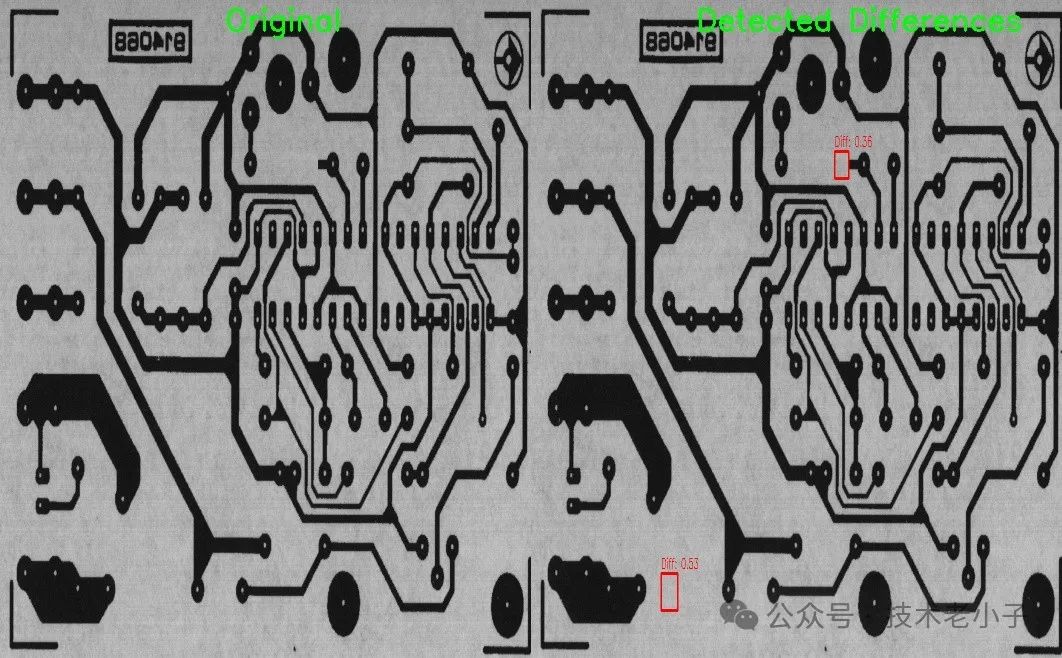
本文将详细介绍如何使用OpenCvSharp来实现模板图像与待检测图像之间的差异检测。这种技术常用于产品质量检测、PCB板检测等场景。上面的示意图展示了一个简单的例子,左边是完整的模板图像,右边是缺少部分元件的待检测图像。
环境准备
// 需要安装的NuGet包
// Install-Package OpenCvSharp4
// Install-Package OpenCvSharp4.runtime.win

using OpenCvSharp;
using System;
using System.Collections.Generic;
完整代码实现
using OpenCvSharp;
using System;
using System.Collections.Generic;
using System.Linq;
using System.Text;
using System.Threading.Tasks;

namespace OpenCv082902
{
    public class TemplateDifferenceDetector
    {
        /// <summary>
        /// 检测结果类
        /// </summary>
        public class DetectionResult
        {
            public Point Location { get; set; }
            public double Difference { get; set; }
            public Rect Region { get; set; }
        }

        /// <summary>
        /// PCB图像差异检测的配置参数
        /// </summary>
        public class DetectionConfig
        {
            public double Threshold { get; set; } = 0.5;          // 差异阈值
            public double MinArea { get; set; } = 10;            // 最小检测面积
            public int BlurSize { get; set; } = 3;               // 高斯模糊核大小
            public int MorphSize { get; set; } = 3;              // 形态学操作核大小
            public bool EnableHistEqualization { get; set; } = true;  // 是否启用直方图均衡化
            public bool EnableNoiseReduction { get; set; } = true;    // 是否启用降噪
        }

        /// <summary>
        /// 执行差异检测
        /// </summary>
        /// <param name="templatePath">模板图像路径</param>
        /// <param name="targetPath">待检测图像路径</param>
        /// <param name="config">检测配置参数</param>
        /// <returns>检测结果列表</returns>
        public static List<DetectionResult> DetectDifferences(
            string templatePath,
            string targetPath,
            DetectionConfig config = null)
        {
            config ??= new DetectionConfig();

            // 读取图像
            using var template = Cv2.ImRead(templatePath);
            using var target = Cv2.ImRead(targetPath);

            // 确保图像成功加载
            if (template.Empty() || target.Empty())
            {
                throw new Exception("无法加载图像");
            }

            // 预处理图像
            using var processedTemplate = PreprocessImage(template, config);
            using var processedTarget = PreprocessImage(target, config);

            // 计算差异图
            using var diff = new Mat();
            Cv2.Absdiff(processedTemplate, processedTarget, diff);

            // 应用阈值处理
            using var thresholdMat = new Mat();
            Cv2.Threshold(diff, thresholdMat, config.Threshold * 255, 255, ThresholdTypes.Binary);

            // 应用形态学操作来减少噪声
            if (config.EnableNoiseReduction)
            {
                var kernel = Cv2.GetStructuringElement(
                    MorphShapes.Rect,
                    new Size(config.MorphSize, config.MorphSize)
                );

                Cv2.MorphologyEx(
                    thresholdMat,
                    thresholdMat,
                    MorphTypes.Open,
                    kernel
                );
            }

            // 寻找轮廓
            Cv2.FindContours(
                thresholdMat,
                out Point[][] contours,
                out HierarchyIndex[] hierarchy,
                RetrievalModes.External,
                ContourApproximationModes.ApproxSimple
            );

            // 分析差异区域
            var results = new List<DetectionResult>();
            foreach (var contour in contours)
            {
                // 计算轮廓面积,过滤掉太小的区域
                double area = Cv2.ContourArea(contour);
                if (area < config.MinArea)
                    continue;

                // 获取边界矩形
                var boundingRect = Cv2.BoundingRect(contour);

                // 计算该区域的平均差异值
                using var roi = new Mat(diff, boundingRect);
                Scalar meanDiff = Cv2.Mean(roi);

                results.Add(new DetectionResult
                {
                    Location = new Point(boundingRect.X, boundingRect.Y),
                    Difference = meanDiff.Val0 / 255.0, // 归一化差异值
                    Region = boundingRect
                });
            }

            return results;
        }

        /// <summary>
        /// 图像预处理
        /// </summary>
        private static Mat PreprocessImage(Mat input, DetectionConfig config)
        {
            // 转换为灰度图
            var processed = input.CvtColor(ColorConversionCodes.BGR2GRAY);

            // 应用高斯模糊减少噪声
            if (config.EnableNoiseReduction)
            {
                Cv2.GaussianBlur(
                    processed,
                    processed,
                    new Size(config.BlurSize, config.BlurSize),
                    0
                );
            }

            // 直方图均衡化增强对比度
            if (config.EnableHistEqualization)
            {
                Cv2.EqualizeHist(processed, processed);
            }

            return processed;
        }

        /// <summary>
        /// 可视化检测结果
        /// </summary>
        public static void VisualizeResults(
            string templatePath,
            string targetPath,
            string outputPath,
            List<DetectionResult> results)
        {
            using var target = Cv2.ImRead(targetPath);
            using var output = target.Clone();

            // 在图像上标注差异区域
            foreach (var result in results)
            {
                // 绘制矩形框
                Cv2.Rectangle(
                    output,
                    result.Region,
                    new Scalar(0, 0, 255), // 红色
                    2
                );

                // 添加差异值标注
                string text = $"Diff: {result.Difference:F2}";
                Cv2.PutText(
                    output,
                    text,
                    new Point(result.Location.X, result.Location.Y - 5),
                    HersheyFonts.HersheySimplex,
                    0.5,
                    new Scalar(0, 0, 255),
                    1
                );
            }

            // 创建对比图
            using var comparison = new Mat();
            using var targetResized = target.Resize(new Size(target.Width / 2, target.Height));
            using var outputResized = output.Resize(new Size(output.Width / 2, output.Height));
            Cv2.HConcat(new[] { targetResized, outputResized }, comparison);

            // 添加标题
            Cv2.PutText(
                comparison,
                "Original",
                new Point(target.Width / 4 - 40, 30),
                HersheyFonts.HersheySimplex,
                1,
                new Scalar(0, 255, 0),
                2
            );

            Cv2.PutText(
                comparison,
                "Detected Differences",
                new Point(target.Width * 3 / 4 - 100, 30),
                HersheyFonts.HersheySimplex,
                1,
                new Scalar(0, 255, 0),
                2
            );

            // 保存结果图像
            comparison.SaveImage(outputPath);

        }

        /// <summary>
        /// 使用示例
        /// </summary>
        public static void Example()
        {
            var config = new DetectionConfig
            {
                Threshold = 0.3,             // 降低阈值使检测更敏感
                MinArea = 5,                 // 降低最小面积阈值
                BlurSize = 3,                // 适当的模糊核大小
                MorphSize = 2,               // 较小的形态学操作核心
                EnableHistEqualization = true,
                EnableNoiseReduction = true
            };

            var results = DetectDifferences(
                "template.jpg",
                "target.jpg",
                config
            );

            VisualizeResults(
                "template.jpg",
                "target.jpg",
                "output.jpg",
                results
            );

            Console.WriteLine($"Found {results.Count} differences");
            foreach (var result in results)
            {
                Console.WriteLine($"Difference at ({result.Location.X}, {result.Location.Y}) " +
                                $"with difference value: {result.Difference:F2}");
            }
        }
    }
}
使用示例
using OpenCv082902;
using OpenCvSharp;
using System;
using System.Collections.Generic;

class Program
{

    static void Main(string[] args)
    {
        // 使用自定义配置
        var config = new TemplateDifferenceDetector.DetectionConfig
        {
            Threshold = 0.3,
            MinArea = 5,
            BlurSize = 3,
            MorphSize = 2,
            EnableHistEqualization = true,
            EnableNoiseReduction = true
        };

        var results = TemplateDifferenceDetector.DetectDifferences("pcb_layout.png", "pcb_layout1.jpg", config);

        // 可视化结果
        TemplateDifferenceDetector.VisualizeResults("pcb_layout.png", "pcb_layout1.jpg", "output.jpg", results);

        Console.ReadKey();
    }

}
图片
图片
检测失败的可能原因:
- 图像对齐问题 - 两张图像可能有微小的偏移或旋转
- 阈值设置过高 - 导致小的差异被忽略
- 最小面积设置过大 - 导致小的差异区域被过滤
- 图像质量问题 - 如噪声、模糊等影响检测效果
总结
本文详细介绍了使用OpenCvSharp实现模板差异检测的完整方案。通过合适的图像处理和计算机视觉技术,可以有效地检测出两张图像之间的差异。代码实现了基本功能,并提供了良好的扩展性。在实际应用中,可以根据具体需求调整参数和添加其他功能。


