后端开发必备:ElasticSearch入门与进阶

大数据 数据分析
Kibana 是一款 ES 的数据可视化和管理工具,可以提供直方图,线形图,饼状图,地图。Kibana 还包含 Canvas 和 Elastic Maps 等应用程序。Canvas 可以基于用户创建动态信息。Elastic Maps 可以对空间数据进行可视化处理。

ES 是一个分布式的开源搜索和分析引擎,适用于文本、数字、地理空间、结构化数据、非结构化数据等数据的搜索。ES 是在 Apache Lucene 的基础上完成开发。由 Elastic 于 2010 年发布。ES 通过其简单的 REST 风格的 API、分布式特性、速度和可扩容闻名世界。是 Elastic Stack 的核心组件。Elastic Stack 是一套用于数据采集、扩充、保存、分析、可视化的开源工具。Elastic Stack 称之为 ELK。目前 ELK 包含一系列丰富的轻量数据采集代理,这些代理被称之为 Beats。

ES 的用途

主要有以下的用途:

• 应用程序搜索

• 网站搜索

• 企业搜索

• 日志处理

• 基础设施指标和容器监测

• 应用程序性能监测

• 地理空间数据分析和可视化

• 安全分析

• 业务分析

工作原理

从多个来源输入到 ES 中,数据在 ES 中进行索引和解析,标准化并充实这些数据。这些数据在 ES 中索引完成之后,用户就可以针对他们的数据进行复杂的查询,并使用聚合来检索这些数据,在 Kibana 中,用户可以创建数据可视化面板,并对 ELK 进行管理。

索引

ES 索引是指相互关联的文档集合。ES 是会以 JSON 文档的形式保存数据,每个文档都会在一组键值对中建立联系。

ES 使用的是一种倒排序索引的数据结构。这个结构可以允许十分快速的进行全文本的搜索。

在索引的过程中,ES 会保存文档并构建倒排序索引,这样用户就可以实时的对文档数据进行搜索。索引是在添加过程中就启动的。

Logstash

Logstash 是 ELK 的核心菜品,可以对数据进行聚合和处理。并将数据发送到 ES 中。Logstash 是一个开源的服务器端数据处理管道。

Kibana

Kibana 是一款 ES 的数据可视化和管理工具,可以提供直方图,线形图,饼状图,地图。Kibana 还包含 Canvas 和 Elastic Maps 等应用程序。Canvas 可以基于用户创建动态信息。Elastic Maps 可以对空间数据进行可视化处理。

为什么要使用 ES

• ES 很快:ES 是在 Lucene 基础上构建,所以全文本搜索相当的出色。ES 还是一个实时搜索平台。文档索引操作到文档变为可搜索之间速度很快。

• ES 具有分布式的特征:ES 中保存的文档分布在不同的容器中,这些容器为分片,可以对分片进行复制并形成冗余副本。ES 可以扩充到数百台,并处理 PB 级别的数据。

• ES 包含一系列广泛的功能:ES 拥有大量的内置功能,方便用户管理数据。

• ES 简化了数据采集,可视化报告的过程:通过与 Beats 和 Logstash 集成,用户可以在 ES 中索引数据并处理数据,

ES 搭建

安装镜像:

docker pull docker.elastic.co/elasticsearch/elasticsearch:7.3.2

启动容器:

docker run -d --name es -p 9200:9200 -p 9300:9300 -e "discovery.type=single-node" docker.elastic.co/elasticsearch/elasticsearch:7.3.2

修改配置:

#进入 docker 容器内部

docker exec -it es /bin/bash

#打开配置文件

vim config/elasticsearch.yml

## 加入跨域配置

http.cors.enabled: true

http.cors.allow-origin: "*"

进入容器,安装分词器:

docker exec -it es /bin/bash
./bin/elasticsearch-plugin install https://github.com/medcl/elasticsearch-analysis-ik/releases/download/v7.3.2/elasticsearch-analysis-ik-7.3.2.zip

重启 ES:

docker restart es

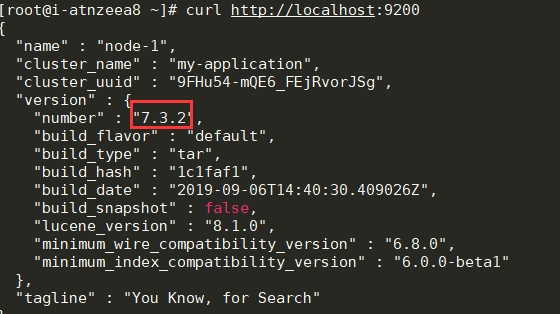
测试:

图片图片

查看分词器是否安装上:

图片图片

ES 查询

空查询

空查询将会返回一个索引库中所有文档:

curl -X GET "localhost:9200/_search?pretty" -H 'Content-Type: application/json' -d'
{}
'

在一个或者多个索引库或者所有的 _type 中查询:

GET /index_2014*/type1,type2/_search
{}

使用分页:

GET /_search
{
  "from": 30,
  "size": 10
}

查询表达式

只需要在查询上,将语句传递给 queue 参数:

GET /_search
{
    "query": YOUR_QUERY_HERE
}

查询语句的结构

一个查询的典型结构:

{
    QUERY_NAME: {
        ARGUMENT: VALUE,
        ARGUMENT: VALUE,...
    }
}

针对某个字段:

{
    QUERY_NAME: {
        FIELD_NAME: {
            ARGUMENT: VALUE,
            ARGUMENT: VALUE,...
        }
    }
}

如果想要使用 match 查询 tewwt 字段中包含 elasticsesh 的内容。

curl -X GET "localhost:9200/_search?pretty" -H 'Content-Type: application/json' -d'
{
    "query": {
        "match": {
            "tweet": "elasticsearch"
        }
    }
}
'

合并查询

分为叶子语句,被用于将查询字符串和字段进行对比,复合语句用于合并其他查询语句。

例如下面语句:找出信件正文包含 business opportunity 的星标邮件,或者在邮件正文包含 business opportunity 的非垃圾邮件:

{
    "bool": {
        "must": { "match":   { "email": "business opportunity" }},
        "should": [
            { "match":       { "starred": true }},
            { "bool": {
                "must":      { "match": { "folder": "inbox" }},
                "must_not":  { "match": { "spam": true }}
            }}
        ],
        "minimum_should_match": 1
    }
}

常用查询

match_all 查询

该查询匹配所有文档:

{ "match_all": {}}

match 查询

用于使用分词器进行查询:

{ "match": { "tweet": "About Search" }}

multi_match 查询

用于在多个字段上执行相同更多 match 查询:

{
    "multi_match": {
        "query":    "full text search",
        "fields":   [ "title", "body" ]
    }
}

range 查询

用于找出在指定区间内的数字或者时间:

{
    "range": {
        "age": {
            "gte":  20,
            "lt":   30
        }
    }
}

term 查询

用于进行精确匹配:

{ "term": { "age":    26           }}
{ "term": { "date":   "2014-09-01" }}
{ "term": { "public": true         }}
{ "term": { "tag":    "full_text"  }}

terms 查询

用于进行多值匹配:

{ "terms": { "tag": [ "search", "full_text", "nosql" ] }}

exists 查询和 missing 查询

用于查询在指定字段中有值或者无值的文档:

{
    "exists":   {
        "field":    "title"
    }
}

ES 索引

创建一个索引

PUT /my_index
{
    "settings": { ... any settings ... },
    "mappings": {
        "type_one": { ... any mappings ... },
        "type_two": { ... any mappings ... },
        ...
    }
}

此刻,ES 会自动创建一个索引。

删除一个索引

DELETE /my_index

索引设置

• number_of_shards:每个索引的主分片数

• number_of_replicas:每个主分片的副本数

创建只有 一个主分片,没有副本的小索引:

PUT /my_temp_index
{
    "settings": {
        "number_of_shards" :   1,
        "number_of_replicas" : 0
    }
}

配置分析器

standard 分析器是用于全文字段的默认分析器,包含以下部分:

• standard 分词器,通过单词边界分割输入的文本。

• standard 语汇单元过滤器,目的是整理分词器触发的语汇单元(但是目前什么都没做)。

• lowercase 语汇单元过滤器,转换所有的语汇单元为小写。

• stop 语汇单元过滤器,删除停用词—对搜索相关性影响不大的常用词,如 a、the、and、is。

在下面的例子中,创建了一个新的分析器 es_std,并使用预定义的西班牙语停用词列表。

PUT /spanish_docs
{
    "settings": {
        "analysis": {
            "analyzer": {
                "es_std": {
                    "type":      "standard",
                    "stopwords": "_spanish_"
                }
            }
        }
    }
}

进行测试:

curl -X GET "localhost:9200/spanish_docs/_analyze?analyzer=es_std&pretty" -H 'Content-Type: application/json' -d'
El veloz zorro marrón
'

通过结果进行查看:

{
  "tokens" : [
    { "token" :    "veloz",   "position" : 2 },
    { "token" :    "zorro",   "position" : 3 },
    { "token" :    "marrón",  "position" : 4 }
  ]
}

自定义分析器

在 analysis 下的相应位置设置字符过滤器,分词过滤器,词单元过滤器。

PUT /my_index
{
    "settings": {
        "analysis": {
            "char_filter": { ... custom character filters ... },
            "tokenizer":   { ...    custom tokenizers     ... },
            "filter":      { ...   custom token filters   ... },
            "analyzer":    { ...    custom analyzers      ... }
        }
    }
}

接着创建一个自定义分析器,用于清楚 html 部分,将 & 映射为 and:

"char_filter": {
    "&_to_and": {
        "type":       "mapping",
        "mappings": [ "&=> and "]
    }
}

使用标准分词器讽刺,小写词条使用小写过滤,使用自定义停止词过滤器移除自定义的停止词列表中包含的词。

"filter": {
    "my_stopwords": {
        "type":        "stop",
        "stopwords": [ "the", "a" ]
    }
}

最后使用分析器,自定义组合过滤器和分词器。

"analyzer": {
    "my_analyzer": {
        "type":           "custom",
        "char_filter":  [ "html_strip", "&_to_and" ],
        "tokenizer":      "standard",
        "filter":       [ "lowercase", "my_stopwords" ]
    }
}

总和如下所示:

curl -X PUT "localhost:9200/my_index?pretty" -H 'Content-Type: application/json' -d'
{
    "settings": {
        "analysis": {
            "char_filter": {
                "&_to_and": {
                    "type":       "mapping",
                    "mappings": [ "&=> and "]
            }},
            "filter": {
                "my_stopwords": {
                    "type":       "stop",
                    "stopwords": [ "the", "a" ]
            }},
            "analyzer": {
                "my_analyzer": {
                    "type":         "custom",
                    "char_filter":  [ "html_strip", "&_to_and" ],
                    "tokenizer":    "standard",
                    "filter":       [ "lowercase", "my_stopwords" ]
            }}
}}}
'

测试一下:

curl -X GET "localhost:9200/my_index/_analyze?analyzer=my_analyzer&pretty" -H 'Content-Type: application/json' -d'
The quick & brown fox
'

可以看到结果如下所示:

{
  "tokens" : [
      { "token" :   "quick",    "position" : 2 },
      { "token" :   "and",      "position" : 3 },
      { "token" :   "brown",    "position" : 4 },
      { "token" :   "fox",      "position" : 5 }
    ]
}

最后,把这个分词器用在 string 字段上:

curl -X PUT "localhost:9200/my_index/_mapping/my_type?pretty" -H 'Content-Type: application/json' -d'
{
    "properties": {
        "title": {
            "type":      "string",
            "analyzer":  "my_analyzer"
        }
    }
}
'

类型和映射

Lucene 如何处理文档

在 Lucene 中一个文档由键值对组成。在索引文档的时候,每个字段的值都会添加到相关字段的倒排序中。

类型如何实现

每个文档的类型名称将会保存在 _type 字段上,当要检索字段的时候,ES 会自动在 _type 字段上检索。

例如在 User 类型中,name 字段会映射声明为 string 类型,并索引到 name 的倒排序中,需要使用 whitespace 分词器分析。

"name": {
    "type":     "string",
    "analyzer": "whitespace"
}

Lucene 索引的每个字段都包含一个单一的扁平的模式

在 Lucene 中,一个特定的字段可以映射到 string 类型或者是 number 类型,但是不能两者兼具。因为 ES 添加的优于 lucene 的额外机制(以元数据 _type 字段的形式。)在 ES 中所有类型都最终共享相同的映射。

{
   "data": {
      "mappings": {
         "people": {
            "properties": {
               "name": {
                  "type": "string",
               },
               "address": {
                  "type": "string"
               }
            }
         },
         "transactions": {
            "properties": {
               "timestamp": {
                  "type": "date",
                  "format": "strict_date_optional_time"
               },
               "message": {
                  "type": "string"
               }
            }
         }
      }
   }
}

在上方中,"name"/"address" 和 "timestamp"/"message" 虽然是独立的,但是在 Lucene 中是一个映射。

{
   "data": {
      "mappings": {
        "_type": {
          "type": "string",
          "index": "not_analyzed"
        },
        "name": {
          "type": "string"
        }
        "address": {
          "type": "string"
        }
        "timestamp": {
          "type": "long"
        }
        "message": {
          "type": "string"
        }
      }
   }
}

对于整个索引,映射在本质上被 扁平化 成一个单一的、全局的模式。

Java 连接 ES

添加依赖:

<!-- TransportClient 依赖包-->
        <dependency>
            <groupId>org.elasticsearch.client</groupId>
            <artifactId>transport</artifactId>
            <version>6.2.2</version>
        </dependency>

        <!-- 测试包,与 JAVA 连接 ES 无关 -->
        <dependency>
            <groupId>junit</groupId>
            <artifactId>junit</artifactId>
            <version>4.12</version>
            <scope>test</scope>
        </dependency>

创建 ES 集群:

图片图片

连接 ES:

package cn.zsm.es;

import org.elasticsearch.client.transport.TransportClient;
import org.elasticsearch.common.settings.Settings;
import org.elasticsearch.common.transport.TransportAddress;
import org.elasticsearch.transport.client.PreBuiltTransportClient;
import org.junit.Before;
import org.junit.Test;

import java.net.InetAddress;
import java.net.UnknownHostException;

public class JavaEsTest {

    private String IP;
    private int PORT;

    @Before
    public void init(){
        this.IP = "192.168.?.?";
        this.PORT = 9300;
    }

    @Test
    public void esClient(){
        try {
            Settings settings = Settings.builder().put("cluster.name", "my-application").build();
            TransportClient client = new PreBuiltTransportClient(settings)
                    .addTransportAddresses(new TransportAddress(InetAddress.getByName(IP), PORT));
            System.out.println(client.toString());
        } catch (UnknownHostException e) {
            e.printStackTrace();
        }
    }

}

测试结果:

图片图片


责任编辑:武晓燕 来源: 程序猿技术充电站
相关推荐

2023-12-30 18:31:24

NGINXVPS服务器

2020-06-19 16:25:19

MySQL日志文件数据库

2013-09-29 13:26:12

iOS开发者服务工具

2014-04-14 05:31:08

WindowsPhonWP8MVC

2023-06-27 08:34:32

2010-06-07 18:51:15

UML入门

2019-07-09 05:44:35

前后端分离架构接口规范

2021-05-06 15:08:40

开发前端后端

2013-07-26 10:54:40

BaaS后端即服务云存储

2017-03-16 08:46:43

TensorFlow安装入门

2018-11-06 21:50:09

前端Html脚本语言

2009-07-16 16:27:33

ibatis DAO

2023-10-07 14:25:14

2010-07-27 15:53:15

2021-03-07 09:12:54

GolangNode.js.后端

2011-06-03 14:36:32

IOS 环境搭建

2011-06-03 15:36:22

IOS 环境搭建

2011-06-03 15:08:09

IOS 环境搭建

2011-06-03 16:05:20

IOS 环境搭建

2020-08-07 08:03:37

IONetty
点赞
收藏

51CTO技术栈公众号