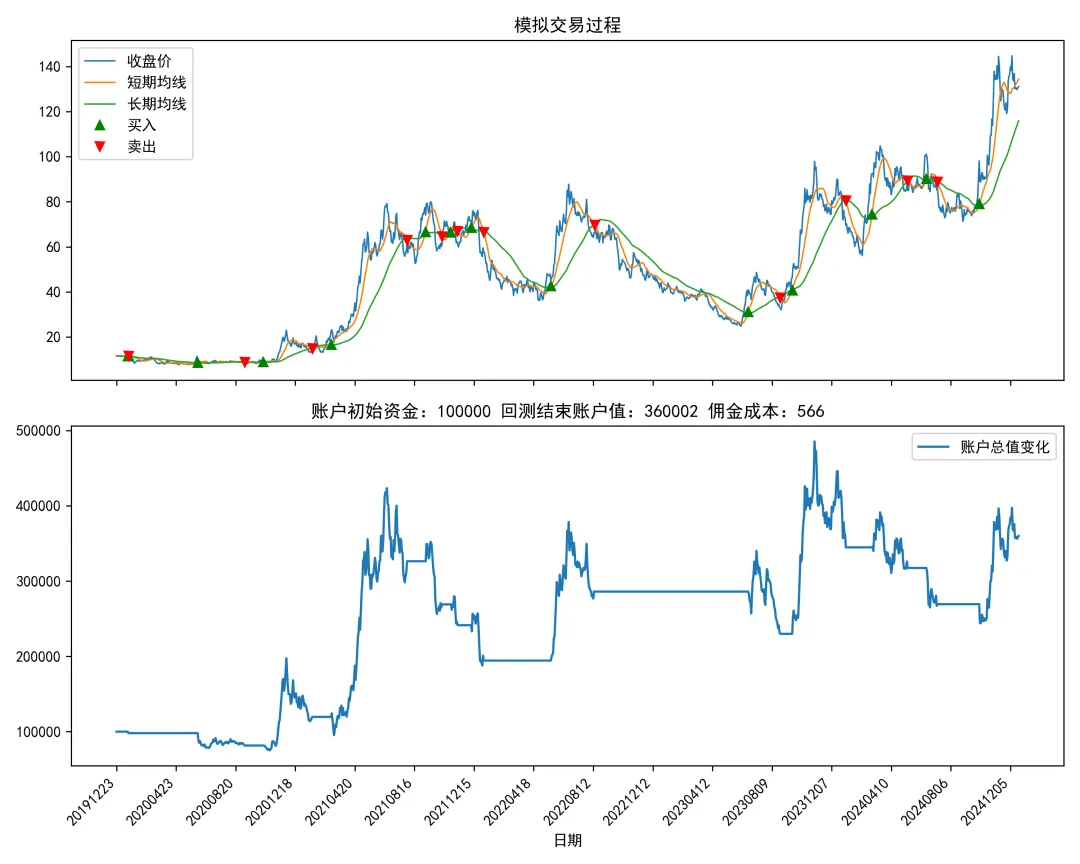
Python凭借其在数据科学领域积累的丰富生态,已然成为专业「量化分析」中必不可少的技术手段。今天要给大家分享的例子,就展示了如何基于Python中常用的numpy、pandas等常用数据分析处理框架,针对目标个股简单实现「均线策略回测」。

1. 相关库的导入
分析过程需要用到的库如下,其中numpy、pandas等库用于实现分析过程的「数据处理」及「运算」,xtquant用于快捷「获取」股票历史行情数据,matplotlib则用于对策略过程及效果进行「可视化」:
import numpy as np
import pandas as pd
from xtquant import xtdata # qmt行情数据模块
from functools import reduce
import matplotlib.pyplot as plt
from datetime import datetime, timedelta
from matplotlib.ticker import MaxNLocator
2. 获取目标个股历史行情数据
在导入相关库后,我们首先需要获取目标个股的「历史行情数据」,以601127.SH赛力斯为例,我们基于xtquant中的行情数据模块,直接下载并提取目标个股「近5年」的日线行情数据(xtquant调用股票行情数据使用需配合本机QMT程序):
# 以601127.SH赛力斯为例
target_stock = '601127.SH'
# 获取近5年历史日线行情数据
start_time = (datetime.now() - timedelta(days=365 * 5)).strftime('%Y%m%d')
# 下载数据
xtdata.download_history_data(
    target_stock,
    period='1d',
    start_time=start_time
)
# 提取数据
raw_history = xtdata.get_market_data(
    stock_list=[target_stock],
    period='1d',
    start_time=start_time,
    field_list=['open', 'high', 'low', 'close', 'volume']
)
3. 历史行情数据清洗转换
为了进行下一步的策略回测模拟,我们需要对先前下载提取的日线历史行情数据进行「清洗转换」,通过下面的代码,即可将上一步的原始数据转换为标准的「数据框」格式:

# 转换为回测所需标准数据框格式
history_df = (
    reduce(
        lambda left, right: left.join(right),
        [
            value
            .T
            .rename(
                columns={
                    target_stock: key
                }
            )
            for key, value in raw_history.items()
        ]
    )
    .reset_index(drop=False)
    .rename(columns={'index': 'datetime'})
)
history_df.head()
4. 回测模拟相关参数设置
接下来我们需要定义策略模拟相关的初始资金、交易佣金率、交易最低佣金等基本参数:
# 回测模拟相关参数设置

initial_cash = 100000  # 初始资金
commission_rate = 0.0001  # 交易佣金率
min_commission = 5  # 交易最低佣金
short_window = 15 # 短期均线窗口大小
long_window = 60 # 长期均线窗口大小
5. 交易信号计算
按照上一步给定的参数,首先计算出短期、长期均线值:
# 计算短期均线
history_df['short_mavg'] = history_df['close'].rolling(window=short_window, min_periods=1).mean()
# 计算长期均线
history_df['long_mavg'] = history_df['close'].rolling(window=long_window, min_periods=1).mean()
接着按照短期均线超过长期均线买入,反之卖出的简单均线策略,计算出不同的「交易信号」点:
# 初始化交易信号字段
history_df['signal'] = 0
# 将所有短期均线突破长期均线的交易日,交易信号标记为1
history_df.loc[short_window:, 'signal'] = np.where(
    history_df.loc[short_window:, 'short_mavg'] > history_df.loc[short_window:, 'long_mavg'],
    1,
    0
)
# 通过差分运算,辅助计算交易时机
history_df['positions'] = history_df['signal'].diff()
6. 基于交易信号模拟交易过程
接着我们就可以在前面计算结果的基础上,执行模拟交易过程,并妥善记录中间过程「账户值变化」情况:
cash = initial_cash # 资金
total_shares = 0  # 持仓股数
portfolio_value = []  # 记录每日账户总值
total_commission = 0 # 记录累计佣金支出

# 执行交易模拟过程
for row in history_df.itertuples():
    # 当出现买入信号时
    if row.positions == 1:
        num_shares = cash // row.close  # 计算本次可买入的股数
        total_commission += max(min_commission, commission_rate * num_shares * row.close)  # 累加本次交易佣金
        cash -= num_shares * row.close  # 更新最新资金量
        total_shares += num_shares  # 更新最新持股数量

    # 当出现卖出信号,且存在有效持仓时,假设全部卖出
    elif row.positions == -1 and total_shares > 0:
        total_commission += max(min_commission, commission_rate * total_shares * row.close)  # 计算本次交易佣金
        cash += total_shares * row.close # 更新最新资金量
        total_shares = 0  # 更新最新持股数量

    # 计算每日的账户总值
    portfolio_value.append(cash + total_shares * row.close)

# 添加账户总值字段
history_df['portfolio_value'] = portfolio_value
7. 回测结果可视化
最后,我们将整个回测过程,以及最终的账户结果值、佣金成本等信息整合到一张图中展示:
# 设置中文字体
plt.rcParams['font.family'] = ['SimHei']
# 设置负号显示
plt.rcParams['axes.unicode_minus'] = False

fig, (ax1, ax2) = plt.subplots(2, 1, figsize=(10, 8), sharex=True)

# 绘制上图 - 交易过程
ax1.plot(history_df['datetime'], history_df['close'], label='收盘价', linewidth=1)
ax1.plot(history_df['datetime'], history_df['short_mavg'], label='短期均线', linewidth=1)
ax1.plot(history_df['datetime'], history_df['long_mavg'], label='长期均线', linewidth=1)
ax1.plot(history_df[history_df['positions'] == 1]['datetime'], history_df['short_mavg'][history_df['positions'] == 1], '^', markersize=6, color='g', label='买入')
ax1.plot(history_df[history_df['positions'] == -1]['datetime'], history_df['short_mavg'][history_df['positions'] == -1], 'v', markersize=6, color='r', label='卖出')
ax1.legend()
ax1.set_title('模拟交易过程')

# 绘制下图 - 账户值波动变化
ax2.plot(history_df['datetime'], history_df['portfolio_value'], label='账户总值变化')
ax2.legend()
ax2.set_title(f'账户初始资金:{initial_cash} 回测结束账户值:{round(portfolio_value[-1])} 佣金成本:{round(total_commission)}')
ax2.set_xlabel('日期')

# 设置共享的x轴刻度和标签角度
ax2.xaxis.set_major_locator(MaxNLocator(nbins=20))  # 设置刻度数量
plt.setp(ax2.get_xticklabels(), rotation=45, ha='right')  # 设置标签角度和对齐方式

plt.tight_layout()
# 导出图片
plt.savefig('回测结果可视化.png', dpi=300)
plt.show()


