在我们系统开发中,通常会需要对接口的请求情况做一些日志记录,通过详细的日志记录,我们可以获取每个接口请求的关键信息,包括请求时间、请求参数、请求主机、以及用户身份等。这些信息将为后续的性能优化、故障排查和用户行为分析提供重要依据。本篇文章将介绍如何在 NestJS 中优雅的实现接口日志记录。
什么是 AOP
在开始之前,我们需要了解一下什么是 AOP 架构?
我们首先了解一下 NestJS 对一个请求的处理过程。在 NestJS 中,一个请求首先会先经过控制器(Controller),然后 Controller 调用服务 (Service)中的方法,在 Service 中可能还会进行数据库的访问(Repository)等操作,最后返回结果。但是如果我们想在这个过程中加入一些通用逻辑,比如日志记录,权限控制等该如何做呢?
这时候就需要用到 AOP(Aspect-Oriented Programming,面向切面编程)了,它允许开发者通过定义切面(Aspects)来对应用程序的各个部分添加横切关注点(Cross-Cutting Concerns)。横切关注点是那些不属于应用程序核心业务逻辑,但在整个应用程序中多处重复出现的功能或行为。这样可以让我们在不侵入业务逻辑的情况下来加入一些通用逻辑。也就是说 AOP 架构允许我们在请求的不同阶段插入代码,而不需要修改业务逻辑的代码。
NestJS 中的五种实现 AOP 的方式有Middleware(中间件)、Guard(导航守卫)、Pipe(管道)、Interceptor(拦截器)、ExceptionFilter(异常过滤器),感兴趣的可以查看相关资料了解这些AOP。本篇文章将介绍如何使用Interceptor(拦截器)来实现接口日志记录。
然后看一下我们的需求,我们需要记录每个接口的请求情况,包括请求时间、请求参数、请求主机、以及用户身份等。我们肯定是不能在每个接口中都去手动的去添加日志记录的,这样会非常的麻烦,而且也不优雅。所以这时候我们就可以使用 AOP 架构中的Interceptor(拦截器)来实现接口日志记录。拦截器可以在请求到达控制器之前或之后执行一些操作,我们可以在拦截器中记录接口的请求情况,这样就可以实现接口日志记录了。
日志记录模块实现
首先我们需要生成一个日志记录模块,用于记录接口的请求情况。在NestJS中执行nest g res log就可以自动生成一个模板。然后新建log/entities/operationLog.entity.ts文件,用于定义日志记录的实体类。
import * as moment from "moment";
import {
  Column,
  CreateDateColumn,
  Entity,
  PrimaryGeneratedColumn,
  UpdateDateColumn,
} from "typeorm";
//操作日志表
@Entity("fs_operation_log")
export class OperationLog {
  @PrimaryGeneratedColumn()
  id: number; // 标记为主键,值自动生成
  @Column({ length: 100, nullable: true })
  title: string; //系统模块
  @Column({ length: 20, nullable: true })
  operation_type: string; //操作类型
  @Column({ length: 20, nullable: true })
  method: string; //请求方式
  @Column({ type: "text", nullable: true })
  params: string; //参数
  @Column({ nullable: true })
  ip: string; //ip
  @Column({ type: "text", nullable: true })
  url: string; //地址
  @Column({ nullable: true })
  user_agent: string; //浏览器
  @Column({ nullable: true })
  username: string; //操作人员
  @CreateDateColumn({
    transformer: {
      to: (value) => {
        return value;
      },
      from: (value) => {
        return moment(value).format("YYYY-MM-DD HH:mm:ss");
      },
    },
  })
  create_time: Date;

  @UpdateDateColumn({
    transformer: {
      to: (value) => {
        return value;
      },
      from: (value) => {
        return moment(value).format("YYYY-MM-DD HH:mm:ss");
      },
    },
  })
  update_time: Date;
}启动项目后,在数据库中就会自动生成fs_operation_log表了。
然后在log/log.module.ts文件中通过@Global将这个模块注册为全局模块,并导入这个实体类,同时将LogService导出,这样就可以在其它模块中使用了。
import { Global, Module } from "@nestjs/common";
import { LogService } from "./log.service";
import { LogController } from "./log.controller";
import { OperationLog } from "./entities/operationLog.entity";
import { TypeOrmModule } from "@nestjs/typeorm";

//全局模块
@Global()
@Module({
  controllers: [LogController],
  providers: [LogService],
  imports: [TypeOrmModule.forFeature([OperationLog])],
  exports: [LogService],
})
export class LogModule {}最后在log/log.service.ts文件中定义一个saveLog方法,用于保存日志记录。
import { Injectable } from '@nestjs/common';
import { OperationLog } from './entities/operationLog.entity';
import {Repository } from 'typeorm';
import { InjectRepository } from '@nestjs/typeorm';
import { ApiException } from 'src/common/filter/http-exception/api.exception';
import { ApiErrorCode } from 'src/common/enums/api-error-code.enum';

@Injectable()
export class LogService {
    constructor(
        @InjectRepository(OperationLog)
        private readonly operationLog: Repository<OperationLog>
    ) { }
    // 保存操作日志
    async saveOperationLog(operationLog: OperationLog) {
        await this.operationLog.save(operationLog);
    }

}
这样我们就完成了日志记录模块的实现了。后面我们会在拦截器中调用这个方法来实现接口日志的记录。
拦截器实现
新建src/common/interceptor/log.interceptor.ts文件,用于实现拦截器。在拦截器中可以通过context.switchToHttp().getRequest()获取到请求相关信息。同时我们可以通过context.getHandler()获取到当前控制器的元数据,从而获取到控制器中自定义装饰器定义的模块名。
首先看一下自定义装饰器@LogOperationTitle。
在src/common/decorator/oprertionlog.decorator.ts文件中定义了一个@LogOperationTitle装饰器,用于标记当前控制器的模块名。
import { SetMetadata } from "@nestjs/common";

// 操作日志装饰器,设置操作日志模块名
export const LogOperationTitle = (title: string) =>
SetMetadata("logOperationTitle", title);简单来说就是使用@LogOperationTitle装饰器可以定义模块名称(logOperationTitle),然后在拦截器中获取到这个模块名称。然后看下自定义拦截器的实现。
//操作日志拦截器
import {
    Injectable,
    NestInterceptor,
    ExecutionContext,
    CallHandler,
} from '@nestjs/common';
import { Observable } from 'rxjs';
import { tap } from 'rxjs/operators';
import { LogService } from 'src/log/log.service';
import { OperationLog } from 'src/log/entities/operationLog.entity';
import { Reflector } from '@nestjs/core';
export interface Response<T> {
    data: T;
}

@Injectable()
export class OperationLogInterceptor<T>
    implements NestInterceptor<T, Response<T>>
{
    constructor(
        private readonly logService: LogService,
        private readonly reflactor: Reflector,
    ) { }
    intercept(
        context: ExecutionContext,
        next: CallHandler,
    ): Observable<Response<T>> {
        //获取请求对象
        const request = context.switchToHttp().getRequest();
        //获取当前控制器元数据中的日志logOperationTitle
        const title = this.reflactor.get<string>('logOperationTitle', context.getHandler());
        return next
            .handle().pipe(tap(() => {
                const log = new OperationLog();
                log.title = title;
                log.method = request.method;
                log.url = request.url;
                log.ip = request.ip;
                //请求参数
                log.params = JSON.stringify({ ...request.query, ...request.params, ...request.body });
                //浏览器信息
                log.user_agent = request.headers['user-agent'];
                log.username = request.user?.username;
                this.logService.saveOperationLog(log).catch((err) => {
                    console.log(err);
                });

            }
            ));
    }
}
这样我们就完成了拦截器的实现了。
使用拦截器
因为我们需要在每个请求中都用到这个拦截器,所以我们可将其定义为全局拦截器。前面文章中我们介绍过可以在main.ts文件中通过app.useGlobalInterceptors(new OperationLogInterceptor())将拦截器注册为全局拦截器,但是这样会出现一个问题,就是我们在log/log.module.ts文件中定义的LogService服务无法在拦截器中使用,因为拦截器是没有依赖注入的,所以我们需要在app.module.ts文件中通过APP_INTERCEPTOR提供者将拦截器注册为全局拦截器,这样才可以在拦截器中使用LogService服务了。
import { APP_GUARD, APP_INTERCEPTOR } from '@nestjs/core';
import { OperationLogInterceptor } from './common/interceptor/log/log.interceptor';
//此处省略其它代码
@Module({
    providers: [AppService,
    // 注册全局拦截器
    {
      provide: APP_INTERCEPTOR,
      useClass: OperationLogInterceptor,
    }
  ],
})
此时启动项目我们的拦截器就已经生效了。比如随便访问几次菜单查询的接口,就可以在数据库看到日志记录已经成功了。

但是你会发现模块名还是空的,因为我们还没有在控制器中使用@LogOperationTitle装饰器来定义模块名。所以我们需要在控制器中使用@LogOperationTitle装饰器来定义模块名。比如在menu/menu.controller.ts文件中定义菜单查询模块名。
//菜单查询
@Get()
@LogOperationTitle('菜单查询')
async findAll() {
    return await this.menuService.findAll();
}
再次请求接口,就可以看到模块名已经记录成功了。

提供查询日志接口
我们还需要提供一个查询和导出日志接口给前端使用,用于查询日志记录。在log/log.controller.ts文件中定义一个查询和导出日志接口。(导出功能前面文章已经介绍过了,这里就不详细介绍了,感兴趣的可以查看前面文章)
import { Controller, Get, Query, Res } from '@nestjs/common';
import { LogService } from './log.service';
import { FindListDto } from './dto/find-list.dto';
import { LogOperationTitle } from 'src/common/decorators/oprertionlog.decorator';
import { ApiOperation } from '@nestjs/swagger';
import { Permissions } from 'src/common/decorators/permissions.decorator';
import { Response } from 'express';
@Controller('log')
export class LogController {
  constructor(private readonly logService: LogService) { }

  //日志查询
  @LogOperationTitle('日志查询')
  @ApiOperation({ summary: '日志管理-查询' })
  @Permissions('system:log:list')
  @Get('list')
  findLogList(@Query() findListDto: FindListDto) {
    return this.logService.findList(findListDto);
  }

  //日志导出
  @LogOperationTitle('日志导出')
  @ApiOperation({ summary: '日志管理-导出' })
  @Get('export')
  async export(@Query() findListDto: FindListDto, @Res() res: Response) {
    const data = await this.logService.export(findListDto);
    res.send(data);
  }
}其中FindListDto类型为:
import { ApiProperty } from "@nestjs/swagger";
import { IsOptional } from "class-validator";

export class FindListDto {
    @ApiProperty({
        example: '模块名称',
        required: false,
    })
    @IsOptional()
    title?: string;

    @ApiProperty({
        example: '操作人',
        required: false,
    })
    @IsOptional()
    username?: string;
    @ApiProperty({
        example: '请求地址',
        required: false,
    })
    @IsOptional()
    url?: string;

    @ApiProperty({
        example: '结束时间',
        required: false,
    })
    end_time: string;

    @ApiProperty({
        example: '开始时间',
        required: false,
    })
    begin_time: string;
    @ApiProperty({
        example: '当前页',
        required: false,
    })
    page_num: number;
    @ApiProperty({
        example: '每页条数',
        required: false,
    })
    page_size: number;
}
前端可以通过这些参数来查询日志记录。
在log/log.service.ts文件中实现findList方法和export方法。
import { Injectable } from '@nestjs/common';
import { OperationLog } from './entities/operationLog.entity';
import { Between, Like, Repository } from 'typeorm';
import { InjectRepository } from '@nestjs/typeorm';
import { FindListDto } from './dto/find-list.dto';
import { ApiException } from 'src/common/filter/http-exception/api.exception';
import { ApiErrorCode } from 'src/common/enums/api-error-code.enum';
import { exportExcel } from 'src/utils/common';
import { mapLogZh } from 'src/config/excelHeader';
@Injectable()
export class LogService {
    constructor(
        @InjectRepository(OperationLog)
        private readonly operationLog: Repository<OperationLog>
    ) { }
    // 保存操作日志
    async saveOperationLog(operationLog: OperationLog) {
        await this.operationLog.save(operationLog);
    }
    // 分页查询操作日志
    async findList(findList: FindListDto) {
        const condition = {};
        if (findList.title) {
            condition['title'] = Like(`%${findList.title}%`);
        }
        if (findList.username) {
            condition['username'] = Like(`%${findList.username}%`);
        }
        if (findList.url) {
            condition['url'] = Like(`%${findList.url}%`);
        }
        if (findList.begin_time && findList.end_time) {
            condition['create_time'] = Between(findList.begin_time, findList.end_time);
        }
        try {
            const [list, total] = await this.operationLog.findAndCount({
                skip: (findList.page_num - 1) * findList.page_size,
                take: findList.page_size,
                order: {
                    create_time: 'DESC'
                },
                where: condition
            });
            return {
                list,
                total
            };
        } catch (error) {
            throw new ApiException('查询失败', ApiErrorCode.FAIL);
        }

    }
    //日志导出
    async export(findList: FindListDto) {

        try {
            const { list } = await this.findList(findList)
            const excelBuffer = await exportExcel(list, mapLogZh);
            return excelBuffer;
        } catch (error) {
            throw new ApiException('导出失败', ApiErrorCode.FAIL);
        }
    }
}
这样我们就完成了日志的查询与导出接口。
前端实现
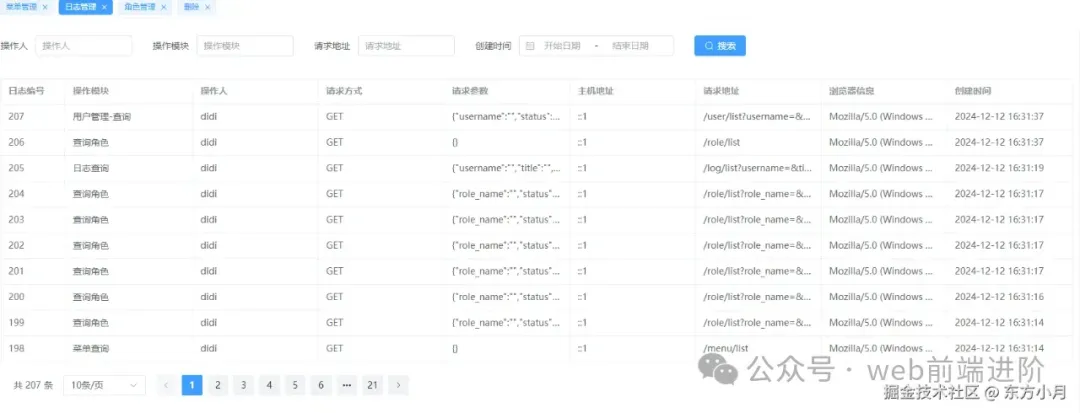
最后在前端调用接口实现日志的查询与导出功能。最终实现的页面如下:

感兴趣的可以直接去源码地址(https://github.com/qddidi/fs-admin)查看相关代码实现。


