译者 | 晶颜
审校 | 重楼
本文提供了关于如何使用Milvus构建多模态RAG系统以及如何为AI系统开辟各种可能性的深入指南。
局限于单一的数据格式已经逐渐落伍。随着企业越来越依赖信息来做出关键决策,他们需要能够比较不同格式的数据。幸运的是,传统的限于单一数据类型的人工智能系统已经让位于能够理解和处理复杂信息的多模态(Multimodal)系统。
多模态搜索和多模态检索增强生成(RAG)系统近年来在这一领域取得了很大进展。这些系统能够处理多种类型的数据,包括文本、图像和音频,以提供上下文感知的响应。
在这篇文章中,我们将讨论开发人员如何使用Milvus构建他们自己的多模态RAG系统。我们还将引导你构建这样一个系统,该系统可以处理文本和图像数据,特别是执行相似性搜索,并利用语言模型来优化输出。
Milvus是什么?
向量数据库是一种特殊类型的数据库,用于存储、索引和检索向量嵌入,向量嵌入是数据的数学表示(如图像、文本和音频),不仅可以比较数据的等价性,还可以比较数据的语义相似性。Milvus就是一个开源、高性能的向量数据库。你可以在GitHub上找到它,它有Apache-2.0许可证并已获得超过3万颗星星。
Milvus帮助开发人员提供灵活的解决方案来管理和查询大规模向量数据。Milvus的效率使其成为开发人员使用深度学习模型构建应用程序的理想选择,例如检索增强生成(RAG)、多模态搜索、推荐引擎和异常检测。
Milvus提供多种部署选项来满足开发人员的需求。Milvus Lite是一个轻量级版本,可以在Python应用程序中运行,非常适合在本地环境中创建应用程序原型。Milvus Standalone和Milvus Distributed是可扩展和“生产就绪”(即产品已经过充分测试和优化,可在生产环境中使用)的选项。
多模态RAG:扩展至文本之外
在构建系统之前,了解传统的基于文本的RAG及其向多模态RAG的演变是很重要的。
检索增强生成(RAG)是从外部源检索上下文信息并从大型语言模型(LLM)生成更准确输出的一种方法。传统的RAG是提高LLM输出的一种非常有效的策略,但是它仍然局限于文本数据。而在许多现实世界的应用程序中,数据已经扩展到文本之外,结合图像、图表和其他形式提供了关键的上下文。
多模态RAG通过支持使用不同的数据类型解决了上述限制,为LLM提供了更好的上下文。
简单地说,在多模态RAG系统中,检索组件能够跨不同的数据模态搜索相关信息,生成组件根据检索到的信息生成更准确的结果。
理解向量嵌入和相似性搜索
向量嵌入和相似性搜索是多模态RAG的两个基本概念。让我们先来理解它们。
向量嵌入
如前所述,向量嵌入是数据的数学/数值表示。机器使用这种表示来理解不同数据类型(如文本、图像和音频)的语义含义。
在使用自然语言处理(NLP)时,将文档块转换为向量,并将语义相似的单词映射到向量空间中的附近点。图像也是如此,其中嵌入表示语义特征。这使我们能够以数字格式理解颜色、纹理和物体形状等指标。
使用向量嵌入的主要目的是帮助保持不同数据块之间的关系和相似性。
相似性搜索
相似性搜索用于查找和定位给定数据集中的数据。在向量嵌入的背景下,相似性搜索在给定的数据集中找到最接近查询向量的向量。
以下是几种常用的度量向量之间相似性的方法:
- 欧几里得距离:测量向量空间中两点之间的直线距离。
- 余弦相似度:测量两个向量之间夹角的余弦值(关注它们的方向而不是大小)。
- 点积:对应元素相加的简单乘法。
相似性度量的选择通常取决于特定于应用程序的数据以及开发人员处理问题的方式。
在大规模数据集上进行相似性搜索时,需要很强大的计算能力和资源。这就是近似最近邻(ANN)算法发挥作用的地方。人工神经网络算法用于交换小百分比或数量的准确性,以获得显著的速度提升。这使得它们成为大规模应用程序的合适选择。
Milvus还使用先进的人工神经网络算法(包括HNSW和DiskANN),在大型向量嵌入数据集上执行高效的相似性搜索,使开发人员能够快速找到相关数据点。此外,Milvus支持其他索引算法,如HSNW, IVF, CAGRA等,使其成为一个更有效的向量搜索解决方案。
用Milvus构建多模态RAG
现在我们已经学习了这些概念,是时候使用Milvus构建一个多模态RAG系统了。在下述示例中,我们将使用Milvus Lite(Milvus的轻量级版本,非常适合实验和原型设计)进行向量存储和检索,BGE用于精确的图像处理和嵌入,GPT用于高级结果重新排序。
先决条件
首先,你需要一个Milvus实例来存储你的数据。你可以使用pip设置Milvus Lite,使用Docker运行本地实例,或者通过Zilliz Cloud注册一个免费托管的Milvus帐户。
其次,你需要为你的RAG管道提供LLM,因此建议前往OpenAI并获取API密钥。免费层足以使此代码运行。
接下来,创建一个新目录和一个Python虚拟环境(或者采取你用来管理Python的任何步骤)。
对于本教程,你还需要安装pymilvus库(它是Milvus的官方Python SDK)和一些常用工具。
设置Milvus Lite
pip install -U pymilvus
安装依赖项
pip install --upgrade pymilvus openai datasets opencv-python timm einops ftfy peft tqdm
git clone https://github.com/FlagOpen/FlagEmbedding.git
pip install -e FlagEmbedding
下载数据
下面的命令将下载示例数据并将其解压缩到本地文件夹“./images_folder”,其中包括:
- 图片:Amazon Reviews 2023的一个子集,包含大约900张来自“Appliance”、 “Cell_Phones_and_Accessories”和“Electronics”类别的图片。
- 查询图片示例:leopard.jpg
wget https://github.com/milvus-io/bootcamp/releases/download/data/amazon_reviews_2023_subset.tar.gztar -xzf amazon_reviews_2023_subset.tar.gz
加载嵌入模型
我们将使用可视化BGE模型“big - visualizing -base-en-v1.5”来生成图像和文本的嵌入。
现在从HuggingFace下载权重。
wget https://huggingface.co/BAAI/bge-visualized/resolve/main/Visualized_base_en_v1.
然后,让我们构建一个编码器。
import torchfrom visual_bge.modeling import Visualized_BGE
class Encoder:
def __init__(self, model_name: str, model_path: str):
self.model = Visualized_BGE(model_name_bge=model_name, model_weight=model_path)
self.model.eval()
def encode_query(self, image_path: str, text: str) -> list[float]:
with torch.no_grad():
query_emb = self.model.encode(image=image_path, text=text)
return query_emb.tolist()[0]
def encode_image(self, image_path: str) -> list[float]:
with torch.no_grad():
query_emb = self.model.encode(image=image_path)
return query_emb.tolist()[0]
model_name = "BAAI/bge-base-en-v1.5"
model_path = "./Visualized_base_en_v1.5.pth" # Change to your own value if using a different model path
encoder = Encoder(model_name, model_path)
生成嵌入和加载数据到Milvus
本节将指导你如何将示例图像与其相应的嵌入加载到数据库中。
生成嵌入
首先,我们需要为数据集中的所有图像创建嵌入。
从data目录加载所有图像并将它们转换为嵌入。
import os
from tqdm import tqdm
from glob import glob
data_dir = (
"./images_folder" # Change to your own value if using a different data directory
)
image_list = glob(
os.path.join(data_dir, "images", "*.jpg")
) # We will only use images ending with ".jpg"
image_dict = {}
for image_path in tqdm(image_list, desc="Generating image embeddings: "):
try:
image_dict[image_path] = encoder.encode_image(image_path)
except Exception as e:
print(f"Failed to generate embedding for {image_path}. Skipped.")
continue
print("Number of encoded images:", len(image_dict))
执行多模态搜索和重新排序结果
在本节中,我们将首先使用多模态查询搜索相关图像,然后使用LLM服务对检索结果进行重新排序,并找到带有解释的最佳图像。
运行多模态搜索
现在,我们准备使用由图像和文本指令组成的查询来执行高级多模态搜索。
query_image = os.path.join(
data_dir, "leopard.jpg"
) # Change to your own query image path
query_text = "phone case with this image theme"
query_vec = encoder.encode_query(image_path=query_image, text=query_text)
search_results = milvus_client.search(
collection_name=collection_name,
data=[query_vec],
output_fields=["image_path"],
limit=9, # Max number of search results to return
search_params={"metric_type": "COSINE", "params": {}}, # Search parameters
)[0]
retrieved_images = [hit.get("entity").get("image_path") for hit in search_results]
print(retrieved_images)
结果如下:
['./images_folder/images/518Gj1WQ-RL._AC_.jpg',
'./images_folder/images/41n00AOfWhL._AC_.jpg'
用GPT-40重新排序结果
现在,我们将使用GPT-40对检索到的图像进行排序,并找到最匹配的结果。最后,LLM还将解释排名原因。
1. 创建全景视图。
import numpy as np
import cv2
img_height = 300
img_width = 300
row_count = 3
def create_panoramic_view(query_image_path: str, retrieved_images: list) -> np.ndarray:
"""
creates a 5x5 panoramic view image from a list of images
args:
images: list of images to be combined
returns:
np.ndarray: the panoramic view image
"""
panoramic_width = img_width * row_count
panoramic_height = img_height * row_count
panoramic_image = np.full(
(panoramic_height, panoramic_width, 3), 255, dtype=np.uint8
)
# create and resize the query image with a blue border
query_image_null = np.full((panoramic_height, img_width, 3), 255, dtype=np.uint8)
query_image = Image.open(query_image_path).convert("RGB")
query_array = np.array(query_image)[:, :, ::-1]
resized_image = cv2.resize(query_array, (img_width, img_height))
border_size = 10
blue = (255, 0, 0) # blue color in BGR
bordered_query_image = cv2.copyMakeBorder(
resized_image,
border_size,
border_size,
border_size,
border_size,
cv2.BORDER_CONSTANT,
value=blue,
)
query_image_null[img_height * 2 : img_height * 3, 0:img_width] = cv2.resize(
bordered_query_image, (img_width, img_height)
)
# add text "query" below the query image
text = "query"
font_scale = 1
font_thickness = 2
text_org = (10, img_height * 3 + 30)
cv2.putText(
query_image_null,
text,
text_org,
cv2.FONT_HERSHEY_SIMPLEX,
font_scale,
blue,
font_thickness,
cv2.LINE_AA,
)
# combine the rest of the images into the panoramic view
retrieved_imgs = [
np.array(Image.open(img).convert("RGB"))[:, :, ::-1] for img in retrieved_images
]
for i, image in enumerate(retrieved_imgs):
image = cv2.resize(image, (img_width - 4, img_height - 4))
row = i // row_count
col = i % row_count
start_row = row * img_height
start_col = col * img_width
border_size = 2
bordered_image = cv2.copyMakeBorder(
image,
border_size,
border_size,
border_size,
border_size,
cv2.BORDER_CONSTANT,
value=(0, 0, 0),
)
panoramic_image[
start_row : start_row + img_height, start_col : start_col + img_width
] = bordered_image
# add red index numbers to each image
text = str(i)
org = (start_col + 50, start_row + 30)
(font_width, font_height), baseline = cv2.getTextSize(
text, cv2.FONT_HERSHEY_SIMPLEX, 1, 2
)
top_left = (org[0] - 48, start_row + 2)
bottom_right = (org[0] - 48 + font_width + 5, org[1] + baseline + 5)
cv2.rectangle(
panoramic_image, top_left, bottom_right, (255, 255, 255), cv2.FILLED
)
cv2.putText(
panoramic_image,
text,
(start_col + 10, start_row + 30),
cv2.FONT_HERSHEY_SIMPLEX,
1,
(0, 0, 255),
2,
cv2.LINE_AA,
)
# combine the query image with the panoramic view
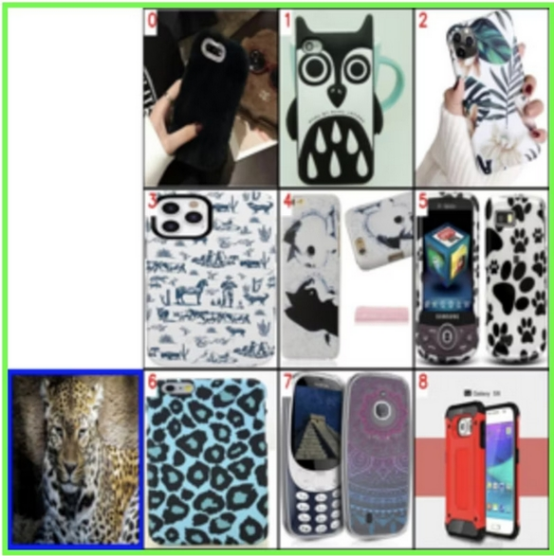
panoramic_image = np.hstack([query_image_null, panoramic_image])
return panoramic_image
2. 将查询图像和检索图像与索引结合在一个全景视图中。
from PIL import Image
combined_image_path = os.path.join(data_dir, "combined_image.jpg")
panoramic_image = create_panoramic_view(query_image, retrieved_images)
cv2.imwrite(combined_image_path, panoramic_image)
combined_image = Image .open(combined_image_path )
show_combined_image = combined_image.resize((300, 300))
show_combined_image.show()
多模态搜索结果
3. 对结果重新排序并给出解释
我们将把所有组合的图像发送到多模态LLM服务,并提供适当的提示,对检索结果进行排序并给出解释。注意:要启用GPT- 40作为LLM,你需要提前准备好你的OpenAI API Key。
import requests
import base64
openai_api_key = "sk-***" # Change to your OpenAI API Key
def generate_ranking_explanation(
combined_image_path: str, caption: str, infos: dict = None
) -> tuple[list[int], str]:
with open(combined_image_path, "rb") as image_file:
base64_image = base64.b64encode(image_file.read()).decode("utf-8")
information = (
"You are responsible for ranking results for a Composed Image Retrieval. "
"The user retrieves an image with an 'instruction' indicating their retrieval intent. "
"For example, if the user queries a red car with the instruction 'change this car to blue,' a similar type of car in blue would be ranked higher in the results. "
"Now you would receive instruction and query image with blue border. Every item has its red index number in its top left. Do not misunderstand it. "
f"User instruction: {caption} \n\n"
)
# add additional information for each image
if infos:
for i, info in enumerate(infos["product"]):
information += f"{i}. {info}\n"
information += (
"Provide a new ranked list of indices from most suitable to least suitable, followed by an explanation for the top 1 most suitable item only. "
"The format of the response has to be 'Ranked list: []' with the indices in brackets as integers, followed by 'Reasons:' plus the explanation why this most fit user's query intent."
)
headers = {
"Content-Type": "application/json",
"Authorization": f"Bearer {openai_api_key}",
}
payload = {
"model": "gpt-4o",
"messages": [
{
"role": "user",
"content": [
{"type": "text", "text": information},
{
"type": "image_url",
"image_url": {"url": f"data:image/jpeg;base64,{base64_image}"},
},
],
}
],
"max_tokens": 300,
}
response = requests.post(
"https://api.openai.com/v1/chat/completions", headers=headers, json=payload
)
result = response.json()["choices"][0]["message"]["content"]
# parse the ranked indices from the response
start_idx = result.find("[")
end_idx = result.find("]")
ranked_indices_str = result[start_idx + 1 : end_idx].split(",")
ranked_indices = [int(index.strip()) for index in ranked_indices_str]
# extract explanation
explanation = result[end_idx + 1 :].strip()
return ranked_indices, explanation
得到排名后的图像指标和最佳结果的原因:
ranked_indices, explanation = generate_ranking_explanation(
combined_image_path, query_text
)
4. 显示最佳结果并附有说明
print(explanation)
best_index = ranked_indices[0]
best_img = Image.open(retrieved_images[best_index])
best_img = best_img.resize((150, 150))
best_img.show()
结果:
“原因:最适合用户查询意图的项是索引6,因为指令指定了一个以图片为主题的手机壳,是一只豹子。索引为6的手机壳采用了类似豹纹的主题设计,最符合用户对图像主题手机壳的需求。”
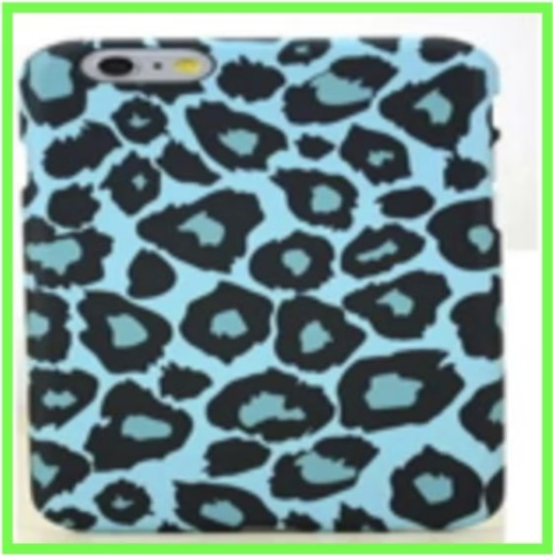
豹纹手机壳-最佳效果
结语
在这篇文章中,我们讨论了使用Milvus(一个开源向量数据库)构建一个多模态RAG系统的具体操作指南,介绍了开发人员如何设置Milvus、加载图像数据、执行相似性搜索以及使用LLM对检索结果进行重新排序以获得更准确的响应。
可以说,多模态RAG解决方案为人工智能系统提供了多种可能性,可以轻松理解和处理多种形式的数据。一些常见的可能性包括改进图像搜索引擎、更好的上下文驱动结果等等,其他更多可能性等你来探索!
原文标题:Want to Search for Something With an Image and a Text Description? Try a Multimodal RAG,作者:Jiang Chen