近年来,Transformer 架构彻底改变了自然语言处理(NLP)任务。视觉Transformer(ViT)将这一创新更进一步,将变换器架构适应于图像分类任务。本教程将指导您使用ViT对花卉图像进行分类。
一、先决条件
要跟随本教程,您应该具备以下基础知识:
- Python编程
- 深度学习概念
- TensorFlow和Keras
二、数据集概览
在本教程中,我们将使用一个包含3670张图像的花卉数据集,这些图像被归类为五个类别:雏菊、蒲公英、玫瑰、向日葵和郁金香。数据集已预先分割为训练和测试集,以方便使用。
第1步:理解视觉Transformer架构
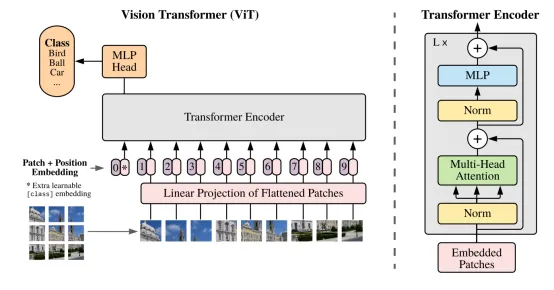
视觉Transformer(ViT)是由谷歌研究引入的一种新颖架构,它将最初为自然语言处理(NLP)开发的Transformer架构应用于计算机视觉任务。与传统的卷积神经网络(CNN)不同,ViT将图像分割成块,并处理这些块作为标记序列,类似于NLP任务中处理单词的方式。
ViT的关键优势:
- 能够有效处理大规模数据集。
- 在图像分类任务中实现最先进的性能。
- 具有高效的迁移学习能力。
让我们深入了解ViT架构的关键组成部分:
(1) 将输入图像分割成块
与传统的卷积神经网络(CNN)不同,ViT将输入图像分割成固定大小的块。然后每个块被展平成一维向量。例如,一个来自3通道图像(RGB)的16x16块将产生一个768维向量(16 * 16 * 3)。
图表:图像到块
+-----------------+
| Image |
| (224 x 224) |
+-----------------+
|
V
+---------------------+
| Patch 1 |
| (16 x 16) |
+---------------------+
|
V
+---------------------+
| Patch 2 |
| (16 x 16) |
+---------------------+
|
...
|
V
+---------------------+
| Patch n |
| (16 x 16) |
+---------------------+
(2) 块的线性embedding
每个展平的块被线性embedding到固定大小的向量中。这一步类似于NLP中使用的词embedding,将块转换为适合Transformer处理的格式。
图表:块embedding
+---------------------+
| Flattened Patch 1 |
| [p1, p2, ..., pn] |
+---------------------+
|
V
+---------------------------+
| Linear Embedding |
| [e1, e2, ..., em] |
+---------------------------+
(3) 添加位置embedding
为了保留空间信息,将位置embedding添加到每个块embedding中。这有助于模型理解每个块在原始图像中的相对位置。
图表:位置embedding
+---------------------------+ +-----------------------+
| Linear Embedded Patches | + | Positional Embeddings |
| [e1, e2, ..., em] | | [pe1, pe2, ..., pem] |
+---------------------------+ +-----------------------+
| |
V V
+---------------------------+
| Embedded Patches + |
| Positional Embeddings |
| [e1+pe1, e2+pe2, ..., |
| em+pem] |
+---------------------------+
(4) 类别标记
在embedding块的序列前添加一个可学习的分类标记([CLS])。这个标记用于聚合所有块的信息,并最终用于分类。
图表:添加类别标记
+---------------------------+
| Class Token |
| [cls] |
+---------------------------+
|
V
+---------------------------+ +---------------------------+
| Embedded Patches + | | Class Token + |
| Positional Embeddings | --> | Embedded Patches + |
| [e1+pe1, e2+pe2, ..., | | Positional Embeddings |
| em+pem] | | [cls, e1+pe1, e2+pe2, ... |
+---------------------------+ | em+pem] |
+---------------------------+
(5) Transformer编码器
将向量序列(类别标记+embedding块)传递过一系列变换器编码器层。每一层由多头自注意力和MLP块组成。
图表:Transformer编码器
+------------------------------------+
| Transformer Encoder Layer |
| |
| +------------------------------+ |
| | Multi-Headed Self-Attention | |
| +------------------------------+ |
| |
| +------------------------------+ |
| | MLP Block | |
| +------------------------------+ |
| |
+------------------------------------+
|
V
+------------------------------------+
| Output Sequence |
| [cls, e1', e2', ..., em'] |
+------------------------------------+
每个编码器层处理输入序列并产生相同长度和维度的输出序列。自注意力机制允许每个块关注所有其他块,使模型能够捕捉块之间的长期依赖性和交互。
(6) 分类头
用于分类的[CLS]标记的最终隐藏状态。将全连接层应用于[CLS]标记的输出以预测类别概率。
图表:分类头
+------------------------------------+
| Output Sequence |
| [cls, e1', e2', ..., em'] |
+------------------------------------+
|
V
+---------------------------+
| Fully Connected Layer |
| [class probabilities] |
+---------------------------+
第2步:实现视觉Transformer
让我们逐一了解vit.py文件中ViT实现的主要组成部分:
(1) 类别标记
这个类创建一个可学习的分类标记,该标记被添加到块嵌入序列的前面。
class ClassToken(Layer):
def __init__(self):
super().__init__()
def build(self, input_shape):
w_init = tf.random_normal_initializer()
self.w = tf.Variable(
initial_value=w_init(shape=(1, 1, input_shape[-1]), dtype=tf.float32),
trainable=True
)
def call(self, inputs):
batch_size = tf.shape(inputs)[0]
hidden_dim = self.w.shape[-1]
cls = tf.broadcast_to(self.w, [batch_size, 1, hidden_dim])
cls = tf.cast(cls, dtype=inputs.dtype)
return cls
(2) MLP块
这个函数实现了Transformer编码器中使用的MLP块。
def mlp(x, cf):
x = Dense(cf["mlp_dim"], activation="gelu")(x)
x = Dropout(cf["dropout_rate"])(x)
x = Dense(cf["hidden_dim"])(x)
x = Dropout(cf["dropout_rate"])(x)
return x
(3) Transformer编码器
这个函数实现了一个Transformer编码器层,包括自注意力和MLP块。
def transformer_encoder(x, cf):
skip_1 = x
x = LayerNormalization()(x)
x = MultiHeadAttention(
num_heads=cf["num_heads"], key_dim=cf["hidden_dim"]
)(x, x)
x = Add()([x, skip_1])
skip_2 = x
x = LayerNormalization()(x)
x = mlp(x, cf)
x = Add()([x, skip_2])
return x
(4) 视觉Transformer模型
这个函数组装完整的视觉Transformer模型。
def ViT(cf):
inputs = Input(shape=cf["input_shape"])
patches = Patches(cf["patch_size"])(inputs)
x = PatchEncoder(num_patches=cf["num_patches"], projection_dim=cf["projection_dim"])(patches)
cls_token = ClassToken()(x)
x = Concatenate(axis=1)([cls_token, x])
for _ in range(cf["num_layers"]):
x = transformer_encoder(x, cf)
x = LayerNormalization()(x)
x = x[:, 0]
x = Dense(cf["num_classes"], activation="softmax")(x)
model = Model(inputs, x)
return model
第3步:数据准备和加载
在train.py文件中,我们处理数据准备和加载:
(1) 加载和分割数据集
这个函数加载数据集并将其分割为训练、验证和测试集。
from glob import glob
import os
from sklearn.utils import shuffle
from sklearn.model_selection import train_test_split
def load_data(path, split=0.1):
images = shuffle(glob(os.path.join(path, "*", "*.jpg")))
split_size = int(len(images) * split)
train_x, valid_x = train_test_split(images, test_size=split_size, random_state=42)
train_x, test_x = train_test_split(train_x, test_size=split_size, random_state=42)
return train_x, valid_x, test_x
(2) 处理图像和创建块
这个函数处理图像、调整大小并创建块。
import cv2
import numpy as np
from patchify import patchify
def process_image_label(path):
image = cv2.imread(path)
image = cv2.resize(image, (hp["image_size"], hp["image_size"]))
image = cv2.cvtColor(image, cv2.COLOR_BGR2RGB)
image = image / 255.0
patch_shape = (hp["patch_size"], hp["patch_size"], hp["num_channels"])
patches = patchify(image, patch_shape, hp["patch_size"])
patches = np.reshape(patches, hp["flat_patches_shape"])
patches = patches.astype(np.float32)
label = os.path.basename(os.path.dirname(path))
class_idx = hp["class_names"].index(label)
class_idx = np.array(class_idx, dtype=np.float32)
return patches, class_idx
(3) 创建TensorFlow数据集
这个函数从处理过的图像创建TensorFlow数据集。
import tensorflow as tf
def tf_dataset(images, batch=32):
ds = tf.data.Dataset.from_tensor_slices((images))
ds = ds.map(parse).batch(batch).prefetch(8)
return ds
第4步:模型训练
在train.py文件中,我们设置训练过程:
(1) 编译模型
这个函数使用指定的优化器和损失函数编译ViT模型。
model.compile(
loss="categorical_crossentropy",
optimizer=tf.keras.optimizers.Adam(hp["lr"], clipvalue=1.0),
metrics=["acc"]
)
(2) 设置回调
这个函数设置各种回调,用于在训练期间监控和保存模型。
from tensorflow.keras.callbacks import ModelCheckpoint, ReduceLROnPlateau, CSVLogger, EarlyStopping
callbacks = [
ModelCheckpoint(model_path, monitor='val_loss', verbose=1, save_best_only=True),
ReduceLROnPlateau(monitor='val_loss', factor=0.1, patience=10, min_lr=1e-10, verbose=1),
CSVLogger(csv_path),
EarlyStopping(monitor='val_loss', patience=50, restore_best_weights=False),
]
(3) 训练模型
这个函数使用训练和验证数据集训练ViT模型。
model.fit(
train_ds,
epochs=hp["num_epochs"],
validation_data=valid_ds,
callbacks=callbacks
)
第5步:模型评估
在test.py文件中,我们加载训练好的模型并在测试集上评估它:
model = ViT(hp)
model.load_weights(model_path)
model.compile(
loss=tf.keras.losses.CategoricalCrossentropy(from_logits=False),
optimizer=tf.keras.optimizers.Adam(hp["lr"]),
metrics=["acc"]
)
model. Evaluate(test_ds)
结论
在本教程中,我们实现了一个用于花卉图像分类的视觉Transformer(ViT)。我们涵盖了以下关键点:
- 视觉Transformer的架构
- 使用TensorFlow和Keras实现ViT模型
- 为花卉数据集准备和加载数据
- 模型训练过程
- 在测试集上评估模型
视觉Transformer展示了注意力机制在计算机视觉任务中的强大能力,可能取代或补充传统的CNN架构。通过遵循本教程,您将获得有关图像分类的尖端深度学习模型的实践经验。
进一步探索
为了进一步提高您的理解和结果,您可以尝试:
- 尝试不同的超参数
- 尝试数据增强技术
- 比较ViT与基于CNN的模型的性能
- 可视化注意力图以了解模型关注的内容
请记住,视觉Transformer通常在大型数据集上预训练并在较小的特定任务数据集上微调时表现最佳。在本教程中,我们在相对较小的数据集上从头开始训练,但原理保持不变。通过遵循这些步骤,您将能够实现并训练一个用于花卉图像分类的视觉Transformer模型,深入了解现代深度学习技术在计算机视觉中的应用。
论文链接:https://arxiv.org/pdf/2010.11929.pdf
GitHub链接:https://github.com/sanjay-dutta/Computer-Vision-Practice/tree/main/Vit_flower
数据集链接:https://storage.googleapis.com/download.tensorflow.org/example_images/flower_photos.tgz