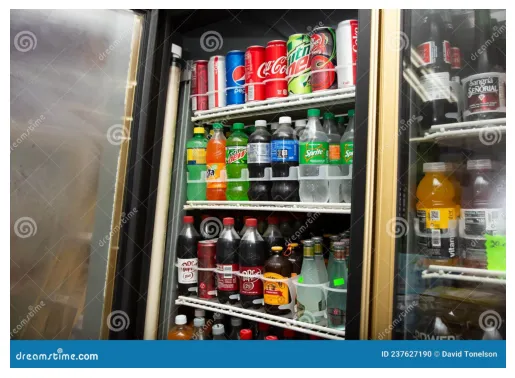
在这篇文章中,我们将探讨如何使用Hugging Face的transformers库来使用零样本目标检测在冰箱图像中识别物体。这种方法允许我们在不需要针对这些物体进行特定预训练的情况下识别各种物品。

以下是如何工作的代码的逐步指南。在这种情况下,我们使用Google的OWL-ViT模型,该模型非常适合目标检测任务。该模型作为管道加载,允许我们将其作为目标检测器使用,设置非常简单。
# 导入必要的库
from transformers import pipeline
在这里,transformers库用于目标检测,利用Hugging Face的零样本目标检测模型。零样本模型是目标检测任务的强大工具,因为它们不需要对每个对象的特定数据集进行训练,而是能够开箱即用地理解各种对象的上下文。
# 从Hugging Face模型中心加载特定检查点
checkpoint = “google/owlv2-base-patch16-ensemble”
detector = pipeline(model=checkpoint, task=”zero-shot-object-detection”)
加载和显示图像
# 导入图像处理库
import skimage
import numpy as np
from PIL import Image
import matplotlib.pyplot as plt
# 加载并显示图像
image = Image.open(‘/content/image2.jpg’)
plt.imshow(image)
plt.axis(‘off’)
plt.show()
image = Image.fromarray(np.uint8(image)).convert(“RGB”)在这里,我们使用广泛用于Python图像处理的PIL库从指定路径加载图像(image2.jpg)。然后我们使用matplotlib显示它。

检测物体
模型已加载,图像已准备就绪,我们继续进行检测。
# 定义候选标签并在图像上运行检测器
predictions = detector(
    image,
    candidate_labels=[“fanta”, “cokacola”, “bottle”, “egg”, “bowl”, “donut”, “milk”, “jar”, “curd”, “pickle”, “refrigerator”, “fruits”, “vegetables”, “bread”,”yogurt”],
)
predictions
[{'score': 0.4910733997821808,
'label': 'bottle',
'box': {'xmin': 419, 'ymin': 1825, 'xmax': 574, 'ymax': 2116}},
{'score': 0.45601949095726013,
'label': 'bottle',
'box': {'xmin': 1502, 'ymin': 795, 'xmax': 1668, 'ymax': 1220}},
{'score': 0.4522128999233246,
'label': 'bottle',
'box': {'xmin': 294, 'ymin': 1714, 'xmax': 479, 'ymax': 1924}},
{'score': 0.4485340714454651,
'label': 'milk',
'box': {'xmin': 545, 'ymin': 811, 'xmax': 770, 'ymax': 1201}},
{'score': 0.44276902079582214,
'label': 'bottle',
'box': {'xmin': 1537, 'ymin': 958, 'xmax': 1681, 'ymax': 1219}},
{'score': 0.4287840723991394,
'label': 'bottle',
'box': {'xmin': 264, 'ymin': 1726, 'xmax': 459, 'ymax': 2104}},
{'score': 0.41883620619773865,
'label': 'bottle',
'box': {'xmin': 547, 'ymin': 632, 'xmax': 773, 'ymax': 1203}},
{'score': 0.15758953988552094,
'label': 'jar',
'box': {'xmin': 1141, 'ymin': 1628, 'xmax': 1259, 'ymax': 1883}},
{'score': 0.15696804225444794,
'label': 'egg',
'box': {'xmin': 296, 'ymin': 1034, 'xmax': 557, 'ymax': 1131}},
{'score': 0.15674084424972534,
'label': 'egg',
'box': {'xmin': 292, 'ymin': 1109, 'xmax': 552, 'ymax': 1212}},
{'score': 0.1565699428319931,
'label': 'coke',
'box': {'xmin': 294, 'ymin': 1714, 'xmax': 479, 'ymax': 1924}},
{'score': 0.15651869773864746,
'label': 'milk',
'box': {'xmin': 417, 'ymin': 1324, 'xmax': 635, 'ymax': 1450}}]在零样本检测中,我们提供了一个候选标签列表,或在图像中寻找的可能物品,例如常见的冰箱物品:“fanta”,“milk”,“yogurt”等。然后模型尝试在图像中定位这些物体,提供它们的边界框和置信度分数。
可视化检测结果
为了可视化检测到的物体,我们在它们周围绘制矩形框,并用检测到的标签和置信度分数标记它们。
from PIL import ImageDraw
draw = ImageDraw.Draw(image)
for prediction in predictions:
    box = prediction[“box”]
    label = prediction[“label”]
    score = prediction[“score”]
    xmin, ymin, xmax, ymax = box.values()
    draw.rectangle((xmin, ymin, xmax, ymax), outline=”red”, width=1)
    draw.text((xmin, ymin), f”{label}: {round(score,2)}”, fill=”white”)
image
代码创建了一个ImageDraw实例,允许我们在图像上叠加矩形框和文本。对于每个检测到的物体,我们提取其边界框坐标(xmin,ymin,xmax,ymax),标签和置信度分数。在检测到的物体周围绘制矩形框,并将标签和分数添加为文本。
提取检测到的物体
get_detected_objects函数允许我们仅从预测中提取检测到的物体的标签,以便更容易地访问物体名称。
# 提取检测到的物体的函数
def get_detected_objects(predictions):
    detected_objects = [pred[“label”] for pred in predictions]
    return detected_objects
# 打印检测到的物体列表
detected_objects = get_detected_objects(predictions)
print(“Detected Objects:”, detected_objects)输出:
Detected Objects: [‘bottle’, ‘bottle’, ‘bottle’, ‘milk’, ‘bottle’, ‘bottle’, ‘bottle’, ‘coke’, ‘jar’, ‘milk’, ‘refrigerator’, ‘jar’, ‘jar’, ‘refrigerator’, ‘bottle’, ‘jar’, ‘yogurt’, ‘yogurt’, ‘refrigerator’, ‘bottle’, ‘jar’, ‘vegetables’, ‘bottle’, ‘jar’, ‘coke’, ‘jar’, ‘yogurt’, ‘coke’, ‘yogurt’, ‘milk’, ‘coke’, ‘egg’, ‘egg’, ‘bottle’, ‘vegetables’, ‘milk’, ‘coke’, ‘fruits’, ‘vegetables’, ‘milk’, ‘jar’, ‘jar’, ‘bottle’, ‘yogurt’, ‘refrigerator’, ‘milk’, ‘milk’, ‘coke’, ‘bottle’, ‘coke’, ‘egg’, ‘yogurt’, ‘bottle’, ‘milk’, ‘refrigerator’, ‘bottle’, ‘bottle’, ‘egg’, ‘bottle’, ‘milk’, ‘egg’, ‘bottle’, ‘milk’, ‘curd’, ‘coke’, ‘bowl’, ‘vegetables’, ‘milk’, ‘milk’, ‘coke’, ‘egg’, ‘bottle’, ‘curd’, ‘egg’, ‘egg’, ‘yogurt’, ‘egg’, ‘bottle’, ‘egg’, ‘jar’, ‘egg’, ‘egg’, ‘coke’, ‘milk’, ‘vegetables’, ‘curd’, ‘bottle’, ‘jar’, ‘egg’, ‘yogurt’, ‘milk’, ‘egg’, ‘fruits’, ‘yogurt’, ‘jar’, ‘milk’, ‘milk’, ‘curd’, ‘fruits’, ‘curd’, ‘yogurt’, ‘yogurt’, ‘yogurt’, ‘egg’, ‘coke’, ‘egg’, ‘refrigerator’, ‘cokacola’, ‘curd’, ‘jar’, ‘bottle’, ‘refrigerator’, ‘bottle’, ‘milk’, ‘milk’, ‘coke’, ‘curd’, ‘yogurt’, ‘fruits’, ‘yogurt’, ‘vegetables’, ‘yogurt’, ‘coke’, ‘cokacola’, ‘egg’, ‘milk’, ‘milk’, ‘egg’, ‘coke’, ‘coke’, ‘curd’, ‘cokacola’, ‘jar’, ‘jar’, ‘bottle’, ‘curd’, ‘coke’, ‘yogurt’, ‘curd’, ‘fruits’, ‘refrigerator’, ‘milk’, ‘fruits’, ‘cokacola’, ‘milk’, ‘cokacola’, ‘egg’, ‘yogurt’, ‘pickle’, ‘fruits’, ‘coke’, ‘pickle’, ‘egg’, ‘fruits’, ‘refrigerator’, ‘refrigerator’, ‘bottle’, ‘curd’, ‘egg’, ‘egg’, ‘bottle’, ‘refrigerator’, ‘egg’, ‘jar’, ‘jar’, ‘bottle’, ‘pickle’, ‘egg’, ‘jar’, ‘cokacola’, ‘yogurt’, ‘milk’, ‘curd’, ‘bottle’, ‘milk’, ‘milk’, ‘cokacola’, ‘bottle’]这段代码仅从预测中检索标签,并打印检测到的物体列表。
扩展检测标签
我们可以通过调整候选标签来执行进一步的检测,例如添加其他饮料或品牌。
# 使用额外的标签再次运行检测器
predictions = detector(
    image,
    candidate_labels=[“fanta”, “cokacola”, “pepsi”, “mountain dew”, “sprite”, “pepper”, “sangria”, “vitamin water”, “beer”],
)
通过这种方式,我们扩展了候选标签列表,允许我们搜索冰箱中常见的其他物品和品牌。
from PIL import ImageDraw
draw = ImageDraw.Draw(image)
for prediction in predictions:
    box = prediction[“box”]
    label = prediction[“label”]
    score = prediction[“score”]
    xmin, ymin, xmax, ymax = box.values()
    draw.rectangle((xmin, ymin, xmax, ymax), outline=”red”, width=1)
    draw.text((xmin, ymin), f”{label}: {round(score,2)}”, fill=”white”)
image
图像中检测到的物体
结论
这个代码示例展示了零样本目标检测在动态环境中识别物体的强大功能,比如冰箱内部。通过指定自定义标签,你可以将检测定制到广泛的应用中,而无需为每个特定任务重新训练模型。Hugging Face的transformers库和像Google的OWL-ViT这样的预训练模型,使得实施强大的目标检测变得非常简单,几乎不需要设置。


