在现代软件开发中,异步编程已成为提升系统性能和用户体验的重要手段。特别是在高并发场景下,异步任务的处理能够有效降低响应时间,提高系统的可伸缩性。Spring Boot 3.3 提供了便捷的异步编程支持,使得开发者可以轻松实现高效的任务调度。本篇文章将详细探讨如何在 Spring Boot 项目中优雅地实现异步任务,包括配置、实现和调用的最佳实践。
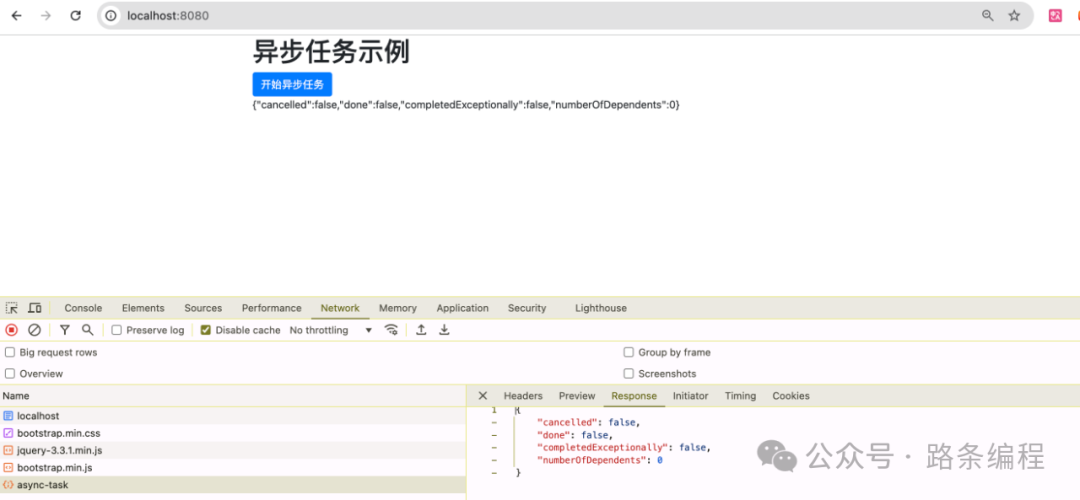
运行效果:
 图片
图片
若想获取项目完整代码以及其他文章的项目源码,且在代码编写时遇到问题需要咨询交流,欢迎加入下方的知识星球。
在本文中,我们将通过具体的代码示例,讲解如何配置 YAML 文件、创建配置属性类、实现异步任务的服务类,以及如何通过前端页面调用异步接口。通过这些步骤,你将能够构建一个响应快速且高效的 Spring Boot 应用。
项目结构
首先,确保你的项目结构如下:
src
├── main
│   ├── java
│   │   └── com
│   │       └── icoderoad
│   │           └── async
│   │               ├── AsyncApplication.java
│   │               ├── config
│   │               │   ├── AsyncConfig.java
│   │               │   └── TaskProperties.java
│   │               ├── controller
│   │               │   └── TaskController.java
│   │               └── service
│   │                   └── TaskService.java
│   └── resources
│       ├── application.yml
│       └── templates
│           └── index.html
└── pom.xml
项目 pom.xml 配置
确保在 pom.xml 中引入必要的依赖:
<?xml versinotallow="1.0" encoding="UTF-8"?>
<project xmlns="http://maven.apache.org/POM/4.0.0" xmlns:xsi="http://www.w3.org/2001/XMLSchema-instance"
	xsi:schemaLocation="http://maven.apache.org/POM/4.0.0 https://maven.apache.org/xsd/maven-4.0.0.xsd">
	<modelVersion>4.0.0</modelVersion>
	<parent>
		<groupId>org.springframework.boot</groupId>
		<artifactId>spring-boot-starter-parent</artifactId>
		<version>3.3.4</version>
		<relativePath/> <!-- lookup parent from repository -->
	</parent>
	<groupId>com.icoderoad</groupId>
	<artifactId>async-spring-boot</artifactId>
	<version>0.0.1-SNAPSHOT</version>
	<name>async-spring-boot</name>
	<description>Demo project for Spring Boot</description>

	<properties>
		<java.version>17</java.version>
	</properties>
	<dependencies>
		<dependency>
	        <groupId>org.springframework.boot</groupId>
	        <artifactId>spring-boot-starter-web</artifactId>
	    </dependency>
	    <dependency>
	        <groupId>org.springframework.boot</groupId>
	        <artifactId>spring-boot-starter-thymeleaf</artifactId>
	    </dependency>
	    <dependency>
	        <groupId>org.projectlombok</groupId>
	        <artifactId>lombok</artifactId>
	        <optional>true</optional>
	    </dependency>
	    <dependency>
	        <groupId>org.springframework.boot</groupId>
	        <artifactId>spring-boot-starter-validation</artifactId>
	    </dependency>

		<dependency>
			<groupId>org.springframework.boot</groupId>
			<artifactId>spring-boot-starter-test</artifactId>
			<scope>test</scope>
		</dependency>
	</dependencies>

	<build>
		<plugins>
			<plugin>
				<groupId>org.springframework.boot</groupId>
				<artifactId>spring-boot-maven-plugin</artifactId>
			</plugin>
		</plugins>
	</build>

</project>
YAML 属性文件配置
在 src/main/resources/application.yml 中添加以下配置:
server:
  port: 8080

task:
  pool:
    core-size: 5  # 线程池核心大小
    max-size: 10   # 线程池最大大小
    queue-capacity: 25  # 队列容量
    timeout: 5000  # 任务超时时间,单位毫秒
创建配置属性类
创建 TaskProperties.java 来读取 YAML 配置:
package com.icoderoad.async.config;

import org.springframework.boot.context.properties.ConfigurationProperties;
import org.springframework.stereotype.Component;

import lombok.Data;

@Data
@Component
@ConfigurationProperties(prefix = "task.pool")  // 读取 task 下的配置
public class TaskProperties {

    private int coreSize;

    private int maxSize;

    private int queueCapacity;

    private int timeout;

}
创建异步配置类
在 AsyncConfig.java 中使用配置属性类进行任务初始化:
package com.icoderoad.async.config;

import org.springframework.beans.factory.annotation.Autowired;
import org.springframework.context.annotation.Bean;
import org.springframework.context.annotation.Configuration;
import org.springframework.scheduling.annotation.EnableAsync;
import org.springframework.scheduling.annotation.EnableScheduling;
import org.springframework.scheduling.concurrent.ThreadPoolTaskExecutor;

@Configuration
@EnableAsync  // 启用异步功能
@EnableScheduling  // 启用定时任务
public class AsyncConfig {

    @Autowired
    private TaskProperties taskProperties;

    @Bean
    public ThreadPoolTaskExecutor taskExecutor() {
        ThreadPoolTaskExecutor executor = new ThreadPoolTaskExecutor();
        executor.setCorePoolSize(taskProperties.getCoreSize());
        executor.setMaxPoolSize(taskProperties.getMaxSize());
        executor.setQueueCapacity(taskProperties.getQueueCapacity());
        executor.setThreadNamePrefix("Async-");
        executor.initialize();
        return executor;
    }
}
创建服务类
在 TaskService.java 中创建更典型的异步任务配置:
package com.icoderoad.async.service;

import org.springframework.beans.factory.annotation.Autowired;
import org.springframework.scheduling.annotation.Async;
import org.springframework.stereotype.Service;
import com.icoderoad.async.config.TaskProperties;

import java.util.concurrent.CompletableFuture;

@Service
public class TaskService {

    @Autowired
    private TaskProperties taskProperties;

    @Async  // 表示该方法是异步执行的
    public CompletableFuture<String> executeAsyncTask() {
        try {
            Thread.sleep(taskProperties.getTimeout());  // 模拟耗时操作
            return CompletableFuture.completedFuture("异步任务执行完成!");
        } catch (InterruptedException e) {
            Thread.currentThread().interrupt();
            return CompletableFuture.completedFuture("任务被中断!");
        }
    }
}
创建控制器
在 TaskController.java 中创建一个控制器来调用异步服务并返回 JSON 格式的接口:
package com.icoderoad.async.controller;

import java.util.concurrent.CompletableFuture;

import org.springframework.http.ResponseEntity;
import org.springframework.web.bind.annotation.PostMapping;
import org.springframework.web.bind.annotation.RequestMapping;
import org.springframework.web.bind.annotation.RestController;

import com.icoderoad.async.service.TaskService;

@RestController
@RequestMapping("/tasks")
public class TaskController {

    private final TaskService taskService;

    public TaskController(TaskService taskService) {
        this.taskService = taskService;
    }

    @PostMapping("/async-task")
    public ResponseEntity<CompletableFuture<String>> asyncTask() {
        CompletableFuture<String> result = taskService.executeAsyncTask();  // 调用异步任务
        return ResponseEntity.ok(result);
    }
}
创建前端页面
在 src/main/resources/templates/index.html 中添加以下代码,并使用 jQuery 调用 JSON 接口:
<!DOCTYPE html>
<html xmlns:th="http://www.thymeleaf.org">
<head>
    <meta charset="UTF-8">
    <title>异步任务示例</title>
    <link rel="stylesheet" href="https://stackpath.bootstrapcdn.com/bootstrap/4.3.1/css/bootstrap.min.css">
    <script src="https://code.jquery.com/jquery-3.3.1.min.js"></script>
    <script src="https://stackpath.bootstrapcdn.com/bootstrap/4.3.1/js/bootstrap.min.js"></script>
</head>
<body>
<div class="container">
    <h1>异步任务示例</h1>
    <button id="startTask" class="btn btn-primary">开始异步任务</button>
    <p id="result"></p>
</div>

<script>
    $(document).ready(function() {
        $('#startTask').click(function() {
            $.ajax({
                url: '/tasks/async-task',
                type: 'POST',
                contentType: 'application/json',  // 设置请求内容类型为 JSON
                dataType: 'json',  // 期望的响应数据类型
                success: function(data) {
                    $('#result').text(data);  // 显示返回结果
                },
                error: function() {
                    $('#result').text('任务执行失败!');
                }
            });
        });
    });
</script>
</body>
</html>
启动测试
- 启动 Spring Boot 应用:运行 AsyncApplication.java,确保应用成功启动。
- 访问前端页面:打开浏览器并访问 http://localhost:8080/index.html。
- 点击按钮:点击“开始异步任务”按钮,触发异步任务的执行。
- 观察行为:
立即返回:在点击按钮后,接口会立即返回,而不是等任务执行完。这是因为任务是异步执行的。
注意
这种设计允许用户在等待异步任务完成时,继续与页面进行其他交互,提升了用户体验。这意味着,即使后台任务还在执行,用户也可以继续操作页面,而不会被阻塞。这样,可以在高并发场景下有效提升系统的响应能力。
结论
本文详细介绍了如何在 Spring Boot 3.3 中实现异步执行任务的最佳实践。我们通过配置 YAML 文件、创建配置属性类、实现异步任务服务类和控制器,最后使用前端 jQuery 调用异步接口,展示了异步任务的完整实现流程。
异步任务不仅提高了系统的响应速度,还能够有效管理后台处理任务,降低用户等待时间。通过合理的线程池配置和异步执行的设计,我们可以使应用程序在高并发情况下依然表现出色。希望本文能为大家在实际项目中实现异步处理提供有效的参考,提升开发效率和用户体验。


