速览!Spring Boot 3.3 快速实现 API 加密的最佳实践

开发 前端
通过本文,我们了解了 RSA 加密的基本原理,并结合 SpringBoot3.3 快速实现了 API 数据的加解密。在实际生产环境中,RSA 加密能够有效保护敏感信息的安全传输。

景(如支付、登录认证等),API 的数据传输面临着信息泄露的风险。因此,在这些场景下,数据加密显得尤为重要。为了提高安全性,RSA 加密算法作为非对称加密的一种典型实现,广泛应用于 API 加密场景中。本文将深入介绍 RSA 加密的基本原理,并结合 SpringBoot3.3,使用 rsa-encrypt-body-spring-boot 快速实现 API 数据加解密。

RSA 加密算法简介

RSA 加密是一种非对称加密算法,具有公钥和私钥的密钥对。公钥用于加密数据,而私钥用于解密。加密和解密的具体流程如下:

  1. 生成密钥对:RSA 通过数学算法生成一对密钥:公钥(Public Key)和私钥(Private Key)。
  2. 加密数据:前端(或客户端)使用服务器提供的公钥将敏感数据进行加密。由于加密过程不可逆,只有拥有私钥的服务器才能解密这些数据。
  3. 传输加密数据:客户端将加密后的数据通过 API 发送至后端服务器。
  4. 解密数据:

服务器端收到加密数据后,使用 RSA 私钥解密得到原始数据。

解密后的数据再由服务器进行进一步的业务处理。

RSA 的优势在于公钥可以公开分发,不需要像对称加密算法一样保证密钥的安全性。同时,只有服务器端持有私钥,能够有效避免数据在传输过程中被窃取和篡改。

运行效果:
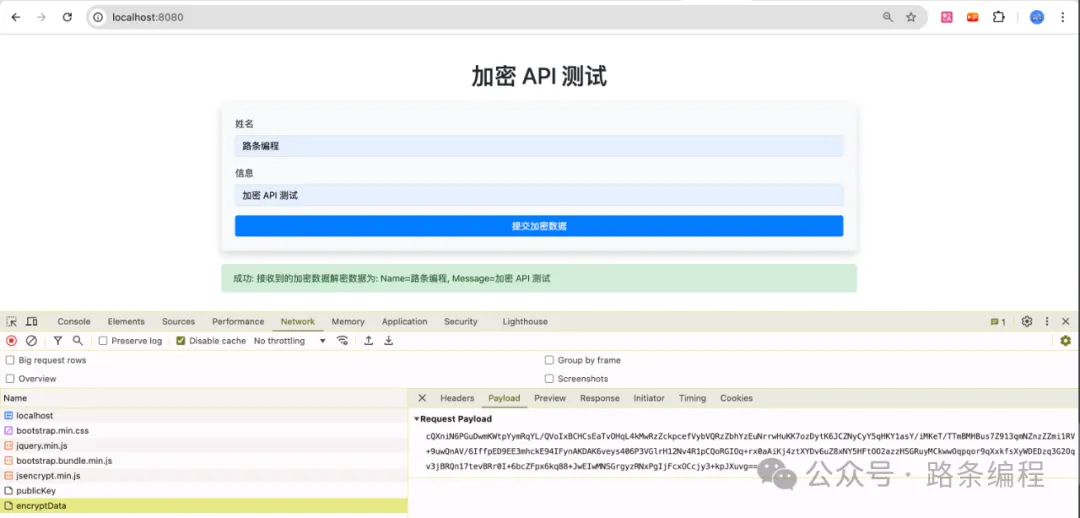
图片图片

若想获取项目完整代码以及其他文章的项目源码,且在代码编写时遇到问题需要咨询交流,欢迎加入下方的知识星球。

接下来,我们将结合 SpringBoot 实现基于 RSA 加密的 API 数据加密传输。

项目依赖配置

在项目中首先需要配置 pom.xml 文件以引入相关依赖:

pom.xml 配置*

<?xml versinotallow="1.0" encoding="UTF-8"?>
<project xmlns="http://maven.apache.org/POM/4.0.0" xmlns:xsi="http://www.w3.org/2001/XMLSchema-instance"
	xsi:schemaLocation="http://maven.apache.org/POM/4.0.0 https://maven.apache.org/xsd/maven-4.0.0.xsd">
	<modelVersion>4.0.0</modelVersion>
	<parent>
		<groupId>org.springframework.boot</groupId>
		<artifactId>spring-boot-starter-parent</artifactId>
		<version>3.3.4</version>
		<relativePath/> <!-- lookup parent from repository -->
	</parent>
	<groupId>com.icoderoad</groupId>
	<artifactId>rsa-encrypt</artifactId>
	<version>0.0.1-SNAPSHOT</version>
	<name>rsa-encrypt</name>
	<description>Demo project for Spring Boot</description>
	
	<properties>
		<java.version>17</java.version>
	</properties>
	<dependencies>
		
		<!-- RSA 加密依赖 -->
	    <dependency>
	        <groupId>cn.shuibo</groupId>
	        <artifactId>rsa-encrypt-body-spring-boot</artifactId>
	        <version>1.0.1.RELEASE</version>
	    </dependency>
	
	    <!-- Lombok 依赖 -->
	    <dependency>
	        <groupId>org.projectlombok</groupId>
	        <artifactId>lombok</artifactId>
	        <scope>provided</scope>
	    </dependency>
	
	    <!-- Thymeleaf 依赖 -->
	    <dependency>
	        <groupId>org.springframework.boot</groupId>
	        <artifactId>spring-boot-starter-thymeleaf</artifactId>
	    </dependency>
	
	    <!-- Web 依赖 -->
	    <dependency>
	        <groupId>org.springframework.boot</groupId>
	        <artifactId>spring-boot-starter-web</artifactId>
	    </dependency>

		<dependency>
			<groupId>org.springframework.boot</groupId>
			<artifactId>spring-boot-starter-test</artifactId>
			<scope>test</scope>
		</dependency>
	</dependencies>

	<build>
		<plugins>
			<plugin>
				<groupId>org.springframework.boot</groupId>
				<artifactId>spring-boot-maven-plugin</artifactId>
			</plugin>
		</plugins>
	</build>

</project>

application.yml 配置

在 application.yml 中配置 RSA 加密的公钥和私钥,保证后端可以正常解密前端的加密数据。

rsa:
  encrypt:
    open: true # 是否开启加密 true or false
    showLog: true # 是否打印加解密log true or false
    timestampCheck: true # 是否开启时间戳检查 true or false
    publicKey: |-
      MIIBIjANBgkqhkiG9w0BAQEFAAOCAQ8AMIIBCgKCAQEArw2n5D...
    privateKey: |-
      MIIEvAIBADANBgkqhkiG9w0BAQEFAASCBKcw...

** 使用 OpenSSL 生成 RSA 密钥对**

  1. 生成 RSA 私钥(private key): 运行以下命令生成一个 2048 位的私钥:
openssl genpkey -algorithm RSA -out private_key.pem -pkeyopt rsa_keygen_bits:2048

这会生成一个 private_key.pem 文件,文件中包含 -----BEGIN PRIVATE KEY----- 和 -----END PRIVATE KEY-----。

从私钥生成公钥(public key): 使用以下命令生成公钥:

openssl rsa -pubout -in private_key.pem -out public_key.pem

这会生成一个 public_key.pem 文件,包含公钥内容。

移除头尾标识符,获得纯 Base64 内容: 打开 private_key.pem 和 public_key.pem 文件,手动移除头尾标识符(如 -----BEGIN PRIVATE KEY----- 和 -----END PRIVATE KEY-----),并将中间的内容保存下来。这个内容是纯粹的 Base64 编码后的密钥。私钥的格式看起来会像这样(去掉换行符后):

MIIEvQIBADANBgkqhkiG9w0BAQEFAASCBKcwggSjAgEAAoIBAQC1...

替换 application.yml 中的密钥: 将得到的纯 Base64 内容替换到你的 application.yml 文件中:

rsa:
  encrypt:
    publicKey: |
      MIIBIjANBgkqhkiG9w0BAQEFAAOCAQ8AMIIBCgKCAQEArw2n5D...
    privateKey: |
      MIIEvAIBADANBgkqhkiG9w0BAQEFAASCBKcw...

启动类

注意:启动类 RsaEncryptApplication 中添加@EnableSecurity注解

package com.icoderoad.rsa.encrypt;

import org.springframework.boot.SpringApplication;
import org.springframework.boot.autoconfigure.SpringBootApplication;

import cn.shuibo.annotation.EnableSecurity;

@EnableSecurity
@SpringBootApplication
public class RsaEncryptApplication {

	public static void main(String[] args) {
		SpringApplication.run(RsaEncryptApplication.class, args);
	}

}

配置读取类

通过 @ConfigurationProperties 来读取加密相关的配置信息。我们使用 Lombok 的注解来简化代码,实现 Getter 和 Setter。

package com.icoderoad.rsa.encrypt.config;

import org.springframework.boot.context.properties.ConfigurationProperties;
import org.springframework.stereotype.Component;

import lombok.Data;

@Data
@Component
@ConfigurationProperties(prefix = "encrypt.rsa")
public class RsaProperties {
    private String publicKey;
    private String privateKey;
}

后端代码实现

实体类

package com.icoderoad.rsa.encrypt.entity;

import lombok.Data;

@Data
public class User {

	private String name;
	private String message;
}

Controller 需要接收前端发送的加密 JSON 数据,并通过 RSA 进行解密处理。这里修改了前端传输的数据格式,并使用 @RequestBody 解析 JSON 格式的数据。

package com.icoderoad.rsa.encrypt.controller;

import org.springframework.beans.factory.annotation.Autowired;
import org.springframework.web.bind.annotation.GetMapping;
import org.springframework.web.bind.annotation.PostMapping;
import org.springframework.web.bind.annotation.RequestBody;
import org.springframework.web.bind.annotation.RequestMapping;
import org.springframework.web.bind.annotation.RestController;

import com.icoderoad.rsa.encrypt.config.RsaProperties;
import com.icoderoad.rsa.encrypt.entity.User;

import cn.shuibo.annotation.Decrypt;

@RestController
@RequestMapping("/api/demo")
public class DemoController {

	@Autowired
	private RsaProperties rsaProperties;

	@GetMapping("/publicKey")
	public String getPublicKey() {
		// 返回配置中的公钥
		return rsaProperties.getPublicKey();
	}

	@Decrypt
	@PostMapping("/encryptData")
	public String receiveEncryptedData(@RequestBody User user) {
		// 获取解密后的数据
		String name = user.getName();
		String message = user.getMessage();

		return "接收到的加密数据解密数据为: Name=" + name + ", Message=" + message;
	}
}

前端代码实现

我们通过 Thymeleaf 模板引擎构建页面,并使用 jQuery 和 Bootstrap 来处理前端加密逻辑。

在 src/main/resources/templates 目录下创建 index.html 文件:

<!DOCTYPE html>
<html lang="zh" xmlns:th="http://www.thymeleaf.org">
<head>
    <meta charset="UTF-8">
    <meta name="viewport" content="width=device-width, initial-scale=1.0">
    <title>API 加密测试</title>
    <!-- 引入 Bootstrap 和 jQuery 的 CDN -->
    <link href="https://cdn.bootcss.com/bootstrap/4.5.0/css/bootstrap.min.css" rel="stylesheet">
    <script src="https://cdn.bootcss.com/jquery/3.5.1/jquery.min.js"></script>
    <script src="https://cdn.bootcss.com/bootstrap/4.5.0/js/bootstrap.bundle.min.js"></script>
</head>
<body>
<div class="container mt-5">
    <h1 class="text-center mb-4">加密 API 测试</h1>
    <form id="encryptForm" class="shadow p-4 rounded bg-light">
        <div class="form-group">
            <label for="name">姓名</label>
            <input type="text" class="form-control" id="name" placeholder="输入姓名" required>
        </div>
        <div class="form-group">
            <label for="message">信息</label>
            <input type="text" class="form-control" id="message" placeholder="输入信息" required>
        </div>
        <button type="button" class="btn btn-primary btn-block">提交加密数据</button>
    </form>
    <div id="result" class="mt-4"></div>
</div>

<script src="https://cdnjs.cloudflare.com/ajax/libs/jsencrypt/3.0.0/jsencrypt.min.js"></script>
<script>
$(document).ready(function() {
    // 获取公钥
    $.get("/api/demo/publicKey", function(publicKey) {
        const encrypt = new JSEncrypt();
        
        encrypt.setPublicKey('-----BEGIN PUBLIC KEY-----' + publicKey + '-----END PUBLIC KEY-----');

        $("#encryptForm button").click(function(event) {
            event.preventDefault(); // 防止按钮默认提交

            // 获取用户输入
            const name = $("#name").val();
            const message = $("#message").val();
            var user = {"name": name, "message": message};
            // 加密数据
            const encryptedData = encrypt.encrypt(JSON.stringify(user));

            // 使用 AJAX 提交加密数据
            $.ajax({
                url: "/api/demo/encryptData", // API 端点
                method: "POST",
                contentType: "application/json",
                data: encryptedData,
                success: function(response) {
                    console.log("成功:", response);
                    $("#result").html(`<div class="alert alert-success">成功: ${response}</div>`); // 显示返回的解密结果
                },
                error: function(error) {
                    console.error("错误:", error);
                    $("#result").html(`<div class="alert alert-danger">提交失败,请重试!</div>`);
                }
            });
        });
    });
});
</script>
</body>
</html>

前端加密逻辑说明

在上述代码中,前端通过 btoa 模拟了数据加密,实际生产环境中应使用成熟的前端 RSA 加密库,例如 jsencrypt 来完成 RSA 加密操作。页面通过 jQuery 提交加密后的数据至后端。

运行项目

  1. 启动 SpringBoot 项目后,访问 http://localhost:8080。
  2. 输入姓名和信息,点击“提交加密数据”,页面将通过 jQuery 发起 POST 请求,并传输加密后的数据。
  3. 后端接收到加密数据后,通过 RSA 解密工具解密,并返回解密结果。

结语

通过本文,我们了解了 RSA 加密的基本原理,并结合 SpringBoot3.3 快速实现了 API 数据的加解密。在实际生产环境中,RSA 加密能够有效保护敏感信息的安全传输。然而,RSA 也存在一些限制,如加密数据长度受限、性能开销较大等问题。因此,对于大规模数据传输,可以结合对称加密和非对称加密(如 RSA + AES)来提高系统的安全性和效率。

对于 API 安全性的提升,除了加密传输,其他安全措施(如接口签名、白名单 IP 过滤等)也应配合使用,全面提高系统的防护能力。

责任编辑:武晓燕 来源: 路条编程
相关推荐

2024-10-11 11:46:40

2024-05-13 13:13:13

APISpring程序

2018-04-09 14:26:06

Go语法实践

2016-12-27 08:49:55

API设计策略

2024-03-08 10:50:44

Spring技术应用程序

2024-11-06 11:33:09

2024-10-30 08:05:01

Spring参数电子签章

2024-10-08 09:27:04

SpringRESTfulAPI

2013-06-13 09:21:31

RESTful APIRESTfulAPI

2024-09-05 09:35:58

CGLIBSpring动态代理

2017-03-13 14:09:19

RESTful API实践

2021-03-09 13:18:53

加密解密参数

2022-06-04 12:25:10

解密加密过滤器

2024-09-26 08:48:42

SpringAPITogglz

2023-11-07 07:08:57

2018-12-04 09:00:00

API安全性令牌

2014-07-29 09:25:39

加密密钥管理云加密

2014-04-18 10:58:44

AndroidAPI实践

2023-04-14 12:23:15

2017-04-27 10:33:50

云计算
点赞
收藏

51CTO技术栈公众号