环境:Spring5.3.23
1. 概述
Spring Boot是一个开源的非常流行的Java框架,由Pivotal团队开发,用于简化Spring应用程序的创建和部署。它遵循约定优于配置的原则,让开发者能够快速搭建和运行应用程序。Spring Boot通过自动配置和内置的依赖管理,简化了Spring应用程序的初始搭建以及开发过程。
Spring Boot为开发者提供了许多有用的功能,包括:
- 自动配置:Spring Boot会自动配置应用程序所需的各种组件,减少了手动配置的工作量。
- 嵌入式Web服务器:Spring Boot内置了Tomcat和Jetty等Web服务器,使得应用程序能够快速启动和运行。
- 约定优于配置的原则:Spring Boot遵循约定优于配置的原则,让开发者能够使用默认的配置,而无需过多地关注底层技术实现。
- 强大的依赖管理:Spring Boot提供了强大的依赖管理功能,能够自动管理应用程序所需的依赖项。
- 安全性:Spring Boot提供了安全性功能,包括身份验证和授权等,确保应用程序的安全性。
总之,Spring Boot是一个强大而简单的框架,它让开发者能够快速创建和运行应用程序。无论你是初学者还是有一定经验的开发者,Spring Boot都能够为你提供便利和高效的开发体验。在接下来的文章中,我们将通过自己动手写一个简单的Spring Boot应用程序来揭示这个过程原来如此简单。让我们一起开始这个项目吧!
提示:本篇文章需要你对Spring启动流程有一点的了解。
2. 动手实现
2.1 自定义Web类型的ApplicationContext
我们需要在自定义的ApplicationContext合适的方法中去启动内嵌的Tomcat。
public class PackAnnotationApplicationContext extends GenericWebApplicationContext {


  public PackAnnotationApplicationContext() {
    AnnotationConfigUtils.registerAnnotationConfigProcessors(this);
  }


  @Override
  protected void onRefresh() {
    super.onRefresh();
    try {
      // 创建WebServer
      createWebServer() ;
    } catch (Exception e) {
      throw new ApplicationContextException("Unable to start web server", e) ;
    }
  }


  @Override
  protected void postProcessBeanFactory(ConfigurableListableBeanFactory beanFactory) {
    beanFactory.addBeanPostProcessor(new PackServletContextAwareProcessor(this)) ;
    super.postProcessBeanFactory(beanFactory);
  }


  private void createWebServer() throws Exception {
    final int PORT = 8088 ;


    Tomcat tomcat = new Tomcat() ;
    // 获取Server节点 ---》 server.xml 【Server节点】
    Server server = tomcat.getServer() ;
    // 获取Service节点 ---》 server.xml 【Server---> Service节点】
    Service service = server.findService("Tomcat") ;


    // 配置Connector ---》 server.xml 【Server---> Service--->Connector节点】
    Http11NioProtocol protocol = new Http11NioProtocol() ;
    ThreadPoolExecutor executor = new ThreadPoolExecutor(1, 1, 60, TimeUnit.SECONDS, new LinkedBlockingQueue<>()) ;
    // 配置Connector ---》 server.xml 【Server---> Service--->Executor节点】
    protocol.setExecutor(executor) ;
    protocol.setConnectionTimeout(20000);
    Connector connector = new Connector(protocol) ;
    // 设置访问端口
    connector.setPort(PORT) ;
    connector.setURIEncoding("UTF-8") ;
    service.addConnector(connector) ;


    // 配置Engine ---》 server.xml 【Server--->Service--->Engine】
    StandardEngine engine = new StandardEngine() ;
    // 这里的设置的默认host要和下面StandardHost设置的name一致
    engine.setDefaultHost("localhost");
    // 配置Engine ---》 server.xml 【Server--->Service--->Engine--->Host】
    StandardHost host = new StandardHost() ;
    host.setName("localhost") ;
    host.setAppBase(System.getProperties().getProperty("user.home")) ;
    engine.addChild(host) ;
    service.setContainer(engine) ;


    // 配置Context ---》 server.xml 【Server--->Service--->Engine--->Host--->Context】
    StandardContext context = new StandardContext() ;
    // 如果不配置这个,则会有这个错误:One or more components marked the context as not correctly configured
    context.addLifecycleListener(new FixContextListener()) ;
    // 访问路径
    context.setPath("");
    // Context节点添加到Host节点
    host.addChild(context) ;


    context.addServletContainerInitializer(new ServletContainerInitializer() {
      @Override
      public void onStartup(Set<Class<?>> c, ServletContext servletContext) throws ServletException {
        // 这个的主要作用是,当一个Bean实现了ServletContextAware接口时,用来注入该ServletContext对象
        PackAnnotationApplicationContext.this.setServletContext(servletContext) ;
        DispatcherServlet dispatcherServlet = PackAnnotationApplicationContext.this.getBean(DispatcherServlet.class) ;
        Dynamic dynamic = servletContext.addServlet("dispatcherServlet", dispatcherServlet) ;
        dynamic.setLoadOnStartup(0) ;
        dynamic.addMapping("/*") ;
      }
    }, null);
    tomcat.start();
  }
}
如上,我们做了2件非常重要的事:1. 重写onRefresh方法。2. 创建内嵌的Tomcat服务。
2.2 自定义启动类程序PackSpringApplication
该类就是用来模拟SpringBoot中的SpringApplication对象。
public class PackSpringApplication {


  private Class<?>[] primarySources ;


  public PackSpringApplication(Class<?>[] primarySources) {
    this.primarySources = primarySources ;
  }


  public ConfigurableApplicationContext run(String[] args) {
    ConfigurableApplicationContext context =  new PackAnnotationApplicationContext() ;
    prepareEnvironment(context, args) ;
    prepareContext(context) ;
    refreshContex(context) ;
    return context ;
  }
  // 刷新上下文,核心就是调用AbstractApplicationContext#refresh方法
  private void refreshContex(ConfigurableApplicationContext context) {
    context.refresh() ;
  }
  // 注备上下文环境,这里简单处理了命令行参数
  private void prepareEnvironment(ConfigurableApplicationContext context, String[] args) {
    ConfigurableEnvironment environment = new StandardEnvironment() ;
    PropertySource<?> propertySource = new SimpleCommandLinePropertySource(args) ;
    environment.getPropertySources().addFirst(propertySource) ;
    context.setEnvironment(environment) ;
  }
  // 准备上下文
  private void prepareContext(ConfigurableApplicationContext context) {
    BeanDefinitionRegistry registry = getBeanDefinitionRegistry(context) ;
    BeanNameGenerator generator = new DefaultBeanNameGenerator() ;
    for (Class<?> clazz : primarySources) {
      AbstractBeanDefinition definition = BeanDefinitionBuilder.genericBeanDefinition(clazz).getBeanDefinition() ;
      registry.registerBeanDefinition(generator.generateBeanName(definition, registry), definition) ;
    }
  }


  private BeanDefinitionRegistry getBeanDefinitionRegistry(ApplicationContext context) {
    if (context instanceof BeanDefinitionRegistry) {
      return (BeanDefinitionRegistry) context;
    }
    if (context instanceof AbstractApplicationContext) {
      return (BeanDefinitionRegistry) ((AbstractApplicationContext) context).getBeanFactory();
    }
    throw new IllegalStateException("Could not locate BeanDefinitionRegistry");
  }
  public static ConfigurableApplicationContext run(Class<?> primarySource, String[] args) {
    return new PackSpringApplication(new Class<?>[] {primarySource}).run(args) ;
  }
}
以上大致模拟的就是Spring Boot启动执行流程的步骤。
2.3 定义Web请求相关的配置
@Configuration
public class WebConfig {


  @Bean
  public DispatcherServlet dispatcherServlet() {
    DispatcherServlet dispatcherServlet = new DispatcherServlet();
    dispatcherServlet.setDispatchOptionsRequest(true) ;
    dispatcherServlet.setDispatchTraceRequest(true) ;
    dispatcherServlet.setThrowExceptionIfNoHandlerFound(true) ;
    dispatcherServlet.setPublishEvents(true) ;
    dispatcherServlet.setEnableLoggingRequestDetails(true) ;
    return dispatcherServlet ;
  }
}
这里为了让你更加清晰的认识到SpringMVC相关的内容,就不使用@EnableWebMvc该注解。
有了上面的配置,接下来就可以写个测试程序进行测试
2.4 测试
测试Controller接口
@RestController
@RequestMapping("/demo")
public class DemoController {


  @GetMapping("/index")
  public Object index() {
    return "index......" ;
  }
  @GetMapping("/body")
  public User body() {
    return new User(1, "测试") ;
  }
}
测试启动类
@Configuration
@ComponentScan({"com.pack.main.programmatic_tomcat_04"})
public class DemoApplication {


  public static void main(String[] args) {
    PackSpringApplication.run(DemoApplication.class, args) ;
  }
}
测试第一个接口:/demo/index
 图片
图片
测试第二个接口:/demo/body
 图片
图片
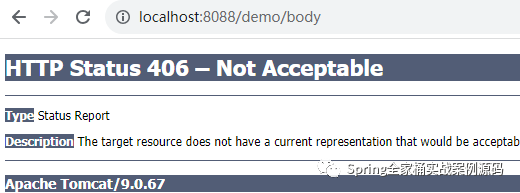
返回406状态码,程序出错了,这是因为在默认情况下,SpringMVC会使用系统默认提供的RequestMappingHandlerAdapter对象进行目标Controller的调用。但是默认的HandlerAdapter对象并不能处理返回值是这种对象类型。而默认支持支如下4中类型:
- ByteArrayHttpMessageConverter
- StringHttpMessageConverter
- SourceHttpMessageConverter
- AllEncompassingFormHttpMessageConverter
所以,这里我们需要自定义RequestMappingHandlerAdapter。在WebConfig中定义该Bean对象,设置
@Bean
public RequestMappingHandlerAdapter requestMappingHandlerAdapter() {
  RequestMappingHandlerAdapter handlerAdapter = new RequestMappingHandlerAdapter() ;
  List<HttpMessageConverter<?>> messageConverters = new ArrayList<>() ;
  messageConverters.add(new StringHttpMessageConverter());
  messageConverters.add(new MappingJackson2HttpMessageConverter()) ;
  handlerAdapter.setMessageConverters(messageConverters) ;
  return handlerAdapter ;
}
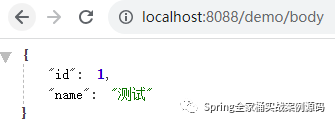
再次测试
 图片
图片


