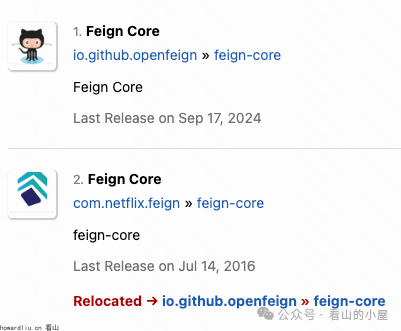
OpenFeign是Spring微服务全家桶中的重要组件。前身是Netflix Feign,在2013年首次发布。2016年,Netflix发布了Feign的最后一个版本(8.18.0),并将其捐赠给开源社区,随后Feign更名为OpenFeign,于同年发布了OpenFeign的首个版本(9.0.0)。在2017年,Spring Cloud团队将对Feign的依赖升级为OpenFeign。
 图片
图片
OpenFeign和Netflix Feign
为了避免歧义,文中提到的Feign或OpenFeign,都是指 OpenFeign。
OpenFeign是Netflix团队开发的一个声明式、模板化的 Web 服务客户端,目标是开发一种简单、优雅的 HTTP 服务客户端。在设计时,借鉴了各种优秀类库,比如Retrofit、 JAXRS-2.0、WebSocket等。
通过OpenFeign,我们可以像调用方法一样实现HTTP API访问。
本文将介绍如何使用原生的 OpenFeign,原生的使用方式,不是集成在Spring Cloud中的使用方式。
来,一起来。
先来个简单的例子
引入依赖
OpenFeign很贴心的提供了BOM,我们可以直接使用控制组件版本。
<project>
    ……
    <properties>
        <openfeign.version>13.4</openfeign.version>
    </properties>

    <dependencyManagement>
        <dependencies>
            <dependency>
                <groupId>io.github.openfeign</groupId>
                <artifactId>feign-bom</artifactId>
                <version>${openfeign.version}</version>
                <type>pom</type>
                <scope>import</scope>
            </dependency>
        </dependencies>
    </dependencyManagement>
</project>
我这里使用的是13.4版本(学习的时候就得学新的,新的bug少)。
然后引入core模块:
<dependency>
    <groupId>io.github.openfeign</groupId>
    <artifactId>feign-core</artifactId>
</dependency>
有了前面的BOM,后面的模块就不用指定版本了。
定义接口
private interface Client {
    @RequestLine("GET /anything/{anything}")
    @Headers({"Content-Type: application/json"})
    String anything(@Param("anything") String anything);
}
为了调用方便,我们借助https://httpbin.org提供的HTTP API接口anything用来验证,这个接口会返回传入的参数。这样也方便我们检查调用是否正常。
创建客户端
final Client client = Feign.builder()
        .logLevel(Level.FULL)
        .target(Client.class, "https://httpbin.org");
final String anything = client.anything("testCore");
Assertions.assertNotNull(anything);
Assertions.assertTrue(anything.contains("testCore"));
System.out.println(anything);
是不是非常简单,通过建造器模式简单配置下参数,定义接口的域名,然后就像调用本地方法一样调用接口,然后就拿到返回值了。
OpenFeign提供了很多的扩展口,比如日志、解析器、拦截器、编码器、错误处理器等,可以通过builder方法进行配置。
自定义编解码器
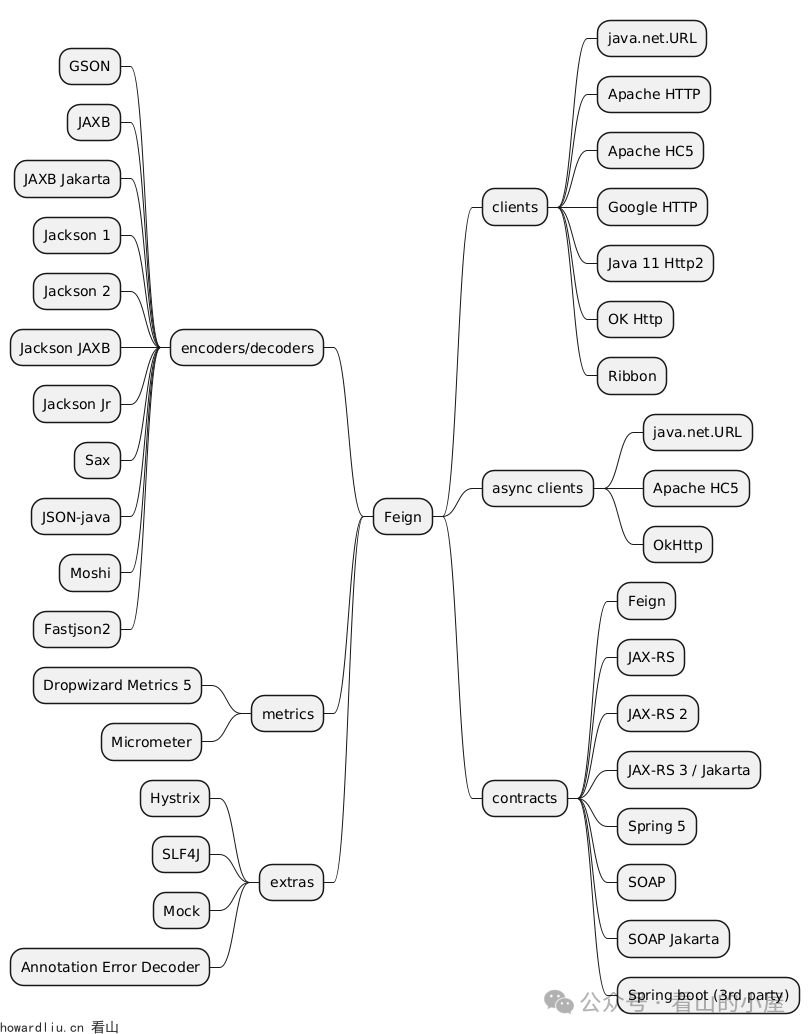
OpenFeign提供了12种编解码器,默认使用的是字符串编解码器,如果需要自定义编解码器,可以通过builder方法进行配置。
比如,我们想要使用Jackson实现:
我们先引入feign-jackson模块:
<dependency>
    <groupId>io.github.openfeign</groupId>
    <artifactId>feign-jackson</artifactId>
</dependency>
然后在建造器参数指定JacksonDecoder和JacksonEncoder:
final Client client = Feign.builder()
        .logLevel(Level.FULL)
        .decoder(new JacksonDecoder())
        .encoder(new JacksonEncoder())
        .target(Client.class, "https://httpbin.org");
final Map<String, Object> requestBody = Map.of("k1", "value1", "k2", "value2");
final Map<String, Object> anythingResult = client.anythingJson("testJson", requestBody);
如果想要换成Gson,引入feign-gson模块,在建造器参数替换为GsonDecoder和GsonEncoder就行。
还有JAXB、Moshi、Fashjson、SAX等一种编解码器可以使用。
自定义客户端
OpenFeign默认的客户端是Java提供的HttpURLConnection,如果需要自定义客户端,可以通过builder方法进行配置。
比如,我们想要使用OkHttp,可以先引入feign-okhttp模块:
<dependency>
    <groupId>io.github.openfeign</groupId>
    <artifactId>feign-okhttp</artifactId>
</dependency>
然后通过client方法替换:
final Client client = Feign.builder()
        .logLevel(Level.FULL)
        .decoder(new JacksonDecoder())
        .encoder(new JacksonEncoder())
        .client(new OkHttpClient())
        .target(Client.class, "https://httpbin.org");
final Map<String, Object> anythingResult = client.anythingJsonBodyTemplate("testJson", "value1", "value2");
此时使用的就是OkHttpClient了。
OpenFeign还支持Apache HTTP、Apache HC5、Google HTTP、Java11 HTTP2、Ribbon。
自定义拦截器
拦截器可以对请求和响应进行拦截处理,比如打印日志、添加请求头、添加签名等,可以使用requestInterceptor自定义拦截器。
首先,定义我们自己的拦截器,比如我们在请求头中添加一个自定义的header:
public class MyRequestInterceptor implements RequestInterceptor {
    @Override
    public void apply(RequestTemplate template) {
        template.header("my-header", "my-value");
    }
}
然后指定拦截器:
final Client client = Feign.builder()
        .logLevel(Level.FULL)
        .decoder(new JacksonDecoder())
        .encoder(new JacksonEncoder())
        .requestInterceptor(new MyRequestInterceptor())
        .target(Client.class, "https://httpbin.org");
final Map<String, Object> anythingResult = client.anythingJsonBodyTemplate("testJson", "value1", "value2");
System.out.println(anythingResult);

Assertions.assertNotNull(anythingResult);
Assertions.assertTrue(anythingResult.get("url") instanceof String);
Assertions.assertTrue(((String) anythingResult.get("url")).endsWith("testJson"));
Assertions.assertTrue(anythingResult.containsKey("json"));
Assertions.assertTrue(anythingResult.get("json") instanceof Map<?, ?>);

Assertions.assertTrue(anythingResult.containsKey("headers"));
boolean hasMyHeader = false;
if (anythingResult.get("headers") instanceof Map headers) {
    for (Object key : headers.keySet()) {
        if (key.toString().equalsIgnoreCase("my-header")) {
            hasMyHeader = true;
            final Object value = headers.get(key);
            Assertions.assertTrue(value instanceof String);
            Assertions.assertEquals("my-value", value);
        }
    }
}
Assertions.assertTrue(hasMyHeader);
访问anything接口时会把请求头的信息返回回来,说明拦截器执行成功了。
自定义重试器
OpenFeign默认的重试器是feign.Retryer.Default,共重试5次,每次间隔步长为1.5的(重试次数-1)次幂,间隔最大1秒。
如果想要自定义重试逻辑,我们可以自己实现。
public class MyRetryer implements Retryer {
    int attempt = 0;

    @Override
    public void continueOrPropagate(RetryableException e) {
        if (attempt++ >= 3) {
            throw e;
        }
        System.out.println("重试第:" + attempt + "次");
        try {
            TimeUnit.MILLISECONDS.sleep(100);
        } catch (InterruptedException ex) {
             Thread.currentThread().interrupt();
            throw new RuntimeException(ex);
        }
    }

    @Override
    public Retryer clone() {
        return new MyRetryer();
    }
}
然后通过retryer方法指定。
final Client client = Feign.builder()
        .logLevel(Level.FULL)
        .decoder(new JacksonDecoder())
        .encoder(new JacksonEncoder())
        .retryer(new MyRetryer())
        // 默认是 feign.Retryer.Default
        // 可以指定不重试 feign.Retryer.NEVER_RETRY
        .target(Client.class, "https://httpbin.abc");
Assertions.assertThrowsExactly(RetryableException.class, () -> client.codes("500"));
需要强调一下,只有访问HTTP时出现了IO异常才会重试,如果接口正常返回了,只不过不是200之类的正常响应,不会进重试逻辑。示例中把域名写错了,属于IO异常,会重试3次。
如果不想重试,可以指定为feign.Retryer.NEVER_RETRY。
使用Spring的注解
OpenFeign接口定义使用的是URL模板,具体协议可以参https://www.rfc-editor.org/rfc/rfc6570.html。
大部分人对这个协议有些陌生,但是对Spring的注解比较属性,所以OpenFeign也贴心的提供了Spring契约适配。
首先,引入spring模块依赖:
<dependency>
    <groupId>io.github.openfeign</groupId>
    <artifactId>feign-spring</artifactId>
</dependency>
这种方式引入的是Spring 6.x,如果想要使用Spring 4.x,可以引入feign-spring4模块。
然后使用Spring MVC注解定义接口:
@PostMapping(value = "/anything/{anything}",
        produces = "application/json", consumes = "application/json")
Map<String, Object> anythingJsonSpring(@PathVariable("anything") String anything,
        @RequestParam("p1") String p1,
        @RequestParam("p2") String p2,
        @RequestBody Map<String, Object> requestBody);
构建客户端的时候,需要使用contract指定是Spring的契约:
final SpringClient client = Feign.builder()
        .logLevel(Level.FULL)
        .decoder(new JacksonDecoder())
        .encoder(new JacksonEncoder())
        .contract(new SpringContract())
        .target(SpringClient.class, "https://httpbin.org");
final Map<String, Object> requestBody = Map.of("k1", "value1", "k2", "value2");
final Map<String, Object> anythingResult = client.anythingJsonSpring("testJson",
        "param1", "param2", requestBody);
这样就可以正常运行了。
文末总结
本文介绍了OpenFeign的基本使用方法,包括如何引入依赖、如何定义接口、如何构建客户端、如何自定义拦截器、重试器等。
OpenFeign的入门篇结束,后续我们将介绍OpenFeign的更多功能,比如错误处理器、熔断器、监控等。
 图片
图片


