我们在前面的两个章节中基本上对Spring Boot 3版本的新变化进行了全面的回顾,以确保在接下来研究Spring AI时能够避免任何潜在的问题。今天,我们终于可以直接进入主题:Spring AI是如何发起请求并将信息返回给用户的。
在接下来的内容中,我们将专注于这一过程,而流式回答和函数回调的相关内容我们可以在下次的讲解中详细探讨。
开始解析
首先,对于还没有项目的同学,请务必安装所需的POM依赖项。请注意,JDK的版本要求为17。因此,你可以在IDEA中轻松下载和配置这个版本。
<?xml version="1.0" encoding="UTF-8"?>
<project xmlns="http://maven.apache.org/POM/4.0.0" xmlns:xsi="http://www.w3.org/2001/XMLSchema-instance"
    xsi:schemaLocation="http://maven.apache.org/POM/4.0.0 https://maven.apache.org/xsd/maven-4.0.0.xsd">
    <modelVersion>4.0.0</modelVersion>
    <parent>
        <groupId>org.springframework.boot</groupId>
        <artifactId>spring-boot-starter-parent</artifactId>
        <version>3.3.1</version>
        <relativePath/> <!-- lookup parent from repository -->
    </parent>
    <groupId>com.example</groupId>
    <artifactId>demo</artifactId>
    <version>0.0.1-SNAPSHOT</version>
    <name>demo</name>
    <description>Demo project for Spring Boot</description>
    <url/>
    <licenses>
        <license/>
    </licenses>
    <developers>
        <developer/>
    </developers>
    <scm>
        <connection/>
        <developerConnection/>
        <tag/>
        <url/>
    </scm>
    <properties>
        <java.version>17</java.version>
<!--        <spring-ai.version>1.1.0</spring-ai.version>-->
        <spring-ai.version>1.0.0-M2</spring-ai.version>
    </properties>
    <dependencies>

        <dependency>
            <groupId>org.springframework.boot</groupId>
            <artifactId>spring-boot-starter-actuator</artifactId>
        </dependency>

        <dependency>
            <groupId>org.springframework.boot</groupId>
            <artifactId>spring-boot-starter-web</artifactId>
        </dependency>
        <dependency>
            <groupId>org.springframework.ai</groupId>
            <artifactId>spring-ai-openai-spring-boot-starter</artifactId>
        </dependency>
        <dependency>
            <groupId>com.github.xiaoymin</groupId>
            <artifactId>knife4j-openapi3-jakarta-spring-boot-starter</artifactId>
            <version>4.1.0</version>
        </dependency>
        <dependency>
            <groupId>javax.servlet</groupId>
            <artifactId>javax.servlet-api</artifactId>
            <version>4.0.1</version>
        </dependency>
        <dependency>
            <groupId>org.projectlombok</groupId>
            <artifactId>lombok</artifactId>
            <optional>true</optional>
        </dependency>
        <dependency>
            <groupId>org.springframework.boot</groupId>
            <artifactId>spring-boot-starter-test</artifactId>
            <scope>test</scope>
        </dependency>
    </dependencies>
    <dependencyManagement>
        <dependencies>
            <dependency>
<!--                <groupId>group.springframework.ai</groupId>-->
                <groupId>org.springframework.ai</groupId>
                <artifactId>spring-ai-bom</artifactId>
                <version>${spring-ai.version}</version>
                <type>pom</type>
                <scope>import</scope>
            </dependency>
        </dependencies>
    </dependencyManagement>

    <build>
        <plugins>
            <plugin>
                <groupId>org.graalvm.buildtools</groupId>
                <artifactId>native-maven-plugin</artifactId>
                <configuration>
                    <!-- imageName用于设置生成的二进制文件名称 -->
                    <imageName>${project.artifactId}</imageName>
                    <!-- mainClass用于指定main方法类路径 -->
                    <mainClass>com.example.demo.DemoApplication</mainClass>
                    <buildArgs>
                        --no-fallback
                    </buildArgs>
                </configuration>
                <executions>
                    <execution>
                        <id>build-native</id>
                        <goals>
                            <goal>compile-no-fork</goal>
                        </goals>
                        <phase>package</phase>
                    </execution>
                </executions>
            </plugin>
            <plugin>
                <groupId>org.springframework.boot</groupId>
                <artifactId>spring-boot-maven-plugin</artifactId>
                <configuration>
                    <excludes>
                        <exclude>
                            <groupId>org.projectlombok</groupId>
                            <artifactId>lombok</artifactId>
                        </exclude>
                    </excludes>
                </configuration>
            </plugin>
        </plugins>
    </build>
    <repositories>
        <repository>
            <id>spring-milestones</id>
            <name>Spring Milestones</name>
            <url>https://repo.spring.io/milestone</url>
            <snapshots>
                <enabled>false</enabled>
            </snapshots>
        </repository>
    </repositories>

</project>
基本用法在之前的讲解中已经覆盖过,因此这里就不再详细说明。为了更好地理解这一概念,我们将通过两个具体的例子来进行演示。
第一个例子将展示阻塞回答的实现,而第二个例子则会涉及带有上下文信息记忆的回答。这两种方式将帮助我们更深入地了解如何在实际应用中灵活运用这些技术。
基本用法
这里将提供一个阻塞回答的用法示例,以便更好地理解其应用场景和具体实现方式。
@PostMapping("/ai")
ChatDataPO generationByText(@RequestParam("userInput")  String userInput) {
    String content = this.myChatClientWithSystem.prompt()
                .user(userInput)
                .call()
                .content();
    log.info("content: {}", content);
    ChatDataPO chatDataPO = ChatDataPO.builder().code("text").data(ChildData.builder().text(content).build()).build();;
    return chatDataPO;
}
在这个示例中,我们将展示如何实现一个等待 AI 完成回答的机制,并将结果直接返回给接口调用端。这一过程实际上非常简单,您只需将问题传递给 user 参数即可。接下来,我们将进行源码解析。
为了节省时间,我们不会详细逐行分析中间过程的代码,因为这可能会显得冗长而复杂。相反,我们将直接聚焦于关键源码,以便更高效地理解其核心逻辑和实现细节。
源码解析——构建请求
我们现在直接进入 content 方法进行深入分析。在前面的步骤中,所有方法的参数调用主要是为了构建一个对象,为后续的操作做准备。而真正的核心调用逻辑则集中在 content 方法内部。
private ChatResponse doGetChatResponse(DefaultChatClientRequestSpec inputRequest, String formatParam) {

            Map<String, Object> context = new ConcurrentHashMap<>();
            context.putAll(inputRequest.getAdvisorParams());
            DefaultChatClientRequestSpec advisedRequest = DefaultChatClientRequestSpec.adviseOnRequest(inputRequest,
                    context);

            var processedUserText = StringUtils.hasText(formatParam)
                    ? advisedRequest.getUserText() + System.lineSeparator() + "{spring_ai_soc_format}"
                    : advisedRequest.getUserText();

            Map<String, Object> userParams = new HashMap<>(advisedRequest.getUserParams());
            if (StringUtils.hasText(formatParam)) {
                userParams.put("spring_ai_soc_format", formatParam);
            }

            var messages = new ArrayList<Message>(advisedRequest.getMessages());
            var textsAreValid = (StringUtils.hasText(processedUserText)
                    || StringUtils.hasText(advisedRequest.getSystemText()));
            if (textsAreValid) {
                if (StringUtils.hasText(advisedRequest.getSystemText())
                        || !advisedRequest.getSystemParams().isEmpty()) {
                    var systemMessage = new SystemMessage(
                            new PromptTemplate(advisedRequest.getSystemText(), advisedRequest.getSystemParams())
                                .render());
                    messages.add(systemMessage);
                }
                UserMessage userMessage = null;
                if (!CollectionUtils.isEmpty(userParams)) {
                    userMessage = new UserMessage(new PromptTemplate(processedUserText, userParams).render(),
                            advisedRequest.getMedia());
                }
                else {
                    userMessage = new UserMessage(processedUserText, advisedRequest.getMedia());
                }
                messages.add(userMessage);
            }

            if (advisedRequest.getChatOptions() instanceof FunctionCallingOptions functionCallingOptions) {
                if (!advisedRequest.getFunctionNames().isEmpty()) {
                    functionCallingOptions.setFunctions(new HashSet<>(advisedRequest.getFunctionNames()));
                }
                if (!advisedRequest.getFunctionCallbacks().isEmpty()) {
                    functionCallingOptions.setFunctionCallbacks(advisedRequest.getFunctionCallbacks());
                }
            }
            var prompt = new Prompt(messages, advisedRequest.getChatOptions());
            var chatResponse = this.chatModel.call(prompt);

            ChatResponse advisedResponse = chatResponse;
            // apply the advisors on response
            if (!CollectionUtils.isEmpty(inputRequest.getAdvisors())) {
                var currentAdvisors = new ArrayList<>(inputRequest.getAdvisors());
                for (RequestResponseAdvisor advisor : currentAdvisors) {
                    advisedResponse = advisor.adviseResponse(advisedResponse, context);
                }
            }

            return advisedResponse;
        }
这段代码没有任何注释,确实令人感到意外,充分说明了Spring代码的设计初衷——更多是为开发者所用,而非为人类阅读。其核心思想是,能够有效使用就足够了。尽管这段代码显得简洁明了,但其重要性不容忽视。所有的实现都非常精炼,没有冗余的代码,因此我决定不进行删减,而是将其完整呈现出来。
为了帮助大家更好地理解其中的逻辑和结构,我将使用伪代码来进行讲解。
初始化上下文:创建一个空的上下文。
请求调整:请求调整的逻辑是基于上下文对输入请求进行动态处理。首先,我们需要判断请求对象是否已经被 advisor 包装。如果需要那么我们将返回一个经过 advisor 包装后的请求对象。
下面是相关的源码实现,展示了这一逻辑的具体细节:
public static DefaultChatClientRequestSpec adviseOnRequest(DefaultChatClientRequestSpec inputRequest,
                Map<String, Object> context) {

//....此处省略一堆代码
        var currentAdvisors = new ArrayList<>(inputRequest.advisors);
                for (RequestResponseAdvisor advisor : currentAdvisors) {
                    adviseRequest = advisor.adviseRequest(adviseRequest, context);
                }
                advisedRequest = new DefaultChatClientRequestSpec(adviseRequest.chatModel(), adviseRequest.userText(),
                        adviseRequest.userParams(), adviseRequest.systemText(), adviseRequest.systemParams(),
                        adviseRequest.functionCallbacks(), adviseRequest.messages(), adviseRequest.functionNames(),
                        adviseRequest.media(), adviseRequest.chatOptions(), adviseRequest.advisors(),
                        adviseRequest.advisorParams(), inputRequest.getObservationRegistry(),
                        inputRequest.getCustomObservationConvention());
            }

            return advisedRequest;
        }
在这里,我想详细讲解一下 advisor.adviseRequest(adviseRequest, context) 这一方法的功能和重要性。由于我们已经配置了增强类,比如引入了一个聊天记忆功能,该方法的作用就显得尤为关键。具体来说,它负责对传入的请求进行增强处理,以满足特定的业务需求。
值得注意的是,这个增强请求的方法是与增强响应方法相对应的,它们通常成对出现。接下来,深入查看 adviseRequest 方法的具体实现:
String content = this.myChatClientWithSystem.prompt()
                .advisors(new MessageChatMemoryAdvisor(chatMemory))
                .user(userInput)
                .call()
                .content();
我们配置了 MessageChatMemoryAdvisor 类,其核心方法的具体实现是,在接收到相应的信息后,将该信息存储到一个聊天记忆中。这样一来,下一次处理请求时,就可以直接从聊天记忆中提取相关内容。
public AdvisedRequest adviseRequest(AdvisedRequest request, Map<String, Object> context) {

    //此处省略一堆代码
    // 4. Add the new user input to the conversation memory.
    UserMessage userMessage = new UserMessage(request.userText(), request.media());
    this.getChatMemoryStore().add(this.doGetConversationId(context), userMessage);

    return advisedRequest;
}
处理用户文本、构建用户参数:需要依据 formatParam 方法来对用户的输入进行处理。具体而言,这个步骤不仅涉及到对用户文本的格式化,还需要更新相应的用户参数。
接下来,我们将展示具体的实现示例,以便更清晰地理解这一过程的操作细节:
.user(u -> u.text("""
                Generate the filmography for a random actor.
                {format}
              """)
            .param("format", converter.getFormat()))
上面的代码段会将 {format} 替换为实际的格式化信息。除了用户提供的参数外,系统信息中同样包含了一些需要解析的参数,这些参数也必须在处理过程中正确地传入。
构建消息列表:根据系统文本和用户文本的有效性,构建消息的过程将两者进行整合。我们可以将所有有效的消息添加到一个 List 集合中,以便于后续处理。此外,系统还会创建一个信息对象,用于保存这些消息的相关信息,以确保在需要时可以方便地访问和管理它们。
是否有函数回调:如果有,则设置一下具体的函数。(下一章节细讲)
生成聊天提示:创建一个提示new Prompt()对象并调用聊天模型api获取返回信息。
返回增强:如果当前请求对象配置了 advisor,那么将会调用相应的增强方法。此外,系统会自动将对应的问答内容存储到信息列表中,因此相应的信息也需要被一并记录下来。
public ChatResponse adviseResponse(ChatResponse chatResponse, Map<String, Object> context) {

    List<Message> assistantMessages = chatResponse.getResults().stream().map(g -> (Message) g.getOutput()).toList();

    this.getChatMemoryStore().add(this.doGetConversationId(context), assistantMessages);

    return chatResponse;
}
返回结果:返回最终的聊天响应。
源码解析——请求OpenAI
接下来,我们将详细探讨如何通过请求对象来调用 OpenAI 接口的具体过程。为此,我们将以 OpenAI 的源码为基础进行分析。如果您使用的是其他 AI 产品,那么在这一环节的流程将会有所不同,系统会根据具体的产品进行相应的跳转。如图所示:
 图片
图片
我们将对 OpenAI 的请求调用过程进行全面的解析,以深入理解其背后的机制和实现细节:
public ChatResponse call(Prompt prompt) {

    ChatCompletionRequest request = createRequest(prompt, false);

    ChatModelObservationContext observationContext = ChatModelObservationContext.builder()
        .prompt(prompt)
        .provider(OpenAiApiConstants.PROVIDER_NAME)
        .requestOptions(buildRequestOptions(request))
        .build();

    ChatResponse response = ChatModelObservationDocumentation.CHAT_MODEL_OPERATION
        .observation(this.observationConvention, DEFAULT_OBSERVATION_CONVENTION, () -> observationContext,
                this.observationRegistry)
        .observe(() -> {

            ResponseEntity<ChatCompletion> completionEntity = this.retryTemplate
                .execute(ctx -> this.openAiApi.chatCompletionEntity(request, getAdditionalHttpHeaders(prompt)));

            var chatCompletion = completionEntity.getBody();

            if (chatCompletion == null) {
                logger.warn("No chat completion returned for prompt: {}", prompt);
                return new ChatResponse(List.of());
            }

            List<Choice> choices = chatCompletion.choices();
            if (choices == null) {
                logger.warn("No choices returned for prompt: {}", prompt);
                return new ChatResponse(List.of());
            }

            List<Generation> generations = choices.stream().map(choice -> {
        // @formatter:off
                Map<String, Object> metadata = Map.of(
                        "id", chatCompletion.id() != null ? chatCompletion.id() : "",
                        "role", choice.message().role() != null ? choice.message().role().name() : "",
                        "index", choice.index(),
                        "finishReason", choice.finishReason() != null ? choice.finishReason().name() : "",
                        "refusal", StringUtils.hasText(choice.message().refusal()) ? choice.message().refusal() : "");
                // @formatter:on
                return buildGeneration(choice, metadata);
            }).toList();

            // Non function calling.
            RateLimit rateLimit = OpenAiResponseHeaderExtractor.extractAiResponseHeaders(completionEntity);

            ChatResponse chatResponse = new ChatResponse(generations, from(completionEntity.getBody(), rateLimit));

            observationContext.setResponse(chatResponse);

            return chatResponse;

        });

    if (response != null && isToolCall(response, Set.of(OpenAiApi.ChatCompletionFinishReason.TOOL_CALLS.name(),
            OpenAiApi.ChatCompletionFinishReason.STOP.name()))) {
        var toolCallConversation = handleToolCalls(prompt, response);
        // Recursively call the call method with the tool call message
        // conversation that contains the call responses.
        return this.call(new Prompt(toolCallConversation, prompt.getOptions()));
    }

    return response;
}
虽然这些内容都很有价值,删减并不是一个好的选择,但由于缺乏注释,我们可能需要仔细分析。让我们一起来看看这些信息,逐步理清其中的逻辑和要点。
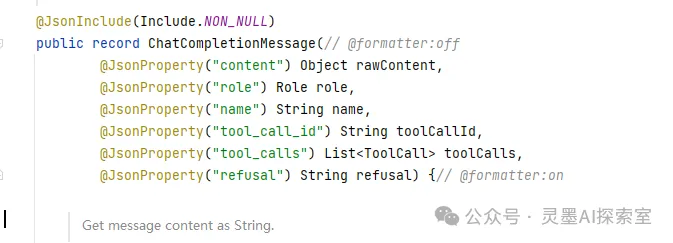
createRequest 函数的主要作用是构建在实际调用 API 时所需的请求对象。由于不同服务提供商的接口设计各有特点,因此我们需要根据具体的 API 规范自行实现这一过程。例如,在调用 OpenAI 的接口时,我们需要构建特定的参数结构,这一过程大家应该已经非常熟悉。如下图所示,我们可以看到构建请求时所需的各项参数及其格式。
 图片
图片
ChatModelObservationContext 主要用于配置与请求相关的其他限制和要求。这包括多个关键参数,例如本次请求的最大 token 数量限制、所使用的 OpenAI 问答模型的具体类型、以及请求的频率限制等。如代码所示:
private ChatOptions buildRequestOptions(OpenAiApi.ChatCompletionRequest request) {
    return ChatOptionsBuilder.builder()
        .withModel(request.model())
        .withFrequencyPenalty(request.frequencyPenalty())
        .withMaxTokens(request.maxTokens())
        .withPresencePenalty(request.presencePenalty())
        .withStopSequences(request.stop())
        .withTemperature(request.temperature())
        .withTopP(request.topP())
        .build();
}
剩下的 ChatResponse 大方法负责实际执行 API 请求并处理响应。在这一过程中,有几个关键细节值得注意。
请求对象使用的是 retryTemplate,这是一个具有重试机制的请求 API 工具。它的设计旨在增强请求的可靠性,特别是在面对暂时性故障或网络问题时,能够自动进行重试,从而提高成功率。更为灵活的是,retryTemplate 允许用户进行配置,以满足不同应用场景的需求。
用户可以根据实际需要调整重试次数、重试间隔时间以及其他相关参数,所有这些配置都可以通过 spring.ai.retry 这一前缀进行自定义设置。具体大家可以看这个类:
@AutoConfiguration
@ConditionalOnClass(RetryTemplate.class)
@EnableConfigurationProperties({ SpringAiRetryProperties.class })
public class SpringAiRetryAutoConfiguration {
  //此处省略一堆代码
}
接着,如果 OpenAI 的接口正常返回响应,那么系统将开始格式化回答。在这一过程中,涉及到多个关键字段,这些字段对于程序员们而言应该都是相当熟悉的,尤其是那些有过接口对接经验的开发者。
Map<String, Object> metadata = Map.of(
                            "id", chatCompletion.id() != null ? chatCompletion.id() : "",
                            "role", choice.message().role() != null ? choice.message().role().name() : "",
                            "index", choice.index(),
                            "finishReason", choice.finishReason() != null ? choice.finishReason().name() : "",
                            "refusal", StringUtils.hasText(choice.message().refusal()) ? choice.message().refusal() : "");
接着,在接收到所有返回参数后,系统将这些参数整合并返回给 response 对象。然而,在这一阶段,我们又进行了一个重要的判断,检查是否为 isToolCall。这个判断实际上涉及到函数回调的机制,这一部分的实现逻辑非常关键,但今天我们就不深入探讨这个细节,留待下次再进行讲解。
至此,整个调用流程已经圆满完成。我们的接口顺利而愉快地将处理后的信息返回给了调用端,确保了用户请求的高效响应。
总结
在这次探讨中,我们聚焦于Spring AI如何有效地发起请求并将响应信息传递给用户。这一过程不仅是开发者与AI交互的桥梁,更是优化用户体验的关键。通过明确的请求结构和响应机制,Spring AI能够灵活地处理各种用户输入,并根据上下文调整回答策略。
然后,我们深入分析了这一机制的核心,关注具体实现与业务逻辑。在此过程中,我们通过实例演示阻塞回答与带上下文记忆的回答如何在实际应用中发挥作用。这样的实操不仅能帮助我们更好地理解Spring AI的工作原理,也为将来深入探讨流式回答和函数回调埋下了伏笔。
理解这一过程的背后逻辑,将为我们在日常开发中应用Spring AI提供有力支持。随着技术的不断进步,开发者们面临的挑战也在日益增加,但通过这种清晰的请求与响应架构,我们可以更从容地应对复杂性,实现更加智能化的解决方案。


