为了防止验证系统被暴力破解,很多系统都增加了验证码效验,比较常见的就是图片二维码,业内比较安全的是短信验证码,当然还有一些拼图验证码,加入人工智能的二维码等等,我们今天的主题就是前后端分离的图片二维码登录方案。
未分离验证码登录方案
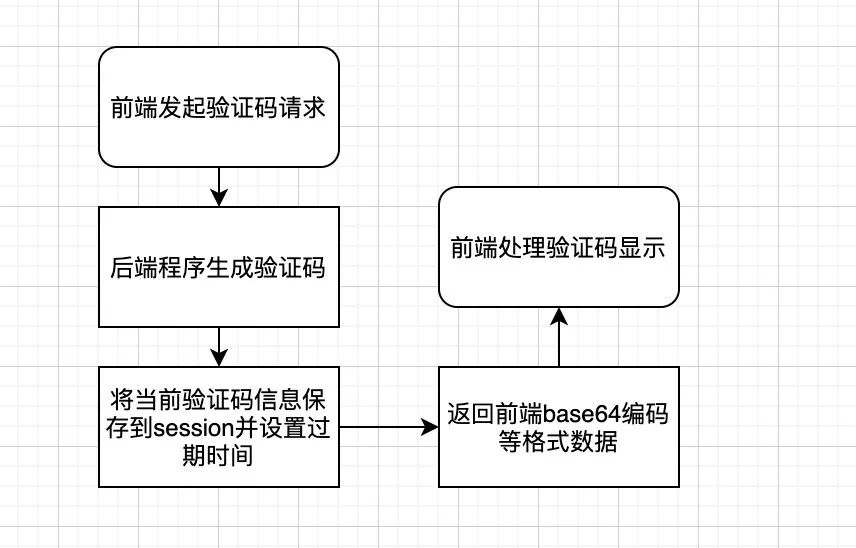
传统的项目大都是基于session交互的,前后端都在一个项目里面,比如传统的SSH项目或者一些JSP系统,当前端页面触发到获取验证码请求,可以将验证码里面的信息存在上下文中,所以登录的时候只需要 用户名、密码、验证码即可。
验证码生成流程如下:
 图片
图片
登录验证流程如下:
 图片
图片
可以发现,整个登录流程还是依赖session上下文的,并且由后端调整页面。
分离验证码登录方案
随着系统和业务的不停升级,前后端代码放在一起的项目越来越臃肿,已经无法快速迭代和职责区分了,于是纷纷投入了前后端分离的怀抱,发现代码和职责分离以后,开发效率越来越高了,功能迭代还越来越快,但是以前的验证码登录方案就要更改了。
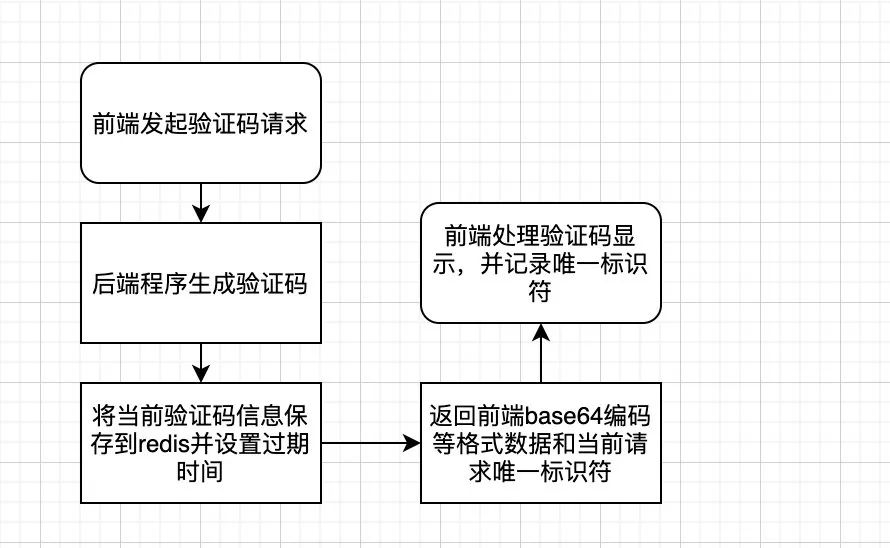
验证码生成流程如下:
 图片
图片
对比原来的方案,增加了redis中间件,不再是存在session里面了,但是后面怎么区分这个验证码是这个请求生成的呢?所以我们加入了唯一标识符来区分
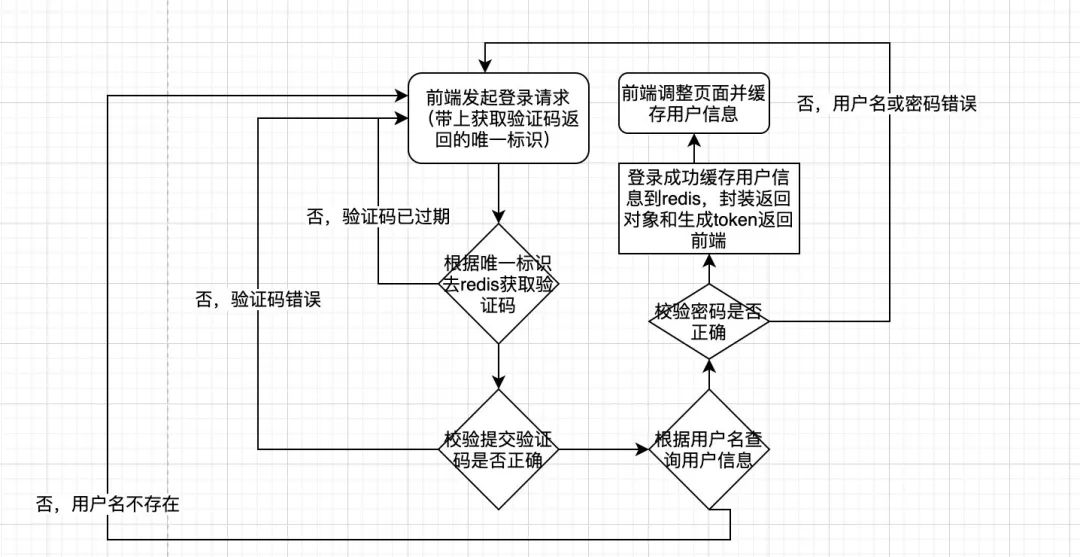
登录验证流程如下:
 图片
图片
可以发现,基于前后端分离的分布式项目登录方案对比原来,加了一个redis中间件和token返回,不再依赖上下文session,并且页面调整也是由后端换到了前端
动手撸轮子
基于验证码的轮子还是挺多的,本文就以Kaptcha这个项目为例,通过springboot项目集成Kaptcha来实现验证码生成和登录方案。
Kaptcha介绍
Kaptcha是一个基于SimpleCaptcha的验证码开源项目
我找的这个轮子是基于SimpleCaptcha二次封装的,maven依赖如下
<!--Kaptcha是一个基于SimpleCaptcha的验证码开源项目-->
<dependency>
  <groupId>com.github.penggle</groupId>
  <artifactId>kaptcha</artifactId>
  <version>2.3.2</version>
</dependency>
新建项目并加入依赖
依赖主要有 SpringBoot、Kaptcha、Redis
<?xml versinotallow="1.0" encoding="UTF-8"?>
<project xmlns="http://maven.apache.org/POM/4.0.0"
         xmlns:xsi="http://www.w3.org/2001/XMLSchema-instance"
         xsi:schemaLocation="http://maven.apache.org/POM/4.0.0 http://maven.apache.org/xsd/maven-4.0.0.xsd">
    <modelVersion>4.0.0</modelVersion>

    <groupId>com.lzp</groupId>
    <artifactId>kaptcha</artifactId>
    <version>1.0-SNAPSHOT</version>

    <parent>
        <groupId>org.springframework.boot</groupId>
        <artifactId>spring-boot-starter-parent</artifactId>
        <version>2.3.0.RELEASE</version>
        <relativePath/> <!-- lookup parent from repository -->
    </parent>

    <dependencies>
        <!--Kaptcha是一个基于SimpleCaptcha的验证码开源项目-->
        <dependency>
            <groupId>com.github.penggle</groupId>
            <artifactId>kaptcha</artifactId>
            <version>2.3.2</version>
        </dependency>

        <dependency>
            <groupId>org.springframework.boot</groupId>
            <artifactId>spring-boot-starter-web</artifactId>
        </dependency>


        <dependency>
            <groupId>org.springframework.boot</groupId>
            <artifactId>spring-boot-starter-data-redis</artifactId>
        </dependency>

        <!-- redis依赖commons-pool 这个依赖一定要添加 -->
        <dependency>
            <groupId>org.apache.commons</groupId>
            <artifactId>commons-pool2</artifactId>
        </dependency>

        <dependency>
            <groupId>com.alibaba</groupId>
            <artifactId>fastjson</artifactId>
            <version>1.2.3</version>
        </dependency>

        <dependency>
            <groupId>com.fasterxml.jackson.core</groupId>
            <artifactId>jackson-databind</artifactId>
        </dependency>

    </dependencies>


    <build>
        <plugins>
            <plugin>
                <groupId>org.springframework.boot</groupId>
                <artifactId>spring-boot-maven-plugin</artifactId>
            </plugin>
        </plugins>
    </build>

</project>
Redis配置类RedisConfig
@Configuration
public class RedisConfig {

    @Bean
    public RedisTemplate<String, Object> redisTemplate(LettuceConnectionFactory redisConnectionFactory){
        RedisTemplate<String, Object> redisTemplate = new RedisTemplate<String, Object>();
        redisTemplate.setKeySerializer(new StringRedisSerializer());
        redisTemplate.setValueSerializer(new GenericJackson2JsonRedisSerializer());
        redisTemplate.setHashKeySerializer(new StringRedisSerializer());
        redisTemplate.setHashValueSerializer(new GenericJackson2JsonRedisSerializer());
        redisTemplate.setConnectionFactory(redisConnectionFactory);
        return redisTemplate;
    }

}
验证码配置类KaptchaConfig
@Configuration
public class KaptchaConfig {
    @Bean
    public DefaultKaptcha producer(){

        DefaultKaptcha defaultKaptcha = new DefaultKaptcha();
        Properties properties = new Properties();
        properties.setProperty("kaptcha.border", "no");
        properties.setProperty("kaptcha.border.color", "105,179,90");
        properties.setProperty("kaptcha.textproducer.font.color", "black");
        properties.setProperty("kaptcha.image.width", "110");
        properties.setProperty("kaptcha.image.height", "40");
        properties.setProperty("kaptcha.textproducer.char.string","23456789abcdefghkmnpqrstuvwxyzABCDEFGHKMNPRSTUVWXYZ");
        properties.setProperty("kaptcha.textproducer.font.size", "30");
        properties.setProperty("kaptcha.textproducer.char.space","3");
        properties.setProperty("kaptcha.session.key", "code");
        properties.setProperty("kaptcha.textproducer.char.length", "4");
        properties.setProperty("kaptcha.textproducer.font.names", "宋体,楷体,微软雅黑");
//        properties.setProperty("kaptcha.obscurificator.impl","com.xxx");可以重写实现类
        properties.setProperty("kaptcha.noise.impl","com.google.code.kaptcha.impl.NoNoise");
        Config config = new Config(properties);
        defaultKaptcha.setConfig(config);

        return defaultKaptcha;
    }
验证码控制层CaptchaController
为了方便代码写一块了,讲究看:
import com.google.code.kaptcha.impl.DefaultKaptcha;
import com.lzp.kaptcha.service.CaptchaService;
import com.lzp.kaptcha.vo.CaptchaVO;
import org.springframework.beans.factory.annotation.Autowired;
import org.springframework.web.bind.annotation.GetMapping;
import org.springframework.web.bind.annotation.RequestMapping;
import org.springframework.web.bind.annotation.ResponseBody;
import org.springframework.web.bind.annotation.RestController;
import sun.misc.BASE64Encoder;

import javax.imageio.ImageIO;
import java.awt.image.BufferedImage;
import java.io.ByteArrayOutputStream;
import java.io.IOException;

@RestController
@RequestMapping("/captcha")
public class CaptchaController {

    @Autowired
    private DefaultKaptcha producer;

    @Autowired
    private CaptchaService captchaService;

    @ResponseBody
    @GetMapping("/get")
    public CaptchaVO getCaptcha() throws IOException {

        // 生成文字验证码
        String content = producer.createText();
        // 生成图片验证码
        ByteArrayOutputStream outputStream = null;
        BufferedImage image = producer.createImage(content);

        outputStream = new ByteArrayOutputStream();
        ImageIO.write(image, "jpg", outputStream);
        // 对字节数组Base64编码
        BASE64Encoder encoder = new BASE64Encoder();

        String str = "data:image/jpeg;base64,";
        String base64Img = str + encoder.encode(outputStream.toByteArray()).replace("\n", "").replace("\r", "");

        CaptchaVO captchaVO  =captchaService.cacheCaptcha(content);
        captchaVO.setBase64Img(base64Img);

        return  captchaVO;
    }

}
验证码返回对象CaptchaVO
public class CaptchaVO {
    /**
     * 验证码标识符
     */
    private String captchaKey;
    /**
     * 验证码过期时间
     */
    private Long expire;
    /**
     * base64字符串
     */
    private String base64Img;

    public String getCaptchaKey() {
        return captchaKey;
    }

    public void setCaptchaKey(String captchaKey) {
        this.captchaKey = captchaKey;
    }

    public Long getExpire() {
        return expire;
    }

    public void setExpire(Long expire) {
        this.expire = expire;
    }

    public String getBase64Img() {
        return base64Img;
    }

    public void setBase64Img(String base64Img) {
        this.base64Img = base64Img;
    }
}
Redis封装类 RedisUtils
网上随意找的,类里面注明来源,将就用,代码较多就不贴了。
验证码方法层CaptchaService
import com.lzp.kaptcha.utils.RedisUtils;
import com.lzp.kaptcha.vo.CaptchaVO;
import org.springframework.beans.factory.annotation.Autowired;
import org.springframework.beans.factory.annotation.Value;
import org.springframework.stereotype.Service;

import java.util.UUID;

@Service
public class CaptchaService {

    @Value("${server.session.timeout:300}")
    private Long timeout;

    @Autowired
    private RedisUtils redisUtils;


    private final String CAPTCHA_KEY = "captcha:verification:";

    public CaptchaVO cacheCaptcha(String captcha){
        //生成一个随机标识符
        String captchaKey = UUID.randomUUID().toString();

        //缓存验证码并设置过期时间
        redisUtils.set(CAPTCHA_KEY.concat(captchaKey),captcha,timeout);

        CaptchaVO captchaVO = new CaptchaVO();
        captchaVO.setCaptchaKey(captchaKey);
        captchaVO.setExpire(timeout);

        return captchaVO;
    }

}
用户登录对象封装LoginDTO
public class LoginDTO {

    private String userName;

    private String pwd;

    private String captchaKey;

    private String captcha;

    public String getUserName() {
        return userName;
    }

    public void setUserName(String userName) {
        this.userName = userName;
    }

    public String getPwd() {
        return pwd;
    }

    public void setPwd(String pwd) {
        this.pwd = pwd;
    }

    public String getCaptchaKey() {
        return captchaKey;
    }

    public void setCaptchaKey(String captchaKey) {
        this.captchaKey = captchaKey;
    }

    public String getCaptcha() {
        return captcha;
    }

    public void setCaptcha(String captcha) {
        this.captcha = captcha;
    }
}
登录控制层UserController
这块我写逻辑代码了,相信大家都看的懂。
import com.lzp.kaptcha.dto.LoginDTO;
import com.lzp.kaptcha.utils.RedisUtils;
import com.lzp.kaptcha.vo.UserVO;
import org.springframework.beans.factory.annotation.Autowired;
import org.springframework.web.bind.annotation.PostMapping;
import org.springframework.web.bind.annotation.RequestBody;
import org.springframework.web.bind.annotation.RequestMapping;
import org.springframework.web.bind.annotation.RestController;

@RestController
@RequestMapping("/user")
public class UserController {

    @Autowired
    private RedisUtils redisUtils;

    @PostMapping("/login")
    public UserVO login(@RequestBody LoginDTO loginDTO)  {
        Object captch = redisUtils.get(loginDTO.getCaptchaKey());
        if(captch == null){
            // throw 验证码已过期
        }
        if(!loginDTO.getCaptcha().equals(captch)){
            // throw 验证码错误
        }
        // 查询用户信息

        //判断用户是否存在 不存在抛出用户名密码错误

        //判断密码是否正确,不正确抛出用户名密码错误

        //构造返回到前端的用户对象并封装信息和生成token

        return new UserVO();
    }
}
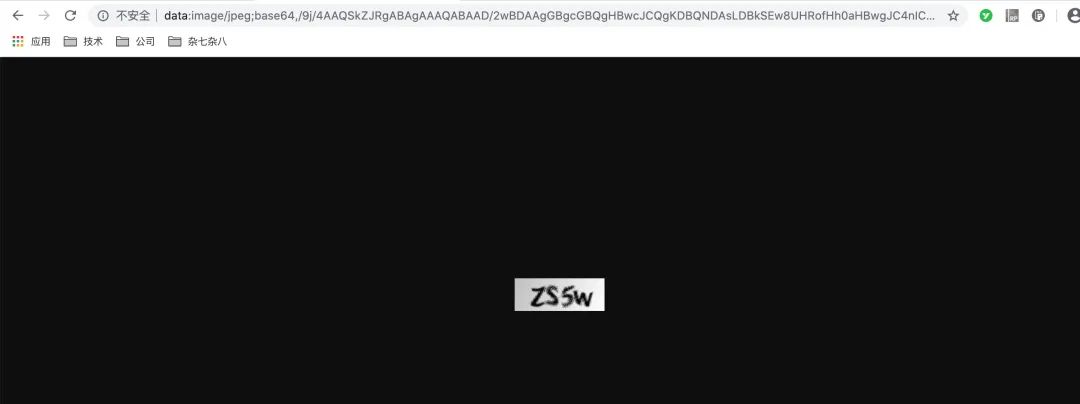
验证码获取和查看
 图片
图片


