译者 | 布加迪
审校 | 重楼
深度学习大大提高了医疗图像分割的准确度和效率,本文将探讨常用技术及其应用。
采用深度学习技术已经使医疗成像发生了革命性的变化。使用机器学习的这一分支开创了医疗图像分割精度和高效的新时代,而医疗图像分割是现代医疗保健诊断和治疗计划的一个核心分析过程。通过利用神经网络,深度学习算法能够以前所未有的精度检测医疗图像中的异常。
这项技术突破有助于重塑我们对待医疗图像分析的范式。从改善早期疾病检测到促进个性化治疗策略,医疗图像分割中的深度学习正在为更有针对性、更有效的患者护理铺平道路。我们在本文中将深入研究深度学习为医疗图像分割领域带来的变革性方法,探索这些先进的算法如何推动医疗成像发展、乃至推动医疗领域本身发展。
医疗图像分割简介
医疗图像分割指将图像分割成不同的区域。每个区域代表一个特定的结构或特征,比如器官或肿瘤。这个过程对于解读和分析医疗图像很重要。它可以帮助医生更准确地诊断疾病。分割有助于规划治疗和跟踪病人的病情变化。
用于图像分割的常见深度学习架构
不妨先看看将深度学习用于图像分割的几种常见架构:
1.U-Net
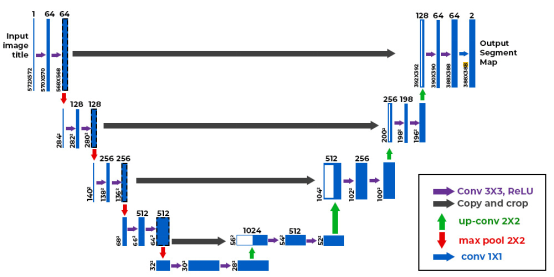
U-Net有一个U形,有用于上下文的编码器和用于精确定位的解码器。U-Net中的跳过连接保留了编码器层和解码器层的重要细节。U-Net有助于在MRI和CT扫描图中分割器官、脑肿瘤、肺结节及其他关键结构。
2.全卷积网络(FCN)
FCN在整个网络中使用卷积层,而不是使用完全连接的层。这使模型能够生成密集的分割图。FCN借助上采样技术保持输入图像的空间维度。它们有助于对每个像素单独进行分类。比如说,它们有助于在MRI扫描图中发现脑肿瘤,并在CT图像中显示肝脏的位置。
3.SegNet
SegNet兼顾了性能和计算效率。其编码器-解码器设计先减小图像尺寸,然后再将其放大以创建详细的分割图。SegNet在编码期间存储最大池索引,并在解码期间重用它们以提高准确性。它被用于分割视网膜血管、X光下的肺叶及效率很重要的其他结构。
4.DeepLab
DeepLab在保持空间分辨率的同时,使用空洞卷积来扩展接受域。ASPP模块捕获不同尺度的特征。这有助于模型处理分辨率各异的图像。DeepLab用于处理发现MRI扫描图中的脑肿瘤、肝脏病变和心脏细节等任务。
示例:U-Net肺肿瘤分割
现在不妨看一个使用U-Net模型逐步分割肺肿瘤的例子。
1.挂载Google Drive
首先我们将挂载Google Drive,以访问存储在其中的文件。
from google.colab import drive
drive.mount('/content/drive')
2.定义文件夹路径
现在我们为Google Drive中含有图像和标签的文件夹设置路径。
# Define paths to the folders in Google Drive
image_folder_path = '/content/drive/My Drive/Dataset/Lung dataset'
label_folder_path = '/content/drive/My Drive/Dataset/Ground truth'
3.收集PNG文件
接下来,定义一个函数来收集和排序指定文件夹中的所有PNG文件路径。
# Function to collect PNG images from a folder
def collect_png_from_folder(folder_path):
png_files = []
for root, _, files in os.walk(folder_path):
for file in files:
if file.endswith(".png"):
png_files.append(os.path.join(root, file))
return sorted(png_files)
4.加载和预处理数据集
接下来我们将定义一个函数,从各自的文件夹中加载和预处理图像和标签。该函数确保图像和标签正确匹配并调整大小。
# Function to load images and labels directly
def load_images_and_labels(image_folder_path, label_folder_path, target_size=(256, 256), filter_size=3):
# Collect file paths
image_files = collect_png_from_folder(image_folder_path)
label_files = collect_png_from_folder(label_folder_path)
# Ensure images and labels are sorted and match in number
if len(image_files) != len(label_files):
raise ValueError("Number of images and labels do not match.")
# Load images
def load_image(image_path):
image = cv2.imread(image_path, cv2.IMREAD_GRAYSCALE)
if image is None:
raise ValueError(f"Unable to load image: {image_path}")
image = cv2.resize(image, target_size)
image = cv2.medianBlur(image, filter_size)
return image.astype('float32') / 255.0
# Load labels
def load_label(label_path):
label = cv2.imread(label_path, cv2.IMREAD_COLOR)
if label is None:
raise ValueError(f"Unable to load label image: {label_path}")
return cv2.resize(label, target_size)
images = np.array([load_image(path) for path in image_files])
labels = np.array([load_label(path) for path in label_files])
return images, labels
5.显示图像和标签
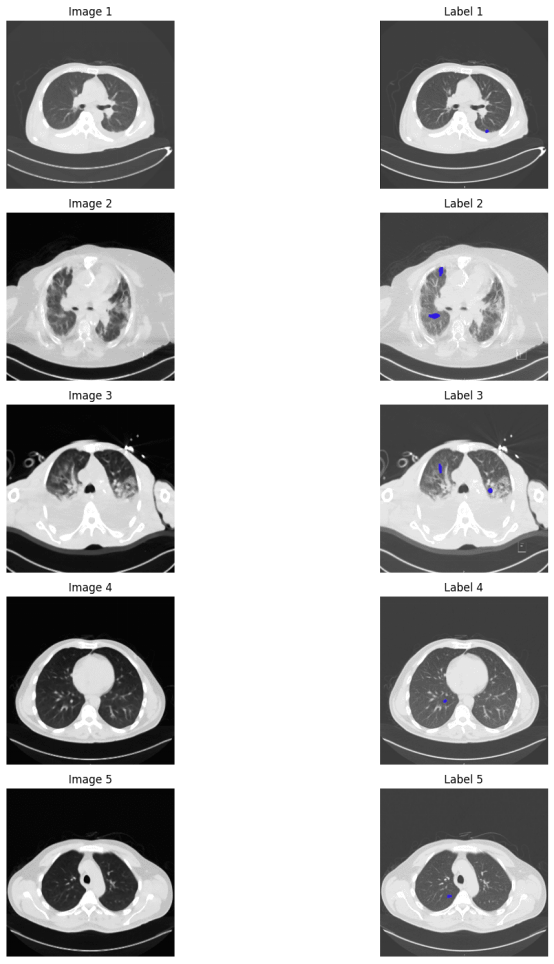
现在我们将定义一个函数,并排显示指定数量的图像及其相应的标签。使用前面定义的函数来加载图像和标签,然后显示几个示例以进行可视化。蓝色点代表肿瘤标记。
# Function to display images and labels
def display_images_and_labels(images, labels, num_samples=5):
num_samples = min(num_samples, len(images))
plt.figure(figsize=(15, 3 * num_samples))
for i in range(num_samples):
plt.subplot(num_samples, 2, 2 * i + 1)
plt.title(f'Image {i + 1}')
plt.imshow(images[i], cmap='gray')
plt.axis('off')
plt.subplot(num_samples, 2, 2 * i + 2)
plt.title(f'Label {i + 1}')
plt.imshow(labels[i])
plt.axis('off')
plt.tight_layout()
plt.show()
# Load images and labels
images, labels = load_images_and_labels(image_folder_path, label_folder_path)
# Display a few samples
display_images_and_labels(images, labels, num_samples=5)
6.定义U-Net模型
现在是时候定义U-Net模型了。U-Net架构使用Adam优化器。它采用分类交叉熵作为损耗函数。准确度被用作评估指标。
# Define the U-Net model
def unet_model(input_size=(256, 256, 1), num_classes=3):
inputs = Input(input_size)
# Encoder (Downsampling Path)
c1 = Conv2D(64, (3, 3), activation='relu', kernel_initializer='he_normal', padding='same')(inputs)
c1 = Dropout(0.1)(c1)
c1 = Conv2D(64, (3, 3), activation='relu', kernel_initializer='he_normal', padding='same')(c1)
p1 = MaxPooling2D((2, 2))(c1)
c2 = Conv2D(128, (3, 3), activation='relu', kernel_initializer='he_normal', padding='same')(p1)
c2 = Dropout(0.1)(c2)
c2 = Conv2D(128, (3, 3), activation='relu', kernel_initializer='he_normal', padding='same')(c2)
p2 = MaxPooling2D((2, 2))(c2)
c3 = Conv2D(256, (3, 3), activation='relu', kernel_initializer='he_normal', padding='same')(p2)
c3 = Dropout(0.2)(c3)
c3 = Conv2D(256, (3, 3), activation='relu', kernel_initializer='he_normal', padding='same')(c3)
p3 = MaxPooling2D((2, 2))(c3)
c4 = Conv2D(512, (3, 3), activation='relu', kernel_initializer='he_normal', padding='same')(p3)
c4 = Dropout(0.2)(c4)
c4 = Conv2D(512, (3, 3), activation='relu', kernel_initializer='he_normal', padding='same')(c4)
p4 = MaxPooling2D(pool_size=(2, 2))(c4)
# Bottleneck
c5 = Conv2D(1024, (3, 3), activation='relu', kernel_initializer='he_normal', padding='same')(p4)
c5 = Dropout(0.3)(c5)
c5 = Conv2D(1024, (3, 3), activation='relu', kernel_initializer='he_normal', padding='same')(c5)
# Decoder (Upsampling Path)
u6 = Conv2DTranspose(512, (2, 2), strides=(2, 2), padding='same')(c5)
u6 = concatenate([u6, c4])
c6 = Conv2D(512, (3, 3), activation='relu', kernel_initializer='he_normal', padding='same')(u6)
c6 = Dropout(0.2)(c6)
c6 = Conv2D(512, (3, 3), activation='relu', kernel_initializer='he_normal', padding='same')(c6)
u7 = Conv2DTranspose(256, (2, 2), strides=(2, 2), padding='same')(c6)
u7 = concatenate([u7, c3])
c7 = Conv2D(256, (3, 3), activation='relu', kernel_initializer='he_normal', padding='same')(u7)
c7 = Dropout(0.2)(c7)
c7 = Conv2D(256, (3, 3), activation='relu', kernel_initializer='he_normal', padding='same')(c7)
u8 = Conv2DTranspose(128, (2, 2), strides=(2, 2), padding='same')(c7)
u8 = concatenate([u8, c2])
c8 = Conv2D(128, (3, 3), activation='relu', kernel_initializer='he_normal', padding='same')(u8)
c8 = Dropout(0.1)(c8)
c8 = Conv2D(128, (3, 3), activation='relu', kernel_initializer='he_normal', padding='same')(c8)
u9 = Conv2DTranspose(64, (2, 2), strides=(2, 2), padding='same')(c8)
u9 = concatenate([u9, c1], axis=3)
c9 = Conv2D(64, (3, 3), activation='relu', kernel_initializer='he_normal', padding='same')(u9)
c9 = Dropout(0.1)(c9)
c9 = Conv2D(64, (3, 3), activation='relu', kernel_initializer='he_normal', padding='same')(c9)
# Output layer
outputs = Conv2D(num_classes, (1, 1), activation='softmax')(c9)
model = Model(inputs=[inputs], outputs=[outputs])
# Compile the model
model.compile(optimizer='adam',
loss='categorical_crossentropy',
metrics=['accuracy'])
return model
7.训练U-Net模型
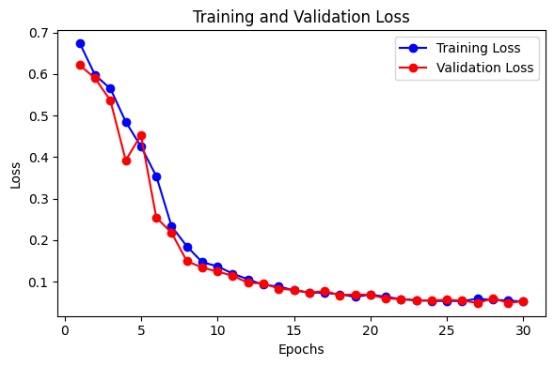
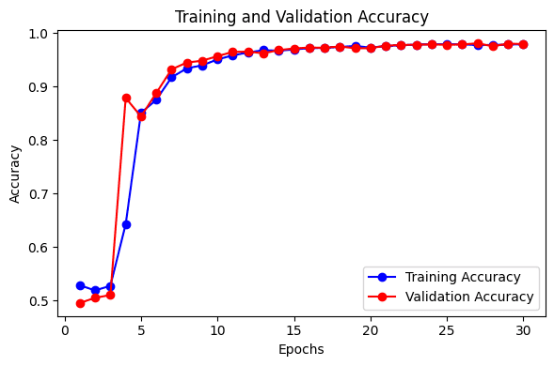
这里我们将训练U-Net模型,并将其保存到一个文件中。训练和验证在轮次期间的准确性和损失被绘制成图,以直观显示模型的性能。该模型可用于对新数据进行测试。
from sklearn.model_selection import train_test_split
# Split the data into training, validation, test sets
X_train, X_temp, y_train, y_temp = train_test_split(X, Y, test_size=0.4, random_state=42)
X_val, X_test, y_val, y_test = train_test_split(X_temp, y_temp, test_size=0.5, random_state=42)
# Define EarlyStopping callback
early_stopping = EarlyStopping(monitor='val_loss', patience=3, restore_best_weights=True)
# Train the model with EarlyStopping
history = model.fit(X_train, y_train,
epochs=50,
batch_size=16,
validation_data=(X_val, y_val),
callbacks=[early_stopping])
# Save the model
model.save('/content/unet_real_data.h5')
# Function to Plot Accuracy
def plot_accuracy(history):
epochs = range(1, len(history.history['accuracy']) + 1)
# Plot Training and Validation Accuracy
plt.figure(figsize=(6, 4))
plt.plot(epochs, history.history['accuracy'], 'bo-', label='Training Accuracy')
plt.plot(epochs, history.history['val_accuracy'], 'ro-', label='Validation Accuracy')
plt.title('Training and Validation Accuracy')
plt.xlabel('Epochs')
plt.ylabel('Accuracy')
plt.legend()
plt.tight_layout()
plt.show()
# Function to Plot Loss
def plot_loss(history):
epochs = range(1, len(history.history['loss']) + 1)
# Plot Training and Validation Loss
plt.figure(figsize=(6, 4))
plt.plot(epochs, history.history['loss'], 'bo-', label='Training Loss')
plt.plot(epochs, history.history['val_loss'], 'ro-', label='Validation Loss')
plt.title('Training and Validation Loss')
plt.xlabel('Epochs')
plt.ylabel('Loss')
plt.legend()
plt.tight_layout()
plt.show()
# Call the functions to plot accuracy and loss
plot_accuracy(history)
plot_loss(history)
医疗图像分割中深度学习的优点
深度学习在医疗分割中的优点有很多。以下是其中几个重要的优点:
提高准确性:深度学习模型非常擅长准确地分割医疗图像。它们可以发现并描绘使用旧方法可能遗漏的细小的或棘手的细节。
效率和速度:这种模型可以快速处理和分析许多图像。它们使分割过程更快,减少了对人力工作的需求。
处理复杂数据:深度学习模型可以处理来自CT或MRI扫描图的复杂3D图像。它们可以处理不同类型的图像,并适应各种成像技术。
医疗图像分割中深度学习的挑战
正如有优点一样,我们也必须牢记使用这项技术面临的挑战。
有限的数据:始终没有足够的已标记医疗图像来训练深度学习模型。创建这些标签很耗时,需要熟练的专家。这使得获得足够的数据用于训练变得困难。
隐私问题:医疗图像含有敏感的患者信息,因此要有严格的规定来保护这些数据的私密性。这意味着可能没有那么多的数据用于研究和训练。
可解释性:深度学习模型可能很难理解,因此很难信任和验证它们的结果。
结语
综上所述,深度学习使医疗图像分割变得更好。卷积神经网络和Transformers等方法改进了我们分析图像的方式,从而带来了更准确的诊断和更好的病人护理。
原文标题:Deep Learning Approaches in Medical Image Segmentation,作者:Jayita Gulati