轻松掌握!Spring Boot 集成 Resilience4j 实现断路器的全流程实战

开发 前端
断路器模式 是微服务架构中确保系统健壮性的重要模式之一。它能够避免由于某个依赖服务的故障导致系统的整体崩溃。通过 Resilience4j,我们可以方便地在 Spring Boot 应用中集成断路器功能,并通过配置灵活地调整其行为。

在现代分布式系统架构中,服务之间的通信非常频繁,尤其是微服务架构下,每个微服务都会依赖其他服务的响应。虽然这种架构能够有效地提高系统的扩展性和灵活性,但也带来了一些问题,比如网络延迟、依赖的服务不可用、超时等。为了避免整个系统因为某个服务不可用而崩溃,我们可以使用 断路器模式 来防止这种“雪崩效应”的发生。

断路器模式(Circuit Breaker Pattern)作为一种保护机制,可以帮助我们监控和控制外部服务的调用。在服务出现故障时,断路器可以快速响应并阻止后续调用,从而避免不必要的等待和资源消耗。本文将结合代码示例,讲解如何在 Spring Boot 项目中使用 Resilience4j 实现断路器,并展示如何在前后端代码中进行交互,前端部分使用 Thymeleaf 模板引擎,结合 jQuery 和 Bootstrap 实现。

断路器模式简介

断路器模式 是应对外部服务故障的一种保护机制。它的核心思想是,当某个外部服务调用频繁失败时,不再继续尝试调用该服务,而是直接返回一个预设的结果或执行一个备用逻辑(即回退方法)。断路器模式通常包含以下三种状态:

  1. 关闭状态 (Closed):当服务正常工作时,断路器处于关闭状态,所有请求都会直接通过并调用目标服务。
  2. 打开状态 (Open):当检测到服务连续多次失败,断路器会进入打开状态,此时所有请求都会被快速失败,直接触发回退方法。
  3. 半开状态 (Half-Open):经过一段时间后,断路器会自动尝试允许少量请求通过,如果这些请求成功,断路器会回到关闭状态;否则,继续保持打开状态。

这种机制能够有效防止系统因为某个服务的不可用而产生的资源浪费和响应延迟。

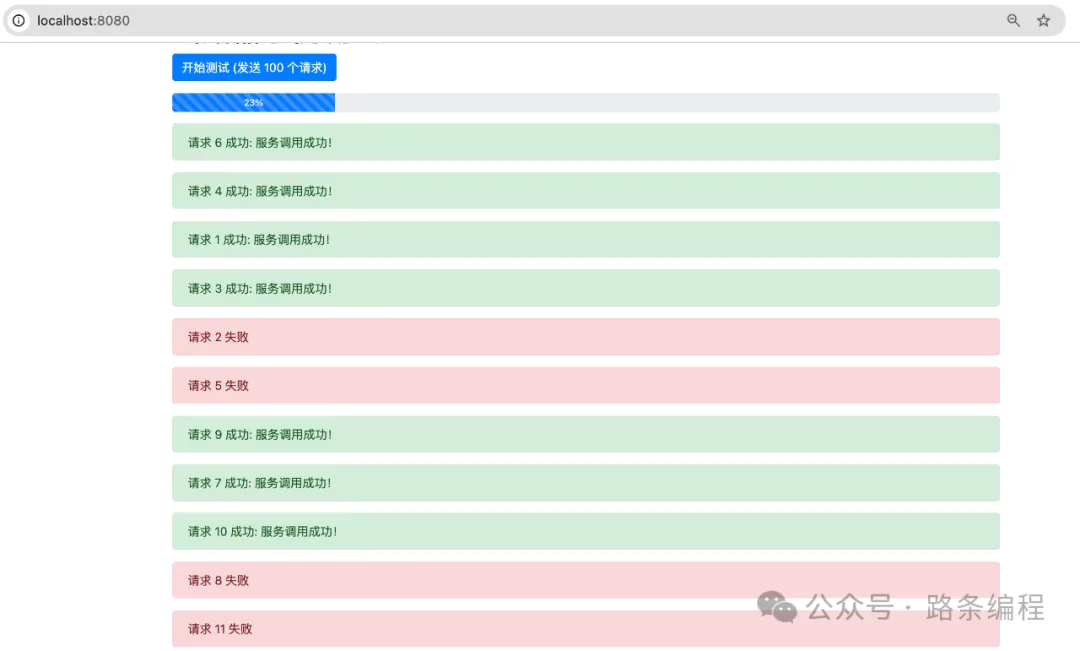
运行效果:
图片图片

若想获取项目完整代码以及其他文章的项目源码,且在代码编写时遇到问题需要咨询交流,欢迎加入下方的知识星球。

引入依赖 (pom.xml)

首先,我们需要在 pom.xml 文件中引入相关的依赖。这里包括 Spring Boot、Resilience4j、Lombok 以及用于模板渲染的 Thymeleaf 依赖。

<?xml versinotallow="1.0" encoding="UTF-8"?>
<project xmlns="http://maven.apache.org/POM/4.0.0" xmlns:xsi="http://www.w3.org/2001/XMLSchema-instance"
	xsi:schemaLocation="http://maven.apache.org/POM/4.0.0 https://maven.apache.org/xsd/maven-4.0.0.xsd">
	<modelVersion>4.0.0</modelVersion>
	<parent>
		<groupId>org.springframework.boot</groupId>
		<artifactId>spring-boot-starter-parent</artifactId>
		<version>3.3.3</version>
		<relativePath/> <!-- lookup parent from repository -->
	</parent>
	<groupId>com.icoderoad</groupId>
	<artifactId>circuit-breaker</artifactId>
	<version>0.0.1-SNAPSHOT</version>
	<name>circuit-breaker</name>
	<description>Demo project for Spring Boot</description>
	
	<properties>
		<java.version>17</java.version>
	</properties>
	<dependencies>
		<!-- Spring Boot Starter Web -->
	    <dependency>
	        <groupId>org.springframework.boot</groupId>
	        <artifactId>spring-boot-starter-web</artifactId>
	    </dependency>
	
	    <!-- Resilience4j 断路器 -->
	    <dependency>
		    <groupId>io.github.resilience4j</groupId>
		    <artifactId>resilience4j-spring-boot3</artifactId>
		    <version>2.2.0</version>
		</dependency>
	
	    <!-- Lombok -->
	    <dependency>
	        <groupId>org.projectlombok</groupId>
	        <artifactId>lombok</artifactId>
	        <scope>provided</scope>
	    </dependency>
	
	    <!-- Thymeleaf 模板引擎 -->
	    <dependency>
	        <groupId>org.springframework.boot</groupId>
	        <artifactId>spring-boot-starter-thymeleaf</artifactId>
	    </dependency>

		<dependency>
			<groupId>org.springframework.boot</groupId>
			<artifactId>spring-boot-starter-test</artifactId>
			<scope>test</scope>
		</dependency>
	</dependencies>

	<build>
		<plugins>
			<plugin>
				<groupId>org.springframework.boot</groupId>
				<artifactId>spring-boot-maven-plugin</artifactId>
			</plugin>
		</plugins>
	</build>

</project>

配置文件 (application.yml)

接下来,我们需要在 application.yml 中为 Resilience4j 断路器配置相关参数。这些参数用于定义断路器的行为,包括滑动窗口的大小、失败率阈值、断路器打开状态的等待时间等。

resilience4j:
  circuitbreaker:
    configs:
      default:
        slidingWindowSize: 10 # 增大滑动窗口以计算多个请求的失败率
        failureRateThreshold: 50 # 设置更高的失败率阈值,例如 50%
        waitDurationInOpenState: 10000 # 打开状态持续时间 10 秒
        permittedNumberOfCallsInHalfOpenState: 3 # 半开状态下允许通过的请求数量
        minimumNumberOfCalls: 5 # 最少需要 5 个请求才能计算失败率
        automaticTransitionFromOpenToHalfOpenEnabled: true
    instances:
      myService:
        baseConfig: default
        
  timeout:
    default:
      timeoutDuration: 2s # 设置超时时间为 2 秒

timeoutDuration:请求超过 2 秒没有返回时会触发超时异常。

failureRateThreshold:将失败率设置为 50%,这样只要一半的请求失败,断路器就会打开。

minimumNumberOfCalls:设置为 5,以确保在少量请求中也能计算失败率

读取配置类 (@ConfigurationProperties)

我们可以使用 @ConfigurationProperties 注解来读取配置文件中的断路器相关配置,并通过 Lombok 自动生成类的 getter 和 setter 方法。

package com.icoderoad.circuit.breaker.config;

import org.springframework.boot.context.properties.ConfigurationProperties;
import org.springframework.stereotype.Component;

import lombok.Data;

@Data
@Component
@ConfigurationProperties(prefix = "resilience4j.circuitbreaker")
public class CircuitBreakerProperties {
	
    private CircuitBreakerConfig configs;
    
    private CircuitBreakerInstance instances;

}

package com.icoderoad.circuit.breaker.config;

import lombok.Data;

@Data
class CircuitBreakerConfig {
    private DefaultConfig defaultConfig;
}

package com.icoderoad.circuit.breaker.config;

import lombok.Data;

@Data
class DefaultConfig {
    private int slidingWindowSize;
    private int failureRateThreshold;
    private int waitDurationInOpenState;
}

package com.icoderoad.circuit.breaker.config;

import lombok.Data;

@Data
class CircuitBreakerInstance {
    private MyServiceConfig myService;
}


package com.icoderoad.circuit.breaker.config;

import lombok.Data;

@Data
class MyServiceConfig {
    private String baseConfig;
}

实体类

假设我们有一个简单的 User 实体类,Lombok 可以帮助我们简化代码:

package com.icoderoad.circuit.breaker.entity;

import lombok.Data;

@Data
public class User {
    private Long id;
    private String name;
    private String email;
}

配置类

在你的配置类或主应用类中,添加一个方法,使用 @Bean 注解来定义 RestTemplate。

package com.icoderoad.circuit.breaker.config;

import org.springframework.context.annotation.Bean;
import org.springframework.context.annotation.Configuration;
import org.springframework.web.client.RestTemplate;

@Configuration
public class AppConfig {

    @Bean
    public RestTemplate restTemplate() {
        return new RestTemplate();
    }
}

断路器业务逻辑实现

接下来,在服务层中,我们通过 RestTemplate 调用外部服务,并为该方法应用断路器。为了模拟外部调用,我们将把外部服务调用更改为服务内部的调用(例如 /api/internalService),来模拟服务依赖。

package com.icoderoad.circuit.breaker.service;

import io.github.resilience4j.circuitbreaker.annotation.CircuitBreaker;
import org.springframework.stereotype.Service;
import org.springframework.web.client.RestTemplate;

@Service
public class MyService {

    private final RestTemplate restTemplate;

    public MyService(RestTemplate restTemplate) {
        this.restTemplate = restTemplate;
    }

    @CircuitBreaker(name = "myService", fallbackMethod = "fallback")
    public String callInternalService() {
        // 模拟服务内调用
        return restTemplate.getForObject("http://localhost:8080/api/internalService", String.class);
    }

    // 回退方法,当断路器触发时执行
    public String fallback(Throwable t) {
        return "内部服务不可用,请稍后再试。";
    }
}

控制器

我们创建一个控制器来处理前端发来的请求,并调用服务层的 callInternalService 方法。

package com.icoderoad.circuit.breaker.controller;

import org.springframework.web.bind.annotation.GetMapping;
import org.springframework.web.bind.annotation.RestController;

import com.icoderoad.circuit.breaker.service.MyService;

@RestController
public class CircuitBreakerController {

    private final MyService myService;

    public CircuitBreakerController(MyService myService) {
        this.myService = myService;
    }

    @GetMapping("/api/call")
    public String callService() {
        return myService.callInternalService();
    }
}

另外,为了模拟外部调用服务的内部服务接口,我们可以简单创建一个模拟的内部服务端点。

package com.icoderoad.circuit.breaker.controller;

import org.springframework.web.bind.annotation.GetMapping;
import org.springframework.web.bind.annotation.RestController;

@RestController
public class InternalServiceController {

    @GetMapping("/api/internalService")
    public String internalService() {
    	try {
            // 模拟服务延迟5秒,超过Resilience4j设置的2秒超时
            Thread.sleep(5000);
        } catch (InterruptedException e) {
            e.printStackTrace();
            return "服务调用失败!";
        }
        // 模拟随机失败
        if (Math.random() > 0.5) {
            throw new RuntimeException("模拟服务异常");
        }
        return "服务调用成功!";
    }
}

在这个例子中,我们使用 RestTemplate 发起对本地服务的调用,模拟服务依赖。当请求失败时,

断路器会进入打开状态,随后的请求将直接调用 fallback 方法,返回一个预定义的消息以避免等待。

前端实现 (Thymeleaf + jQuery + Bootstrap)

前端部分将使用 Thymeleaf 作为模板引擎,结合 jQuery 和 Bootstrap 实现一个简单的界面,用户可以通过点击按钮来触发服务调用,并显示结果。

在 src/main/resources/templates 目录下创建 index.html 文件:

<!DOCTYPE html>
<html lang="en" xmlns:th="http://www.thymeleaf.org">
<head>
    <meta charset="UTF-8">
    <title>Resilience4j 断路器示例</title>
    <link rel="stylesheet" href="https://cdn.jsdelivr.net/npm/bootstrap@4.5.2/dist/css/bootstrap.min.css">
    <script src="https://code.jquery.com/jquery-3.5.1.min.js"></script>
</head>
<body>
    <div class="container">
        <h1>断路器示例</h1>
        <button id="callService" class="btn btn-primary">调用服务</button>
        <div id="response" class="mt-3"></div>
    </div>

    <script>
        $('#callService').click(function () {
            $.ajax({
                url: '/api/call',
                type: 'GET',
                success: function (data) {
                    $('#response').text(data);
                },
                error: function () {
                    $('#response').text('服务调用失败!');
                }
            });
        });
    </script>
</body>
</html>

在这个前端页面中,当用户点击按钮时,将通过 jQuery 发起一个 AJAX 请求,并显示服务的响应结果。

断路器的运行机制及测试

启动应用后,访问页面 http://localhost:8080并点击“调用服务”按钮,系统会尝试调用 /api/internalService。在正常情况下,页面会显示“服务调用成功!”的响应。但如果在短时间内多次触发失败(可以手动引入错误或抛出异常),断路器会打开,此时调用会返回回退方法的结果 “内部服务不可用,请稍后再试。”

通过观察,可以看到断路器的几种状态变化:

  1. 在正常工作时,服务调用正常。
  2. 当连续失败达到阈值时,断路器打开,直接返回回退方法的结果。
  3. 一段时间后,断路器进入半开状态,允许部分请求通过,如果恢复正常则关闭断路器。

结论

断路器模式 是微服务架构中确保系统健壮性的重要模式之一。它能够避免由于某个依赖服务的故障导致系统的整体崩溃。通过 Resilience4j,我们可以方便地在 Spring Boot 应用中集成断路器功能,并通过配置灵活地调整其行为。

本文详细讲解了如何通过 Spring Boot 与 Resilience4j 实现断路器模式,并结合 Thymeleaf 前端模板与 jQuery 的异步请求展示了一个完整的前后端交互流程。在实际项目中,可以进一步扩展 Resilience4j 的功能,比如结合 限流、重试 等模式,以提高系统的可用性和稳定性。通过这种机制,不仅能够提高系统对不可预见故障的处理能力,还能为用户提供更好的体验,减少因为服务不可用带来的负面影响。

责任编辑:武晓燕 来源: 路条编程
相关推荐

2024-10-11 18:31:14

2022-11-16 17:16:41

spring限流

2021-12-15 08:15:26

Spring Circuit BreSpring Clou

2021-12-09 08:57:46

Spring ClouCircuit Bre断路器

2023-06-27 07:31:59

微服务容错库重试

2023-03-13 08:02:55

断路器应用API

2022-09-15 15:25:47

spring-微服务

2020-04-23 15:59:04

SpringKafka集群

2018-11-02 15:45:41

Spring BootRedis数据库

2022-10-08 11:39:56

断路器Golang项目

2009-10-12 13:18:55

RHEL 4内核

2023-10-07 10:08:54

2024-10-11 11:19:05

LiteFlow框架流程

2021-06-15 07:33:13

Java函数式编程

2024-01-03 07:19:19

LogbackLog4j2Java

2023-12-14 13:28:00

Spring流程Web

2021-12-28 11:13:05

安全认证 Spring Boot

2024-01-30 08:01:15

RabbitMQ业务逻辑应用场景

2023-10-15 22:40:25

插件JIB

2021-12-11 13:29:36

SpringBoot 官方
点赞
收藏

51CTO技术栈公众号