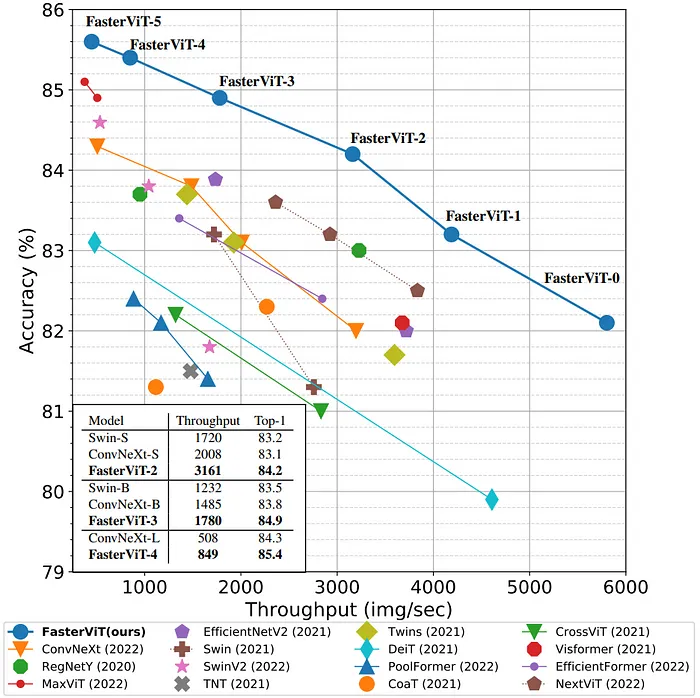
Faster Vision Transformer(FVT)是Vision Transformer(ViT)架构的一个变体,这是一种为计算机视觉任务设计的神经网络。FVT 是原始 ViT 模型的更快、更高效版本,原始模型由 Dosovitskiy 等人在 2020 年的论文 “一幅图像值 16x16 个词:用于大规模图像识别的转换器” 中引入。

FVT 的关键特性
- 高效架构:FVT 旨在比原始 ViT 模型更快、更高效。它通过减少参数数量和计算复杂性,同时保持类似的性能来实现这一点。
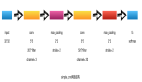
- 多尺度视觉转换器:FVT 使用多尺度视觉转换器架构,允许它以多种尺度和分辨率处理图像。这是通过使用层次结构实现的,其中较小的转换器用于处理图像的较小区域。
- 自注意力机制:FVT 使用自注意力机制,允许它对图像的不同部分之间的复杂关系进行建模。这是通过使用在训练过程中学习到的注意力权重来实现的。
- 位置编码:FVT 使用位置编码来保留图像的空间信息。这是通过使用学习到的位置嵌入来实现的,它们被添加到输入令牌中。
首先,让我们开始实现在自定义数据集上训练视觉转换器。为此,我们需要通过 pip 安装 fastervit。
pip install fastervit让我们导入我们刚刚通过 pip 安装的 pytorch 库以及更快视觉转换器库。
import torch
from torchvision import datasets, transforms
from torch.utils.data import DataLoader
import os
在这个实现中,我从 Kaggle 下载了损坏道路数据集。在这里检查。然后将它们分割为训练和验证数据集。之后加载数据集并应用数据转换。
data_dir = 'sih_road_dataset'

# Define data transformations
data_transforms = {
    'train': transforms.Compose([
        transforms.RandomResizedCrop(224),
        transforms.RandomHorizontalFlip(),
        transforms.ToTensor(),
        transforms.Normalize([0.485, 0.456, 0.406], [0.229, 0.224, 0.225])
    ]),
    'val': transforms.Compose([
        transforms.Resize(256),
        transforms.CenterCrop(224),
        transforms.ToTensor(),
        transforms.Normalize([0.485, 0.456, 0.406], [0.229, 0.224, 0.225])
    ]),
}

# Load datasets
image_datasets = {x: datasets.ImageFolder(os.path.join(data_dir, x), data_transforms[x]) for x in ['train', 'val']}
dataloaders = {x: DataLoader(image_datasets[x], batch_size=32, shuffle=True, num_workers=4) for x in ['train', 'val']}
dataset_sizes = {x: len(image_datasets[x]) for x in ['train', 'val']}
class_names = image_datasets['train'].classes
接下来我们将加载更快视觉转换器模型。
# Load the FasterViT model and modify it for your number of classes.

from fastervit import create_model

# Load FasterViT model
model = create_model('faster_vit_0_224',
                     pretrained=True,
                     model_path="faster_vit_0.pth.tar")

# Print the model architecture
print(model)
当我们打印模型时,我们可以看到末尾的头部层,这是需要修改以进行微调的部分。
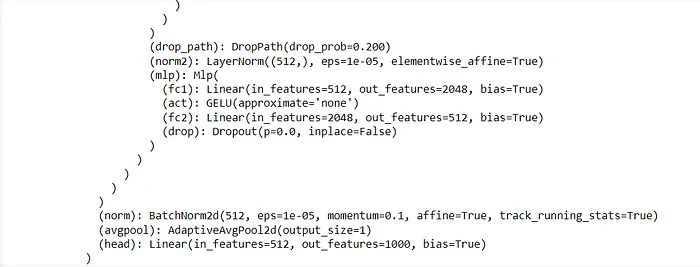
为了针对您的自定义分类任务修改这一层,您应该用一个具有适当数量输出类别的新线性层替换头部层。
# Modify the final layer for custom classification
num_ftrs = model.head.in_features
model.head = torch.nn.Linear(num_ftrs, len(class_names))

# Move the model to GPU if available
device = torch.device("cuda:0" if torch.cuda.is_available() else "cpu")
model = model.to(device)
接下来指定优化器和学习率,
import torch.optim as optim
from torch.optim import lr_scheduler

# Define loss function
criterion = torch.nn.CrossEntropyLoss()

# Define optimizer
optimizer = optim.SGD(model.parameters(), lr=0.001, momentum=0.9)

# Learning rate scheduler
exp_lr_scheduler = lr_scheduler.StepLR(optimizer, step_size=7, gamma=0.1)
好的,现在一切都已定义,我们现在指定将用于训练我们模型的自定义数据集的训练函数。
import time
import copy

def train_model(model, criterion, optimizer, scheduler, num_epochs=5):
    since = time.time()

    best_model_wts = copy.deepcopy(model.state_dict())
    best_acc = 0.0

    for epoch in range(num_epochs):
        print(f'Epoch {epoch}/{num_epochs - 1}')
        print('-' * 10)

        # Each epoch has a training and validation phase
        for phase in ['train', 'val']:
            if phase == 'train':
                model.train()  # Set model to training mode
            else:
                model.eval()   # Set model to evaluate mode

            running_loss = 0.0
            running_corrects = 0

            # Iterate over data.
            for inputs, labels in dataloaders[phase]:
                inputs = inputs.to(device)
                labels = labels.to(device)

                # Zero the parameter gradients
                optimizer.zero_grad()

                # Forward
                with torch.set_grad_enabled(phase == 'train'):
                    outputs = model(inputs)
                    _, preds = torch.max(outputs, 1)
                    loss = criterion(outputs, labels)

                    # Backward + optimize only if in training phase
                    if phase == 'train':
                        loss.backward()
                        optimizer.step()

                # Statistics
                running_loss += loss.item() * inputs.size(0)
                running_corrects += torch.sum(preds == labels.data)

            if phase == 'train':
                scheduler.step()

            epoch_loss = running_loss / dataset_sizes[phase]
            epoch_acc = running_corrects.double() / dataset_sizes[phase]

            print(f'{phase} Loss: {epoch_loss:.4f} Acc: {epoch_acc:.4f}')

            # Deep copy the model
            if phase == 'val' and epoch_acc > best_acc:
                best_acc = epoch_acc
                best_model_wts = copy.deepcopy(model.state_dict())

        print()

    time_elapsed = time.time() - since
    print(f'Training complete in {time_elapsed // 60:.0f}m {time_elapsed % 60:.0f}s')
    print(f'Best val Acc: {best_acc:.4f}')

    # Load best model weights
    model.load_state_dict(best_model_wts)
    return model
下一步是启动训练过程!
# Train the model
model = train_model(model, criterion, optimizer, exp_lr_scheduler, num_epochs=5)

# Save the model
torch.save(model.state_dict(), 'faster_vit_custom_model.pth')
请注意,这不是最好的模型,因为我们可以看到模型在训练数据集上过拟合了。本文的主要目的是演示如何实现 Faster Vision Transformer 并在自定义数据集上训练它们。还有其他方法可以解决过拟合问题。
让我们对下面的图像进行训练过的模型的快速测试:
import torch
from torchvision import transforms
from PIL import Image
from fastervit import create_model
# Define the number of classes in your custom dataset
num_classes = 4 # Replace with your actual number of classes
# Create the model architecture
model = create_model('faster_vit_0_224', pretrained=False)
# Modify the final classification layer to match the number of classes in your custom dataset
model.head = torch.nn.Linear(model.head.in_features, num_classes)
# Move the model to GPU if available
device = torch.device("cuda:0" if torch.cuda.is_available() else "cpu")
model = model.to(device)
# Load the trained model weights
model.load_state_dict(torch.load('faster_vit_custom_model.pth'))
model.eval() # Set the model to evaluation mode
# Define data transformations for the input image
preprocess = transforms.Compose([
transforms.Resize(256),
transforms.CenterCrop(224),
transforms.ToTensor(),
transforms.Normalize([0.485, 0.456, 0.406], [0.229, 0.224, 0.225])
])
# Function to load and preprocess the image
def load_image(image_path):
image = Image.open(image_path).convert('RGB')
image = preprocess(image)
image = image.unsqueeze(0) # Add batch dimension
return image.to(device)
# Function to make predictions
def predict(image_path, model, class_names):
image = load_image(image_path)
with torch.no_grad():
outputs = model(image)
_, preds = torch.max(outputs, 1)
predicted_class = class_names[preds.item()]
return predicted_class
# List of class names (ensure this matches your custom dataset's classes)
class_names = ['good', 'poor', 'satisfactory', 'very_poor'] # Replace with your actual class names
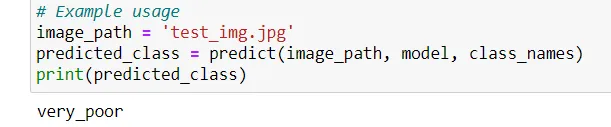
# Example usage
image_path = 'test_img.jpg'
predicted_class = predict(image_path, model, class_names)
print(predicted_class)预测的类别是,