一、介绍
说到定时任务,相信大家都不陌生,在我们实际的工作中,用到定时任务的场景可以说非常的多,例如:
- 双 11 的 0 点,定时开启秒杀
- 每月1号,财务系统自动拉取每个人的绩效工资,用于薪资计算
- 使用 TCP 长连接时,客户端按照固定频率定时向服务端发送心跳请求
等等,定时器像水和空气一般,普遍存在于各个场景中,在实际的业务开发中,基本上少不了定时任务的应用。
总结起来,一般定时任务的表现有以下几个特征:
1.在某个时刻触发,例如11.11号0点开启秒杀
2.按照固定频率周期性触发,例如每分钟发送心跳请求
3.预约指定时刻开始周期性触发,例如从12.1号开始每天7点闹钟响起
说了这么多,也不BB了,下面我们就来点干活,列举一些实际项目中使用的相关工具!
二、crontab 定时器
2.1、介绍
crontab 严格来说并不是属于 java 内的,它是 linux 自带的一个工具,可以周期性地执行某个shell脚本或命令。
由于 crontab 在实际开发中应用比较多, 特别是对于运维的人,crontab 命令是必须用到的命令,自动化运维中一定少不了它,而且 crontab 表达式跟我们后面要介绍的其他定时任务框架,例如 Quartz,Spring Schedule 的 cron 表达式类似,所以这里先介绍 crontab。
简而言之,crontab 就是一个自定义定时器。
命令格式如下:
.---------------- minute (0 - 59)
|  .------------- hour (0 - 23)
|  |  .---------- day of month (1 - 31)
|  |  |  .------- month (1 - 12) OR jan,feb,mar,apr ...
|  |  |  |  .---- day of week (0 - 6) (Sunday=0 or 7) ...
|  |  |  |  |
* * * * * command- 第一个参数(minute):代表一小时内的第几分,范围 0-59。
- 第二个参数(hour):代表一天中的第几小时,范围 0-23。
- 第三个参数(day):代表一个月中的第几天,范围 1-31。
- 第四个参数(month):代表一年中第几个月,范围 1-12。
- 第五个参数(week):代表星期几,范围 0-7 (0及7都是星期天)。
- 第六个参数(command):所要执行的指令。
具体应用的时候,时间定义大概是长下面这个样子!
# 每5分钟执行一次命令
*/5 * * * * Command
# 每小时的第5分钟执行一次命令
5 * * * * Command
# 指定每天下午的 6:30 执行一次命令
30 18 * * * Command
# 指定每月8号的7:30分执行一次命令
30 7 8 * * Command
# 指定每年的6月8日5:30执行一次命令
30 5 8 6 * Command
# 指定每星期日的6:30执行一次命令
30 6 * * 0 Command
2.2、具体示例
以centOS操作系统为例,创建一个定时任务,每分钟执行某个指定shell脚本,过程如下!
- 首先安装 crond 相关服务
yum -y install cronie yum-cron- 编写一个输出当前时间到日志的shell脚本
#创建一个test.sh脚本
vim /root/shell/test.sh

#脚本内容如下,将内容输出到file.log文件
echo `date '+%Y-%m-%d %H:%M:%S'` >> /root/shell/file.log- 先执行一下脚本,观察内容是否输出到file.log文件
sh /root/shell/test.sh- 查看日志文件内容
cat /root/shell/file.log如果出现以下内容,说明运行正常!
 图片
图片
- 接着再来创建一个定时任务,每分钟执行一次test.sh
#编辑定时任务【删除-添加-修改】
crontab -e- 在文件末尾加入如下信息
#每分钟执行一次test.sh脚本
*/1 * * * * sh /root/shell/test.sh- 如果想查定时任务是否加入,可以通过如下命令
#查看crontab定时任务
crontab -l
图片
图片
- 最后就是重启定时任务
##重新载入配置
systemctl reload crond
#重启服务
systemctl restart crond- 查看file.log文件实时输出内容,观察test.sh脚本是否被执行
tail -f /root/shell/file.log从结果上看,运行正常!
 图片
图片
- 如果想查看定时任务日志,可通过如下命令进行查看
tail -f /var/log/cron如果想移除某个定时任务,直接输入crontab -e命令,并移除对应的脚本,然后刷新配置、重启服务即可!
如果想深入的了解crontab使用,可以参考这篇文章,里面总结得比较好, 这里就不再多说了。
三、java 自带的定时器
3.1、Timer
Timer 定时器,由 jdk 提供的java.util.Timer和java.util.TimerTask两个类组合实现。
其中TimerTask表示某个具体任务,而Timer则是进行调度任务处理。
实现过程也很简单,示例如下:
import java.util.Timer;
import java.util.TimerTask;

public class TimerTest extends TimerTask {

    private String jobName;

    public TimerTest(String jobName) {
        this.jobName = jobName;
    }

    @Override
    public void run() {
        System.out.println("execute " + jobName);
    }

    public static void main(String[] args) {
        Timer timer = new Timer();
        long delay1 = 1 * 1000;
        long period1 = 1 * 1000;
        // 从现在开始 1 秒钟之后,每隔 1 秒钟执行一次 job1
        timer.schedule(new TimerTest("job1"), delay1, period1);

        long delay2 = 2 * 1000;
        long period2 = 2 * 1000;
        // 从现在开始 2 秒钟之后,每隔 2 秒钟执行一次 job2
        timer.schedule(new TimerTest("job2"), delay2, period2);
    }
}
输出结果:
execute job1
execute job2
execute job1
execute job1
execute job2
execute job1
execute job1
execute job2
...
Timer 的优点在于简单易用,由于所有任务都是由同一个线程来调度,因此所有任务都是串行执行的,同一时间只能有一个任务在执行,前一个任务的延迟或异常都将会影响到之后的任务。
具体原因如下:
- 1.当一个线程抛出异常时,整个 Timer 都会停止运行。例如上面的 job1 抛出异常的话,job2 也不会再跑了
- 当一个线程里面处理的时间非常长的时候,会影响其他 job 的调度。例如,如果 job1 处理的时间要 1 分钟, 那么 job2 至少要等 1 分钟之后才能跑。
基于上面的原因,Timer 现在生产环境中都不在使用!
3.2、ScheduledExecutor
鉴于 Timer 的上述缺陷,从 Java 5 开始,推出了基于线程池设计的 ScheduledExecutor。
其设计思想是,每一个被调度的任务都会由线程池中一个线程来管理执行,因此任务是并发执行的,相互之间不会受到干扰。需要注意的是,只有当任务的执行时间到来时,ScheduedExecutor 才会真正启动一个线程,其余时间 ScheduledExecutor 都是在轮询任务的状态。
实现过程,示例如下:
import java.util.concurrent.Executors;
import java.util.concurrent.ScheduledExecutorService;
import java.util.concurrent.TimeUnit;

public class ScheduledExecutorTest implements Runnable {

    private String jobName;

    public ScheduledExecutorTest(String jobName) {
        this.jobName = jobName;
    }

    @Override
    public void run() {
        System.out.println("execute " + jobName);
    }

    public static void main(String[] args) {
        //设置10个核心线程
        ScheduledExecutorService service = Executors.newScheduledThreadPool(10);

        long initialDelay1 = 1;
        long period1 = 1;

        // 从现在开始1秒钟之后,每隔1秒钟执行一次job1
        service.scheduleAtFixedRate(
                new ScheduledExecutorTest("job1"), initialDelay1,
                period1, TimeUnit.SECONDS);

        long initialDelay2 = 2;
        long delay2 = 2;
        // 从现在开始2秒钟之后,每隔2秒钟执行一次job2
        service.scheduleWithFixedDelay(
                new ScheduledExecutorTest("job2"), initialDelay2,
                delay2, TimeUnit.SECONDS);
    }
}
输出结果:
execute job1
execute job1
execute job2
execute job1
execute job1
execute job2
execute job1
在 ScheduledExecutorService 中,由initialDelay、delay和TimeUnit三个参数决定任务的执行频率。
其中:
- TimeUnit:表示执行的单位,例如:毫秒、秒、分、小时、天...
- initialDelay:表示从现在开始多少TimeUnit后执行任务
- delay:表示任务执行周期,每隔多少TimeUnit执行一次任务
从 api 上可以看到,ScheduledExecutorService 的出现,完全可以替代 Timer ,同时完美的解决上面所说的 Timer 存在的两个问题!
- 当任务抛异常时,即使异常没有被捕获, 线程池也还会新建线程,所以定时任务不会停止
- 由于 ScheduledExecutorService 是不同线程处理不同的任务,因此不管一个线程的运行时间有多长,都不会影响到另外一个线程的运行
但是 ScheduledExecutorService 也不是万能的,比如我想每月1号统计一次报表、每季度月末统计销售额等等这样的需求。
你会发现使用 ScheduledExecutorService 实现的时候,每次任务执行之后,你需要从当前时间开始出下一次执行时间的间隔,而且每次都要重算,非常麻烦!
遇到这样的需求,就需要一个更加完善的任务调度框架来解决这些复杂的调度问题。
而我们所熟悉的开源框架 Quartz 在这方面就提供了强大的支持。
四、第三方定时器
4.1、Quartz
quartz 在 java 项目中应用非常的广,市面上很多的开源调度框架也基本都是直接或间接基于这个框架来开发的。
下面我们就通过一个例子,来简单地认识一下它。
- 引入quartz包
<dependency>
    <groupId>org.quartz-scheduler</groupId>
    <artifactId>quartz</artifactId>
    <version>2.3.2</version>
</dependency>- 编写示例代码
public class QuartzTest implements Job {

    @Override
    public void execute(JobExecutionContext context) throws JobExecutionException {
        System.out.println(new SimpleDateFormat("yyyy-MM-dd HH:mm:ss").format(new Date()));
    }

    public static void main(String[] args) throws SchedulerException {
        // 创建一个Scheduler
        Scheduler scheduler = StdSchedulerFactory.getDefaultScheduler();

        // 启动Scheduler
        scheduler.start();

        // 新建一个Job, 指定执行类是QuartzTest, 指定一个K/V类型的数据, 指定job的name和group
        JobDetail job = JobBuilder.newJob(QuartzTest.class)
                .usingJobData("jobData", "test")
                .withIdentity("myJob", "myJobGroup")
                .build();

        // 新建一个Trigger, 表示JobDetail的调度计划, 这里的cron表达式是 每1秒执行一次
        Trigger trigger = TriggerBuilder.newTrigger()
                .withIdentity("myTrigger", "myTriggerGroup")
                .startNow()
                .withSchedule(CronScheduleBuilder.cronSchedule("0/5 * * * * ?"))
                .build();

        // 让scheduler开始调度这个job, 按trigger指定的计划
        scheduler.scheduleJob(job, trigger);
    }
}
输出结果:
2020-11-09 21:38:40
2020-11-09 21:38:45
2020-11-09 21:38:50
2020-11-09 21:38:55
2020-11-09 21:39:00
2020-11-09 21:39:05
2020-11-09 21:39:10
...
当然,你还可以从JobExecutionContext对象中,获取上文usingJobData()方法中设置的值。
@Override
public void execute(JobExecutionContext context) throws JobExecutionException {
    //从context中获取instName,groupName以及dataMap
    String jobName = context.getJobDetail().getKey().getName();
    String groupName = context.getJobDetail().getKey().getGroup();
    JobDataMap dataMap = context.getJobDetail().getJobDataMap();
    //从dataMap中获取myDescription,myValue以及myArray
    String value = dataMap.getString("jobData");
    System.out.println("jobName:" + jobName + ",groupName:" + groupName + ",jobData:" + value);
}
输出结果:
jobName:myJob,groupName:myJobGroup,jobData:test在 Quartz 工具包中,设计的核心类主要包括 Scheduler, Job 以及 Trigger。
- Scheduler:可以理解为是一个具体的调度实例,用来调度任务
- JobDetail:定义具体作业的实例,进一步封装和拓展了 Job 功能,其中 Job 是一个接口,类似上面的 TimerTask
- Trigger:设置任务调度策略。例如多久执行一次,什么时候执行,以什么频率执行等等
相比 JDK 提供的任务调度服务,Quartz 最明显的一个特点就是将任务调度者、任务具体实例、任务调度策略进行三方解耦,这么做的优点在于同一个 Job 可以绑定多个不同的 Trigger,同一个 Trigger 也可以调度多个 Job,配置灵活性非常强。
Trigger 同时还支持cron表达式,在任务调度时间配置方面,更加灵活。
当然,Quartz 的用途不仅仅在单例服务上,在分布式调度方面也同样应用非常广,由于篇幅原因,关于 Quartz 的详细使用介绍,我们会在后期的文章中详细深入分析。
4.2、Spring Schedule
与 Quartz 齐名的还有我们所熟悉的 Spring Schedule,由 Spring 原生提供支持。
实现上,Spring 中使用定时任务也非常简单。
4.2.1、基于 XML 配置
- 在springApplication.xml配置文件中加入如下信息
<beans xmlns="http://www.springframework.org/schema/beans"
    xmlns:xsi="http://www.w3.org/2001/XMLSchema-instance"
    xmlns:p="http://www.springframework.org/schema/p"
    xmlns:task="http://www.springframework.org/schema/task"
    xmlns:context="http://www.springframework.org/schema/context"
    xmlns:aop="http://www.springframework.org/schema/aop"
    xsi:schemaLocation="http://www.springframework.org/schema/beans
    http://www.springframework.org/schema/beans/spring-beans-4.0.xsd
    http://www.springframework.org/schema/tx http://www.springframework.org/schema/tx/spring-tx-4.0.xsd
    http://www.springframework.org/schema/jee http://www.springframework.org/schema/jee/spring-jee-4.0.xsd
    http://www.springframework.org/schema/context http://www.springframework.org/schema/context/spring-context-4.0.xsd
    http://www.springframework.org/schema/aop http://www.springframework.org/schema/aop/spring-aop-4.0.xsd
    http://www.springframework.org/schema/task http://www.springframework.org/schema/task/spring-task-4.0.xsd">

    <!-- 定时器开关-->
    <task:annotation-driven />

    <!-- 将TestTask注入ioc-->
    <bean id="myTask" class="com.spring.task.TestTask"></bean>

    <!-- 定时调度方法配置-->
    <task:scheduled-tasks>
        <!-- 这里表示的是每隔5秒执行一次 -->
        <task:scheduled ref="myTask" method="show" cron="*/5 * * * * ?" />
        <!-- 这里表示的是每隔10秒执行一次 -->
        <task:scheduled ref="myTask" method="print" cron="*/10 * * * * ?"/>
    </task:scheduled-tasks>

    <!-- 自动扫描的包名 -->
    <context:component-scan base-package="com.spring.task" />

</beans>- 定义自己的任务执行逻辑
package com.spring.task;

/**
 * 定义任务
 */
public class TestTask {

    public void show() {
        System.out.println("show method 1");
    }

    public void print() {
        System.out.println("print method 1");
    }
}
4.2.2、基于注解配置
基于注解的配置,可以直接在方法上配置相应的调度策略,相比xml的方式更加简洁。
- 实现过程如下
package com.spring.task;
import org.springframework.scheduling.annotation.Scheduled;
import org.springframework.stereotype.Component;

/**
 * 基于注解的定时器
 */
@Component
public class TestTask2 {

    /**
     * 定时计算。每隔5秒执行一次
     */
    @Scheduled(cron = "*/5 * * * * ?")
    public void show() {
        System.out.println("show method 2");
    }

    /**
     * 启动1分钟后执行,之后每隔10秒执行一次
     */
    @Scheduled(initialDelay = 60*1000, fixedRate = 10*1000)
    public void print() {
        System.out.println("print method 2");
    }
}
4.2.3、Spring Boot 定时任务应用
如果在 Spring Boot 项目中,使用就更加方便了。
- 首先在程序入口启动类添加@EnableScheduling,开启定时任务功能
@SpringBootApplication
@EnableScheduling
public class Application {

    public static void main(String[] args) {
        SpringApplication.run(Application.class, args);
    }
}- 编写定时任务逻辑
@Component
public class TestTask3 {

    private int count=0;

    @Scheduled(crnotallow="*/5 * * * * ?")
    private void process() {
        System.out.println("this is scheduler task running  "+(count++));
    }
}
输出结果:
this is scheduler task running  0
this is scheduler task running  1
this is scheduler task running  2
...
4.2.4、任务执行规则
最后,我们来看看 Spring Schedule 的任务执行规则,打开@Scheduled注解类,源码如下:
@Target({ElementType.METHOD, ElementType.ANNOTATION_TYPE})
@Retention(RetentionPolicy.RUNTIME)
@Documented
@Repeatable(Schedules.class)
public @interface Scheduled {

    String cron() default "";

    String zone() default "";

    long fixedDelay() default -1;

    String fixedDelayString() default "";

    long fixedRate() default -1;

    String fixedRateString() default "";

    long initialDelay() default -1;

    String initialDelayString() default "";
}
从方法上可以看出,@Scheduled注解中可以传 8 种参数:
- cron:指定 cron 表达式
- zone:默认使用服务器默认时区。可以设置为java.util.TimeZone中的zoneId
- fixedDelay:从上一个任务完成开始到下一个任务开始的间隔,单位毫秒
- fixedDelayString:同上,时间值是String类型
- fixedRate:从上一个任务开始到下一个任务开始的间隔,单位毫秒
- fixedRateString:同上,时间值是String类型
- initialDelay:任务首次执行延迟的时间,单位毫秒
- initialDelayString:同上,时间值是String类型
其中用的最多的就是cron表达式,下面我们就一起来看看如何来编写配置。
4.2.5、Cron 表达式
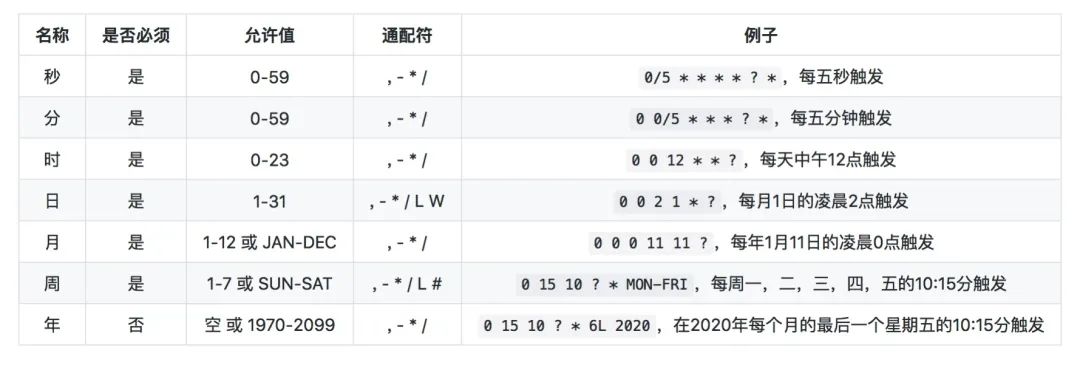
Spring 的 cron 表达式和 Quartz 的 cron 表达式基本都是通用的,但是与 linux 下 crontab 的 cron 表达式是有一定区别的,它可以直接到秒级别。
cron 表达式结构:
.---------------------- seconds(0 - 59)
|  .------------------- minute (0 - 59)
|  |  .---------------- hour (0 - 23)
|  |  |  .------------- day of month (1 - 31)
|  |  |  |  .---------- month (1 - 12)
|  |  |  |  |  .------- Day-of-Week (1 - 7)
|  |  |  |  |  |  .---- year (1970 - 2099) ...
|  |  |  |  |  |  |
*  *  *  *  *  ?  *
具体样例如下:
 图片
图片
在 cron 表达式中不区分大小写,更多配置可以参考这里。
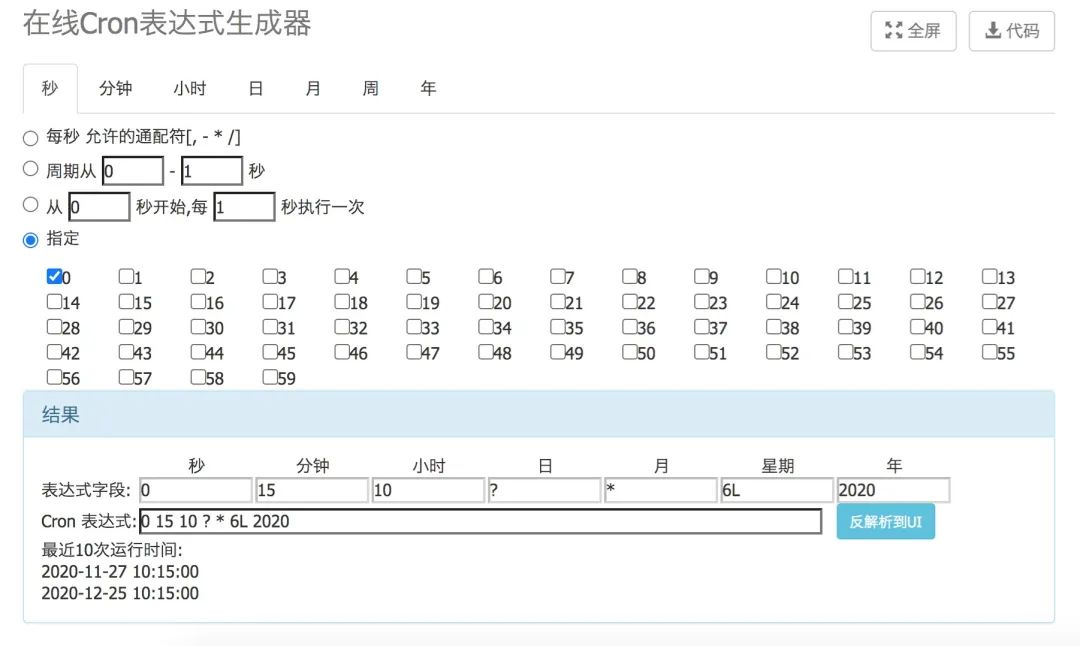
还可以在线解析cron表达式进行测试。
 图片
图片
4.3、elastic-job
elastic-job 是当当基于 quartz 二次开发而开源的一个分布式弹性作业框架,功能十分强大。
主要功能:
- 分布式:重写 Quartz 基于数据库的分布式功能,改用 Zookeeper 实现注册中心。
- 并行调度:采用任务分片方式实现。将一个任务拆分为n个独立的任务项,由分布式的服务器并行执行各自分配到的分片项。
- 弹性扩容缩容:将任务拆分为 n 个任务项后,各个服务器分别执行各自分配到的任务项。一旦有新的服务器加入集群,或现有服务器下线,elastic-job将在保留本次任务执行不变的情况下,下次任务开始前触发任务重分片。
- 集中管理:采用基于Zookeeper的注册中心,集中管理和协调分布式作业的状态,分配和监听。外部系统可直接根据Zookeeper的数据管理和监控elastic-job。
- 定制化流程型任务:作业可分为简单和数据流处理两种模式,数据流又分为高吞吐处理模式和顺序性处理模式,其中高吞吐处理模式可以开启足够多的线程快速的处理数据,而顺序性处理模式将每个分片项分配到一个独立线程,用于保证同一分片的顺序性,这点类似于kafka的分区顺序性。
由于 elastic-job 是基于 Zookeeper 实现集群调度,因此在使用它之前,需要先搭建好 Zookeeper 服务器,网上教程很多,在此不过多介绍。
elastic-job 具体简单实现过程如下!
- 引入相关 elastic-job 依赖
<dependencies>
    <!-- 引入elastic-job-lite核心模块 -->
    <dependency>
        <groupId>com.dangdang</groupId>
        <artifactId>elastic-job-lite-core</artifactId>
        <version>2.0.5</version>
    </dependency>
    <!-- 使用springframework自定义命名空间时引入 -->
    <dependency>
        <groupId>com.dangdang</groupId>
        <artifactId>elastic-job-lite-spring</artifactId>
        <version>2.0.5</version>
    </dependency>
    <dependency>
        <groupId>org.apache.zookeeper</groupId>
        <artifactId>zookeeper</artifactId>
        <version>3.4.9</version>
    </dependency>
</dependencies>- 定义job
public class MyElasticJob implements SimpleJob {

    public void execute(ShardingContext context) {
        System.out.println(context.toString());
        switch (context.getShardingItem()) {
            case 0:
                System.out.println("------------->>>>0");
                break;
            case 1:
                System.out.println("------------->>>>1");
                break;
            case 2:
                System.out.println("------------->>>>2");
                break;
            default:
                System.out.println("------------->>>>default");
                break;
        }
    }


    public static void main(String[] args) {
        new JobScheduler(createRegistryCenter(), createJobConfiguration()).init();
    }

    private static CoordinatorRegistryCenter createRegistryCenter() {
        //配置ZK注册中心地址
        CoordinatorRegistryCenter regCenter = new ZookeeperRegistryCenter(new ZookeeperConfiguration("10.211.108.160:2181", "elastic-job-demo"));
        regCenter.init();
        return regCenter;
    }
    private static LiteJobConfiguration createJobConfiguration() {
        JobCoreConfiguration simpleCoreConfig = JobCoreConfiguration.newBuilder("demoSimpleJob", "0/15 * * * * ?", 10).build();
        // 定义SIMPLE类型配置
        SimpleJobConfiguration simpleJobConfig = new SimpleJobConfiguration(simpleCoreConfig, MyElasticJob.class.getCanonicalName());
        // 定义Lite作业根配置
        LiteJobConfiguration simpleJobRootConfig = LiteJobConfiguration.newBuilder(simpleJobConfig).build();
        return simpleJobRootConfig;
    }
}
具体详细使用,可以参考官方网站。
4.4、xxl-job
xxl-job 是被广泛使用的另外一款使用的分布式任务调度框架,出自大众点评许雪里(xxl 就是作者名字的拼音首字母)的开源项目,官网上介绍这是一个轻量级分布式任务调度框架,其核心设计目标是开发迅速、学习简单、轻量级、易扩展。
 图片
图片
跟elasticjob不同,xxl-job 环境依赖于mysql,不用 ZooKeeper,这也是最大的不同。早起的 xxljob 也是基于 quartz 开发的,不过现在慢慢去 quartz 化了,改成自研的调度模块。
xxl-job 具体简单实现过程如下!
- 引入相关 xxl-job 依赖
<dependencies>
    <dependency>
        <groupId>org.springframework.boot</groupId>
        <artifactId>spring-boot-starter-web</artifactId>
    </dependency>
    <dependency>
        <groupId>org.springframework.boot</groupId>
        <artifactId>spring-boot-starter</artifactId>
    </dependency>
    <dependency>
        <groupId>com.xuxueli</groupId>
        <artifactId>xxl-job-core</artifactId>
        <version>2.2.0</version>
    </dependency>
</dependencies>- 在application.properties添加相关配置
# web port
server.port=8081
# log config
logging.cnotallow=classpath:logback.xml
spring.application.name=xxljob-demo
### 调度中心部署跟地址 [选填]:如调度中心集群部署存在多个地址则用逗号分隔。执行器将会使用该地址进行"执行器心跳注册"和"任务结果回调";为空则关闭自动注册;
xxl.job.admin.addresses=http://127.0.0.1:8080/xxl-job-admin
### 执行器通讯TOKEN [选填]:非空时启用;
xxl.job.accessToken=
### 执行器AppName [选填]:执行器心跳注册分组依据;为空则关闭自动注册
xxl.job.executor.appname=xxl-job-demo
### 执行器注册 [选填]:优先使用该配置作为注册地址,为空时使用内嵌服务 ”IP:PORT“ 作为注册地址。从而更灵活的支持容器类型执行器动态IP和动态映射端口问题。
xxl.job.executor.address=
### 执行器IP [选填]:默认为空表示自动获取IP,多网卡时可手动设置指定IP,该IP不会绑定Host仅作为通讯实用;地址信息用于 "执行器注册" 和 "调度中心请求并触发任务";
xxl.job.executor.ip=
### 执行器端口号 [选填]:小于等于0则自动获取;默认端口为9999,单机部署多个执行器时,注意要配置不同执行器端口;
xxl.job.executor.port=9999
### 执行器运行日志文件存储磁盘路径 [选填] :需要对该路径拥有读写权限;为空则使用默认路径;
xxl.job.executor.logpath=/data/applogs/xxl-job/jobhandler
### 执行器日志文件保存天数 [选填] : 过期日志自动清理, 限制值大于等于3时生效; 否则, 如-1, 关闭自动清理功能;
xxl.job.executor.logretentinotallow=10- 编写一个配置类XxlJobConfig
@Configuration
public class XxlJobConfig {
    private Logger logger = LoggerFactory.getLogger(XxlJobConfig.class);
    @Value("${xxl.job.admin.addresses}")
    private String adminAddresses;
    @Value("${xxl.job.accessToken}")
    private String accessToken;
    @Value("${xxl.job.executor.appname}")
    private String appname;
    @Value("${xxl.job.executor.address}")
    private String address;
    @Value("${xxl.job.executor.ip}")
    private String ip;
    @Value("${xxl.job.executor.port}")
    private int port;
    @Value("${xxl.job.executor.logpath}")
    private String logPath;
    @Value("${xxl.job.executor.logretentiondays}")
    private int logRetentionDays;

    @Bean
    public XxlJobSpringExecutor xxlJobExecutor() {
        logger.info(">>>>>>>>>>> xxl-job config init.");
        XxlJobSpringExecutor xxlJobSpringExecutor = new XxlJobSpringExecutor();
        xxlJobSpringExecutor.setAdminAddresses(adminAddresses);
        xxlJobSpringExecutor.setAppname(appname);
        xxlJobSpringExecutor.setAddress(address);
        xxlJobSpringExecutor.setIp(ip);
        xxlJobSpringExecutor.setPort(port);
        xxlJobSpringExecutor.setAccessToken(accessToken);
        xxlJobSpringExecutor.setLogPath(logPath);
        xxlJobSpringExecutor.setLogRetentionDays(logRetentionDays);
        return xxlJobSpringExecutor;
    }
}- 编写具体任务类XxlJobDemoHandler
@Component
public class XxlJobDemoHandler {
    /**
     * Bean模式,一个方法为一个任务
     * 1、在Spring Bean实例中,开发Job方法,方式格式要求为 "public ReturnT<String> execute(String param)"
     * 2、为Job方法添加注解 "@XxlJob(value="自定义jobhandler名称", init = "JobHandler初始化方法", destroy = "JobHandler销毁方法")",注解value值对应的是调度中心新建任务的JobHandler属性的值。
     * 3、执行日志:需要通过 "XxlJobLogger.log" 打印执行日志;
     */
    @XxlJob("demoJobHandler")
    public ReturnT<String> demoJobHandler(String param) throws Exception {
        XxlJobLogger.log("java, Hello World~~~");
        XxlJobLogger.log("param:" + param);
        return ReturnT.SUCCESS;
    }
}
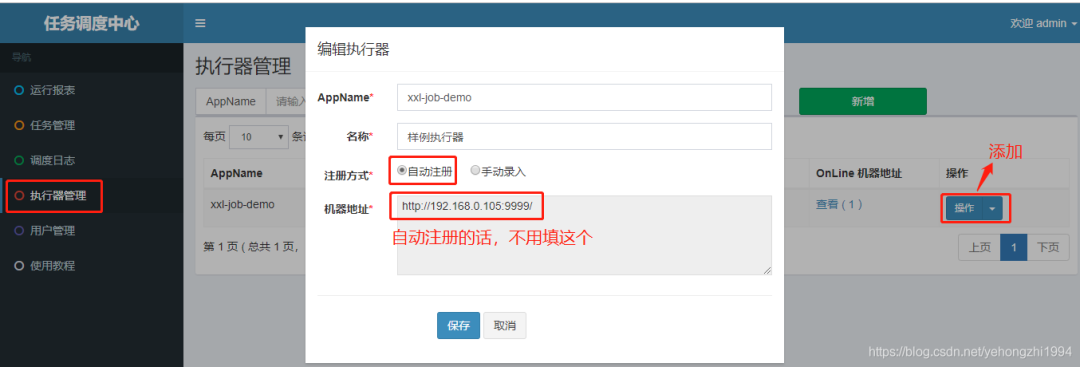
写完之后启动服务,然后可以打开管理界面,找到执行器管理,添加执行器。
 图片
图片
接着到任务管理,添加任务。

最后我们可以到任务管理去测试一下,运行demoJobHandler。
 图片
图片
 图片
图片
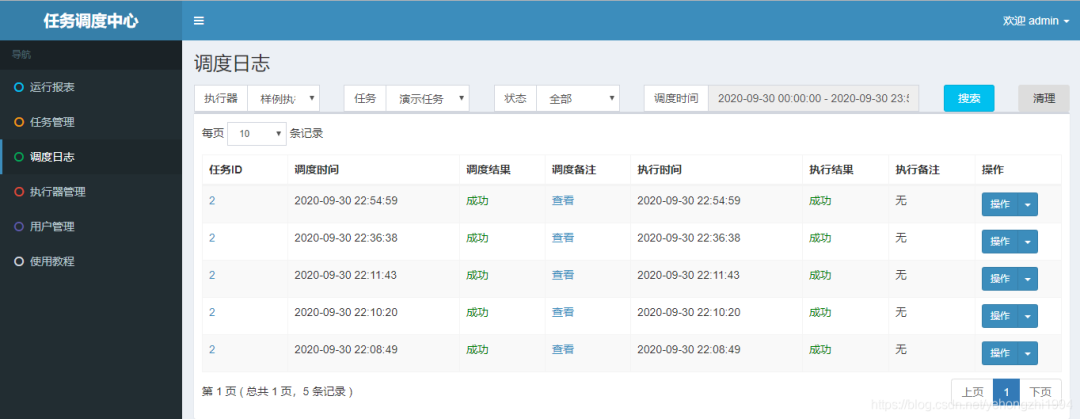
点击保存后,会立即执行。点击查看日志,可以看到任务执行的历史日志记录
 图片
图片
这就是简单的Demo演示,具体详细使用,可以参考官方网站。
五、总结
本文主要围绕定时调度器的理论知识和用法做了一次知识的总结,如果有理解不对的地方,欢迎大家留言指出。
六、参考
1、https://juejin.im/post/6844904002606350343
2、https://developer.ibm.com/zh/languages/java/articles/j-lo-taskschedule/
3、https://www.cnblogs.com/linjiqin/p/11720673.html
4、https://www.cnkirito.moe/timer/
5、https://cloud.tencent.com/developer/article/1138669
6、https://developer.aliyun.com/article/775305


