在现代应用程序中,系统吞吐量和响应速度是关键的性能指标。在高并发环境下,传统的同步处理方式可能会成为系统瓶颈,导致资源浪费和响应延迟。为了应对这种挑战,Spring Boot 3.3 提供了强大的异步处理能力,使我们能够通过异步接口显著提高系统的吞吐量和响应速度。
异步接口的必要性
异步接口的核心在于能够并行处理多个请求,而不阻塞主线程。这对于提高系统吞吐量和用户体验至关重要。传统的同步处理方式需要等待每个请求完成才能处理下一个请求,这种模型在处理大量请求时容易造成资源的紧张和延迟的积累。异步处理则通过将任务分配给后台线程,允许主线程继续处理其他请求,从而有效减少了请求的等待时间和系统的负载。
异步接口的实现方式
在 Spring Boot 中,实现异步接口主要有以下几种方式:
- 使用 @Async 注解:Spring 的 @Async 注解可以将方法标记为异步执行。被注解的方法将会在一个独立的线程中运行,允许主线程继续执行其他操作。
- 使用 CompletableFuture: CompletableFuture 提供了一种更灵活的方式来处理异步任务。它不仅支持简单的异步操作,还提供了丰富的 API 来处理任务的组合、异常处理和结果回调。
- 使用 WebFlux:对于更复杂的异步场景,Spring WebFlux 提供了反应式编程模型,支持高效的非阻塞操作。虽然本文主要集中于传统的异步处理方式,WebFlux 也是一种值得关注的异步解决方案。
- 使用 WebAsyncTask:是 Spring MVC 提供的一种异步处理机制,允许在后台线程中执行长时间运行的任务,并在任务完成后将结果返回给客户端。
- 使用 DeferredResult:是 Spring MVC 提供的一种异步处理机制,可以在后台线程中执行任务并将结果返回给客户端。它提供了更灵活的结果处理方式。
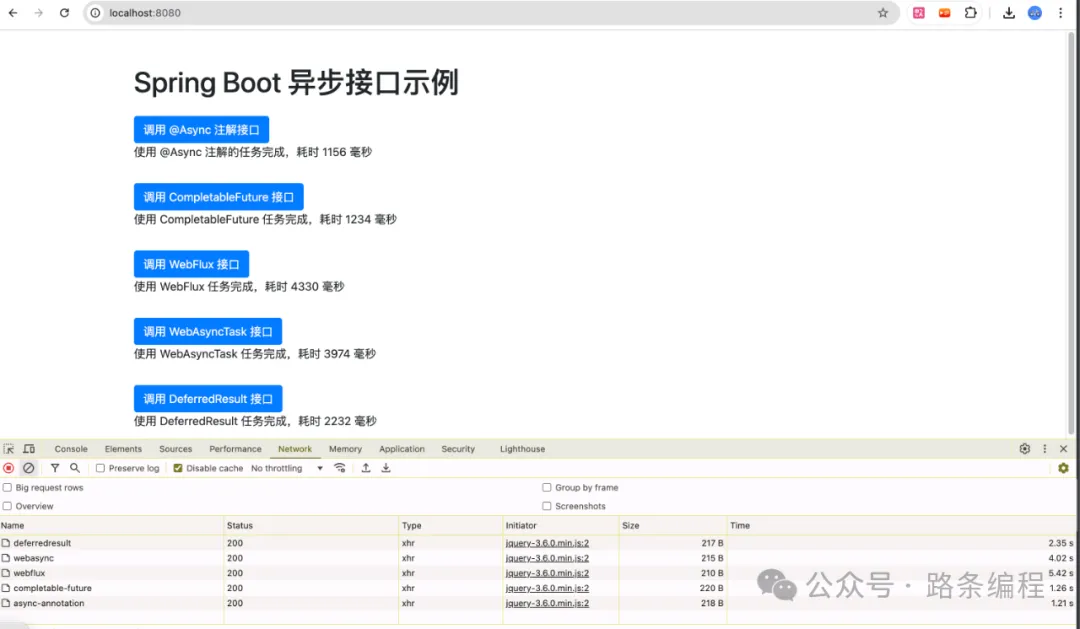
运行效果:
 图片
图片
若想获取项目完整代码以及其他文章的项目源码,且在代码编写时遇到问题需要咨询交流,欢迎加入下方的知识星球。
项目结构
本文将展示如何使用 Spring Boot 3.3 的异步功能来创建一个示例项目,通过简单的示例来说明如何配置异步接口,并在前端使用 jQuery 实现异步请求的触发和结果展示。项目结构如下:
async-demo
│
├── src
│   ├── main
│   │   ├── java
│   │   │   └── com
│   │   │       └── icoderoad
│   │   │           └── async
│   │   │               ├── AsyncDemoApplication.java
│   │   │               ├── controller
│   │   │               │   └── AsyncController.java
│   │   │               └── service
│   │   │                   └── AsyncService.java
│   │   └── resources
│   │       ├── application.yml
│   │       └── templates
│   │           └── index.html
└── pom.xml
Maven 配置
首先,配置 pom.xml 文件,添加所需的依赖:
<?xml versinotallow="1.0" encoding="UTF-8"?>
<project xmlns="http://maven.apache.org/POM/4.0.0" xmlns:xsi="http://www.w3.org/2001/XMLSchema-instance"
	xsi:schemaLocation="http://maven.apache.org/POM/4.0.0 https://maven.apache.org/xsd/maven-4.0.0.xsd">
	<modelVersion>4.0.0</modelVersion>
	<parent>
		<groupId>org.springframework.boot</groupId>
		<artifactId>spring-boot-starter-parent</artifactId>
		<version>3.3.3</version>
		<relativePath/> <!-- lookup parent from repository -->
	</parent>
	<groupId>com.icoderoad</groupId>
	<artifactId>async-demo</artifactId>
	<version>0.0.1-SNAPSHOT</version>
	<name>async-demo</name>
	<description>Demo project for Spring Boot</description>

	<properties>
		<java.version>17</java.version>
	</properties>
	<dependencies>

		<dependency>
            <groupId>org.springframework.boot</groupId>
            <artifactId>spring-boot-starter-web</artifactId>
        </dependency>

        <dependency>
            <groupId>org.springframework.boot</groupId>
            <artifactId>spring-boot-starter-thymeleaf</artifactId>
        </dependency>

        <dependency>
            <groupId>org.springframework.boot</groupId>
            <artifactId>spring-boot-starter-data-jpa</artifactId>
        </dependency>

        <dependency>
            <groupId>org.springframework.boot</groupId>
            <artifactId>spring-boot-starter-webflux</artifactId>
        </dependency>

		<dependency>
			<groupId>org.springframework.boot</groupId>
			<artifactId>spring-boot-starter-test</artifactId>
			<scope>test</scope>
		</dependency>
	</dependencies>

	<build>
		<plugins>
			<plugin>
				<groupId>org.springframework.boot</groupId>
				<artifactId>spring-boot-maven-plugin</artifactId>
			</plugin>
		</plugins>
	</build>

</project>
配置 application.yml
配置文件 application.yml 用于设置应用程序属性:
server:
  port: 8080

spring:
  application:
    name: async-demo
  thymeleaf:
    cache: false
  web:
    resources:
      add-mappings: false
配置异步支持
在 Spring Boot 中启用异步支持,需要在主应用类上添加 @EnableAsync 注解:
package com.icoderoad.async;

import org.springframework.boot.SpringApplication;
import org.springframework.boot.autoconfigure.SpringBootApplication;
import org.springframework.scheduling.annotation.EnableAsync;

@SpringBootApplication
@EnableAsync
public class AsyncDemoApplication {

	public static void main(String[] args) {
		SpringApplication.run(AsyncDemoApplication.class, args);
	}

}
创建异步服务
创建一个服务类 AsyncService,实现以下五种异步处理方式:
使用 @Async 注解
package com.icoderoad.async.service;

import java.time.Duration;
import java.util.concurrent.Callable;
import java.util.concurrent.CompletableFuture;
import java.util.concurrent.Executors;
import java.util.concurrent.ThreadLocalRandom;
import java.util.concurrent.ThreadPoolExecutor;

import org.springframework.scheduling.annotation.Async;
import org.springframework.stereotype.Service;
import org.springframework.web.context.request.async.DeferredResult;
import org.springframework.web.context.request.async.WebAsyncTask;

import reactor.core.publisher.Mono;

@Service
public class AsyncService {
    private final ThreadPoolExecutor executor = (ThreadPoolExecutor) Executors.newCachedThreadPool();

    /**
     * 使用 @Async 注解的异步任务
     * @return CompletableFuture<String> 异步任务的结果
     * @throws InterruptedException 如果线程被中断
     */
    @Async
    public CompletableFuture<String> asyncTaskWithAsyncAnnotation() throws InterruptedException {
        int delay = ThreadLocalRandom.current().nextInt(1000, 5000); // 随机生成任务延迟时间
        Thread.sleep(delay); // 模拟任务执行时间
        return CompletableFuture.completedFuture("使用 @Async 注解的任务完成,耗时 " + delay + " 毫秒");
    }

    /**
     * 使用 CompletableFuture 进行异步任务
     * @return CompletableFuture<String> 异步任务的结果
     * @throws InterruptedException 如果线程被中断
     */
    public CompletableFuture<String> asyncTaskWithCompletableFuture() throws InterruptedException {
        int delay = ThreadLocalRandom.current().nextInt(1000, 5000); // 随机生成任务延迟时间
        return CompletableFuture.supplyAsync(() -> {
            try {
                Thread.sleep(delay); // 模拟任务执行时间
            } catch (InterruptedException e) {
                Thread.currentThread().interrupt(); // 恢复中断状态
            }
            return "使用 CompletableFuture 任务完成,耗时 " + delay + " 毫秒";
        });
    }

    /**
     * 使用 WebFlux 进行异步任务
     * @return Mono<String> 异步任务的结果
     */
    public Mono<String> asyncTaskWithWebFlux() {
        return Mono.fromCallable(() -> {
            int delay = ThreadLocalRandom.current().nextInt(1000, 5000); // 随机生成任务延迟时间
            Thread.sleep(delay); // 模拟任务执行时间
            return "使用 WebFlux 任务完成,耗时 " + delay + " 毫秒";
        }).delayElement(Duration.ofMillis(1000)); // 添加延迟以模拟任务
    }

    /**
     * 使用 WebAsyncTask 进行异步任务
     * @return WebAsyncTask<String> 异步任务的结果
     */
    public WebAsyncTask<String> asyncTaskWithWebAsyncTask() {
        Callable<String> callable = () -> {
            int delay = ThreadLocalRandom.current().nextInt(1000, 5000); // 随机生成任务延迟时间
            Thread.sleep(delay); // 模拟任务执行时间
            return "使用 WebAsyncTask 任务完成,耗时 " + delay + " 毫秒";
        };
        return new WebAsyncTask<>(callable); // 创建并返回 WebAsyncTask
    }

    /**
     * 使用 DeferredResult 进行异步任务
     * @return DeferredResult<String> 异步任务的结果
     */
    public DeferredResult<String> asyncTaskWithDeferredResult() {
        DeferredResult<String> deferredResult = new DeferredResult<>();
        executor.submit(() -> {
            try {
                int delay = ThreadLocalRandom.current().nextInt(1000, 5000); // 随机生成任务延迟时间
                Thread.sleep(delay); // 模拟任务执行时间
                deferredResult.setResult("使用 DeferredResult 任务完成,耗时 " + delay + " 毫秒");
            } catch (InterruptedException e) {
                Thread.currentThread().interrupt(); // 恢复中断状态
                deferredResult.setErrorResult("发生错误"); // 设置错误结果
            }
        });
        return deferredResult; // 返回 DeferredResult
    }
}
创建控制器
创建控制器 AsyncController 来处理 HTTP 请求:
package com.icoderoad.async.controller;

import java.util.concurrent.CompletableFuture;

import org.springframework.beans.factory.annotation.Autowired;
import org.springframework.web.bind.annotation.GetMapping;
import org.springframework.web.bind.annotation.RequestMapping;
import org.springframework.web.bind.annotation.RestController;
import org.springframework.web.context.request.async.DeferredResult;
import org.springframework.web.context.request.async.WebAsyncTask;

import com.icoderoad.async.service.AsyncService;

import reactor.core.publisher.Mono;

@RestController
@RequestMapping("/api")
public class AsyncController {

    @Autowired
    private AsyncService asyncService;

    @GetMapping("/async-annotation")
    public CompletableFuture<String> asyncTaskWithAsyncAnnotation() throws InterruptedException {
        return asyncService.asyncTaskWithAsyncAnnotation();
    }

    @GetMapping("/completable-future")
    public CompletableFuture<String> asyncTaskWithCompletableFuture() throws InterruptedException {
        return asyncService.asyncTaskWithCompletableFuture();
    }

    @GetMapping("/webflux")
    public Mono<String> asyncTaskWithWebFlux() {
        return asyncService.asyncTaskWithWebFlux();
    }

  	@GetMapping("/webasync")
    public WebAsyncTask<String> webAsyncTask() {
        return asyncService.asyncTaskWithWebAsyncTask();
    }

  	@GetMapping("/deferredresult")
    public DeferredResult<String> deferredResult() {
        return asyncService.asyncTaskWithDeferredResult();
    }
}
视图控制器
package com.icoderoad.async.controller;

import org.springframework.stereotype.Controller;
import org.springframework.web.bind.annotation.GetMapping;

@Controller
public class IndexController {

    @GetMapping("/")
    public String index() {
        return "index";
    }

}
创建前端页面
在src/main/resources/templates目录下创建 index.html 页面来展示五种异步请求的结果,并使用 jQuery 实现异步请求的触发:
<!DOCTYPE html>
<html xmlns:th="http://www.thymeleaf.org">
<head>
    <meta charset="UTF-8">
    <title>Spring Boot 异步接口示例</title>
    <link rel="stylesheet" href="https://stackpath.bootstrapcdn.com/bootstrap/4.5.2/css/bootstrap.min.css">
    <script src="https://code.jquery.com/jquery-3.6.0.min.js"></script>
</head>
<body>
    <div class="container">
        <h1 class="mt-5">Spring Boot 异步接口示例</h1>
        <button id="async-annotation" class="btn btn-primary mt-3">调用 @Async 注解接口</button>
        <p id="result-async-annotation"></p>

        <button id="completable-future" class="btn btn-primary mt-3">调用 CompletableFuture 接口</button>
        <p id="result-completable-future"></p>

        <button id="webflux" class="btn btn-primary mt-3">调用 WebFlux 接口</button>
        <p id="result-webflux"></p>

        <button id="webasync" class="btn btn-primary mt-3">调用 WebAsyncTask 接口</button>
        <p id="result-webasync"></p>

        <button id="deferredresult" class="btn btn-primary mt-3">调用 DeferredResult 接口</button>
        <p id="result-deferredresult"></p>
    </div>

    <script>
        $(document).ready(function () {
            $('#async-annotation').click(function () {
                $.get('/api/async-annotation', function (data) {
                    $('#result-async-annotation').text(data);
                });
            });

            $('#completable-future').click(function () {
                $.get('/api/completable-future', function (data) {
                    $('#result-completable-future').text(data);
                });
            });

            $('#webflux').click(function () {
                $.get('/api/webflux', function (data) {
                    $('#result-webflux').text(data);
                });
            });

            $('#webasync').click(function () {
                $.get('/api/webasync', function (data) {
                    $('#result-webasync').text(data);
                });
            });

            $('#deferredresult').click(function () {
                $.get('/api/deferredresult', function (data) {
                    $('#result-deferredresult').text(data);
                });
            });
        });
    </script>
</body>
</html>
总结
通过本文介绍的五种异步处理方式,包括 @Async 注解、CompletableFuture、WebFlux、WebAsyncTask 和 DeferredResult,我们可以有效地提升 Spring Boot 应用的性能。每种方式都有其特定的适用场景和优缺点,开发者可以根据实际需求选择合适的方式来优化应用的吞吐量和响应速度。希望这些示例能够帮助你更好地理解和应用 Spring Boot 中的异步处理功能。


