采用代码聊天:理解代码库的对话式人工智能

译文 精选
人工智能
想象一下,有一个工具可以理解你的代码,可以回答你的问题,提供见解,甚至帮助你调试问题——所有这些都是通过自然语言查询实现的。本文将引导你完成创建对话式人工智能的过程,该过程允许使用Chainlit、Qdrant和OpenAI与你的代码进行对话。

译者 | 李睿

审校 | 重楼

在不断发展的软件开发环境中,与代码库进行对话式交互可以改变游戏规则。

想象一下,有一个工具可以理解你的代码,可以回答你的问题,提供见解,甚至帮助你调试问题——所有这些都是通过自然语言查询实现的。本文将引导你完成创建对话式人工智能的过程,该过程允许使用Chainlit、Qdrant和OpenAI与你的代码进行对话。

对话式人工智能对代码库的好处

  • 简化代码审查:快速审查特定的代码模块并了解其场景,而无需花费更多的时间挖掘文件。
  • 高效调试:询问代码中潜在的问题,并获得有针对性的响应,这有助于减少故障排除所花费的时间。
  • 增强学习: 新的团队成员可以了解代码中不同组件的工作原理,而无需向现有的代码专家学习。
  • 改进文档:使用人工智能进行总结有助于生成复杂代码的解释,从而更容易增强文档。

以下介绍是如何做到这一点的。

为交互准备代码库

第一步是确保代码库已经准备好进行交互。这可以通过将代码向量化并将其存储在向量数据库中来实现,从而有效地对其进行审查。

Python

1 import openai
2 import yaml
3 import os
4 import uuid
5 from qdrant_client import QdrantClient, models
6
7 # Load configuration from config.yaml
8 with open("config.yaml", "r") as file:
9 config = yaml.safe_load(file)
10
11 # Extract API keys and URLs from the config
12 qdrant_cloud_url = config["qdrant"]["url"]
13 qdrant_api_key = config["qdrant"]["api_key"]
14 openai_api_key = config["openai"]["api_key"]
15 code_folder_path = config["folder"]["path"]
16
17 # Initialize OpenAI API
18
openai.api_key = openai_api_key
19
20 # Initialize Qdrant client
21 client = QdrantClient(
22 url=qdrant_cloud_url,
23 api_key=qdrant_api_key,
24 )
25
26 def chunk_code(code, chunk_size=512):
27 """
28 Splits the code into chunks, each of a specified size.
29 This helps in generating embeddings for manageable pieces of code.
30 """
31 lines = code.split('\n')
32 for i in range(0, len(lines), chunk_size):
33 yield '\n'.join(lines[i:i + chunk_size])
34
35 def vectorize_and_store_code(code, filename):
36 try:
37 # Chunk the code for better embedding representation
38 code_chunks = list(chunk_code(code))
39
40 # Generate embeddings for each chunk using the OpenAI API
41 embeddings = []
42 for chunk in code_chunks:
43 response = openai.embeddings.create(
44 input=[chunk], # Input should be a list of strings
45 model="text-embedding-ada-002"
46 )
47
48 # Access the embedding data correctly
49 embedding = response.data[0].embedding
50 embeddings.append(embedding)
51
52 # Flatten embeddings if needed or store each chunk as a separate entry
53 if len(embeddings) == 1:
54 final_embeddings = embeddings[0]
55 else:
56 final_embeddings = [item for sublist in embeddings for item in 
sublist]
57
58 # Ensure the collection exists
59 try:
60 client.create_collection(
61 collection_name="talk_to_your_code",
62 vectors_config=models.VectorParams(size=len(final_embeddings), 
distance=models.Distance.COSINE)
63 )
64 except Exception as e:
65 print("Collection already exists or other error:", e)
66
67 # Insert each chunk into the collection with relevant metadata
68 for i, embedding in enumerate(embeddings):
69 point_id = str(uuid.uuid4())
70 points = [
71 models.PointStruct(
72 id=point_id,
73 vector=embedding,
74 payload={
75 "filename": filename,
76 "chunk_index": i,
77 "total_chunks": len(embeddings),
78 "code_snippet": code_chunks[i]
79 }
80 )
81 ]
82 client.upsert(collection_name="talk_to_your_code", points=points)
83
84 return f"{filename}: Code vectorized and stored successfully."
85
86 except Exception as e:
87 return f"An error occurred with {filename}: {str(e)}"
88
89 def process_files_in_folder(folder_path):
90 for filename in os.listdir(folder_path):
91 if filename.endswith(".py"):
92 file_path = os.path.join(folder_path, filename)
93 with open(file_path, 'r', encoding='utf-8') as file:
94 code = file.read()
95 print(vectorize_and_store_code(code, filename))
96
97 if __name__ == "__main__":
98 process_files_in_folder(code_folder_path)
99

现在了解上述代码值得注意的方面。

  • 加载代码文件并将其分块为可管理的部分。
  • 分块是一个非常重要的环节。块的大小不应过小,以至于你想要了解的函数或模块可以在多个块中使用;也不应该太大,以至于多个函数或模块被压缩到一个块中;这两种情况都会降低检索质量。
  • 使用OpenAI的text- embeddings -ada-002模型为每个块生成嵌入。
  • 在Qdrant中处理和存储嵌入以增强检索。
  • 向代码块中添加元数据将有助于检索特定的组件,并使代码对话功能更加强大。
  • 为简单起见,使用了一个文件夹路径,其中放置了用于构建这个对话模块的两个代码文件。这个设置可以进一步扩展,以便指向GitHub上的URL。
  • 使用2个Python文件,即ragwithknowledgegraph.py和ragwithoutknowledgegraph.py用于生成代码块的嵌入向量,并将其存储在矢量数据库中,可以通过聊天界面对其进行提问。

构建对话界面

现在将设置一个Chainlit界面,该界面接受用户输入,查询Qdrant,并返回关于代码的场景相关信息。

Python

1 import chainlit as cl
2 import qdrant_client
3 import openai
4 import yaml
5 from langchain_openai import ChatOpenAI, OpenAIEmbeddings
6 from langchain.prompts import PromptTemplate
7
8 # Load configuration from config.yaml
9 with open("config.yaml", "r") as file:
10 config = yaml.safe_load(file)
11
12 # Extract API keys and URLs from the config
13 qdrant_cloud_url = config["qdrant"]["url"]
14 qdrant_api_key = config["qdrant"]["api_key"]
15 openai_api_key = config["openai"]["api_key"]
16
17 # Initialize OpenAI API
18 openai.api_key = openai_api_key
19
20 # Initialize OpenAI Embeddings
21 embeddings = OpenAIEmbeddings(model="text-embedding-ada-002", 
openai_api_key=openai_api_key)
22
23 # Initialize Qdrant client
24 client = qdrant_client.QdrantClient(
25 url=qdrant_cloud_url,
26 api_key=qdrant_api_key,
27 )
28
29 # Initialize OpenAI Chat model
30 chat_model = ChatOpenAI(openai_api_key=openai_api_key, model="gpt-4")
31
32 # Define a simple QA prompt template
33 qa_prompt_template = PromptTemplate(
34 input_variables=["context", "question"],
35 template="Given the following context:\n{context}\nAnswer the following 
question:\n{question}"
36 )
37
38 # Chainlit function to handle user input
39 @cl.on_message
40 async def handle_message(message: cl.message.Message):
41 try:
42 # Extract the actual text content from the message object
43 user_input = message.content
44
45 # Generate the query vector using OpenAI Embeddings
46 query_vector = embeddings.embed_query(user_input)
47
48 # Manually send the query to Qdrant
49 response = client.search(
50 collection_name="talk_to_your_code",
51 query_vector=query_vector,
52 limit=5
53 )
54
55 # Process and retrieve the relevant context (code snippets) from the 
Qdrant response
56 context_list = []
57 for point in response:
58 code_snippet = point.payload.get('code_snippet', '')
59 filename = point.payload.get('filename', 'Unknown')
60 context_list.append(f"Filename: {filename}\nCode 
Snippet:\n{code_snippet}\n")
61
62 context = "\n".join(context_list)
63 if not context:
64 context = "No matching documents found."
65
66 # Generate a response using the LLM with the retrieved context
67 prompt = qa_prompt_template.format(context=context, 
question=user_input)
68 response_text = chat_model.predict(prompt)
69
70 # Send the LLM's response
71 await cl.Message(content=response_text).send()
72
73 except Exception as e:
74 # Log the error
75 print(f"Error during message handling: {e}")
76 await cl.Message(content=f"An error occurred: {str(e)}").send()
77
78 if __name__ == "__main__":
79 cl.run()
80

上述代码的重要方面包括:

  • 初始化Chainlit并配置其与OpenAI和Qdrant交互。
  • 为输入生成查询向量,以帮助从Qdrant检索相关代码片段。
  • 定义一个提示模板,将从Qdrant检索到的场景与用户的问题结合起来。
  • 将场景和问题提供给OpenAI的语言模型,并将生成的答案返回给用户。
  • 需要注意的是,为了更好地理解,简化了一些实现。

聊天界面的输出

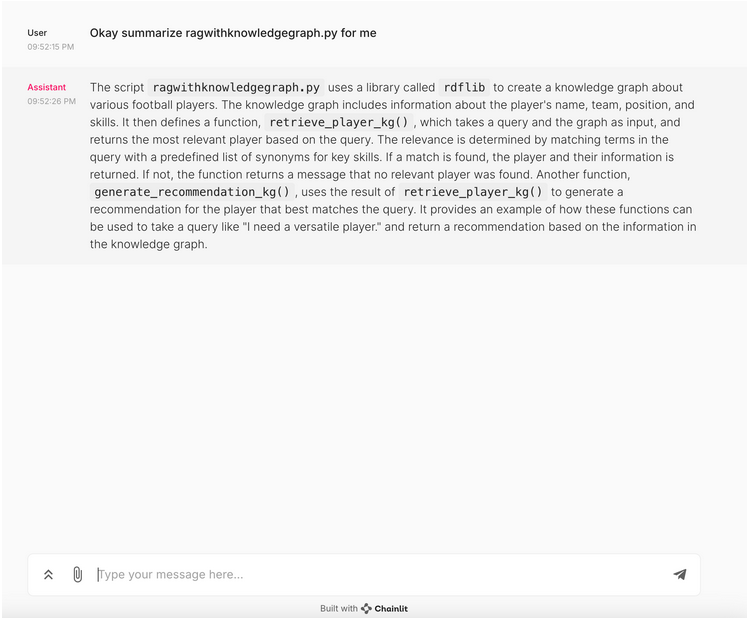
以下了解当要求总结其中一个代码文件时聊天界面生成的输出。如上所述,将2个Python文件加载到vector db,并要求概述其中一个脚本。

这两个脚本中,一个使用了知识图谱来实现一个简单的RAG(检索增强生成)用例,而另一个则没有使用。大型语言模型(LLM)以自然语言的方式很好地完成了对脚本的概述。
下一步骤

  • 通过整合额外的元数据来识别代码的各个方面,从而改进检索。
  • 将聊天界面集成到GitHub URL中,并导入可用于提问的代码库。
  • 通过询问具体和广泛的问题来测试应用程序,以了解应用程序对场景的理解程度。
  • 工程师使用各种不同的提示进行提示和测试检索。

结论

创建一个能够理解你的代码库的对话式人工智能,将在开发过程中解锁一个新的效率和洞察力水平。无论是在简化代码审查、加速调试,还是增强团队协作,这种方法都提供了巨大的价值。通过这种简单的方法,可以改变与代码交互的方式。

原文标题:Chat With Your Code: Conversational AI That Understands Your Codebase,作者:Prince Bose,Tharakarama Reddy Yernapalli Sreenivasulu,Pavan Vemuri

链接:https://dzone.com/articles/conversational-ai-that-understands-your-codebase。

责任编辑:姜华 来源: 51CTO内容精选
相关推荐

2024-04-18 16:12:10

2021-10-08 10:57:19

对话式人工智能关键服务人工智能

2023-05-05 14:59:44

2023-06-30 10:42:00

2023-12-05 14:31:17

人工智能

2016-09-24 22:49:31

2022-02-25 15:59:20

人工智能

2021-03-08 08:00:00

人工智能机器人医疗

2022-11-11 10:07:38

人工智能开源

2023-08-25 10:52:04

2022-05-23 15:56:40

人工智能机器人自然语言

2023-05-05 14:02:59

人工智能聊天机器人

2023-03-28 15:06:47

人工智能聊天机器人

2021-08-24 10:16:51

人工智能机器人工具

2020-02-10 20:16:04

程序员AI人工智能

2023-05-26 13:57:06

人工智能AI

2023-05-11 07:45:28

谷歌人工智能

2022-01-13 06:59:40

人工智能无代码IT

2024-01-05 07:44:22

人工智能用户隐私AI

2019-09-12 15:03:44

点赞
收藏

51CTO技术栈公众号