前言
网络实时通信(WebRTC)是一个开源标准,允许网络应用程序和网站之间的实时通信,而无需插件或额外的软件安装。它也可以作为iOS和安卓应用程序的库,提供与标准相同的功能。
WebRTC适用于任何操作系统,可用于所有现代浏览器,包括谷歌Chrome、Mozilla火狐和Safari。使用WebRTC的一些主要项目包括谷歌会议和Hangouts、WhatsApp、亚马逊Chime、脸书Messenger、Snapchat和Discord。
在本文中,我们将介绍WebRTC的主要用例之一:从一个系统到另一个系统的点对点(P2P)音频和视频流。此功能类似于Twitch等实时流媒体服务,但规模更小、更简单。
要了解的核心WebRTC概念
在本节中,我将回顾您应该了解的五个基本概念,以了解使用WebRTC的Web应用程序的工作原理。这些概念包括点对点通信、Signal服务器和ICE协议。
点对点通信
在本指南中,我们将使用WebRTC的RTCPeerConnection对象,该对象主要涉及连接两个应用程序并允许它们使用点对点协议进行通信。
在去中心化网络中,对等通信是网络中计算机系统(对等点)之间的直接链接,没有中介(例如服务器)。虽然WebRTC不允许对等点在所有场景下直接相互通信,但它使用的ICE协议和Signal服务器允许类似的行为。您将在下面找到更多关于它们的信息。
Signal 服务器
对于WebRTC应用程序中的每一对要开始通信,它们必须执行“握手”,这是通过offer或answer完成的。一个对等点生成offer并与另一个对等点共享,另一个对等点生成answer并与第一个对等点共享。
为了使握手成功,每个对等点都必须有一种方法来共享他们的offer或answer。这就是Signal 服务器的用武之地。
Signal 服务器的主要目标是启动对等点之间的通信。对等点使用信号服务器与另一个对等点共享其offer或answer,另一个可以使用Signal 服务器与第一个对等点共享其offer或answer。
ICE协议
在特定情况下,比如当所有涉及的设备都不在同一个本地网络中时,WebRTC应用程序可能很难相互建立对等连接。这是因为除非对等点在同一个本地网络中,否则它们之间的直接socket连接并不总是可能的。
当您想使用跨不同网络的对等连接时,您需要使用交互式连通建立方式(ICE)协议。ICE协议用于在Internet上的对等点之间建立连接。ICE服务器使用该协议在对等点之间建立连接和中继信息。
ICE协议包括用于NAT的会话遍历实用程序(STUN)协议、围绕NAT使用中继的遍历(TURN)协议或两者的混合。
在本教程中,我们不会涵盖ICE协议的实际方面,因为构建服务器、让它工作和测试它所涉及的复杂性。然而,了解WebRTC应用程序的限制以及ICE协议在哪里可以解决这些限制是有帮助的。
WebRTC P2P视频流入门
现在我们已经完成了所有这些,是时候开始复杂的工作了。在下一节中,我们将研究视频流项目。当我们开始时,您可以在这里看到该项目的现场演示。
在我们开始之前,我有一个GitHub存储库 https://github.com/GhoulKingR/webrtc-project ,您可以克隆它以关注本文。此存储库有一个start-tutorial文件夹,按照您将在下一节中采取的步骤进行组织,以及每个步骤末尾的代码副本。虽然不需要使用repo,但它很有帮助。
我们将在repo中处理的文件夹称为start-tutorial。它包含三个文件夹:step-1、step-2和step-3。这三个文件夹对应于下一节中的步骤。
运行视频流项目
现在,让我们开始构建项目。我把这个过程分为三个步骤。我们将创建一个项目,我们可以在每个步骤中运行、测试和使用。
这些步骤包括:
- 网页内的视频流
- 使用BroadcastChannel在浏览器选项卡和窗口之间的流
- 使用 signal服务器在同一设备上的不同浏览器之间流。
网页内的视频流
在这一步中,我们只需要一个index.html文件。如果您在repo中工作,您可以使用start-tutorial/step-1/index.html文件。
现在,让我们将此代码粘贴到其中:
<body>
  <video id="local" autoplay muted></video>
  <video id="remote" autoplay></video>

  <button onclick="start(this)">start video</button>
  <button id="stream" onclick="stream(this)" disabled>stream video</button>

  <script>
    // get video elements
    const local = document.querySelector("video#local");
    const remote = document.querySelector("video#remote");

    function start(e) {
      e.disabled = true;
      navigator.mediaDevices.getUserMedia({ audio: true, video: true })
        .then((stream) => {
          local.srcObject = stream;
          document.getElementById("stream").disabled = false;  // enable the stream button
        })
        .catch(() => e.disabled = false);
    }

function stream(e) {
      // disable the stream button
      e.disabled = true;

      const config = {};
      const localPeerConnection = new RTCPeerConnection(config);  // local peer
      const remotePeerConnection = new RTCPeerConnection(config);  // remote peer

      // if an icecandidate event is triggered in a peer add the ice candidate to the other peer
      localPeerConnection.addEventListener("icecandidate", e => remotePeerConnection.addIceCandidate(e.candidate));
      remotePeerConnection.addEventListener("icecandidate", e => localPeerConnection.addIceCandidate(e.candidate));

      // if the remote peer detects a track in the connection, it forwards it to the remote video element
      remotePeerConnection.addEventListener("track", e => remote.srcObject = e.streams[0]);

      // get camera and microphone source tracks and add it to the local peer
      local.srcObject.getTracks()
        .forEach(track => localPeerConnection.addTrack(track, local.srcObject));
      // Start the handshake process
      localPeerConnection.createOffer({ offerToReceiveAudio: true, offerToReceiveVideo: true })
        .then(async offer => {
          await localPeerConnection.setLocalDescription(offer);
          await remotePeerConnection.setRemoteDescription(offer);
          console.log("Created offer");
        })
        .then(() => remotePeerConnection.createAnswer())
        .then(async answer => {
          await remotePeerConnection.setLocalDescription(answer);
          await localPeerConnection.setRemoteDescription(answer);
          console.log("Created answer");
        });
    }
  </script>
</body>
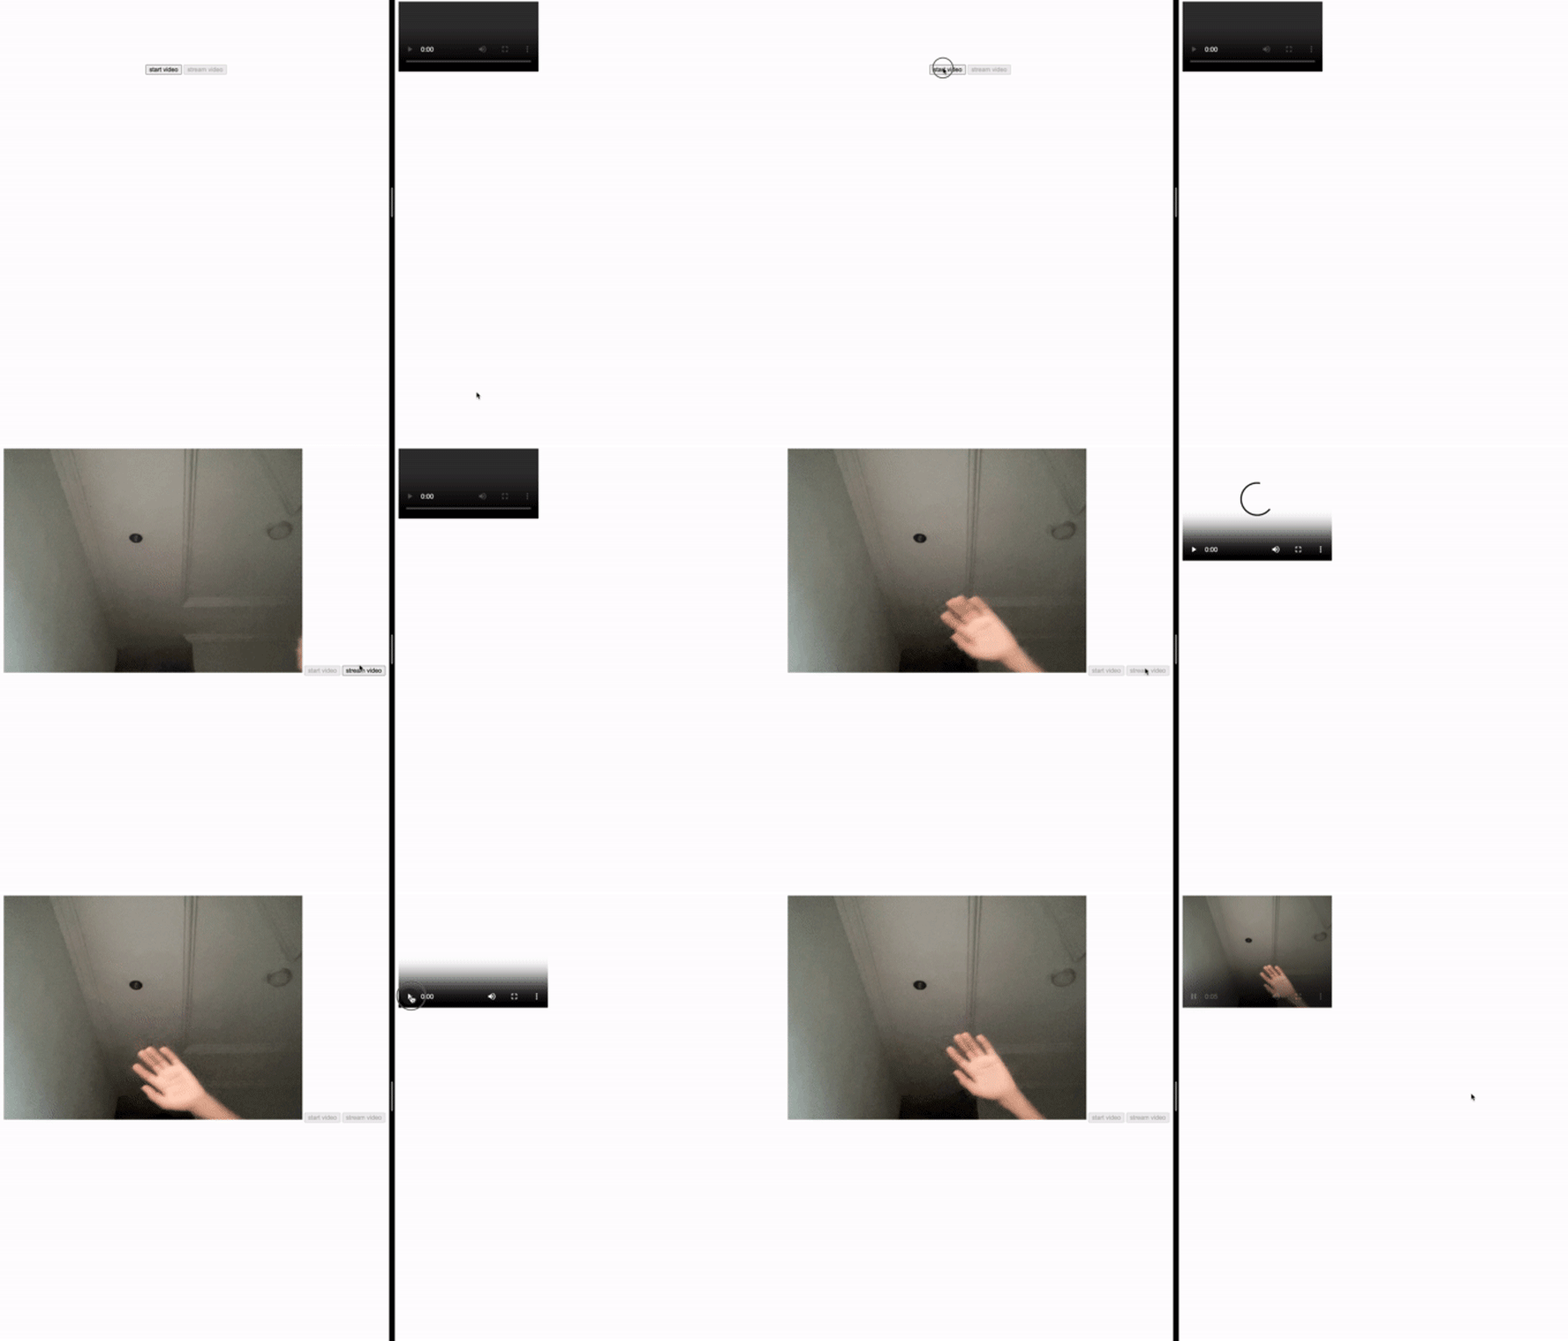
它会给你一些看起来像这样的展示:
 图片
图片
现在,让我们来看看这是怎么回事。
要构建项目,我们需要两个视频元素。我们将使用一个来捕获用户的相机和麦克风。之后,我们将使用WebRTC的RTCPeerConnection对象将此元素的音频和视频流馈送到另一个视频元素:
<video id="local" autoplay muted></video>
<video id="remote" autoplay></video>
RTCPeerConnection对象是在Web浏览器或设备之间建立直接点对点连接的主要对象。
然后我们需要两个按钮。一个是激活用户的网络摄像头和麦克风,另一个是将第一个视频元素的内容流式传输到第二个:
<button onclick="start(this)">start video</button>
<button id="stream" onclick="stream(this)" disabled>stream video</button>
单击时,"start video"按钮运行start功能。单击时,"stream video"按钮运行stream功能。
我们首先看一下start函数:
function start(e) {
  e.disabled = true;
  navigator.mediaDevices.getUserMedia({ audio: true, video: true })
   .then((stream) => {
      local.srcObject = stream;
      document.getElementById("stream").disabled = false;  // enable the stream button
    })
    .catch(() => e.disabled = false);
}
当start函数运行时,它首先使开始按钮不可单击。然后,它通过navigator.mediaDevices.getUserMedia方法请求用户使用其网络摄像头和麦克风的权限。
如果用户授予权限,start函数通过其srcObject字段将视频和音频流发送到第一个视频元素,并启用stream按钮。如果从用户那里获得权限出现问题或用户拒绝权限,该函数会再次单击start按钮。
现在,让我们看一下stream函数:
function stream(e) {
  // disable the stream button
  e.disabled = true;

  const config = {};
  const localPeerConnection = new RTCPeerConnection(config);  // local peer
  const remotePeerConnection = new RTCPeerConnection(config);  // remote peer

  // if an icecandidate event is triggered in a peer add the ice candidate to the other peer
  localPeerConnection.addEventListener("icecandidate", e => remotePeerConnection.addIceCandidate(e.candidate));
  remotePeerConnection.addEventListener("icecandidate", e => localPeerConnection.addIceCandidate(e.candidate));

  // if the remote peer receives track from the connection, it feeds them to the remote video element
  remotePeerConnection.addEventListener("track", e => remote.srcObject = e.streams[0]);

  // get camera and microphone tracks then feed them to local peer
  local.srcObject.getTracks()
    .forEach(track => localPeerConnection.addTrack(track, local.srcObject));

  // Start the handshake process
  localPeerConnection.createOffer({ offerToReceiveAudio: true, offerToReceiveVideo: true })
    .then(async offer => {
      await localPeerConnection.setLocalDescription(offer);
      await remotePeerConnection.setRemoteDescription(offer);
      console.log("Created offer");
    })
    .then(() => remotePeerConnection.createAnswer())
    .then(async answer => {
      await remotePeerConnection.setLocalDescription(answer);
      await localPeerConnection.setRemoteDescription(answer);
      console.log("Created answer");
    });
}
我添加了注释来概述stream函数中的过程,以帮助理解它。然而,握手过程(第21-32行)和ICE候选事件(第10行和第11行)是我们将更详细讨论的重要部分。
在握手过程中,每对都会根据对创建的offer和answer设置其本地和远程描述:
- 生成offer的对将其本地描述设置为该offer,然后将offer的副本发送到第二对以设置为其远程描述
- 同样,生成answer的对将answer设置为其本地描述,并将副本发送到第一对以设置为其远程描述
完成这个过程后,同行立即开始相互交流。
ICE候选是对等方的地址(IP、端口和其他相关信息)。RTCPeerConnection对象使用ICE候选来查找和相互通信。RTCPeerConnection对象中的icecandidate事件在对象生成ICE候选时触发。
我们设置的事件侦听器的目标是将ICE候选人从一个对等点传递到另一个对等点。
在浏览器选项卡和带有BroadcastChannel的窗口之间
使用WebRTC设置点对点应用程序的挑战之一是让它跨不同的应用程序实例或网站工作。在本节中,我们将使用广播频道API允许我们的项目在单个网页之外但在浏览器上下文中工作。
创建必要的文件
我们将从创建两个文件开始,streamer.html和index.html。在repo中,这些文件位于start-tutorial/step-2文件夹中。streamer.html页面允许用户从他们的相机创建实时流,而index.html页面将使用户能够观看这些实时流。
现在,让我们将这些代码块粘贴到文件中。然后,我们将更深入地研究它们。
首先,在streamer.html文件中,粘贴以下代码:
<body>
  <video id="local" autoplay muted></video>
  <button onclick="start(this)">start video</button>
  <button id="stream" onclick="stream(this)" disabled>stream video</button>
  <script>
    // get video elements
    const local = document.querySelector("video#local");
    let peerConnection;
    const channel = new BroadcastChannel("stream-video");
    channel.onmessage = e => {
      if (e.data.type === "icecandidate") {
        peerConnection?.addIceCandidate(e.data.candidate);
      } else if (e.data.type === "answer") {
        console.log("Received answer")
        peerConnection?.setRemoteDescription(e.data);
      }
    }
    // function to ask for camera and microphone permission
    // and stream to #local video element
    function start(e) {
      e.disabled = true;
      document.getElementById("stream").disabled = false;  // enable the stream button
      navigator.mediaDevices.getUserMedia({ audio: true, video: true })
        .then((stream) => local.srcObject = stream);
    }

     function stream(e) {
      e.disabled = true;

      const config = {};
      peerConnection = new RTCPeerConnection(config);  // local peer connection

      // add ice candidate event listener
      peerConnection.addEventListener("icecandidate", e => {
        let candidate = null;

        // prepare a candidate object that can be passed through browser channel
        if (e.candidate !== null) {
          candidate = {
            candidate: e.candidate.candidate,
            sdpMid: e.candidate.sdpMid,
            sdpMLineIndex: e.candidate.sdpMLineIndex,
          };
        }
        channel.postMessage({ type: "icecandidate", candidate });
      });

      // add media tracks to the peer connection
      local.srcObject.getTracks()
        .forEach(track => peerConnection.addTrack(track, local.srcObject));
        // Create offer and send through the browser channel
      peerConnection.createOffer({ offerToReceiveAudio: true, offerToReceiveVideo: true })
        .then(async offer => {
          await peerConnection.setLocalDescription(offer);
          console.log("Created offer, sending...");
          channel.postMessage({ type: "offer", sdp: offer.sdp });
        });
    }
  </script>
</body>
然后,在index.html文件中,粘贴以下代码:
<body>
  <video id="remote" controls></video>

  <script>
    // get video elements
    const remote = document.querySelector("video#remote");
    let peerConnection;

    const channel = new BroadcastChannel("stream-video");
    channel.onmessage = e => {
      if (e.data.type === "icecandidate") {
        peerConnection?.addIceCandidate(e.data.candidate)
      } else if (e.data.type === "offer") {
        console.log("Received offer")
        handleOffer(e.data)
      }
    }
    function handleOffer(offer) {
      const config = {};
      peerConnection = new RTCPeerConnection(config);
      peerConnection.addEventListener("track", e => remote.srcObject = e.streams[0]);
      peerConnection.addEventListener("icecandidate", e => {
        let candidate = null;
        if (e.candidate !== null) {
          candidate = {
            candidate: e.candidate.candidate,
            sdpMid: e.candidate.sdpMid,
            sdpMLineIndex: e.candidate.sdpMLineIndex,
          }
        }
        channel.postMessage({ type: "icecandidate", candidate })
      });
      peerConnection.setRemoteDescription(offer)
        .then(() => peerConnection.createAnswer())
        .then(async answer => {
          await peerConnection.setLocalDescription(answer);
          console.log("Created answer, sending...")
          channel.postMessage({
            type: "answer",
            sdp: answer.sdp,
          });
        });
    }
  </script>
</body>
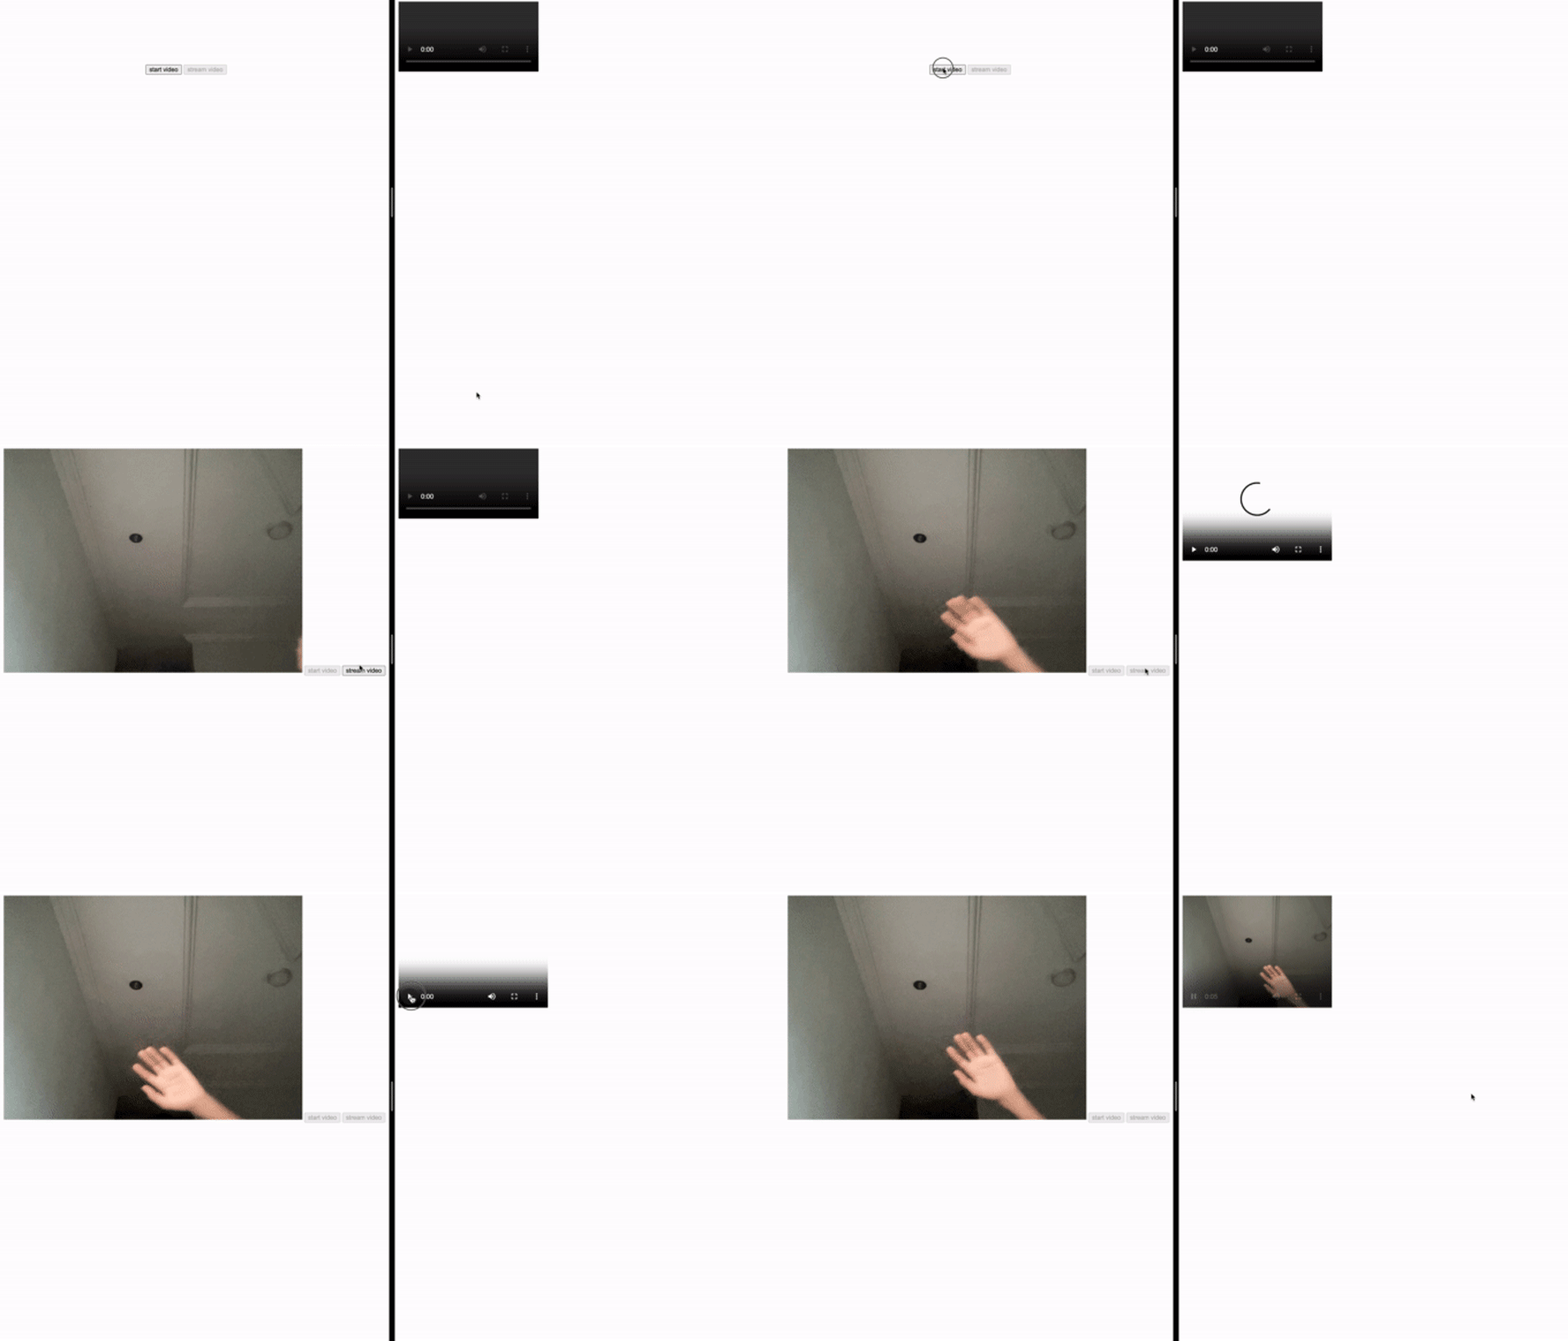
在您的浏览器中,页面的外观和功能将类似于以下动画:
 图片
图片
streamer.html文件的详细分解
现在,让我们更详细地探索这两个页面。我们将从streamer.html页面开始。此页面只需要一个视频和两个按钮元素:
<video id="local" autoplay muted></video>
<button onclick="start(this)">start video</button>
<button id="stream" onclick="stream(this)" disabled>stream video</button>
"start video"按钮的工作方式与上一步相同:它请求用户允许使用他们的相机和麦克风,并将流提供给视频元素。然后,"stream video"按钮初始化对等连接并将视频流提供给对等连接。
由于此步骤涉及两个网页,我们正在使用广播频道API。在我们的index.html和streamer.html文件中,我们必须在每个页面上初始化一个具有相同名称的BroadcastChannel对象,以允许它们进行通信。
BroadcastChannel对象允许您在具有相同URL来源的浏览上下文(例如窗口或选项卡)之间传递基本信息。
当你初始化一个BroadcastChannel对象时,你必须给它一个名字。你可以把这个名字想象成聊天室的名字。如果你用相同的名字初始化两个BroadcastChannel对象,他们可以像在聊天室一样互相交谈。但是如果他们有不同的名字,他们就不能交流,因为他们不在同一个聊天室里。
我说“聊天室”是因为您可以拥有多个具有相同名称的BroadcastChannel对象,并且它们都可以同时相互通信。
由于我们正在处理两个页面,每个页面都有对等连接,我们必须使用BroadcastChannel对象在两个页面之间来回传递offer和answer。我们还必须将对等连接的ICE候选传递给另一个。所以,让我们看看它是如何完成的。
这一切都从stream函数开始:
// streamer.html -> script element

function stream(e) {
  e.disabled = true;

  const config = {};
  peerConnection = new RTCPeerConnection(config);  // local peer connection

  // add ice candidate event listener
  peerConnection.addEventListener("icecandidate", e => {
    let candidate = null;

    // prepare a candidate object that can be passed through browser channel
    if (e.candidate !== null) {
      candidate = {
        candidate: e.candidate.candidate,
        sdpMid: e.candidate.sdpMid,
        sdpMLineIndex: e.candidate.sdpMLineIndex,
      };
    }
    channel.postMessage({ type: "icecandidate", candidate });
  });

   // add media tracks to the peer connection
  local.srcObject.getTracks()
    .forEach(track => peerConnection.addTrack(track, local.srcObject));

  // Create offer and send through the browser channel
  peerConnection.createOffer({ offerToReceiveAudio: true, offerToReceiveVideo: true })
    .then(async offer => {
      await peerConnection.setLocalDescription(offer);
      console.log("Created offer, sending...");
      channel.postMessage({ type: "offer", sdp: offer.sdp });
    });
}
函数中有两个区域与BrowserChannel对象交互。第一个是ICE候选事件侦听器:
peerConnection.addEventListener("icecandidate", e => {
  let candidate = null;

  // prepare a candidate object that can be passed through browser channel
  if (e.candidate !== null) {
    candidate = {
      candidate: e.candidate.candidate,
      sdpMid: e.candidate.sdpMid,
      sdpMLineIndex: e.candidate.sdpMLineIndex,
    };
  }
  channel.postMessage({ type: "icecandidate", candidate });
});
另一种是生成offer后:
peerConnection.createOffer({ offerToReceiveAudio: true, offerToReceiveVideo: true })
  .then(async offer => {
    await peerConnection.setLocalDescription(offer);
    console.log("Created offer, sending...");
    channel.postMessage({ type: "offer", sdp: offer.sdp });
  });
让我们先看看ICE候选事件侦听器。如果您将e.candidate对象直接传递给BroadcastChannel对象,您将在控制台中收到DataCloneError: object can not be cloned错误消息。
发生此错误是因为BroadcastChannel对象无法直接处理e.candidate。您需要从e.candidate创建一个包含所需详细信息的对象以发送到BroadcastChannel对象。我们必须做同样的事情来发送offer。
您需要调用channel.postMessage方法向BroadcastChannel对象发送消息。调用此消息时,另一个网页上的BroadcastChannel对象会触发其onmessage事件侦听器。从index.html页面查看此代码:
channel.onmessage = e => {
  if (e.data.type === "icecandidate") {
    peerConnection?.addIceCandidate(e.data.candidate)
  } else if (e.data.type === "offer") {
    console.log("Received offer")
    handleOffer(e.data)
  }
}
如您所见,我们有条件语句检查进入BroadcastChannel对象的消息类型。消息的内容可以通过e.data读取。e.data.type对应于我们通过channel.postMessage发送的对象的类型字段:
// from the ICE candidate event listener
channel.postMessage({ type: "icecandidate", candidate });

// from generating an offer
channel.postMessage({ type: "offer", sdp: offer.sdp });
现在,让我们看一下处理收到的offer的index.html文件。
index.html文件的详细分解
index.html文件以handleOffer函数开头:
function handleOffer(offer) {
  const config = {};
  peerConnection = new RTCPeerConnection(config);
  peerConnection.addEventListener("track", e => remote.srcObject = e.streams[0]);
  peerConnection.addEventListener("icecandidate", e => {
    let candidate = null;
    if (e.candidate !== null) {
      candidate = {
        candidate: e.candidate.candidate,
        sdpMid: e.candidate.sdpMid,
        sdpMLineIndex: e.candidate.sdpMLineIndex,
      }
    }
    channel.postMessage({ type: "icecandidate", candidate })
  });
  peerConnection.setRemoteDescription(offer)
    .then(() => peerConnection.createAnswer())
    .then(async answer => {
      await peerConnection.setLocalDescription(answer);
      console.log("Created answer, sending...")
      channel.postMessage({
        type: "answer",
        sdp: answer.sdp,
      });
    });
}
当触发时,此方法创建对等连接并将其生成的任何ICE候选发送给另一个对等。然后,继续握手过程,将流媒体的offer设置为其远程描述,生成answer,将该answer设置为其本地描述,并使用BroadcastChannel对象将该answer发送给流媒体。
与index.html文件中的BroadcastChannel对象一样,streamer.html文件中的BroadcastChannel对象需要一个onmessage事件侦听器来接收ICE候选者并从index.html文件中回答:
channel.onmessage = e => {
  if (e.data.type === "icecandidate") {
    peerConnection?.addIceCandidate(e.data.candidate);
  } else if (e.data.type === "answer") {
    console.log("Received answer")
    peerConnection?.setRemoteDescription(e.data);
  }
}
如果您想知道为什么问号?在peerConnection之后,它告诉JavaScript运行时在peerConnection未定义时不要抛出错误。这在某种程度上是一个简写:
if (peerConnection) {
  peerConnection.setRemoteDescription(e.data);
}
用我们的Signal服务器替换BroadcastChannel
BroadcastChannel仅限于浏览器上下文。在这一步中,我们将通过使用一个简单的Signal服务器来克服这个限制,我们将使用Node. js构建它。与前面的步骤一样,我将首先给您粘贴的代码,然后解释其中发生了什么。
那么,让我们开始吧。这一步需要四个文件:index.html、streamer.html、signalserverclass.js和server/index.js。
我们将从signalserverclass.js文件开始:
class SignalServer {
  constructor(channel) {
    this.socket = new WebSocket("ws://localhost:80");
    this.socket.addEventListener("open", () => {
      this.postMessage({ type: "join-channel", channel });
    });
    this.socket.addEventListener("message", (e) => {
      const object = JSON.parse(e.data);
      if (object.type === "connection-established") console.log("connection established");
      else if (object.type === "joined-channel") console.log("Joined channel: " + object.channel);
      else this.onmessage({ data: object });
    });
  }

  onmessage(e) {}
  postMessage(data) {
    this.socket.send( JSON.stringify(data) );
  }
}
接下来,让我们更新index.html和streamer.html文件。对这些文件的唯一更改是我们初始化BroadcastChannel对象和导入signalserverclass.js脚本的脚本标记。
这是更新的index.html文件:
<body>
  <video id="remote" controls></video>

  <script src="signalserverclass.js"></script>          <!-- new change -->
  <script>
    const remote = document.querySelector("video#remote");
    let peerConnection;
    const channel = new SignalServer("stream-video");     // <- new change
    channel.onmessage = e => {
      if (e.data.type === "icecandidate") {
        peerConnection?.addIceCandidate(e.data.candidate);
      } else if (e.data.type === "offer") {
        console.log("Received offer");
        handleOffer(e.data);
      }
    }function handleOffer(offer) {
      const config = {};
      peerConnection = new RTCPeerConnection(config);
      peerConnection.addEventListener("track", e => remote.srcObject = e.streams[0]);
      peerConnection.addEventListener("icecandidate", e => {
        let candidate = null;
        if (e.candidate !== null) {
          candidate = {
            candidate: e.candidate.candidate,
            sdpMid: e.candidate.sdpMid,
            sdpMLineIndex: e.candidate.sdpMLineIndex,
          };
        }
        channel.postMessage({ type: "icecandidate", candidate });
      });
      peerConnection.setRemoteDescription(offer)
        .then(() => peerConnection.createAnswer())
        .then(async answer => {
          await peerConnection.setLocalDescription(answer);
          console.log("Created answer, sending...");
          channel.postMessage({
            type: "answer",
            sdp: answer.sdp,
          });
        });
    }
  </script>
</body>
这是更新后的streamer.html文件:
<body>
  <video id="local" autoplay muted></video>
  <button onclick="start(this)">start video</button>
  <button id="stream" onclick="stream(this)" disabled>stream video</button>
  <script src="signalserverclass.js"></script>         <!-- new change -->
  <script>
    const local = document.querySelector("video#local");
    let peerConnection;

    const channel = new SignalServer("stream-video");     // <- new change
    channel.onmessage = e => {
      if (e.data.type === "icecandidate") {
        peerConnection?.addIceCandidate(e.data.candidate);
      } else if (e.data.type === "answer") {
        console.log("Received answer");
        peerConnection?.setRemoteDescription(e.data);
      }
    }

    // function to ask for camera and microphone permission
    // and stream to #local video element
    function start(e) {
      e.disabled = true;
      document.getElementById("stream").disabled = false;  // enable the stream button
      navigator.mediaDevices.getUserMedia({ audio: true, video: true })
        .then((stream) => local.srcObject = stream);
    }

    function stream(e) {
      e.disabled = true;

      const config = {};
      peerConnection = new RTCPeerConnection(config);  // local peer connection
      peerConnection.addEventListener("icecandidate", e => {
        let candidate = null;
        if (e.candidate !== null) {
          candidate = {
            candidate: e.candidate.candidate,
            sdpMid: e.candidate.sdpMid,
            sdpMLineIndex: e.candidate.sdpMLineIndex,
          };
        }
        channel.postMessage({ type: "icecandidate", candidate });
      });
      local.srcObject.getTracks()
        .forEach(track => peerConnection.addTrack(track, local.srcObject));

      peerConnection.createOffer({ offerToReceiveAudio: true, offerToReceiveVideo: true })
        .then(async offer => {
          await peerConnection.setLocalDescription(offer);
          console.log("Created offer, sending...");
          channel.postMessage({ type: "offer", sdp: offer.sdp });
        });
    }
  </script>
</body>
最后,这是server/index.js文件的内容:
const { WebSocketServer } = require("ws");

const channels = {};
const server = new WebSocketServer({ port: 80 });
server.on("connection", handleConnection);

function handleConnection(ws) {
  console.log('New connection');
  ws.send( JSON.stringify({ type: 'connection-established' }) );

  let id;
  let channel = "";
  ws.on("error", () => console.log('websocket error'));
  ws.on('message', message => {
    const object = JSON.parse(message);

    if (object.type === "join-channel") {
      channel = object.channel;
      if (channels[channel] === undefined) channels[channel] = [];
      id = channels[channel].length || 0;
      channels[channel].push(ws);
      ws.send(JSON.stringify({type: 'joined-channel', channel}));
    } else {
      // forward the message to other channel memebers
      channels[channel]?.filter((_, i) => i !== id).forEach((member) => {
        member.send(message.toString());
      });
    }
  });
  ws.on('close', () => {
    console.log('Client has disconnected!');
    if (channel !== "") {
      channels[channel] = channels[channel].filter((_, i) => i !== id);
    }
  });
}
图片
图片
要让服务器运行,您需要在终端中打开server文件夹,将该文件夹初始化为Node项目,安装ws包,然后运行index.js文件。这些步骤可以使用以下命令完成:
# initialize the project directory
npm init --y

# install the `ws` package
npm install ws

# run the `index.js` file
node index.js
现在,让我们看看文件。为了减少在将BroadcastChannel对象构造函数与SignalServer构造函数交换后编辑代码的需要,我尝试让SignalServer类模仿您使用BroadcastChannel所做的调用和事情-至少对于我们的用例:
class SignalServer {
  constructor(channel) {
    // what the constructor does
  }

  onmessage(e) {}
  postMessage(data) {
    // what postMessage does
  }
}
此类有一个在初始化时加入通道的构造函数。它还有一个postMessage函数来允许发送消息和一个onmessage方法,当从另一个SignalServer对象接收到消息时调用该方法。
SignalServer类的另一个目的是抽象我们的后端进程。我们的信号服务器是一个WebSocket服务器,因为它允许我们在服务器和客户端之间进行基于事件的双向通信,这使得它成为构建信号服务器的首选。
SignalServer类从其构造函数开始其操作:
constructor(channel) {
  this.socket = new WebSocket("ws://localhost:80");
  this.socket.addEventListener("open", () => {
    this.postMessage({ type: "join-channel", channel });
  });
  this.socket.addEventListener("message", (e) => {
    const object = JSON.parse(e.data);
    if (object.type === "connection-established") console.log("connection established");
    else if (object.type === "joined-channel") console.log("Joined channel: " + object.channel);
    else this.onmessage({ data: object });
  });
}
它首先初始化与后端的连接。当连接变为活动状态时,它会向服务器发送一个我们用作join-channel请求的对象:
this.socket.addEventListener("open", () => {
  this.postMessage({ type: "join-channel", channel });
});
现在,让我们看一下我们的WebSocket服务器:
const { WebSocketServer } = require("ws");

const channels = {};
const server = new WebSocketServer({ port: 80 });
server.on("connection", handleConnection);

function handleConnection(ws) {
  // I cut out the details because it's not in focus right now
}
这是一个非常标准的WebSocket服务器。我们有服务器初始化和事件侦听器,用于新客户端连接到服务器时。唯一的新功能是channels变量,我们使用它来存储每个SignalServer对象加入的通道。
如果一个通道不存在并且一个对象想要加入该通道,我们希望服务器创建一个空数组,其中WebSocket连接作为第一个元素。然后,我们将该数组存储为channels对象中带有通道名称的字段。
您可以在下面的message事件侦听器中看到这一点。代码看起来有点复杂,但上面的解释是对代码作用的一般概述:
// ... first rest of the code
ws.on('message', message => {
  const object = JSON.parse(message);

  if (object.type === "join-channel") {
    channel = object.channel;
    if (channels[channel] === undefined) channels[channel] = [];
    id = channels[channel].length || 0;
    channels[channel].push(ws);
    ws.send(JSON.stringify({type: 'joined-channel', channel}));
// ... other rest of the code
之后,事件侦听器向SignalServer对象发送joined-channel消息,告诉它加入通道的请求成功。
至于事件侦听器的其余部分,它将任何不是join-channel类型的消息发送到通道中的其他SignalServer对象:
// rest of the event listener
  } else {
    // forward the message to other channel memebers
    channels[channel]?.filter((_, i) => i !== id).forEach((member) => {
      member.send(message.toString());
    });
  }
});
在handleConnection函数中,id和channel变量分别存储SignalServer objectWebSocket连接在通道中的位置和SignalServer objectWebSocket连接存储在其中的通道名称:
let id;
let channel = ""; 让id;让频道="";
这些变量是在SignalServer对象加入通道时设置的。它们有助于将来自一个SignalServer对象的消息传递给通道中的其他对象,正如您在else块中看到的那样。当SignalServer对象因任何原因断开连接时,它们也有助于从通道中删除它们:
ws.on('close', () => {
  console.log('Client has disconnected!');
  if (channel !== "") {
    channels[channel] = channels[channel].filter((_, i) => i !== id);
  }
});
最后,回到signalserverclass.js文件中的SignalServer类。让我们看一下从WebSocket服务器接收消息的部分:
this.socket.addEventListener("message", (e) => {
  const object = JSON.parse(e.data);
  if (object.type === "connection-established") console.log("connection established");
  else if (object.type === "joined-channel") console.log("Joined channel: " + object.channel);
  else this.onmessage({ data: object });
});
如果您查看WebSocket服务器的handleConnection函数,服务器直接发送到SignalServer对象的消息类型有两种:joined-channel和connection-established。这两种消息类型由此事件侦听器直接处理。
结论
在本文中,我们介绍了如何使用WebRTC构建P2P视频流应用程序——它的主要用例之一。
我们从在单个页面中创建对等连接开始,以便简单了解WebRTC应用程序是如何工作的,而无需担心信令。然后,我们谈到了使用广播频道API进行信令。最后,我们构建了自己的singal服务器。
关注我,变得更强。
原文:https://blog.logrocket.com/webrtc-video-streaming/
作者:Oduah Chigozie


