设备的地理位置指的是设备所在的地理坐标位置,通常以经度,纬度和海拔高度的形式表示。地理位置信息能在许多业务场景中被应用,如导航、地图服务、位置服务、社交媒体等。通过获取设备的地理位置,开发者可以为用户提供个性化的服务和信息,同时有助于进行地理位置相关的功能开发和数据分析。
本期笔者将以一个Demo为例,帮助有需要的HarmonyOS开发者实现获取设备地理位置的功能。
创建工程
UI设计
导入图片资源
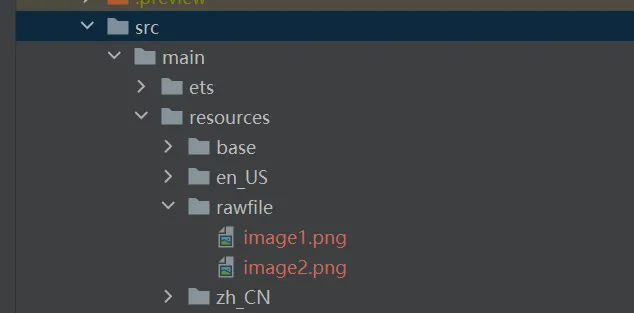
在工程文件目录中打开目录:src/main/resources/rawfile, 添加两张任意的图片(可以在IDE中将待添加的图片资源直接粘贴至rawfile目录下,也可以在文件资源管理器中通过文件路径打开rawfile目录并添加图片资源),分别命名为image1和image2。当然,图片的格式没有要求,只要在之后的步骤中能被正确引用即可。
添加UI描述
打开Index.ets,删除build()中原有的所有代码块,增加新的UI声明和自定义弹窗,并定义一些成员变量,相关代码如下:
@Entry
@Component
struct Index {
title:string = '地理信息面板'
@State Geo_Info:string = ''
//用于存储用户是否授权的状态信息
@State ifAccessible:boolean = false
//new两个弹窗控制器
private dialogController_Accessible : CustomDialogController = new CustomDialogController({
builder:dialog({
message:'已获取权限'
})
})
private dialogController_Inaccessible : CustomDialogController = new CustomDialogController({
builder:dialog({
message:'获取权限失败 | 缺少相关权限'
})
})
build() {
Column({space:10}) {
//新的Text组件
Text(this.title)
.fontSize(26)
.fontWeight(800)
.margin({
top:20,
bottom:20
})
.fontColor('#e699cc')
Row(){
//条件渲染image组件
if(this.ifAccessible == true){
Image($rawfile('image2.png'))
.objectFit(ImageFit.Contain)
.layoutWeight(1)
}else{
Image($rawfile('image1.png'))
.objectFit(ImageFit.Contain)
.layoutWeight(1)
}
Column(){
//两个新的Button组件
Button('获取相关权限')
.width('90%')
.fontSize(18)
.backgroundColor(Color.Pink)
Button('获取地理位置')
.width('90%')
.fontSize(18)
.backgroundColor(Color.Pink)
.margin({
top:14
})
}
.height('100%')
.layoutWeight(4)
.backgroundColor(Color.White)
}
.height('11%')
.width('92%')
//新的TextArea组件
TextArea({
text:this.Geo_Info
})
.width('94%')
.height('50%')
.fontSize(18)
.backgroundColor('#F0F0F0')
.margin({
top:20
})
}
.width('100%')
}
}
//自定义弹窗
@CustomDialog
struct dialog{
controller:CustomDialogController
@State message:string = ''
build(){
Column() {
Text(this.message)
.fontSize(20)
.height(40)
.fontColor(Color.White)
}
.width('100%')
.backgroundColor(Color.Gray)
}
}
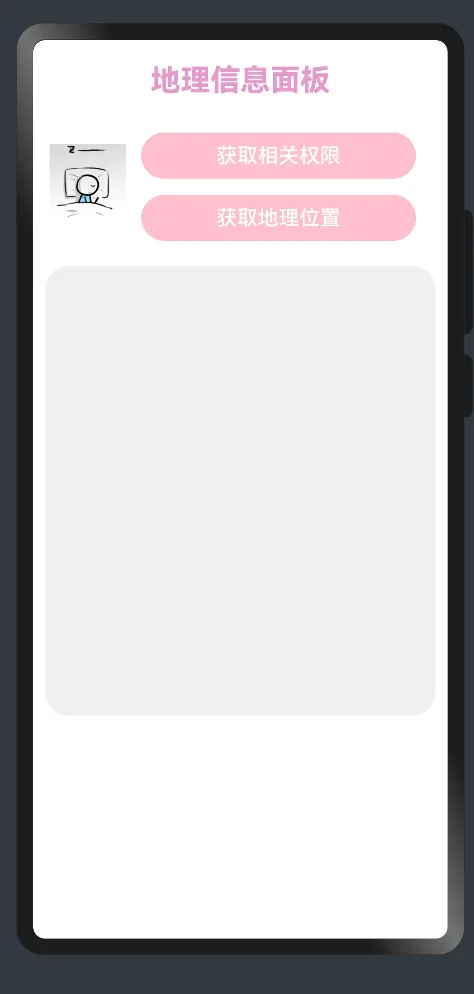
完成Demo的UI设计后,可以打开预览器查看界面效果:
集成功能模块
向用户动态申请授权的基础功能模块
获取设备地理位置信息的前提是用户同意提供相关敏感权限,这意味着我们需要向用户动态申请相关所需权限。而此次关于向用户动态申请授权的模块,笔者将把它们集成在Service目录下的两个TS文件里,分别是Applicant.ts与Detector.ts。
关于如何集成向用户动态申请授权的模块,以及需要在module.json5中添加哪些权限,笔者在上期博客中已详细阐述。
上期博客的链接:https://ost.51cto.com/posts/27101
之后,我们在Index.ets中对其进行调用。
//导入common
import common from '@ohos.app.ability.common'
//导入向用户发起权限申请的模块
import Request_Permission_From_Users from 'ets/Service/Applicant'
@Entry
@Component
struct Index {
......
//获取上下文对象, 储存在成员变量context中
private context = getContext(this) as common.UIAbilityContext
//编写异步方法,调用之前已写好的模块文件Applicant
async apply(){
let res = await Request_Permission_From_Users(this.context)
this.ifAccessible = res
if(res){
this.dialogController_Accessible.open()
}else{
this.dialogController_Inaccessible.open()
}
}
build() {
Column({space:10}) {
......
Column(){
Button('获取相关权限')
.width('90%')
.fontSize(18)
.backgroundColor(Color.Pink)
//调用异步方法apply
.onClick(()=>{
this.apply()
})
......
}
.height('100%')
.layoutWeight(4)
.backgroundColor(Color.White)
}
.height('11%')
.width('92%')
......
}
}
......
获取设备地理信息的功能模块
此功能模块的目的是输出设备所在地的经度,纬度,海拔高度和城市名,以及设备的速度(应该是瞬时的)。这需要先获取设备所在的地理位置坐标,再将地理位置坐标转化为具体的地理描述(即国家,城市等)。
在Service目录下新建一个TypeScript文件(右键Service目录,选择新建,再选择TypeScript),将其命名为Geo。
在编辑器中打开目录Geo.ts,加入以下代码以集成获取设备地理信息的功能,各代码块的具体功能已写注解。
//导入位置服务模块
import geoLocationManager from '@ohos.geoLocationManager';
//导入自定义的权限检查模块
import Check_Access from 'ets/Service/Detector'
//定义结点的标签
const TAG_NODE0 = '------[Geo-Node0] '
const TAG_NODE1 = '------[Geo-Node1] '
const TAG_NODE2 = '------[Geo-Node2] '
/*
*结点函数1:获取用户设备当前所处位置的经度和纬度数据
*/
async function Node1_Get_Geographical_Position(){
//预定义返回值
let output = {
'position_x':null,
'position_y':null,
'position_z':null,
'cityName':' 未知',
'speed':null,
//结点函数的执行状态,默认为失败
'isFinished':false,
'error':'无'
}
//检查定位功能是否可用
if(!geoLocationManager.isLocationEnabled()){
console.info(TAG_NODE1+'Location module loads fail')
output.error = '定位功能不可用, 请检查设备或服务器'
return
}
//定义需要输入的请求参数
let requestInfo = {'priority': 0x203, 'scenario': 0x300,'maxAccuracy': 0}
//等待模块完成获取地理位置的异步操作
await geoLocationManager.getCurrentLocation(requestInfo).then((result) => {
console.info(TAG_NODE1+'Succeed! Current location => latitude: ' + result.latitude+'; longitude: '+result.longitude+';');
//记录获取的地理信息
output.position_x = result.latitude
output.position_y = result.longitude
output.position_z = result.altitude
output.speed = result.speed
//结点函数的执行状态修改为成功
output.isFinished = true
}).catch((error) => {
console.error(TAG_NODE1+'Get current location failed, error: ' + JSON.stringify(error));
output.error = '地理位置获取失败'
});
return output
}
/*
*结点函数2:获取用户设备当前所处的城市名称(中文)
*/
async function Node2_Get_City_Name(input){
//预定义返回值
let output = {
'cityName': ' 未知',
'position_x':input.position_x,
'position_y':input.position_y,
'position_z':input.position_z,
'speed':input.speed,
//结点函数的执行状态,默认为失败
'isFinished': false,
'error':'无'
}
//判断逆地理编码转换服务是否可用
if(!geoLocationManager.isGeocoderAvailable()){
console.error(TAG_NODE2+'Geocoder module loads fail')
output.error = '地理编码转化功能不可用, 请检查设备或服务器'
return output
}
//定义需要输入的请求参数,其中locale键对应的值’zh‘表示服务器将返回中文形式的信息
let reverseGeocodeRequest = {'locale':'zh',"latitude": input.position_x, "longitude": input.position_y, "maxItems": 1};
//等待模块完成逆地理编码转换的异步操作
await geoLocationManager.getAddressesFromLocation(reverseGeocodeRequest).then((result) => {
console.info(TAG_NODE2+'City name : ' + result[0].locality);
//记录获取的城市名
let cityName = result[0].locality
if(cityName.charAt(cityName.length-1) == '市') cityName.replace('市','')
output.cityName = cityName
//结点函数的执行状态修改为成功
output.isFinished = true
}).catch((error) => {
console.error(TAG_NODE2+'Get addresses from location: error: ' + JSON.stringify(error));
output.error = '逆地理编码转换失败'
});
return output
}
//导出可供调用的接口
export async function Get_Geo_Data(){
//模块结点0
if(!Check_Access()){
console.error(TAG_NODE0+'Insufficient required permissions')
return {
'position_x':null,
'position_y':null,
'position_z':null,
'cityName':' 未知',
'speed':null,
'isFinished':false,
'error':'设备未获取相关权限'
}
}
//模块结点1
let output = await Node1_Get_Geographical_Position()
if (!output.isFinished) return output
//模块结点2
return await Node2_Get_City_Name(output)
}
通常,集成这类模块需要优先考虑的问题是回调地狱。回调地狱是指,在使用回调函数处理异步操作时,由于多个异步操作的嵌套和依赖关系,导致代码结构变得混乱和难以维护的情况。在Java中,我们可以通过创建线程和设置各线程优先级的方式,将原本的异步过程调整为线性的同步过程。而在TypeScript中,除了传统的设置线程的方法之外,我们还可以通过Promise或async/await来避免回调地狱,使代码更加清晰和易于理解。
在上述代码中,笔者声明了两个异步函数,分别是Node1_Get_Geographical_Position与Node2_Get_City_Name,不妨称它们为结点函数。其中,第一个结点函数用于获取地理位置信息(包含坐标信息),第二个结点函数用于将所获取的地理坐标信息转换为地理描述,并且,它们在时间维度上有一个执行次序,即先执行第一个结点函数,当其执行完成并返回相关结果后,再执行第二个结点函数。显然,第二个结点函数的输入即为第一个结点函数的输出,而这也是先执行第一个结点函数的原因。
要让两个异步的结点函数按次序线性执行,我们可以定义一个新的异步函数Get_Geo_Data,在其函数体内添加合适的操作语句以调用这两个结点函数。在上述代码中,Get_Geo_Data首先需判定相关的位置权限是否已被提供,接着调用第一个结点函数Node1_Get_Geographical_Position,并在调用时增加了关键字await。这意味着,在Node1_Get_Geographical_Position返回结果之前,Get_Geo_Data函数体中剩下的未执行的操作语句是不会被执行的。当第一个结点函数执行结束后,Get_Geo_Data再调用第二个结点函数Node2_Get_City_Name,同样地,要添加关键字await,否则在第二个结点函数成功响应前,Get_Geo_Data就已经跑完了,这样什么都不会被输出。
接下来,笔者将讨论两个结点函数各自的代码逻辑。
对于第一个结点函数Node1_Get_Geographical_Position,首先它预定义了需要输出的变量output(对应一个Object型数据),其包含7个不同的键值对。接着,检查定位功能是否可用,若可用,则通过导入的系统模块geoLocationManager的getCurrentLocation方法异步获取设备的地理位置信息,并在then()中提取地理位置信息中所携带的经度,纬度,海拔高度,和实时速度。最后,输出变量output。
至于第二个结点函数Node2_Get_City_Name,首先它预定义了需要输出的变量output,并且将传入的参数input(即Node1_Get_Geographical_Position的输出)的一些键对应的值拷贝到output中。之后, 判断逆地理编码转换功能是否可用,若可用,则通过geoLocationManager的getAddressesFromLocation方法异步获取设备所在位置的地理描述信息(即国家,城市等),并在then()中提取地理描述信息中的城市名。最后,输出变量output。
完成功能集成工作后,我们在Index.ets中调用此模块。
......
//导入获取设备地理信息的模块
import { Get_Geo_Data } from 'ets/Service/Geo'
@Entry
@Component
struct Index {
......
//编写异步方法,调用之前已写好的模块文件Geo
async update_geo_data(){
//判断是否获取所需权限
if(!this.ifAccessible){
this.dialogController_Inaccessible.open()
return
}
let info = await Get_Geo_Data()
this.Geo_Info = ' ---地理信息---\n' + '\n当前所在城市:' + info.cityName + '\n纬度: ' + info.position_x + '\n经度: ' + info.position_y + '\n海拔: ' + info.position_z + '\n速度: ' + info.speed + ' m/s\n'
if(!info.isFinished) this.Geo_Info += '\n错误信息: ' + info.error
}
build() {
Column({space:10}) {
.....
Column(){
......
Button('获取地理位置')
.width('90%')
.fontSize(18)
.backgroundColor(Color.Pink)
.margin({
top:14
})
//调用异步方法update_geo_data
.onClick(()=>{
this.update_geo_data()
})
}
.height('100%')
.layoutWeight(4)
.backgroundColor(Color.White)
}
.height('11%')
.width('92%')
......
}
}
......
真机&模拟机调试
可惜的是,模拟机里的逆地理编码转换服务是不可用的,所以其无法得到设备所在地的地理描述,因而无法输出城市名。
相关日志如下,可见,逆地理编码转换服务被检查为不可用。
如果在真机上运行,逆地理编码转换服务是没什么问题的。下图是笔者借用了roommate的真机后得到的程序运行截图。