Vision Transformer(ViT)是一种基于自注意力机制的神经网络架构,主要用于处理图像数据。
它是由谷歌研究人员在 2020 年提出的,标志着「将自然语言处理(NLP)中广泛使用的 Transformer 模型成功应用于计算机视觉领域的一个重要进展。」

基本原理和架构
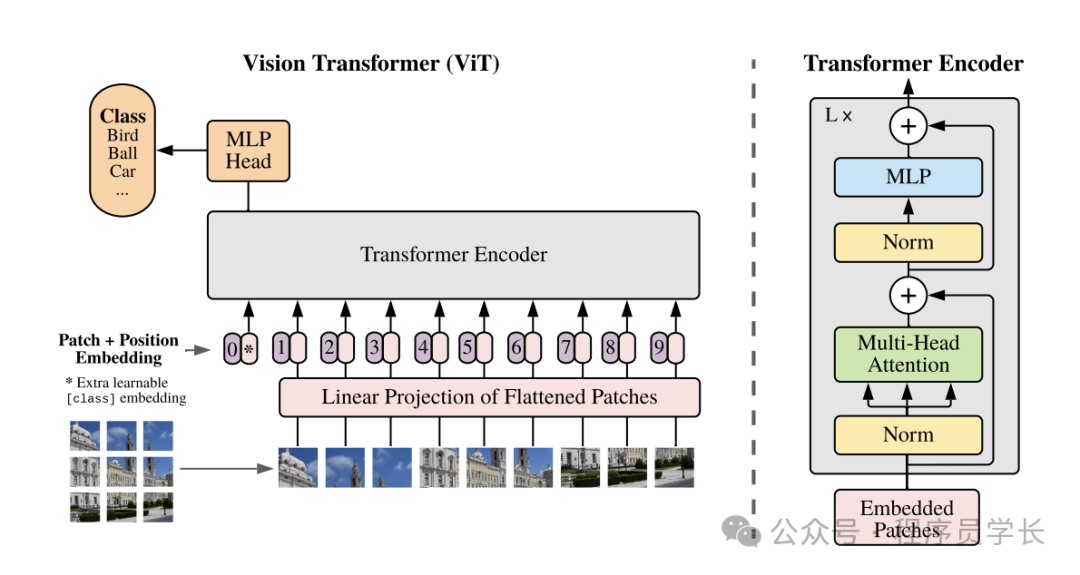
Vision Transformer 的核心思想是将图像分解为一系列的小块(称为 patches),这些小块在输入网络之前被展平并映射到高维空间。这与传统的卷积神经网络(CNN)不同,后者通常会使用卷积层来处理整个图像并提取局部特征。
 图片
图片
1.图像分块
首先,ViT 将输入图像切割成固定大小的小块(例如,16x16像素的块)。每个块被视为一个 “token”,与 NLP 中的单词类似。
2.嵌入层
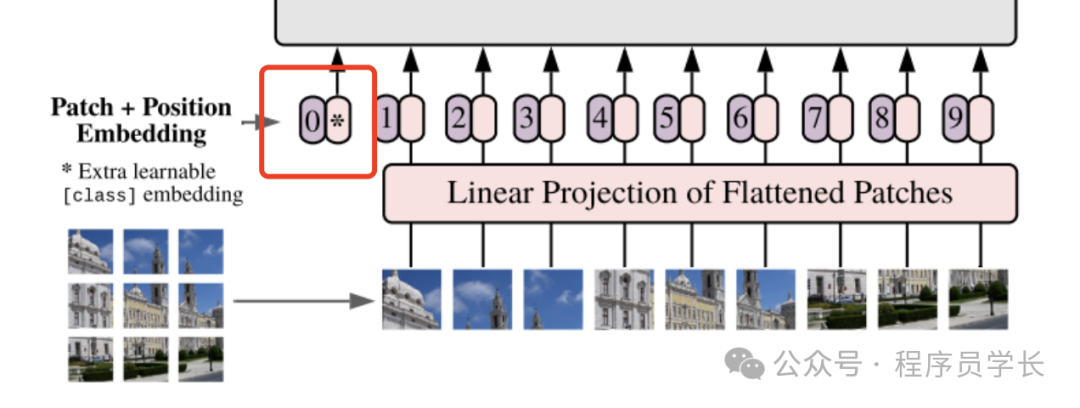
这些图像块(patches)被展平并通过一个线性层转换成一系列的嵌入向量。
此外,还会添加一个可学习的 “class” 嵌入,用于聚合全局信息。
 图片
图片
3.位置编码
为了保留图像块的位置信息,ViT 在嵌入向量中加入位置编码,这是 Transformer 架构中的一个关键组成部分。
4.Transformer 编码器
经过嵌入的图像块(现在作为序列的一部分)输入到标准的 Transformer编码器中。
编码器使用多头自注意力机制和前馈神经网络来处理序列,允许模型捕获块之间的复杂关系。
5.分类头
对于分类任务,Transformer 的输出(特别是 [CLS] token 的输出)会传递到一个前馈网络(即分类头),该网络输出最终的类别预测。
优缺点分析
优点
- 强大的全局信息处理能力
通过自注意力机制,ViT 可以在图像的任何部分之间建立直接的联系,有效捕捉全局依赖关系。 - 高度灵活性
ViT 模型可以很容易地调整到不同大小的输入,且模型架构可扩展性强。 - 更适合大规模数据集
ViT 在大规模数据集上表现通常优于传统 CNN,可以学习更复杂的视觉模式。
缺点
- 需要更多的训练数据
ViT 依赖大量数据来训练,以防止过拟合,对于数据较少的情况可能不如 CNN 有效。 - 计算成本高
由于需要计算长距离的依赖关系,ViT 在计算和内存需求上通常比CNN要高。
代码实现
下面,我们一起来看一下如何使用 VIT 来预测一张图片的类别
1.图像分块
import os
import copy
import math
import typing
import cv2
import numpy as np
import matplotlib.pyplot as plt
import torch
import torch.nn as nn
mountains = np.load('mountains.npy')
H = mountains.shape[0]
W = mountains.shape[1]
print('Mountain at Dusk is H =', H, 'and W =', W, 'pixels.')
P = 20
N = int((H*W)/(P**2))
print('There will be', N, 'patches, each', P, 'by', str(P)+'.')
fig = plt.figure(figsize=(10,6))
plt.imshow(mountains, cmap='Purples_r')
plt.hlines(np.arange(P, H, P)-0.5, -0.5, W-0.5, color='w')
plt.vlines(np.arange(P, W, P)-0.5, -0.5, H-0.5, color='w')
plt.xticks(np.arange(-0.5, W+1, 10), labels=np.arange(0, W+1, 10))
plt.yticks(np.arange(-0.5, H+1, 10), labels=np.arange(0, H+1, 10))
x_text = np.tile(np.arange(9.5, W, P), 3)
y_text = np.repeat(np.arange(9.5, H, P), 5)
for i in range(1, N+1):
plt.text(x_text[i-1], y_text[i-1], str(i), color='w', fnotallow='xx-large', ha='center')
plt.text(x_text[2], y_text[2], str(3), color='k', fnotallow='xx-large', ha='center');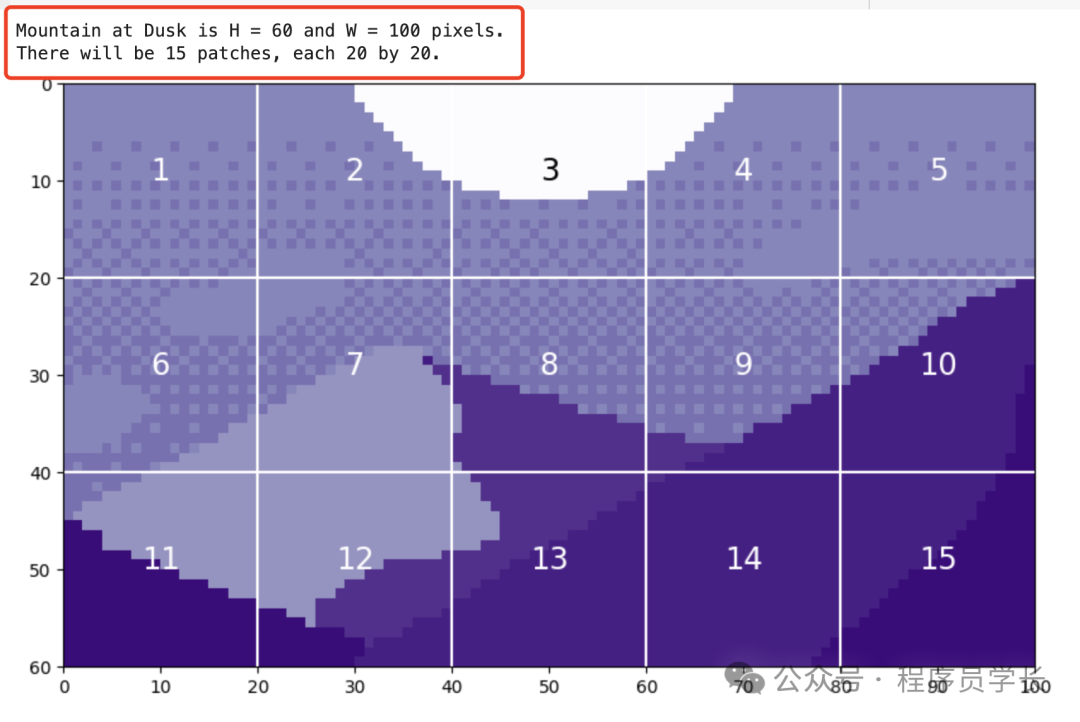 图片
图片
通过展平这些色块,我们可以看到生成的 token。我们以色块 12 为例,因为它包含四种不同的色调。
print('Each patch will make a token of length', str(P**2)+'.')

patch12 = mountains[40:60, 20:40]
token12 = patch12.reshape(1, P**2)
fig = plt.figure(figsize=(10,1))
plt.imshow(token12, aspect=10, cmap='Purples_r')
plt.clim([0,1])
plt.xticks(np.arange(-0.5, 401, 50), labels=np.arange(0, 401, 50))
plt.yticks([])
图片
图片
2.嵌入层
从图像中提取 token 后,通常使用线性投影来更改 token 的长度。
class Patch_Tokenization(nn.Module):
    def __init__(self,
                img_size: tuple[int, int, int]=(1, 1, 60, 100),
                patch_size: int=50,
                token_len: int=768):

        super().__init__()
        self.img_size = img_size
        C, H, W = self.img_size
        self.patch_size = patch_size
        self.token_len = token_len
        assert H % self.patch_size == 0, 'Height of image must be evenly divisible by patch size.'
        assert W % self.patch_size == 0, 'Width of image must be evenly divisible by patch size.'
        self.num_tokens = (H / self.patch_size) * (W / self.patch_size)

        ## Defining Layers
        self.split = nn.Unfold(kernel_size=self.patch_size, stride=self.patch_size, padding=0)
        self.project = nn.Linear((self.patch_size**2)*C, token_len)

    def forward(self, x):
        x = self.split(x).transpose(1,0)
        x = self.project(x)
        return x
请注意,这两个 assert 语句确保图像尺寸可以被块大小整除。实际分割成块的操作是使用 torch.nn.Unfold 层实现的。
x = torch.from_numpy(mountains).unsqueeze(0).unsqueeze(0).to(torch.float32)
token_len = 768
print('Input dimensions are\n\tbatchsize:', x.shape[0], '\n\tnumber of input channels:', x.shape[1], '\n\timage size:', (x.shape[2], x.shape[3]))
# Define the Module
patch_tokens = Patch_Tokenization(img_size=(x.shape[1], x.shape[2], x.shape[3]),
patch_size = P,
token_len = token_len)
x = patch_tokens.split(x).transpose(2,1)
print('After patch tokenization, dimensions are\n\tbatchsize:', x.shape[0], '\n\tnumber of tokens:', x.shape[1], '\n\ttoken length:', x.shape[2])
x = patch_tokens.project(x)
print('After projection, dimensions are\n\tbatchsize:', x.shape[0], '\n\tnumber of tokens:', x.shape[1], '\n\ttoken length:', x.shape[2])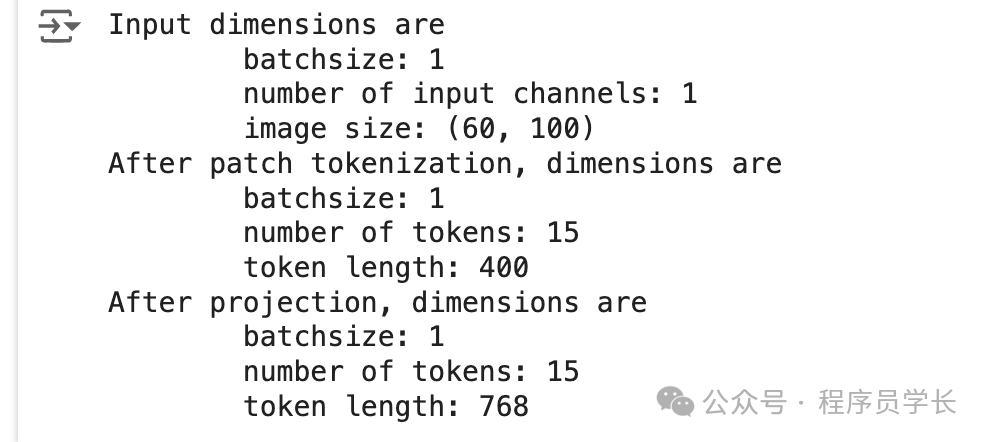 图片
图片
从上图可以看到,经过线性投影层后,token 的维度变成了 768 维。
3.位置编码
接下来将一个空白 token(称为预测标记)添加到图像 token 之前。「此 token 将在编码器的输出中用于进行预测。」
它从空白(相当于零)开始,以便它可以从其他图像 token 中获取信息。
pred_token = torch.zeros(1, 1, x.shape[2]).expand(x.shape[0], -1, -1)
x = torch.cat((pred_token, x), dim=1)
然后,我们为 token 添加一个位置嵌入。
位置嵌入允许 transformer 理解图像标记的顺序。
def get_sinusoid_encoding(num_tokens, token_len):

    def get_position_angle_vec(i):
        return [i / np.power(10000, 2 * (j // 2) / token_len) for j in range(token_len)]

    sinusoid_table = np.array([get_position_angle_vec(i) for i in range(num_tokens)])
    sinusoid_table[:, 0::2] = np.sin(sinusoid_table[:, 0::2])
    sinusoid_table[:, 1::2] = np.cos(sinusoid_table[:, 1::2])

    return torch.FloatTensor(sinusoid_table).unsqueeze(0)


PE = get_sinusoid_encoding(x.shape[1]+1, x.shape[2])
print('Position embedding dimensions are\n\tnumber of tokens:', PE.shape[1], '\n\ttoken length:', PE.shape[2])

x = x + PE
print('Dimensions with Position Embedding are\n\tbatchsize:', x.shape[0], '\n\tnumber of tokens:', x.shape[1], '\n\ttoken length:', x.shape[2])
4.编码器
编码器是模型实际从图像 token 中学习的地方。
编码器主要由注意力模块和神经网络模块组成。
NoneFloat = typing.Union[None, float]
class Attention(nn.Module):
    def __init__(self,
                dim: int,
                chan: int,
                num_heads: int=1,
                qkv_bias: bool=False, qk_scale: Nnotallow=None):

        super().__init__()


        self.num_heads = num_heads
        self.chan = chan
        self.head_dim = self.chan // self.num_heads
        self.scale = qk_scale or self.head_dim ** -0.5

        self.qkv = nn.Linear(dim, chan * 3, bias=qkv_bias)
        self.proj = nn.Linear(chan, chan)

    def forward(self, x):
        if self.chan % self.num_heads != 0:
            raise ValueError('"Chan" must be evenly divisible by "num_heads".')
        B, N, C = x.shape
        qkv = self.qkv(x).reshape(B, N, 3, self.num_heads, self.head_dim).permute(2, 0, 3, 1, 4)

        q, k, v = qkv[0], qkv[1], qkv[2]

        ## Calculate Attention
        attn = (q * self.scale) @ k.transpose(-2, -1)
        attn = attn.softmax(dim=-1)

        x = (attn @ v).transpose(1, 2).reshape(B, N, self.chan)
        x = self.proj(x)

        ## Skip Connection Layer
        v = v.transpose(1, 2).reshape(B, N, self.chan)
        x = v + x
        return x

class NeuralNet(nn.Module):
    def __init__(self,
       in_chan: int,
       hidden_chan: Nnotallow=None,
       out_chan: Nnotallow=None,
       act_layer = nn.GELU):

        super().__init__()

        ## Define Number of Channels
        hidden_chan = hidden_chan or in_chan
        out_chan = out_chan or in_chan

        ## Define Layers
        self.fc1 = nn.Linear(in_chan, hidden_chan)
        self.act = act_layer()
        self.fc2 = nn.Linear(hidden_chan, out_chan)

    def forward(self, x):
        x = self.fc1(x)
        x = self.act(x)
        x = self.fc2(x)
        return x

class Encoding(nn.Module):
    def __init__(self,
       dim: int,
       num_heads: int=1,
       hidden_chan_mul: float=4.,
       qkv_bias: bool=False,
       qk_scale: Nnotallow=None,
       act_layer=nn.GELU,
       norm_layer=nn.LayerNorm):

        super().__init__()

        ## Define Layers
        self.norm1 = norm_layer(dim)
        self.attn = Attention(dim=dim,
                            chan=dim,
                            num_heads=num_heads,
                            qkv_bias=qkv_bias,
                            qk_scale=qk_scale)
        self.norm2 = norm_layer(dim)
        self.neuralnet = NeuralNet(in_chan=dim,
                                hidden_chan=int(dim*hidden_chan_mul),
                                out_chan=dim,
                                act_layer=act_layer)

    def forward(self, x):
        x = x + self.attn(self.norm1(x))
        x = x + self.neuralnet(self.norm2(x))
        return x
现在,我们将通过一个注意力模块。
E = Encoding(dim=x.shape[2], num_heads=4, hidden_chan_mul= 1.5 , qkv_bias= False , qk_scale= None , act_layer=nn.GELU, norm_layer=nn.LayerNorm)
y = E.norm1(x)
print('After norm, dimensions are\n\tbatchsize:', y.shape[0], '\n\tnumber of tokens:', y.shape[1], '\n\ttoken size:', y.shape[2])
y = E.attn(y)
print('After attention, dimensions are\n\tbatchsize:', y.shape[0], '\n\tnumber of tokens:', y.shape[1], '\n\ttoken size:', y.shape[2])
y = y + x
print('After split connection, dimensions are\n\tbatchsize:', y.shape[0], '\n\tnumber of tokens:', y.shape[1], '\n\ttoken size:', y.shape[2])
接下来,我们经过一个神经网络模块。
z = E.norm2(y)
print('After norm, dimensions are\n\tbatchsize:', z.shape[0], '\n\tnumber of tokens:', z.shape[1], '\n\ttoken size:', z.shape[2])
z = E.neuralnet(z)
print('After neural net, dimensions are\n\tbatchsize:', z.shape[0], '\n\tnumber of tokens:', z.shape[1], '\n\ttoken size:', z.shape[2])
z = z + y
print('After split connection, dimensions are\n\tbatchsize:', z.shape[0], '\n\tnumber of tokens:', z.shape[1], '\n\ttoken size:', z.shape[2])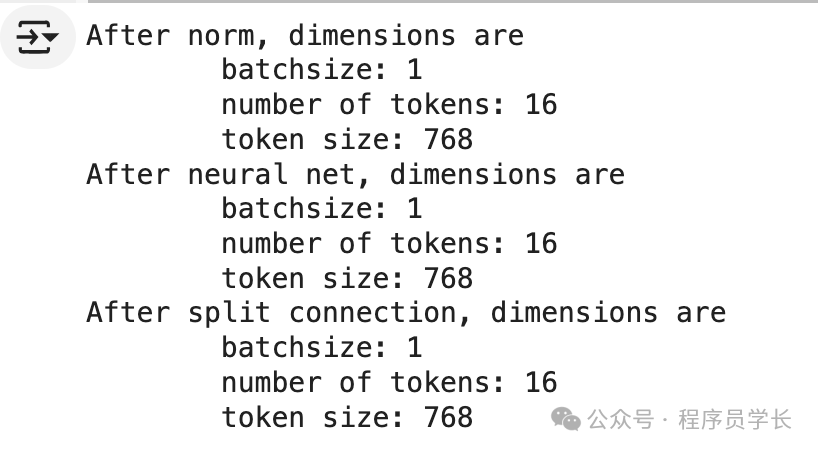 图片
图片
「这就是单个编码器的全部内容!由于最终尺寸与初始尺寸相同,因此模型可以轻松地将 token 传递到多个编码器。」
5.分类头
经过编码器后,模型要做的最后一件事就是进行预测。
norm = nn.LayerNorm(token_len)
z = norm(z)
pred_token = z[:, 0]
head = nn.Linear(pred_token.shape[-1], 1)
pred = head(pred_token)
print('Length of prediction:', (pred.shape[0], pred.shape[1]))
print('Prediction:', float(pred))


