大家好,我是小寒。
今天我将带领大家一步步的来构建一个机器学习模型。
我们将按照以下步骤开发客户流失预测分类模型。
- 业务理解
- 数据收集和准备
- 建立机器学习模型
- 模型优化
- 模型部署
1.业务理解
在开发任何机器学习模型之前,我们必须了解为什么要开发该模型。
这里,我们以客户流失预测为例。
在这种情况下,企业需要避免公司进一步流失,并希望对流失概率高的客户采取行动。有了上述业务需求,所以需要开发一个客户流失预测模型。
2.数据收集和准备
数据采集
数据是任何机器学习项目的核心。没有数据,我们就无法训练机器学习模型。
在现实情况下,干净的数据并不容易获得。通常,我们需要通过应用程序、调查和许多其他来源收集数据,然后将其存储在数据存储中。
在我们的案例中,我们将使用来自 Kaggle 的电信客户流失数据。它是有关电信行业客户历史的开源分类数据,带有流失标签。
https://www.kaggle.com/datasets/blastchar/telco-customer-churn
探索性数据分析 (EDA) 和数据清理
首先,我们加载数据集。
import pandas as pd

df = pd.read_csv('WA_Fn-UseC_-Telco-Customer-Churn.csv')
df.head()
接下来,我们将探索数据以了解我们的数据集。
以下是我们将为 EDA 流程执行的一些操作。
- 检查特征和汇总统计数据。
- 检查特征中是否存在缺失值。
- 分析标签的分布(流失)。
- 为数值特征绘制直方图,为分类特征绘制条形图。
- 为数值特征绘制相关热图。
- 使用箱线图识别分布和潜在异常值。
首先,我们将检查特征和汇总统计数据。
df.info()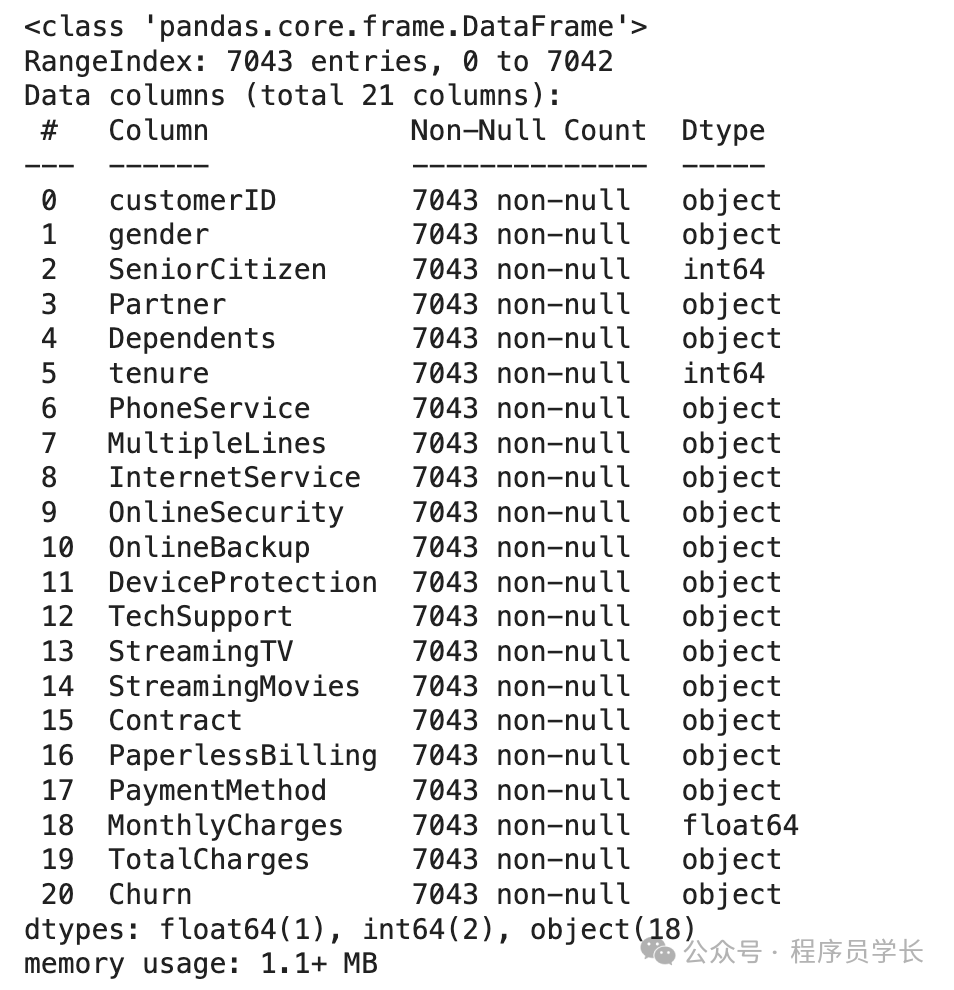 图片
图片
df.describe()

df.describe(exclude = 'number')
图片
图片
让我们检查一下缺失的数据。
df.isnull().sum()可以看到,数据集不包含缺失数据,因此我们不需要执行任何缺失数据处理活动。
然后,我们将检查目标变量以查看是否存在不平衡情况。
df['Churn'].value_counts() 图片
图片
存在轻微的不平衡,因为与无客户流失的情况相比,只有接近 25% 的客户流失发生。
让我们再看看其他特征的分布情况,从数字特征开始。
import numpy as np
df['TotalCharges'] = df['TotalCharges'].replace('', np.nan)
df['TotalCharges'] = pd.to_numeric(df['TotalCharges'], errors='coerce').fillna(0)

df['SeniorCitizen'] = df['SeniorCitizen'].astype('str')

df['ChurnTarget'] = df['Churn'].apply(lambda x: 1 if x=='Yes' else 0)

num_features = df.select_dtypes('number').columns
df[num_features].hist(bins=15, figsize=(15, 6), layout=(2, 5))
图片
图片
我们还将提供除 customerID 之外的分类特征绘图。
import matplotlib.pyplot as plt
# Plot distribution of categorical features
cat_features = df.drop('customerID', axis =1).select_dtypes(include='object').columns
plt.figure(figsize=(20, 20))
for i, col in enumerate(cat_features, 1):
plt.subplot(5, 4, i)
df[col].value_counts().plot(kind='bar')
plt.title(col)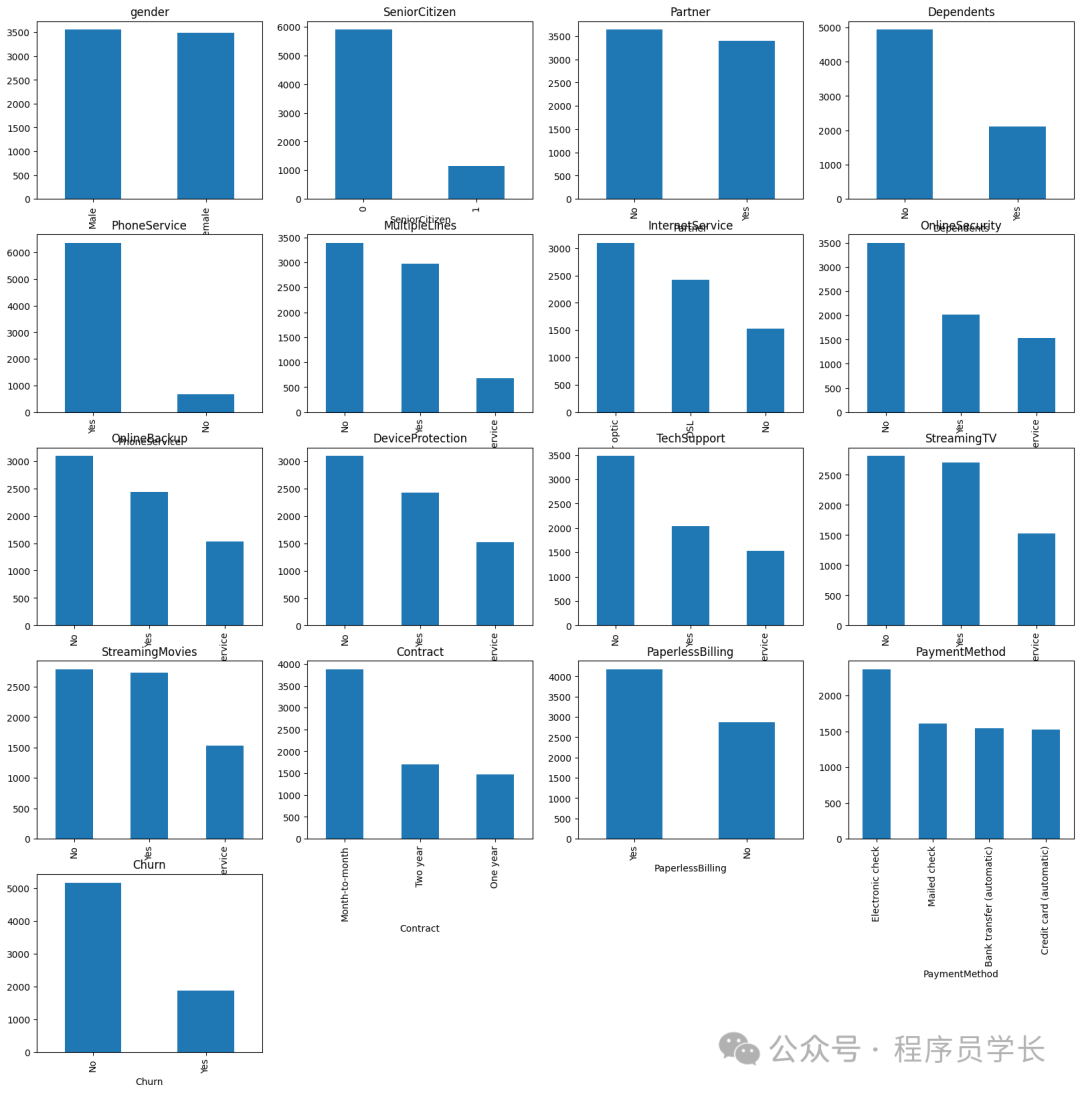 图片
图片
然后我们将通过以下代码看到数值特征之间的相关性。
import seaborn as sns
# Plot correlations between numerical features
plt.figure(figsize=(10, 8))
sns.heatmap(df[num_features].corr())
plt.title('Correlation Heatmap')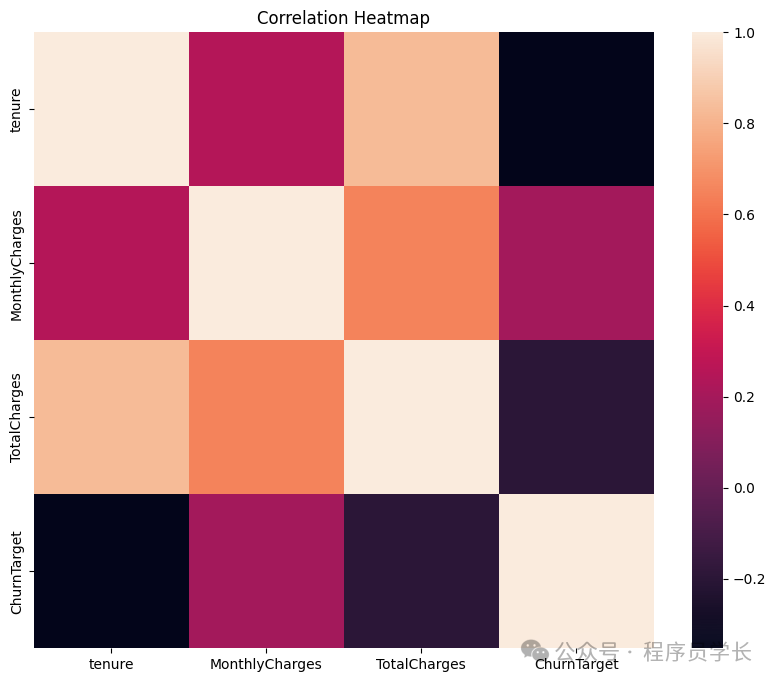 图片
图片
最后,我们将使用基于四分位距(IQR)的箱线图检查数值异常值。
# Plot box plots to identify outliers
plt.figure(figsize=(20, 15))
for i, col in enumerate(num_features, 1):
    plt.subplot(4, 4, i)
    sns.boxplot(y=df[col])
    plt.title(col)
图片
图片
从上面的分析中,我们可以看出,我们不应该解决缺失数据或异常值的问题。
下一步是对我们的机器学习模型进行特征选择,因为我们只想要那些影响预测且在业务中可行的特征。
特征选择
特征选择的方法有很多种,通常结合业务知识和技术应用来完成。
但是,本教程将仅使用我们之前做过的相关性分析来进行特征选择。
首先,让我们根据相关性分析选择数值特征。
target = 'ChurnTarget'
num_features = df.select_dtypes(include=[np.number]).columns.drop(target)

# Calculate correlations
correlations = df[num_features].corrwith(df[target])

# Set a threshold for feature selection
threshold = 0.3
selected_num_features = correlations[abs(correlations) > threshold].index.tolist()
selected_cat_features=cat_features[:-1]

selected_features = []
selected_features.extend(selected_num_features)
selected_features.extend(selected_cat_features)
selected_features
你可以稍后尝试调整阈值,看看特征选择是否会影响模型的性能。
3.建立机器学习模型
选择正确的模型
选择合适的机器学习模型需要考虑很多因素,但始终取决于业务需求。
以下几点需要记住:
- 用例问题。它是监督式的还是无监督式的?是分类式的还是回归式的?用例问题将决定可以使用哪种模型。
- 数据特征。它是表格数据、文本还是图像?数据集大小是大还是小?根据数据集的不同,我们选择的模型可能会有所不同。
- 模型的解释难度如何?平衡可解释性和性能对于业务至关重要。
经验法则是,在开始复杂模型之前,最好先以较简单的模型作为基准。
对于本教程,我们从逻辑回归开始进行模型开发。
分割数据
下一步是将数据拆分为训练、测试和验证集。
from sklearn.model_selection import train_test_split

target = 'ChurnTarget'

X = df[selected_features]
y = df[target]

cat_features = X.select_dtypes(include=['object']).columns.tolist()
num_features = X.select_dtypes(include=['number']).columns.tolist()

#Splitting data into Train, Validation, and Test Set
X_train_val, X_test, y_train_val, y_test = train_test_split(X, y, test_size=0.2, random_state=42, stratify=y)

X_train, X_val, y_train, y_val = train_test_split(X_train_val, y_train_val, test_size=0.25, random_state=42, stratify=y_train_val)
在上面的代码中,我们将数据分成 60% 的训练数据集和 20% 的测试和验证集。
一旦我们有了数据集,我们就可以训练模型。
训练模型
如上所述,我们将使用训练数据训练 Logistic 回归模型。
from sklearn.compose import ColumnTransformer
from sklearn.pipeline import Pipeline
from sklearn.preprocessing import OneHotEncoder
from sklearn.linear_model import LogisticRegression


preprocessor = ColumnTransformer(
    transformers=[
        ('num', 'passthrough', num_features),
        ('cat', OneHotEncoder(), cat_features)
    ])

pipeline = Pipeline(steps=[
    ('preprocessor', preprocessor),
    ('classifier', LogisticRegression(max_iter=1000))
])

# Train the logistic regression model
pipeline.fit(X_train, y_train)
模型评估
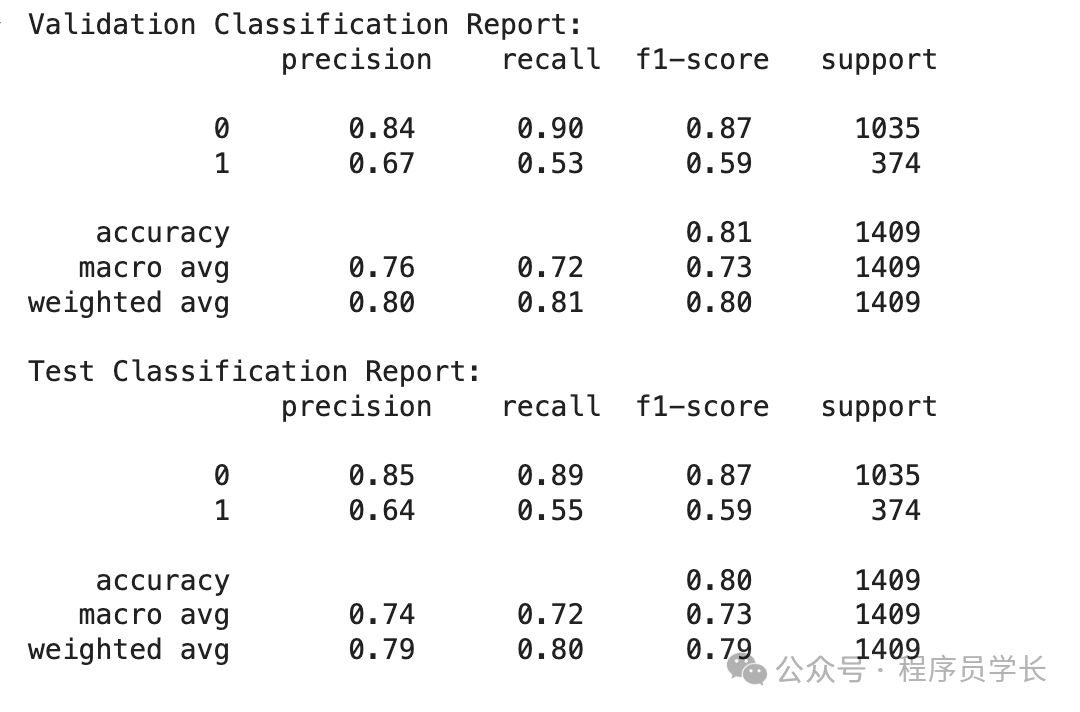
以下代码显示了所有基本分类指标。
from sklearn.metrics import classification_report

# Evaluate on the validation set
y_val_pred = pipeline.predict(X_val)
print("Validation Classification Report:\n", classification_report(y_val, y_val_pred))

# Evaluate on the test set
y_test_pred = pipeline.predict(X_test)
print("Test Classification Report:\n", classification_report(y_test, y_test_pred))
从验证和测试数据中我们可以看出,流失率(1) 的召回率并不是最好的。这就是为什么我们可以优化模型以获得最佳结果。
 图片
图片
4.模型优化
优化模型的一种方法是通过超参数优化,它会测试这些模型超参数的所有组合,以根据指标找到最佳组合。
每个模型都有一组超参数,我们可以在训练之前设置它们。
from sklearn.model_selection import GridSearchCV
# Define the logistic regression model within a pipeline
pipeline = Pipeline(steps=[
('preprocessor', preprocessor),
('classifier', LogisticRegression(max_iter=1000))
])
# Define the hyperparameters for GridSearchCV
param_grid = {
'classifier__C': [0.1, 1, 10, 100],
'classifier__solver': ['lbfgs', 'liblinear']
}
# Perform Grid Search with cross-validation
grid_search = GridSearchCV(pipeline, param_grid, cv=5, scoring='recall')
grid_search.fit(X_train, y_train)
# Best hyperparameters
print("Best Hyperparameters:", grid_search.best_params_)
# Evaluate on the validation set
y_val_pred = grid_search.predict(X_val)
print("Validation Classification Report:\n", classification_report(y_val, y_val_pred))
# Evaluate on the test set
y_test_pred = grid_search.predict(X_test)
print("Test Classification Report:\n", classification_report(y_test, y_test_pred))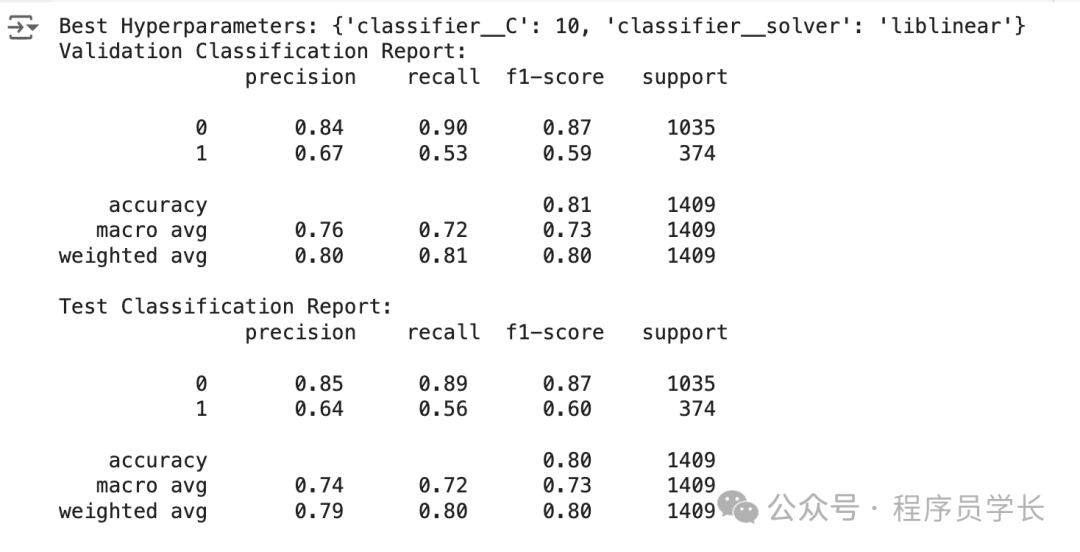 图片
图片
5.部署模型
我们已经构建了机器学习模型。有了模型之后,下一步就是将其部署到生产中。让我们使用一个简单的 API 来模拟它。
首先,让我们再次开发我们的模型并将其保存为 joblib 对象。
import joblib

best_params = {'classifier__C': 10, 'classifier__solver': 'liblinear'}
logreg_model = LogisticRegression(C=best_params['classifier__C'], solver=best_params['classifier__solver'], max_iter=1000)

preprocessor = ColumnTransformer(
    transformers=[
        ('num', 'passthrough', num_features),
        ('cat', OneHotEncoder(), cat_features)])

pipeline = Pipeline(steps=[
    ('preprocessor', preprocessor),
    ('classifier', logreg_model)
])

pipeline.fit(X_train, y_train)

# Save the model
joblib.dump(pipeline, 'logreg_model.joblib')
一旦模型对象准备就绪,我们将创建一个名为 app.py 的 Python 脚本,并将以下代码放入脚本中。
from fastapi import FastAPI
from pydantic import BaseModel
import joblib
import numpy as np

# Load the logistic regression model pipeline
model = joblib.load('logreg_model.joblib')

# Define the input data for model
class CustomerData(BaseModel):
    tenure: int
    InternetService: str
    OnlineSecurity: str
    TechSupport: str
    Contract: str
    PaymentMethod: str

# Create FastAPI app
app = FastAPI()

# Define prediction endpoint
@app.post("/predict")
def predict(data: CustomerData):
    input_data = {
        'tenure': [data.tenure],
        'InternetService': [data.InternetService],
        'OnlineSecurity': [data.OnlineSecurity],
        'TechSupport': [data.TechSupport],
        'Contract': [data.Contract],
        'PaymentMethod': [data.PaymentMethod]
    }

    import pandas as pd
    input_df = pd.DataFrame(input_data)

    # Make a prediction
    prediction = model.predict(input_df)

    # Return the prediction
    return {"prediction": int(prediction[0])}

if __name__ == "__main__":
    import uvicorn
    uvicorn.run(app, host="0.0.0.0", port=8000)
在命令提示符或终端中,运行以下代码。
uvicorn app:app --reload有了上面的代码,我们已经有一个用于接受数据和创建预测的 API。
让我们在新终端中使用以下代码尝试一下。
curl -X POST "http://127.0.0.1:8000/predict" -H "Content-Type: application/json" -d "{\"tenure\": 72, \"InternetService\": \"Fiber optic\", \"OnlineSecurity\": \"Yes\", \"TechSupport\": \"Yes\", \"Contract\": \"Two year\", \"PaymentMethod\": \"Credit card (automatic)\"}"如你所见,API 结果是一个预测值为 0(Not-Churn)的字典。你可以进一步调整代码以获得所需的结果。


