本文经自动驾驶之心公众号授权转载,转载请联系出处。
随着深度学习模型复杂度和数据集规模的增大,计算效率成为了不可忽视的问题。GPU凭借强大的并行计算能力,成为深度学习加速的标配。然而,由于服务器的显存非常有限,随着训练样本越来越大,显存连一个样本都容不下的现象频频发生。除了升级硬件(烧钱)、使用分布式训练(费力),你知道还有哪些方法吗?即使显存充足,所有运算都在GPU上执行就是最高效吗?只要掌握以下小知识,模型训练的种种问题统统搞定,省时省力省钱,重点是高效!
其实CPU和GPU是协同工作的,如果能合理地利用它们各自的优势,就能够节省显存资源(显存不够内存来凑),甚至获得更好的训练性能。本文为您提供了device_guard接口,只需要一行命令,即可实现GPU和CPU的混合训练,不仅可以解决训练模型时通过调整批尺寸(batch size)显存依然超出的问题,让原本无法在单台服务器执行的模型可以训练,同时本文还给出了提高GPU和CPU混合训练效率的方法,将服务器资源利用到极致,帮助您提升模型的性能!
一、模型训练的特点
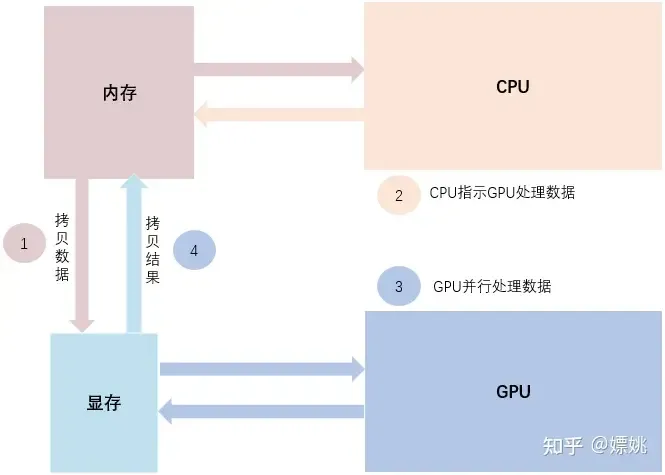
深度学习任务通常使用GPU进行模型训练。这是因为GPU相对于CPU具有更多的算术逻辑单元(ALU),可以发挥并行计算的优势,特别适合计算密集型任务,可以更高效地完成深度学习模型的训练。GPU模式下的模型训练如图1所示,总体可以分为4步:
第1步,将输入数据从系统内存拷贝到显存。
第2步,CPU指示GPU处理数据。
第3步,GPU并行地完成一系列的计算。
第4步,将计算结果从显存拷贝到内存。
 图1 模型训练示意图
从图中可以了解到,虽然GPU并行计算能力优异,但无法单独工作,必须由CPU进行控制调用;而且显存和内存之间的频繁数据拷贝也可能会带来较大的性能开销。CPU虽然计算能力不如GPU,但可以独立工作,可以直接访问内存数据完成计算。因此,想获得更好的训练性能,需要合理利用GPU和CPU的优势。
二、模型训练的常见问题
问题一:GPU显存爆满,资源不足
你建的模型不错,在这个简洁的任务中可能成为新的SOTA,但每次尝试批量处理更多样本时,你都会得到一个CUDA RuntimeError:out of memory。
这是因为GPU卡的显存是非常有限的,一般远低于系统内存。以V100为例,其显存最高也仅有32G,甚至有些显存仅12G左右。因此当模型的参数量较大时,在GPU模式下模型可能无法训练起来。
设置CPU模式进行模型训练,可以避免显存不足的问题,但是训练速度往往太慢。
那么有没有一种方法,可以在单机训练中充分地利用GPU和CPU资源,让部分层在CPU执行,部分层在GPU执行呢?
问题二:频繁数据拷贝,训练效率低
在显存足够的情况下,我们可以直接采用GPU模式去训练模型,但是让所有的网络层都运行在GPU上就一定最高效吗?其实GPU只对特定任务更快,而CPU擅长各种复杂的逻辑运算。框架中有一些OP会默认在CPU上执行,或者有一些OP的输出会被存储在CPU上,因为这些输出往往需要在CPU上访问。这就会导致训练过程中,CPU和GPU之间存在数据拷贝。
图2是CPU和GPU数据传输示意图。假设模型的中间层存在下图中的4个算子。其中算子A和算子B都在CPU执行,因此B可以直接使用A的输出。算子C和算子D都在GPU上执行,那么算子D也可以直接使用C的输出。但是算子B执行完,其输出在CPU上,在算子C执行时,就会将B的输出从CPU拷贝到GPU。
频繁的数据拷贝,也会影响模型的整体性能。如果能把算子A和B设置在GPU上执行,或者算子C和D设置在CPU上执行,避免数据传输,或许会提升模型性能。那么应该如何更加合理地为算子分配设备,使得训练过程更加高效呢?我们需要更综合地考虑,在发挥GPU和CPU各自计算优势的前提下,降低数据拷贝带来的时间消耗。

图2 CPU和GPU数据传输示意图
三、定义化GPU和CPU混合训练
上面两个场景都是希望为模型中的部分层指定运行设备。飞桨提供了fluid.CUDAPlace和fluid.CPUPlace用于指定运行设备,但这两个接口在指定设备时是二选一的,也就是说要么在GPU模式下训练,要么在CPU模式下训练。过去我们无法指定某一部分计算在GPU上执行还是在CPU上执行。飞桨开源框架从1.8版本开始提供了device_guard接口,使用该接口可以为网络中的计算层指定设备为CPU或者GPU,实现更灵活的异构计算调度。
如何使用device_guard接口解决上面两个场景中提到的问题呢?接下来,我们看看具体的例子。
好处一:充分利用CPU资源,避免显存超出
如果使用fluid.CUDAPlace指定了全局的运行设备,飞桨将会自动把支持GPU计算的OP分配在GPU上执行,然而当模型参数量过大并且显存有限时,很可能会遇到显存超出的情况。如下面的示例代码,embedding层的参数size包含两个元素,第一个元素为vocab_size(词表大小),第二个为emb_size(embedding层维度)。实际场景中,词表可能会非常大。示例代码中,词表大小被设置为10,000,000,该层创建的权重矩阵的大小为(10000000, 150),仅这一层就需要占用5.59G的显存。如果再加上其他的网络层,在这种大词表场景下,很有可能会显存超出。
import paddle.fluid as fluid

data = fluid.layers.fill_constant(shape=[1], value=128, dtype='int64')
label = fluid.layers.fill_constant(shape=[1, 150], value=0.5, dtype='float32')
emb = fluid.embedding(input=data, size=(10000000, 150), dtype='float32')
out = fluid.layers.l2_normalize(x=emb, axis=-1)

cost = fluid.layers.square_error_cost(input=out, label=label)
avg_cost = fluid.layers.mean(cost)
sgd_optimizer = fluid.optimizer.SGD(learning_rate=0.001)
sgd_optimizer.minimize(avg_cost)

place = fluid.CUDAPlace(0)
exe = fluid.Executor(place)
exe.run(fluid.default_startup_program())
result = exe.run(fluid.default_main_program(), fetch_list=[avg_cost])embedding是根据input中的id信息从embedding矩阵中查询对应embedding信息,它并不是一个计算密度非常高的OP,因此在CPU上进行计算,其速度也是可接受的。如果将embedding层设置在CPU上运行,就能够充分利用CPU大内存的优势,避免显存超出。可以参考如下代码,使用device_guard将embedding层设置在CPU上。那么,除了embedding层,其他各层都会在GPU上运行。
import paddle.fluid as fluid

data = fluid.layers.fill_constant(shape=[1], value=128, dtype='int64')
label = fluid.layers.fill_constant(shape=[1, 150], value=0.5, dtype='float32')
with fluid.device_guard("cpu"): #一行命令,指定该网络层运行设备为CPU
    emb = fluid.embedding(input=data, size=(10000000, 150), dtype='float32')
out = fluid.layers.l2_normalize(x=emb, axis=-1)

cost = fluid.layers.square_error_cost(input=out, label=label)
avg_cost = fluid.layers.mean(cost)
sgd_optimizer = fluid.optimizer.SGD(learning_rate=0.001)
sgd_optimizer.minimize(avg_cost)

place = fluid.CUDAPlace(0)
exe = fluid.Executor(place)
exe.run(fluid.default_startup_program())
result = exe.run(fluid.default_main_program(), fetch_list=[avg_cost])
因此,在显存有限时你可以参考上面的示例将一些计算密度不高的网络层设置在CPU上避免显存超出。
好处二:合理设置运行设备,减少数据传输
如果你在GPU模式下训练模型,希望提升训练速度,那么可以看看模型中是否存在一些不必要的数据传输。在文章开头我们提到CPU和GPU之间的数据拷贝是耗时的,因此如果能够避免这样的情况,就有可能提升模型的性能。
在下面的内容中,我们将教你如何通过profile工具分析数据传输开销,以及如何使用device_guard避免不必要的数据传输,从而提升模型性能。大致流程如下:
- 首先使用profile工具对模型进行分析,查看是否存在GpuMemcpySync的调用耗时。若存在,则进一步分析发生数据传输的原因。
- 通过Profiling Report找到发生GpuMemcpySync的OP。如果需要,可以通过打印log,找到GpuMemcpySync发生的具体位置。
- 尝试使用device_guard设置部分OP的运行设备,来减少GpuMemcpySync的调用。
- 最后比较修改前后模型的Profiling Report,或者其他用来衡量性能的指标,确认修改后是否带来了性能提升。
步骤1、使用profile工具确认是否发生了数据传输
首先我们需要分析模型中是否存在CPU和GPU之间的数据传输。在OP执行过程中,如果输入Tensor所在的设备与OP执行的设备不同,就会自动将输入Tensor从CPU拷贝到GPU,或者从GPU拷贝到CPU,这个过程是同步的数据拷贝,通常比较耗时。下列示例代码的14行设置了profile,利用profile工具我们可以看到模型的性能数据。
import paddle.fluid as fluid
import paddle.fluid.compiler as compiler
import paddle.fluid.profiler as profiler

data1 = fluid.layers.fill_constant(shape=[1, 3, 8, 8], value=0.5, dtype='float32')
data2 = fluid.layers.fill_constant(shape=[1, 3, 5, 5], value=0.5, dtype='float32')
shape = fluid.layers.shape(data2)
shape = fluid.layers.slice(shape, axes=[0], starts=[0], ends=[4])
out = fluid.layers.crop_tensor(data1, shape=shape)
place = fluid.CUDAPlace(0)
exe = fluid.Executor(place)
exe.run(fluid.default_startup_program())
compiled_prog = compiler.CompiledProgram(fluid.default_main_program())
with profiler.profiler('All', 'total') as prof:
    for i in range(10):
        result = exe.run(program=compiled_prog, fetch_list=[out])
在上述程序运行结束后,将会自动地打印出下面的Profiling Report,可以看到GpuMemCpy Summary中给出了2项数据传输的调用耗时。如果GpuMemCpy Summary中存在GpuMemcpySync,那么就说明你的模型中存在同步的数据拷贝。
进一步分析,可以看到slice和crop_tensor执行中都发生了GpuMemcpySync。我们通过查看网络的定义,就会发现尽管我们在程序中设置了GPU模式运行,但是shape这个OP将输出结果存放在CPU上,导致后面在GPU上执行的slice使用这个结果时发生了从CPU到GPU的数据拷贝。slice的输出结果存放在GPU上,而crop_tensor用到这个结果的参数默认是从CPU上取数据,因此又发生了一次数据拷贝。
------------------------->     Profiling Report     <-------------------------

Note! This Report merge all thread info into one.
Place: All
Time unit: ms
Sorted by total time in descending order in the same thread

Total time: 26.6328
  Computation time       Total: 13.3133     Ratio: 49.9884%
  Framework overhead     Total: 13.3195     Ratio: 50.0116%

-------------------------     GpuMemCpy Summary     -------------------------

GpuMemcpy                Calls: 30          Total: 1.47508     Ratio: 5.5386%
  GpuMemcpyAsync         Calls: 10          Total: 0.443514    Ratio: 1.66529%
  GpuMemcpySync          Calls: 20          Total: 1.03157     Ratio: 3.87331%

-------------------------       Event Summary       -------------------------

Event                                                       Calls       Total       CPU Time (Ratio)        GPU Time (Ratio)        Min.        Max.        Ave.        Ratio.
FastThreadedSSAGraphExecutorPrepare                         10          9.16493     9.152509 (0.998645)     0.012417 (0.001355)     0.025192    8.85968     0.916493    0.344122
shape                                                       10          8.33057     8.330568 (1.000000)     0.000000 (0.000000)     0.030711    7.99849     0.833057    0.312793
fill_constant                                               20          4.06097     4.024522 (0.991025)     0.036449 (0.008975)     0.075087    0.888959    0.203049    0.15248
slice                                                       10          1.78033     1.750439 (0.983212)     0.029888 (0.016788)     0.148503    0.290851    0.178033    0.0668471
GpuMemcpySync:CPU->GPU                                      10          0.45524     0.446312 (0.980388)     0.008928 (0.019612)     0.039089    0.060694    0.045524    0.0170932
crop_tensor                                                 10          1.67658     1.620542 (0.966578)     0.056034 (0.033422)     0.143906    0.258776    0.167658    0.0629515
GpuMemcpySync:GPU->CPU                                      10          0.57633     0.552906 (0.959357)     0.023424 (0.040643)     0.050657    0.076322    0.057633    0.0216398
Fetch                                                       10          0.919361    0.895201 (0.973721)     0.024160 (0.026279)     0.082935    0.138122    0.0919361   0.0345199
GpuMemcpyAsync:GPU->CPU                                     10          0.443514    0.419354 (0.945526)     0.024160 (0.054474)     0.040639    0.059673    0.0443514   0.0166529
ScopeBufferedMonitor::post_local_exec_scopes_process        10          0.341999    0.341999 (1.000000)     0.000000 (0.000000)     0.028436    0.057134    0.0341999   0.0128413
eager_deletion                                              30          0.287236    0.287236 (1.000000)     0.000000 (0.000000)     0.005452    0.022696    0.00957453  0.010785
ScopeBufferedMonitor::pre_local_exec_scopes_process         10          0.047864    0.047864 (1.000000)     0.000000 (0.000000)     0.003668    0.011592    0.0047864   0.00179718
InitLocalVars                                               1           0.022981    0.022981 (1.000000)     0.000000 (0.000000)     0.022981    0.022981    0.022981    0.000862883
步骤2、通过log查看发生数据传输的具体位置
有时同一个OP会在模型中被用到很多次,例如可能我们会在网络的几个不同位置,都定义了slice层。这时候想要确认究竟是在哪个位置发生了数据传输,就需要去查看更加详细的调试信息,那么可以打印出运行时的log。依然以上述程序为例,执行GLOG_vmodule=operator=3 python test_case.py,会得到如下log信息,可以看到这两次数据传输:
- 第3~7行log显示:shape输出的结果在CPU上,在slice运行时,shape的输出被拷贝到GPU上
- 第9~10行log显示:slice执行完的结果在GPU上,当crop_tensor执行时,它会被拷贝到CPU上。
I0406 14:56:23.286592 17516 operator.cc:180] CUDAPlace(0) Op(shape), inputs:{Input[fill_constant_1.tmp_0:float[1, 3, 5, 5]({})]}, outputs:{Out[shape_0.tmp_0:int[4]({})]}.
I0406 14:56:23.286628 17516 eager_deletion_op_handle.cc:107] Erase variable fill_constant_1.tmp_0 on CUDAPlace(0)
I0406 14:56:23.286725 17516 operator.cc:1210] Transform Variable shape_0.tmp_0 from data_type[int]:data_layout[NCHW]:place[CPUPlace]:library_type[PLAIN] to data_type[int]:data_layout[ANY_LAYOUT]:place[CUDAPlace(0)]:library_type[PLAIN]
I0406 14:56:23.286763 17516 scope.cc:169] Create variable shape_0.tmp_0
I0406 14:56:23.286784 17516 data_device_transform.cc:21] DeviceTransform in, src_place CPUPlace dst_place: CUDAPlace(0)
I0406 14:56:23.286867 17516 tensor_util.cu:129] TensorCopySync 4 from CPUPlace to CUDAPlace(0)
I0406 14:56:23.287099 17516 operator.cc:180] CUDAPlace(0) Op(slice), inputs:{EndsTensor[], EndsTensorList[], Input[shape_0.tmp_0:int[4]({})], StartsTensor[], StartsTensorList[]}, outputs:{Out[slice_0.tmp_0:int[4]({})]}.
I0406 14:56:23.287140 17516 eager_deletion_op_handle.cc:107] Erase variable shape_0.tmp_0 on CUDAPlace(0)
I0406 14:56:23.287220 17516 tensor_util.cu:129] TensorCopySync 4 from CUDAPlace(0) to CPUPlace
I0406 14:56:23.287473 17516 operator.cc:180] CUDAPlace(0) Op(crop_tensor), inputs:{Offsets[], OffsetsTensor[], Shape[slice_0.tmp_0:int[4]({})], ShapeTensor[], X[fill_constant_0.tmp_0:float[1, 3, 8, 8]({})]}, outputs:{Out[crop_tensor_0.tmp_0:float[1, 3, 5, 5]({})]}.
步骤3、使用device_guard避免不必要的数据传输
在上面的例子中,shape输出的是一个1-D的Tensor,因此在slice执行时,计算代价相对于数据传输代价或许是更小的。如果将slice设置在CPU上运行,就可以避免2次数据传输,那么是不是有可能提升模型速度呢?我们尝试修改程序,将slice层设置在CPU上执行:
import paddle.fluid as fluid
import paddle.fluid.compiler as compiler
import paddle.fluid.profiler as profiler

data1 = fluid.layers.fill_constant(shape=[1, 3, 8, 8], value=0.5, dtype='float32')
data2 = fluid.layers.fill_constant(shape=[1, 3, 5, 5], value=0.5, dtype='float32')
shape = fluid.layers.shape(data2)
with fluid.device_guard("cpu"): # 一行命令,指定该网络层运行设备为CPU
    shape = fluid.layers.slice(shape, axes=[0], starts=[0], ends=[4])
out = fluid.layers.crop_tensor(data1, shape=shape)
place = fluid.CUDAPlace(0)
exe = fluid.Executor(place)
exe.run(fluid.default_startup_program())
compiled_prog = compiler.CompiledProgram(fluid.default_main_program())
with profiler.profiler('All', 'total') as prof:
    for i in range(10):
        result = exe.run(program=compiled_prog, fetch_list=[out])
步骤4、比较修改前后模型,确认是否带来性能提升
再次观察Profiling Report 中GpuMemCpy Summary的内容,可以看到GpuMemCpySync 这一项已经被消除了。同时注意到,下面的Total time为 14.5345 ms,而修改前是26.6328 ms,速度提升一倍!此实验说明使用device_guard避免数据传输后,示例模型的性能有了明显的提升。 在实际的模型中,若GpuMemCpySync调用耗时占比较大,并且可以通过设置device_guard避免,那么就能够带来一定的性能提升。
------------------------->     Profiling Report     <-------------------------

Note! This Report merge all thread info into one.
Place: All
Time unit: ms
Sorted by total time in descending order in the same thread

Total time: 14.5345
  Computation time       Total: 4.47587     Ratio: 30.7948%
  Framework overhead     Total: 10.0586     Ratio: 69.2052%

-------------------------     GpuMemCpy Summary     -------------------------

GpuMemcpy                Calls: 10          Total: 0.457033    Ratio: 3.14447%
  GpuMemcpyAsync         Calls: 10          Total: 0.457033    Ratio: 3.14447%

-------------------------       Event Summary       -------------------------

Event                                                       Calls       Total       CPU Time (Ratio)        GPU Time (Ratio)        Min. Max.        Ave.        Ratio.
FastThreadedSSAGraphExecutorPrepare                         10    7.70113     7.689066 (0.998433)     0.012064 (0.001567)     0.032657    7.39363     0.770113    0.529852
fill_constant                                               20          2.62299     2.587022 (0.986287)     0.035968 (0.013713)     0.071097    0.342082    0.13115     0.180466
shape                                                       10          1.93504     1.935040 (1.000000)     0.000000 (0.000000)     0.026774    1.6016      0.193504    0.133134
Fetch                                                       10          0.880496    0.858512 (0.975032)     0.021984 (0.024968)     0.07392     0.140896    0.0880496   0.0605797
GpuMemcpyAsync:GPU->CPU                                     10        0.457033    0.435049 (0.951898)     0.021984 (0.048102)     0.037836    0.071424    0.0457033   0.0314447
crop_tensor                                                 10          0.705426    0.671506 (0.951916)     0.033920 (0.048084)     0.05841     0.123901    0.0705426   0.0485346
slice                                                       10          0.324241    0.324241 (1.000000)     0.000000 (0.000000)     0.024299    0.07213     0.0324241   0.0223084
eager_deletion                                              30          0.250524    0.250524 (1.000000)     0.000000 (0.000000)     0.004171    0.016235    0.0083508   0.0172365
ScopeBufferedMonitor::post_local_exec_scopes_process        10   0.047794    0.047794 (1.000000)     0.000000 (0.000000)     0.003344    0.014131    0.0047794   0.00328831
InitLocalVars                                               1           0.034629    0.034629 (1.000000)     0.000000 (0.000000)     0.034629    0.034629    0.034629    0.00238254
ScopeBufferedMonitor::pre_local_exec_scopes_process         10   0.032231    0.032231 (1.000000)     0.000000 (0.000000)     0.002952    0.004076    0.0032231   0.00221755
总结
通过以上实验对比可以发现,device_guard接口能够做到一条命令即可合理设置模型网络层的运行设备,对模型进行GPU和CPU计算的更灵活调度,将服务器的资源利用到极致,解决显存容量捉襟见肘导致模型无法训练的问题。怎么样,这个功能是不是相当实用!心动不如心动,快快参考本文的方法,尽情训练自己的模型吧!


