1前言
问题背景就是在分布式微服务的场景下,如何去更好地校验token。并且通过我们的token我们可以做到单点登录。
如果全部都在GateWay去做的话,我是真的懒得去写那些啥配置了,到时候放行哪些接口都会搞乱。
2token存储
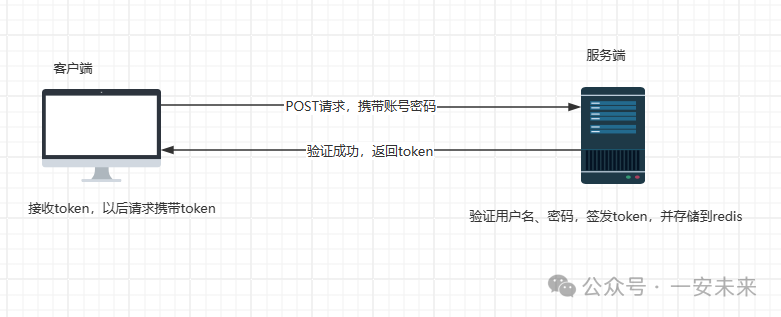
既然我们要校验,那么我们要做的就是拿到这个token,那么首先要做的就是生成token,然后存储token,我们的流程是这样的:
 图片
图片
那么在这里的话,和以往不一样的是,由于咱们的这个其实是一个多端的,所以的话咱们不仅仅有PC端还有移动端,所以token的话也是要做到多端的。
Token 存储实体
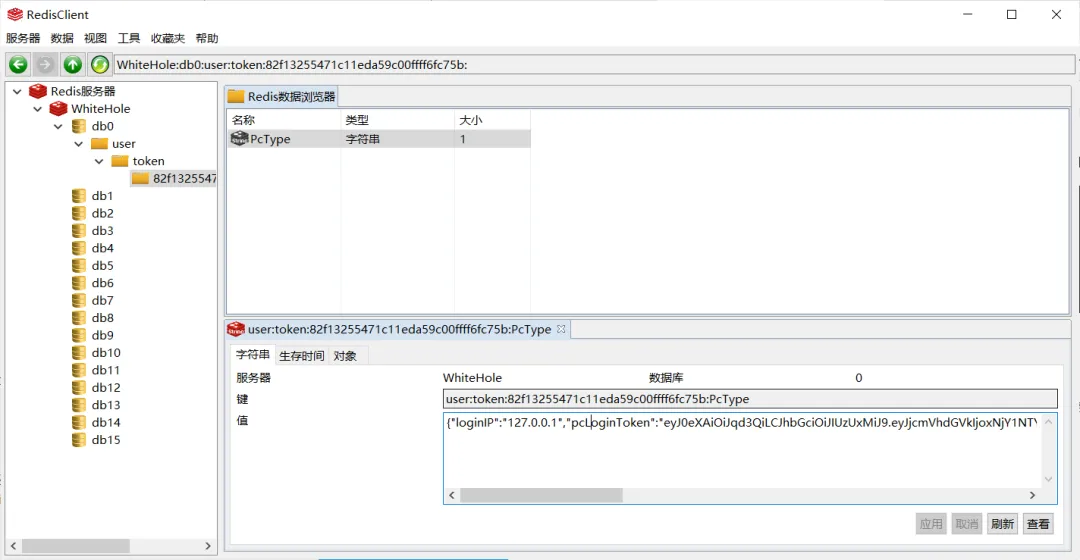
这里新建了一个token的实体,用来存储到redis里面。
@Data
@AllArgsConstructor
@NoArgsConstructor
public class LoginToken {
    //这个是我们的存储Redis里面的Token
    private String PcLoginToken;
    private String MobileLoginToken;
    private String LoginIP;
}
login 业务代码
主要是做多端的token。
@Service
public class loginServiceImpl implements LoginService {

    @Autowired
    UserService userService;
    @Autowired
    RedisUtils redisUtils;
    //为安全期间这里也做一个20防刷
    @Override
    public R Login(LoginEntity entity) {

        String username = entity.getUsername();
        String password = entity.getPassword();
        password=password.replaceAll(" ","");
        if(redisUtils.hasKey(RedisTransKey.getLoginKey(username))){
            return R.error(BizCodeEnum.OVER_REQUESTS.getCode(),BizCodeEnum.OVER_REQUESTS.getMsg());
        }
        redisUtils.set(RedisTransKey.setLoginKey(username),1,20);
        UserEntity User = userService.getOne(
                new QueryWrapper<UserEntity>().eq("username", username)
        );
        if(User!=null){
            if(SecurityUtils.matchesPassword(password,User.getPassword())){
                //登录成功,签发token,按照平台类型去签发不同的Token
                String token = JwtTokenUtil.generateToken(User);
                //登录成功后,将userid--->token存redis,便于做登录验证
                String ipAddr = GetIPAddrUtils.GetIPAddr();
                if(entity.getType().equals(LoginType.PcType)){
                    LoginToken loginToken = new LoginToken(token,null,ipAddr);
                    redisUtils.set(RedisTransKey.setTokenKey(User.getUserid()+":"+LoginType.PcType)
                            ,loginToken,7, TimeUnit.DAYS
                    );
                    return Objects.requireNonNull(R.ok(BizCodeEnum.SUCCESSFUL.getMsg())
                                    .put(LoginType.PcLoginToken, token))
                                    .put("userid",User.getUserid());
                }else if (entity.getType().equals(LoginType.MobileType)){
                    LoginToken loginToken = new LoginToken(null,token,ipAddr);
                    redisUtils.set(RedisTransKey.setTokenKey(User.getUserid()+":"+LoginType.MobileType)
                            ,loginToken,7, TimeUnit.DAYS
                    );
                    return Objects.requireNonNull(R.ok(BizCodeEnum.SUCCESSFUL.getMsg())
                                    .put(LoginType.PcLoginToken, token))
                                    .put("userid",User.getUserid());
                } else {
                    return R.error(BizCodeEnum.NUNKNOW_LGINTYPE.getCode(),BizCodeEnum.NUNKNOW_LGINTYPE.getMsg());
                }
            }else {
                return R.error(BizCodeEnum.BAD_PUTDATA.getCode(),BizCodeEnum.BAD_PUTDATA.getMsg());
            }
        }else {
            return R.error(BizCodeEnum.NO_SUCHUSER.getCode(),BizCodeEnum.NO_SUCHUSER.getMsg());
        }
    }
}
枚举类
public enum BizCodeEnum {
    UNKNOW_EXCEPTION(10000,"系统未知异常"),
    VAILD_EXCEPTION(10001,"参数格式校验失败"),
    HAS_USERNAME(10002,"已存在该用户"),
    OVER_REQUESTS(10003,"访问频次过多"),
    OVER_TIME(10004,"操作超时"),
    BAD_DOING(10005,"疑似恶意操作"),
    BAD_EMAILCODE_VERIFY(10007,"邮箱验证码错误"),
    REPARATION_GO(10008,"请重新操作"),
    NO_SUCHUSER(10009,"该用户不存在"),
    BAD_PUTDATA(10010,"信息提交错误,请重新检查"),
    NOT_LOGIN(10011,"用户未登录"),
    BAD_LOGIN_PARAMS(10012,"请求异常!触发5次以上账号将保护性封禁"),
    NUNKNOW_LGINTYPE(10013,"平台识别异常"),
    BAD_TOKEN(10014,"token校验失败"),
    SUCCESSFUL(200,"successful");

    private int code;
    private String msg;
    BizCodeEnum(int code,String msg){
        this.code = code;
        this.msg = msg;
    }

    public int getCode() {
        return code;
    }

    public String getMsg() {
        return msg;
    }
}
异常处理
/**
 * 校验用户登录时,参数不对的情况,此时可能是恶意爬虫
 * */
public class BadLoginParamsException extends Exception{
    public BadLoginParamsException(){}
    public BadLoginParamsException(String message){
        super(message);
    }

}
public class BadLoginTokenException extends Exception{
    public BadLoginTokenException(){}
    public BadLoginTokenException(String message){
        super(message);
    }
}
public class NotLoginException extends Exception{
    public NotLoginException(){}
    public NotLoginException(String message){
        super(message);
    }
}
那么到此我们在登录部分完成了对token的存储(服务端):
 图片
图片
客户端存储
现在我们服务端已经存储好了,那么接下来就是要在客户端进行存储。这个也好办,我们直接来看到完整的用户登录代码就知道了。
<template>
  <div>
    <el-form :model="formLogin" :rules="rules" ref="ruleForm" label-width="0px" >
      <el-form-item prop="username">
        <el-input v-model="formLogin.username" placeholder="账号">
          <i slot="prepend" class="el-icon-s-custom"/>
        </el-input>
      </el-form-item>
      <el-form-item prop="password">
        <el-input type="password" placeholder="密码" v-model="formLogin.password">
          <i slot="prepend" class="el-icon-lock"/>
        </el-input>
      </el-form-item>
      <el-form-item prop="code">
        <el-row :span="24">
          <el-col :span="12">
            <el-input v-model="formLogin.code" auto-complete="off"  placeholder="请输入验证码" size=""></el-input>
          </el-col>
          <el-col :span="12">
            <div class="login-code" @click="refreshCode">
              <!--验证码组件-->
              <s-identify :identifyCode="identifyCode"></s-identify>
            </div>
          </el-col>
        </el-row>
      </el-form-item>
      <el-form-item>
        <div class="login-btn">
          <el-button type="primary" @click="submitForm()" style="margin-left: auto;width: 35%">登录</el-button>
          <el-button type="primary" @click="goRegister" style="margin-left: 27%;width: 35%" >注册</el-button>
        </div>
      </el-form-item>
    </el-form>
  </div>
</template>

<script>
import SIdentify from "../../components/SIdentify/SIdentify";
export default {
  name: "loginbyUserName",
  components: { SIdentify },
  data() {
    return{
      formLogin: {
        username: "",
        password: "",
        code: ""
      },
      identifyCodes: '1234567890abcdefjhijklinopqrsduvwxyz',//随机串内容
      identifyCode: '',
      // 校验
      rules: {
        username:
          [
            { required: true, message: "请输入用户名", trigger: "blur" }
          ],
        password: [
          { required: true, message: "请输入密码(区分大小写)", trigger: "blur" }
        ],
        code: [
          { required: true, message: "请输入验证码", trigger: "blur" }
        ]
      }

    }
  },
  mounted () {
    // 初始化验证码
    this.identifyCode = ''
    this.makeCode(this.identifyCodes, 4)
  },
  methods:{
    refreshCode () {
      this.identifyCode = ''
      this.makeCode(this.identifyCodes, 4)
    },
    makeCode (o, l) {
      for (let i = 0; i < l; i++) {
        this.identifyCode += this.identifyCodes[this.randomNum(0, this.identifyCodes.length)]
      }
    },
    randomNum (min, max) {
      return Math.floor(Math.random() * (max - min) + min)
    },

    submitForm(){

      if (this.formLogin.code.toLowerCase() !== this.identifyCode.toLowerCase()) {
        this.$message.error('请填写正确验证码')
        this.refreshCode()

      }
      else {
        //这边后面做一个提交,服务器验证,通过之后获得token
        this.axios({
          url: "/user/user/login",
          method: 'post',
          data:{
            "username":this.formLogin.username,
            "password":this.formLogin.password,
            "type": "PcType",
          }
        }).then((res)=>{
            res = res.data
          if (res.code===10001){
            alert("请将对应信息填写完整!")
          }else if(res.code===0){
            alert("登录成功")
            localStorage.setExpire("LoginToken",res.PcLoginToken,this.OverTime)
            localStorage.setExpire("userid",res.userid,this.OverTime)
            this.$router.push({ path: '/userinfo', query: {'userid':res.userid} });
          }else {
            alert(res.msg);
          }
        })
      }
    },
    goRegister(){
      this.$router.push("/register")
    }
  },
}
</script>

<style scoped>
</style>
这里的话,咱们对localStorage做了一点优化:
Storage.prototype.setExpire=(key, value, expire) =>{
  let obj={
    data:value,
    time:Date.now(),
    expire:expire
  };
  localStorage.setItem(key,JSON.stringify(obj));
}
//Storage优化
Storage.prototype.getExpire= key =>{
  let val =localStorage.getItem(key);
  if(!val){
    return val;
  }
  val =JSON.parse(val);
  if(Date.now()-val.time>val.expire){
    localStorage.removeItem(key);
    return null;
  }
  return val.data;
}
这个this.OverTime 就是一个全局变量,就是7天过期的意思。
3token验证
前端提交
那么现在咱们来看看前端的代码:
<script>
export default {
  name: "myspace",
  data() {

    return {

    }
  },
  created() {
    //先对token再进行验证
    let loginToken = localStorage.getExpire("LoginToken");
    let userid = localStorage.getExpire("userid");
    //这个只有用户自己才能进入,自己只能进入自己对应的MySpace
    if(loginToken==null && userid==null){
      alert("检测到您未登录,请先登录")
      this.$router.push({path: "/login"});
    }else {
        //发送token验证token是否正常,否则一样不给过
      this.axios({
        url: "/user/user/space/isLogin",
        method: 'get',
        headers: {
          "userid": userid,
          "loginType": "PcType",
          "loginToken": loginToken,
        },
        params: {
          'userid': userid,
        }
      }).then((res)=>{
        res = res.data;
        if (!(res.code === 0)) {
          alert(res.msg)
          this.$router.push({path: "/login"});
        }
      }).catch((err)=>{
        alert("未知异常,请重新登录")
        this.$router.push({path: "/login"});
      });

    }
  }
}
</script>
后端校验
现在咱们可以来聊聊这个后端的校验了,这个还是很重要的,也是咱们今天的主角。
那么在开始的时候咱们说了这个使用拦截器的方案并不是可行的,而且在后面我们可能还需要在业务处理的时候拿到token去解析里面的东西,完成一些处理,到时候在拦截器的时候也不好处理。
而且重点是并不是所有的接口都要的,但是也不是少部分的接口不要,这就尴尬了,那么如何破局。此时我们就需要定位到每一个具体的方法上面,那么问题不就解决了,这个咋搞,诶嘿,搞个切面+注解不就完了。
自定义注解
先定义一个注解:
@Target(ElementType.METHOD)
@Retention(RetentionPolicy.RUNTIME)
public @interface NeedLogin {
    String value() default "";
}
切面处理
那么之后就是咱们的切面了,我们刚刚定义的异常处理类都是在这个切面上处理的。
public class VerificationAspect {

    @Autowired
    RedisUtils redisUtils;

    @Pointcut("@annotation(com.huterox.common.holeAnnotation.NeedLogin)")
    public void verification() {}

    /**
     * 环绕通知 @Around ,当然也可以使用 @Before (前置通知)  @After (后置通知)就算了
     * @param proceedingJoinPoint
     * @return
     * 我们这里再直接抛出异常,反正有那个谁统一异常类
     */

    @Around("verification()")
    public Object verification(ProceedingJoinPoint proceedingJoinPoint) throws Throwable{

        RequestAttributes requestAttributes = RequestContextHolder.getRequestAttributes();
        ServletRequestAttributes servletRequestAttributes = (ServletRequestAttributes) requestAttributes;
        assert servletRequestAttributes != null;
        HttpServletRequest request = servletRequestAttributes.getRequest();
        //分登录的设备进行验证
        String loginType = request.getHeader("loginType");
        String userid = request.getHeader("userid");
        String tokenUser = request.getHeader("loginToken");
        String tokenKey = RedisTransKey.getTokenKey(userid + ":" + loginType);
        if(tokenUser==null || userid==null || loginType==null){
            throw new BadLoginParamsException();
        }
        if(redisUtils.hasKey(tokenKey)){
            if(loginType.equals(LoginType.PcType)){
                Object o = redisUtils.get(tokenKey);
                LoginToken loginToken = JSON.parseObject(o.toString(), LoginToken.class);
                if(!loginToken.getPcLoginToken().equals(tokenUser)){
                    throw new BadLoginTokenException();
                }
            }else if (loginType.equals(LoginType.MobileType)){
                Object o = redisUtils.get(tokenKey);
                LoginToken loginToken = JSON.parseObject(o.toString(), LoginToken.class);
                if(!loginToken.getMobileLoginToken().equals(tokenUser)){
                    throw new BadLoginTokenException();
                }
            }
        }else {
            throw new NotLoginException();
        }

        return proceedingJoinPoint.proceed();
    }
}
使用
那么接下来就是使用了。我们来看到这个:
 图片
图片
这个是我们的controller,作用就是用来检验这个用户本地的token对不对的,那么实现的服务类啥也没有:
 图片
图片
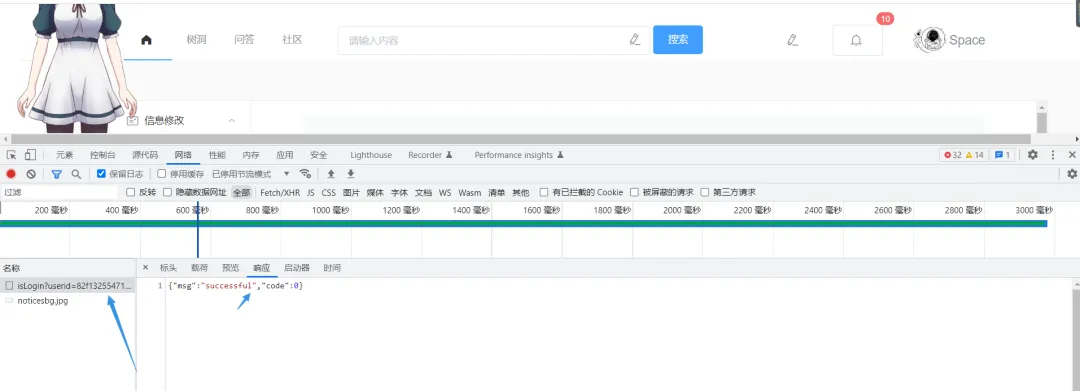
之后我们来看到咱们的一个效果:
 图片
图片
可以看到在进入页面的时候,钩子函数会请求咱们的这个接口,然后的话,咱们通过这个接口的话可以看到验证的效果。这里验证通过了。


