环境:SpringBoot3.2.5
1. 简介
本篇文章将介绍Spring Boot中一个非常强大且十分重要的类Binder,该类可以将外部配置文件的属性值绑定到Spring Boot应用程序中的Java对象上。在Spring Boot中,通常使用@ConfigurationProperties注解来指定外部配置文件中的属性前缀,并使用Binder的bind方法将配置值绑定到Java对象上。这样,Spring Boot应用程序可以方便地读取和使用配置文件中的属性配置。
2. 实战案例
2.1 准备绑定对象
public class Person {
  private Integer age ;
  private String name ;
  // getter, setter
}
配置文件中添加配置属性
pack:
  person:
   age: 20
   name: 张三
测试绑定组件
@Component
public class BinderComponent implements InitializingBean {
  private final Environment env ;
  // 注入该对象是为了后面我们方便注册自定义数据类型转换
  private final ConversionService conviersionService ;
  public BinderComponent(Environment env,
    ConversionService conviersionService) {
    this.env = env ;
    this.conviersionService = conviersionService ;
  }
  public void afterPropertiesSet() throws Exception {
    // 绑定测试都将在这里完成
  }
}
后续案例都将基于上面的环境
2.2 基础绑定
// 这里的pack.person是配置文件中的前缀
BindResult<Person> result = Binder.get(env).bind("pack.person", Person.class) ;
Person person = result.get() ;
System.out.println(person) ;
在该示例中,配置文件中的age属性能正确的转换为Integer。为什么能进行数据类型转换?因为内部(调用Binder#get(env)时)会添加TypeConverterConversionService和ApplicationConversionService两个类型转换器。
2.3 自定义数据类型转换
给Person添加Date类型的字段,如下:
public class Person {
  private Integer age ;
  private String name ;
  private Date birthday ;
  // getter, setter
}
// 配置文件中添加birthday属性
pack:
  person:
    birthday: 2000-01-01
在此执行上面2.2中代码,程序抛出了如下异常
 图片
图片
默认的数据类型转换器是没有String到Date转换功能。我们需要添加自定义的类型转换,如下自定义类型转换器:
@Configuration
public class DataTypeConvertConfig implements WebMvcConfigurer {
  @Override
  public void addFormatters(FormatterRegistry registry) {
    registry.addConverter(new Converter<String, Date>() {
      @Override
      public Date convert(String source) {
        try {
          return new SimpleDateFormat("yyyy-MM-dd").parse(source) ;
        } catch (ParseException e) {
          throw new RuntimeException(e) ;
        }
      }
    });
  }
}
修改数据绑定方式
Iterable<ConfigurationPropertySource> propertySources = ConfigurationPropertySources.get(env) ;
// 不使用默认的类型转换服务,使用自定义(还是自动配置的,只是添加了我们自定义的)
Binder binder = new Binder(propertySources, null, conviersionService) ;
Person result = binder.bindOrCreate("pack.person", Person.class) ;
System.out.println(result) ;
这次成功输出结果。

2.4 数据绑定回调
我们还可以为Binder执行绑定时,传入回调句柄,这样在数据绑定的各个阶段都可以进行相应的处理,如下示例:
Iterable<ConfigurationPropertySource> propertySources = ConfigurationPropertySources.get(env) ;
Binder binder = new Binder(propertySources, null, conviersionService) ;
Person result = binder.bindOrCreate("pack.person", Bindable.of(Person.class), new BindHandler() {
  @Override
  public <T> Bindable<T> onStart(ConfigurationPropertyName name, Bindable<T> target, BindContext context) {
    System.out.printf("准备进行数据绑定:【%s】%n", name) ;
    return target ;
  }
  @Override
  public Object onSuccess(ConfigurationPropertyName name, Bindable<?> target, BindContext context, Object result) {
    System.out.printf("对象绑定成功:【%s】%n", result) ;
    return result ;
  }
  @Override
  public Object onCreate(ConfigurationPropertyName name, Bindable<?> target, BindContext context, Object result) {
    System.out.printf("准备创建绑定对象:【%s】%n", result) ;
    return result ;
  }
  @Override
  public Object onFailure(ConfigurationPropertyName name, Bindable<?> target, BindContext context, Exception error)
      throws Exception {
    System.out.printf("数据绑定失败:【%s】%n", error.getMessage()) ;
    return BindHandler.super.onFailure(name, target, context, error);
  }
  @Override
  public void onFinish(ConfigurationPropertyName name, Bindable<?> target, BindContext context, Object result)
      throws Exception {
    System.out.printf("数据绑定完成:【%s】%n", result) ;
    BindHandler.super.onFinish(name, target, context, result) ;
  }
}) ;
System.out.println(result) ;
输出结果
 图片
图片
每个属性在绑定时都会执行相应的回调方法。
3. 都用在哪里?
在SpringBoot环境中所有的数据绑定功能都是通过Binder进行。下面列出几个非常重要的地方
3.1 SpringBoot启动时绑定SpringApplication
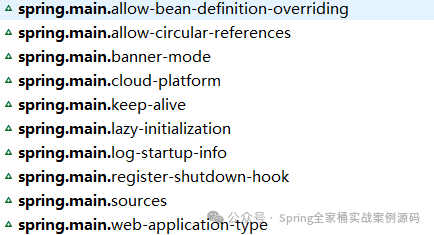
SpringBoot在启动时初始化环境配置Environment时,会将配置文件中的spring.main.*下的配置属性绑定到当前的SpringApplication对象上。
public class SpringApplication {
  public ConfigurableApplicationContext run(String... args) {
    ConfigurableEnvironment environment = prepareEnvironment(listeners, bootstrapContext, applicationArguments);
  }
  private ConfigurableEnvironment prepareEnvironment(...) {
    // ...
    bindToSpringApplication(environment);
  }
  protected void bindToSpringApplication(ConfigurableEnvironment environment) {
    try {
      Binder.get(environment).bind("spring.main", Bindable.ofInstance(this));
    }
  }
}
spring.main有如下配置:
 图片
图片
3.2 绑定使用@ConfigurationProperties类
@ConfigurationProperties注解的类是通过BeanPostProcessor处理器执行绑定(不管是类上使用该注解,还是@Bean注解的方法都是通过该处理器进行绑定)。
public class ConfigurationPropertiesBindingPostProcessor {
  // 该类是由SpringBoot自动配置
  private ConfigurationPropertiesBinder binder;
  // 实例化bean,执行初始化方法之前
  public Object postProcessBeforeInitialization(Object bean, String beanName) throws BeansException {
    // 绑定;
    bind(ConfigurationPropertiesBean.get(this.applicationContext, bean, beanName));
    return bean;
  }
}
上面的ConfigurationPropertiesBean.get方法会处理当前bean实例是独立的一个Bean对象且类上有@ConfigurationProperties注解,或者是当前的bean实例是通过@Bean定义且方法上有@ConfigurationProperties注解。不管是哪种定义的bean只要满足条件,都会被包装成ConfigurationPropertiesBean对象。接下来执行bind方法:
private void bind(ConfigurationPropertiesBean bean) {
  try {
    this.binder.bind(bean);
  }
}
执行绑定
class ConfigurationPropertiesBinder {
  BindResult<?> bind(ConfigurationPropertiesBean propertiesBean) {
    Bindable<?> target = propertiesBean.asBindTarget();
    ConfigurationProperties annotation = propertiesBean.getAnnotation();
    BindHandler bindHandler = getBindHandler(target, annotation);
    return getBinder().bind(annotation.prefix(), target, bindHandler);
  }
}
以上就是@ConfigurationProperties注解的类或方法对象通过Binder绑定的原理。
3.3 SpringCloud Gateway绑定路由谓词&过滤器
当一个路由请求过来时,会查询相应的路由,而这个查找过程中就会通过路由的定义信息转换为Route对象。以下是大致过程(详细还需要自行阅读源码)
public class RoutePredicateHandlerMapping {
  protected Mono<?> getHandlerInternal(ServerWebExchange exchange) {
    return lookupRoute(exchange)... ;
  }
  protected Mono<Route> lookupRoute(...) {
    // 查找路由
    return this.routeLocator.getRoutes()... ;
  }
}
public class RouteDefinitionRouteLocator {
  public Flux<Route> getRoutes() {
    // 将在yaml配置中定义的路由转换为Route对象
    Flux<Route> routes = this.routeDefinitionLocator.getRouteDefinitions().map(this::convertToRoute);
  }
  private Route convertToRoute(RouteDefinition routeDefinition) {
    AsyncPredicate<ServerWebExchange> predicate = combinePredicates(routeDefinition);
    // 获取配置过滤器
    List<GatewayFilter> gatewayFilters = getFilters(routeDefinition);
    return ... ;
  }
  private List<GatewayFilter> getFilters(RouteDefinition routeDefinition) {
    List<GatewayFilter> filters = new ArrayList<>();
    if (!this.gatewayProperties.getDefaultFilters().isEmpty()) {
      // loadGatewayFilters方法中进行配置的绑定
      filters.addAll(loadGatewayFilters(routeDefinition.getId(),
          new ArrayList<>(this.gatewayProperties.getDefaultFilters())));
    }
  }
  List<GatewayFilter> loadGatewayFilters(...) {
    Object configuration = this.configurationService.with(factory)
      ...
      // 该方法执行绑定动作
      .bind();
  }
  public T bind() {
    T bound = doBind();
  }
  protected T doBind() {
    Bindable<T> bindable = Bindable.of(this.configurable.getConfigClass());
    T bound = bindOrCreate(bindable, this.normalizedProperties, this.configurable.shortcutFieldPrefix(),
        /* this.name, */this.service.validator.get(), this.service.conversionService.get());
    return bound;
  }
}
以上源码比较粗略,大家只要知道原理即可,没必要任何一个点都搞的清清楚楚。


