译者 | 朱先忠
审校 | 重楼
摘要:本文将通过实际操作并结合编程方式介绍如何通过开源工具Rerun轻松实现基于开源框架MediaPipe的人体姿态跟踪的可视化呈现。
概述
本文中,我们将探索一个利用开源框架MediaPipe的功能以二维和三维方式跟踪人体姿势的使用情形。使这一探索更有趣味的是由开源可视化工具Rerun提供的可视化展示,该工具能够提供人类动作姿势的整体视图。
您将一步步跟随作者使用MediaPipe在2D和3D环境中跟踪人体姿势,并探索工具Rerun的可视化功能。
人体姿势跟踪
人体姿势跟踪是计算机视觉中的一项任务,其重点是识别关键的身体位置、分析姿势和对动作进行分类。这项技术的核心是一个预先训练的机器学习模型,用于评估视觉输入,并在图像坐标和3D世界坐标中识别身体上的地标。该技术的应用场景包括但不限于人机交互、运动分析、游戏、虚拟现实、增强现实、健康等领域。
有一个完美的模型固然很好,但不幸的是,目前的模型仍然不完美。尽管数据集可能存储了多种体型数据,但人体在个体之间是有所不同的。每个人身体的独特性都带来了挑战,尤其是对于那些手臂和腿部尺寸不标准的人来说,这可能会导致使用这项技术时精度较低。在考虑将这项技术集成到系统中时,承认不准确的可能性至关重要。希望科学界正在进行的努力将为开发更强大的模型铺平道路。
除了缺乏准确性之外,使用这项技术还需要考虑伦理和法律因素。例如,如果个人未经同意,在公共场所拍摄人体姿势可能会侵犯隐私权。在现实世界中实施这项技术之前,考虑到任何道德和法律问题都是至关重要的。
先决条件和初始设置
首先,安装所需的库:
# 安装所需的Python包
pip install mediapipe
pip install numpy
pip install opencv-python<4.6
pip install requests>=2.31,<3
pip install rerun-sdk
# 也可以直接使用配置文件requirements.txt
pip install -r examples/python/human_pose_tracking/requirements.txt
使用MediaPipe跟踪人体姿势
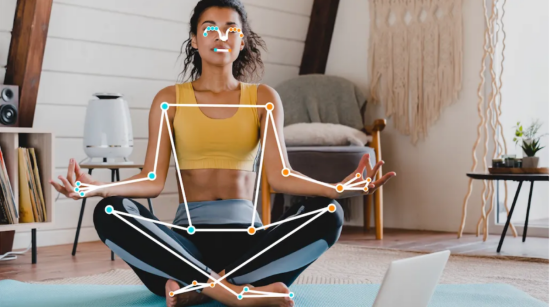
谷歌提供的姿势地标检测指南中的图像(参考文献1)
对于希望集成计算机视觉和机器学习的设备ML解决方案的开发人员来说,基于Python语言的MediaPipe框架正是一个方便的工具。
在下面的代码中,MediaPipe姿态标志检测被用于检测图像中人体的标志。该模型可以将身体姿势标志检测为图像坐标和3D世界坐标。一旦成功运行ML模型,就可以使用图像坐标和3D世界坐标来可视化输出。
import mediapipe as mp
import numpy as np
from typing import Any
import numpy.typing as npt
import cv2
"""
从Mediapipe姿势结果集中读取二维地标位置。
Args:
results (Any): Mediapipe Pose results.
image_width (int): Width of the input image.
image_height (int): Height of the input image.
Returns:
np.array | None: Array of 2D landmark positions or None if no landmarks are detected.
"""
def read_landmark_positions_2d(
results: Any,
image_width: int,
image_height: int,
) -> npt.NDArray[np.float32] | None:
if results.pose_landmarks is None:
return None
else:
# 提取标准化的地标位置并将其缩放为图像尺寸
normalized_landmarks = [results.pose_landmarks.landmark[lm] for lm in mp.solutions.pose.PoseLandmark]
return np.array([(image_width * lm.x, image_height * lm.y) for lm in normalized_landmarks])
"""
从Mediapipe Pose结果集中读取三维地标位置。
Args:
results (Any): Mediapipe Pose results.
Returns:
np.array | None: Array of 3D landmark positions or None if no landmarks are detected.
"""
def read_landmark_positions_3d(
results: Any,
) -> npt.NDArray[np.float32] | None:
if results.pose_landmarks is None:
return None
else:
# 提取三维地标位置
landmarks = [results.pose_world_landmarks.landmark[lm] for lm in mp.solutions.pose.PoseLandmark]
return np.array([(lm.x, lm.y, lm.z) for lm in landmarks])
"""
跟踪并分析输入图像中的姿势。
Args:
image_path (str): Path to the input image.
"""
def track_pose(image_path: str) -> None:
# 读取图像,将颜色转换为RGB格式
image = cv2.imread(image_path)
image = cv2.cvtColor(image, cv2.COLOR_BGR2RGB)
# 创建Pose模型实例
pose_detector = mp.solutions.pose.Pose(static_image_mode=True)
# 处理图像以获得姿势标志
results = pose_detector.process(image)
h, w, _ = image.shape
# 读取二维和三维地标位置
landmark_positions_2d = read_landmark_positions_2d(results, w, h)
landmark_positions_3d = read_landmark_positions_3d(results)
使用Rerun可视化MediaPipe的输出
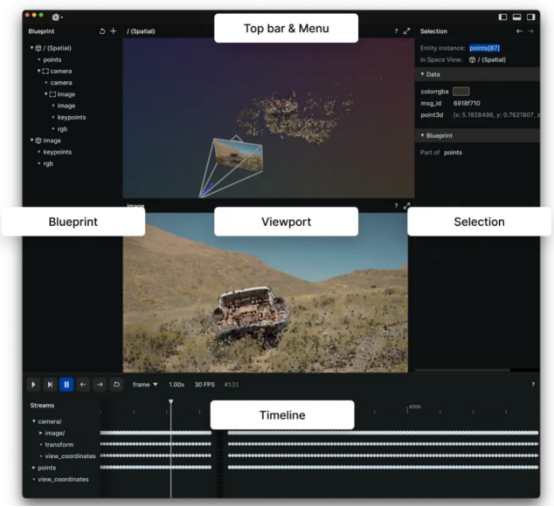
Rerun图像浏览器(图像来自于Rerun官方文档,参考资料2)
Rerun可作为多模态数据的可视化工具。通过Rerun图像浏览器,您可以构建布局、自定义可视化以及与数据交互。本节的其余部分将详细介绍如何使用Rerun SDK在Rerun图像浏览器中记录和显示数据。
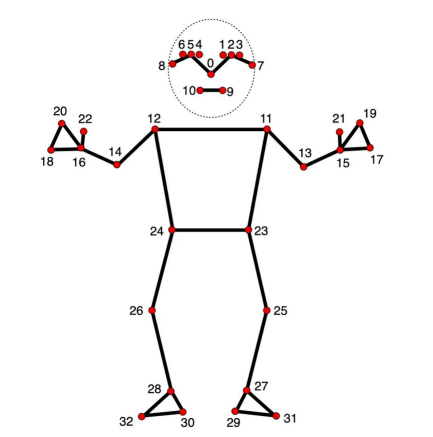
姿势标志模型(谷歌通过姿势标志检测指南拍摄的图像,参考资料1)
在二维和三维点中,指定点之间的连接至关重要。定义这些连接会自动渲染它们之间的线。使用MediaPipe提供的信息,可以从pose_connections集合获取姿势点连接,然后使用Annotation Context将它们设置为关键点连接。
rr.log(
"/",
rr.AnnotationContext(
rr.ClassDescription(
info=rr.AnnotationInfo(id=0, label="Person"),
keypoint_annotatinotallow=[rr.AnnotationInfo(id=lm.value, label=lm.name) for lm in mp_pose.PoseLandmark],
keypoint_cnotallow=mp_pose.POSE_CONNECTIONS,
)
),
timeless=True,
)
图像坐标——二维位置
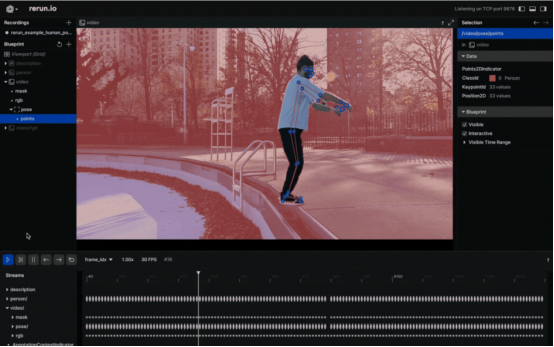
将人的姿势可视化为2D点(作者本人提供的图像)
在视频中以可视化方式观察身体姿势的标志似乎是一个不错的选择。要实现这一点,您需要仔细遵循Rerun文档中有关Entities和Components的相关介绍。其中,“实体路径层次结构(The Entity Path Hierarchy)”页面描述了如何在同一实体上记录多个组件。例如,您可以创建“video”实体,并包括视频的“video/rgb”组件和身体姿势的“video/pose”组件。不过,如果你打算把它用于视频设计中的话,你需要认真掌握时间线的概念。每个帧都可以与适当的数据相关联。
以下是一个可以将视频上的2D点可视化的函数:
def track_pose_2d(video_path: str) -> None:
mp_pose = mp.solutions.pose
with closing(VideoSource(video_path)) as video_source, mp_pose.Pose() as pose:
for idx, bgr_frame in enumerate(video_source.stream_bgr()):
if max_frame_count is not None and idx >= max_frame_count:
break
rgb = cv2.cvtColor(bgr_frame.data, cv2.COLOR_BGR2RGB)
# 将帧与数据关联
rr.set_time_seconds("time", bgr_frame.time)
rr.set_time_sequence("frame_idx", bgr_frame.idx)
# 呈现视频
rr.log("video/rgb", rr.Image(rgb).compress(jpeg_quality=75))
# 获取预测结果
results = pose.process(rgb)
h, w, _ = rgb.shape
# 把2D点记录到'video'实体中
landmark_positions_2d = read_landmark_positions_2d(results, w, h)
if landmark_positions_2d is not None:
rr.log(
"video/pose/points",
rr.Points2D(landmark_positions_2d, class_ids=0, keypoint_ids=mp_pose.PoseLandmark),
)
三维世界坐标——三维点
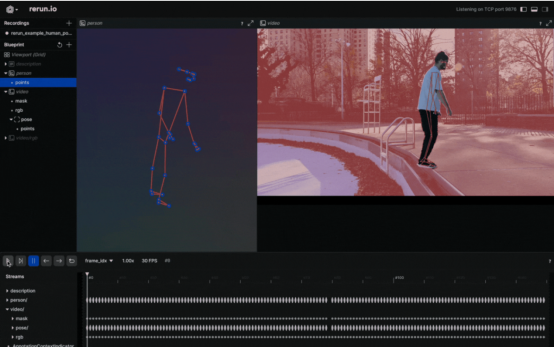
将人的姿势可视化为3D点(作者本人提供的图像)
当你有三维点的时候,为什么要选择二维点呢?创建一个新实体,将其命名为“Person”,并输出有关这些三维点的数据。这就行了!这样就可以创建人体姿势的三维演示。
以下是操作方法:
def track_pose_3d(video_path: str, *, segment: bool, max_frame_count: int | None) -> None:
mp_pose = mp.solutions.pose
rr.log("person", rr.ViewCoordinates.RIGHT_HAND_Y_DOWN, timeless=True)
with closing(VideoSource(video_path)) as video_source, mp_pose.Pose() as pose:
for idx, bgr_frame in enumerate(video_source.stream_bgr()):
if max_frame_count is not None and idx >= max_frame_count:
break
rgb = cv2.cvtColor(bgr_frame.data, cv2.COLOR_BGR2RGB)
# 把帧与数据关联起来
rr.set_time_seconds("time", bgr_frame.time)
rr.set_time_sequence("frame_idx", bgr_frame.idx)
# 呈现视频
rr.log("video/rgb", rr.Image(rgb).compress(jpeg_quality=75))
# 取得预测结果
results = pose.process(rgb)
h, w, _ = rgb.shape
# 对于3D呈现的新的实例"Person"
landmark_positions_3d = read_landmark_positions_3d(results)
if landmark_positions_3d is not None:
rr.log(
"person/pose/points",
rr.Points3D(landmark_positions_3d, class_ids=0, keypoint_ids=mp_pose.PoseLandmark),
)
源代码探索
本文重点介绍了“人体姿势跟踪”示例的主要部分。对于那些喜欢动手的人来说,这个例子的完整源代码可以在GitHub(https://github.com/rerun-io/rerun/blob/latest/examples/python/human_pose_tracking/main.py)上找到。您可以随意探索、修改和理解其中实现的内部工作原理。
提示和建议
1.压缩图像以提高效率
您可以通过压缩记录的图像来提高整个过程的速度:
rr.log(
"video",
rr.Image(img).compress(jpeg_quality=75)
)
2.限制内存使用
如果你记录的数据超过了RAM的容量,它就会开始丢弃旧数据。默认限制是系统RAM的75%。如果你想增加这个限制,可以使用命令行参数——内存限制。有关内存限制的更多信息,请参阅Rerun的“如何限制内存使用”页面信息。
3.根据您的需求定制视觉效果
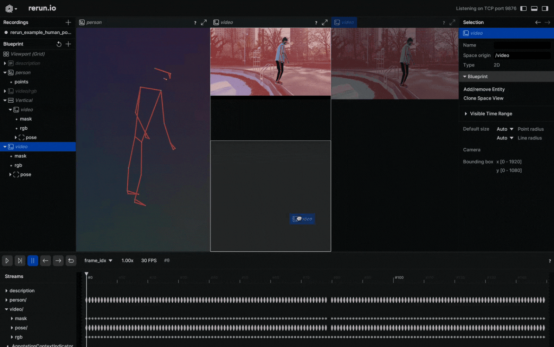
自定义Rerun查看器(作者本人提供的图像)
超越人体姿势跟踪
如果你觉得这篇文章有用且有些见地,下面再推荐一篇类似主题的文章:
- MediaPipe的实时手部跟踪和手势识别:Rerun应用示例
另外,我会经常分享一些关于计算机视觉和机器人的可视化教程。
参考资料
[1]谷歌公司的论文《Pose Landmark Detection Guide》,本页面的部分内容转载自谷歌创建和共享的作品,可根据Creative Commons 4.0 Attribution许可证中描述的条款使用。
[2] Rerun官方参考文档,可根据MIT许可使用。
译者介绍
朱先忠,51CTO社区编辑,51CTO专家博客、讲师,潍坊一所高校计算机教师,自由编程界老兵一枚。
原文标题:Human Pose Tracking with MediaPipe in 2D and 3D: Rerun Showcase,作者:Andreas Naoum