一、什么是张量(Tensor)?
在深度学习领域,PyTorch是一个广泛应用的开源库,Tensor之于PyTorch就好比是array之于Numpy或者DataFrame之于Pandas,都是构建了整个框架中最为底层的核心数据结构。Pytorch中的所有操作都是在张量的基础上进行的。
PyTorch官网对其的定义如下:

也就是说,一个Tensor是一个包含单一数据类型的多维矩阵。通常,其多维特性用三维及以上的矩阵来描述,例如下图所示:单个元素为标量(scalar),一个序列为向量(vector),多个序列组成的平面为矩阵(matrix),多个平面组成的立方体为张量(tensor)。
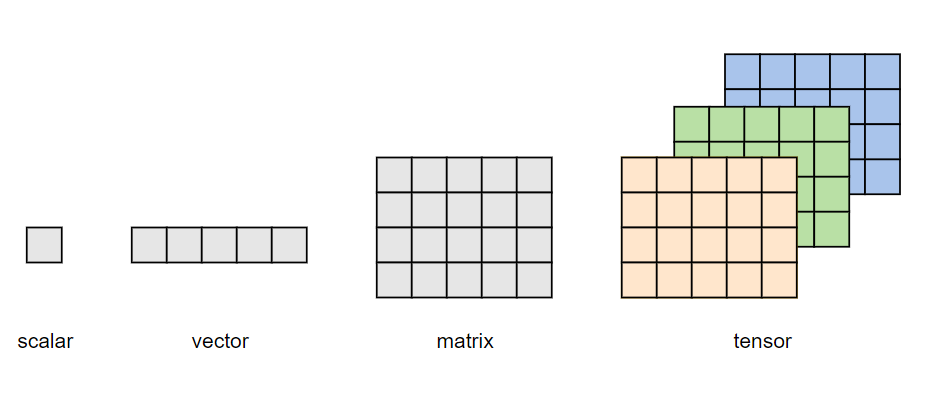
当然,张量也无需严格限制在三维及以上才叫张量,就像矩阵也有一维、二维矩阵乃至多维矩阵之分一样。
「在深度学习的范畴内,标量、向量和矩阵也可分为称为零维张量、一维张量、二维张量。」
二、为什么深度学习要搞出Tensor?
熟悉机器学习的小伙伴们应该都知道,有监督机器学习模型的输入X通常是多个特征列组成的二维矩阵,输出y是单个特征列组成的标签向量或多个特征列组成的二维矩阵。那么深度学习中,为何要定义多维矩阵Tensor呢?
深度学习当前最成熟的两大应用方向莫过于CV和NLP,其中CV面向图像和视频,NLP面向语音和文本,二者分别以卷积神经网络和循环神经网络作为核心基础模块,且标准输入数据集都是至少三维以上。其中,
- 图像数据集:至少包含三个维度(样本数Nx图像高度Hx图像宽度W);如果是彩色图像,则还需增加一个通道C,包含四个维度(NxHxWxC);如果是视频帧,可能还需要增加一个维度T,表示将视频划分为T个等时长的片段。
- 文本数据集:包含三个维度(样本数N×序列长度L×特征数H)。
因此,输入学习模型的输入数据结构通常都要三维以上,这也就促使了Tensor的诞生。
三、Tensor创建
Pytorch可基于给定数据手动创建Tensor,并提供了多种方式:
1.使用torch.tensor()函数直接创建
在PyTorch中,torch.tensor()函数用于直接从Python的数据结构(如列表、元组或NumPy数组)中创建一个新的张量。
"""
data:数据,可以是list,numpy
dtype:数据类型,默认与data对应
device:张量所在的设备(cuda或cpu)
requires_grad:是否需要梯度
pin_memory:是否存于锁存内存
"""
torch.tensor(data,dtype=None,device=None,requires_grad=False,pin_memory=False)
pin_memor用于实现锁页内存,创建DataLoader时,设置pin_memory=True,则意味着生成的Tensor数据最开始是属于内存中的锁页内存,这样将内存的Tensor转义到GPU的显存就会更快一些。
以下是使用torch.tensor()创建张量的基本示例:
import numpy as np
import torch
arr = np.ones((3, 3))
'''
[[1. 1. 1.]
 [1. 1. 1.]
 [1. 1. 1.]]
'''
print(arr)
# ndarray的数据类型:float64
print("ndarray的数据类型:", arr.dtype)
t= torch.tensor(arr)
'''
tensor([[1., 1., 1.],
        [1., 1., 1.],
        [1., 1., 1.]], dtype=torch.float64)
'''
print(t)
如需创建一个放在GPU的数据,则可做如下修改,运行结果同上。
import numpy as np
import torch
device= torch.device("cuda" if torch.cuda.is_available() else 'cpu')
arr = np.ones((3, 3))
print("ndarray的数据类型:", arr.dtype)
t = torch.tensor(arr, device=device)
print(t)
2.从numpy创建Tensor
torch.from_numpy(ndarray)利用该方法创建的tensor与原ndarray共享内存,当修改其中一个数据,另外一个也会被更新。
import numpy as np
import torch
# 创建一个numpy数组
numpy_array = np.array([[1, 2, 3], [4, 5, 6]])

# 从numpy数组创建一个Tensor,并保持数据共享(更改Tensor内容会同时改变numpy数组)
tensor_from_numpy = torch.from_numpy(numpy_array)
print(tensor_from_numpy)

# 输出:
# tensor([[1, 2, 3],
#         [4, 5, 6]], dtype=torch.int32)

# 修改tensor,array也会被修改
print("# -----------修改tensor--------------*")
t[0, 0] = -1
print("numpy array: ", arr)
# 输出:
# numpy array:  [[-1  2  3]
#               [ 4  5  6]]
print("tensor : ", t)
# 输出:
# tensor([[-1, 2, 3],
#         [4, 5, 6]], dtype=torch.int32)
3.根据数值创建张量
(1) torch.zeros():根据size创建全0张量
'''
size:张量的形状
out:输出的张量,如果指定了out,torch.zeros()返回的张量则会和out共享同一个内存地址
layout:内存中的布局方式,有strided,sparse_coo等。如果是稀疏矩阵,则可以设置为sparse_coo以减少内存占用
device:张量所在的设备(cuda或cpu)
requires_grad:是否需要梯度
'''
torch.zeros(*size, out=None, dtype=None, layout=torch.strided, device=None, requires_grad=False)
import torch
out_t = torch.tensor([1])
print(f"out_t初始值:{out_t}")
#指定out
t = torch.zeros((3, 3), out=out_t)
print(f"t:\n{t}")
print(f"out_t更新值:\n{out_t}")
# id是取内存地址,t和out_t是同一个内存地址
print(id(t), id(out_t), id(t) == id(out_t))运行结果如下,由此可见,和out_t最终共享同一个内存地址。
out_t初始值:tensor([1])
t:
tensor([[0, 0, 0],
        [0, 0, 0],
        [0, 0, 0]])
out_t更新值:
tensor([[0, 0, 0],
        [0, 0, 0],
        [0, 0, 0]])
2083081770704 2083081770704 True
(2) torch.zeros_like:根据input形状创建全0张量
torch.zeros_like(input, dtype=None, layout=None, device=None, requires_grad=False, memory_format=torch.preserve_format)同理还有全1张量的创建:torch.ones(),torch.ones_like()
(3) torch.full() & torch.full_like():创建自定义某一数值的张量。
'''
size:张量的形状,例如(3,3)
fill_value:张量中每一个元素的值。
'''

torch.full(size, fill_value, out=None, dtype=None, layout=torch.strided, device=None, requires_grad=False)
例如:
import torch
t = torch.full((4, 4), 10)
print(t)
'''
tensor([[10, 10, 10, 10],
        [10, 10, 10, 10],
        [10, 10, 10, 10],
        [10, 10, 10, 10]])
'''
(4) 创建等差的一维张量。
⭐注意区间为:[start,end)。
'''
start:数列起始值,默认为0
end:数列结束值,开区间,取不到结束值
step:数列公差,默认为1
'''
torch.arange(start=0, end, step=1, out=None, dtype=None, layout=torch.strided, device=None, requires_grad=False)
例如:
import torch
t = torch.arange(2, 10, 2)
print(t) # tensor([2, 4, 6, 8])
(5) torch.linspace():创建均分的一维张量
⭐注意区间为:[start,end]。
'''
step:数列长度(元素个数)
'''
torch.linspace(start, end, steps=100, out=None, dtype=None, layout=torch.strided, device=None, requires_grad=False)
import torch
t = torch.linspace(2, 10, 3)
print(t) # tensor([ 2., 6., 10.])(6) torch.logspace():创建对数均分的一维张量
⭐注意区间为:[start,end]。
'''
step:数列长度(元素个数)
base:对数函数的底,默认为 10
'''
torch.logspace(start, end, steps, base=10, out=None, dtype=None, layout=torch.strided, device=None, requires_grad=False)
import torch
t = torch.logspace(2, 4, 3)
print(t) # tensor([100., 1000., 10000.])(7) torch.eye():创建单位对角矩阵(2维张量)
⭐默认输出方阵。
'''
n: 矩阵行数。因为是方阵,通常只设置n
m: 矩阵列数
'''
torch.eye(n, m=None, out=None, dtype=None, layout=torch.strided, device=None, requires_grad=False)
import torch
t = torch.eye(3)
h = torch.eye(3,4)
print(f"t:{t}")
print(f"h:{h}")运行结果如下:
t:tensor([[1., 0., 0.],
        [0., 1., 0.],
        [0., 0., 1.]])
h:tensor([[1., 0., 0., 0.],
        [0., 1., 0., 0.],
        [0., 0., 1., 0.]])
4.根据概率创建张量
(1) torch.normal():生成正态分布(高斯分布)
⭐返回一个张量,包含从给定参数means、std的离散正态分布中抽取的随机数。
'''
mean:均值
std:标准差
'''
torch.normal(mean, std, *, generator=None, out=None)
包含4种模式:
- mean为标量,std为标量,此时需要设置size。
import torch
t_normal = torch.normal(0., 1., size=(4,))
# t_normal:tensor([ 0.7098,  1.5432, -0.1568, -0.6350])
print(f"t_normal:{t_normal}")
mean为张量,std为标量。
import torch
mean = torch.arange(1, 5, dtype=torch.float)
std = 1
t_normal = torch.normal(mean, std)
'''
mean:tensor([1., 2., 3., 4.])
std:1
'''
print("mean:{}\nstd:{}".format(mean, std))
#tensor([2.2450, 1.0230, 2.0299, 4.5855])
print(t_normal)
这4个数采样分布的均值不同,但是方差都是 1。
- mean为标量,std为张量。
import torch
std = torch.arange(1, 5, dtype=torch.float)
mean = 2
t_normal = torch.normal(mean, std)
'''
mean:2
std:tensor([1., 2., 3., 4.])
'''
print("mean:{}\nstd:{}".format(mean, std))
# tensor([ 1.8482,  4.8143, -3.5074,  4.2010])
print(t_normal)- mean为张量,std为张量。
import torch
mean = torch.arange(1, 5, dtype=torch.float)
std = torch.arange(1, 5, dtype=torch.float)
t_normal = torch.normal(mean, std)
'''
mean:tensor([1., 2., 3., 4.])
std:tensor([1., 2., 3., 4.])
'''
print("mean:{}\nstd:{}".format(mean, std))
# tensor([ 0.8195, -3.9112,  4.8498,  2.3934])
print(t_normal)
其中0.8195是从正态分布N(1,1)中采样得到的,-3.9112是从正态分布N(2,2)中采样得到的,其他数字以此类推。
四、Tensor属性
1.Tensor形状
张量具有如下形状属性:
- Tensor.ndim:张量的维度,例如向量的维度为1,矩阵的维度为2。
- Tensor.shape:张量每个维度上元素的数量。
- Tensor.shape[n]:张量第n维的大小。第n维也称为轴(axis)。
- Tensor.numel:张量中全部元素的个数。
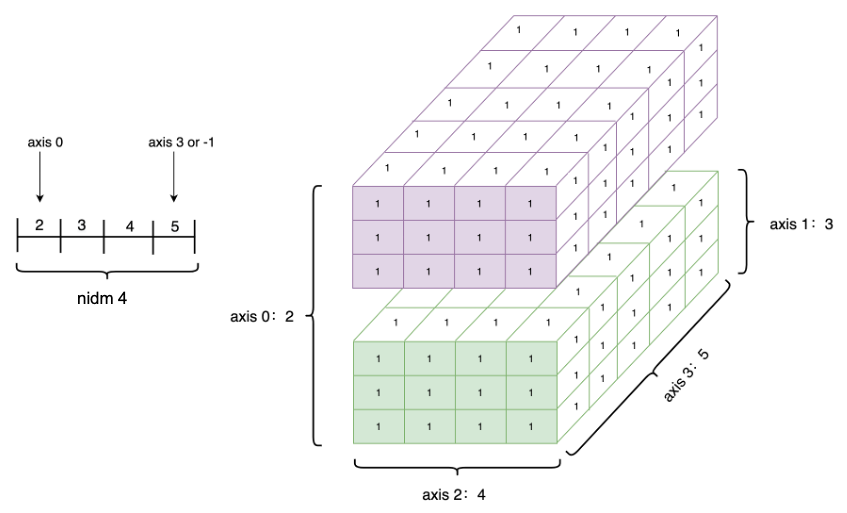
如下是创建一个四维Tensor,并通过图形直观表达以上几个概念的关系。
import torch
Tensor=torch.ones([2,3,4,5])
print("Number of dimensions:", Tensor.ndim)
print("Shape of Tensor:", Tensor.shape)
print("Elements number along axis 0 of Tensor:", Tensor.shape[0])
print("Elements number along the last axis of Tensor:", Tensor.shape[-1])
print('Number of elements in Tensor: ', Tensor.numel())  #用.numel表示元素个数
Tensor的axis、shape、dimension、ndim之间的关系如下图所示。
2.Tensor数据类型
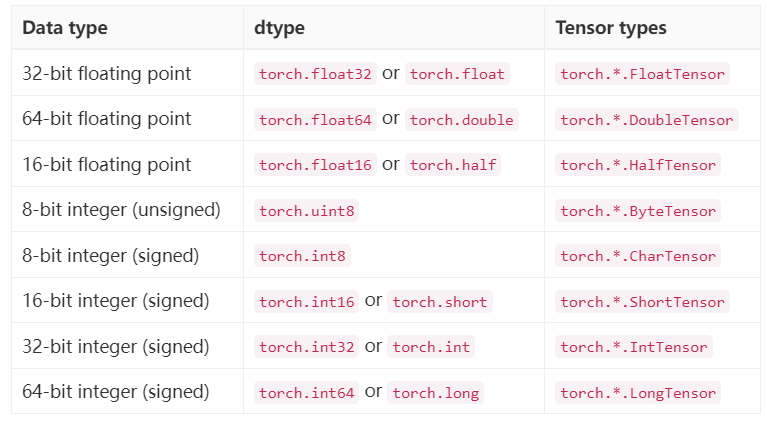
torch.dtype属性标识了torch.Tensor的数据类型。PyTorch有八种不同的数据类型:
例如:
import torch
Tensor=torch.ones([2,3,4,5])
# Data Type of every element: torch.float32
print("Data Type of every element:", Tensor.dtype)
3.Tensor所在设备

如图所示,我们可以看到每种类型的数据都有一个CPU和一个GPU版本,因此我们对张量进行处理的时候需要指定一个设备,它要么是CPU要么是GPU,这是数据被分配的位置,这决定了给定张量的张量计算位置。
Pytorch支持多种设备的使用,我们可以用torch.device来创建一个设备,并指定索引,例如:
device=torch.device('cuda:0')输出结果为:device(type='cuda',index=0),可看到类型为'cuda',即GPU,索引0表示为第一个GPU。
五、Tensor操作
1.形状重置
Tensor的shape可通过torch.reshape接口来改变。例如:
import torch
Tensor =torch.tensor([[[1, 2, 3, 4, 5],
                        [6, 7, 8, 9, 10]],
                      [[11, 12, 13, 14, 15],
                        [16, 17, 18, 19, 20]],
                      [[21, 22, 23, 24, 25],
                        [26, 27, 28, 29, 30]]])
print("the shape of Tensor:", Tensor.shape)
#利用reshape改变形状
reshape_Tensor = torch.reshape(Tensor, [2, 5, 3])
print("After reshape:\n", reshape_Tensor)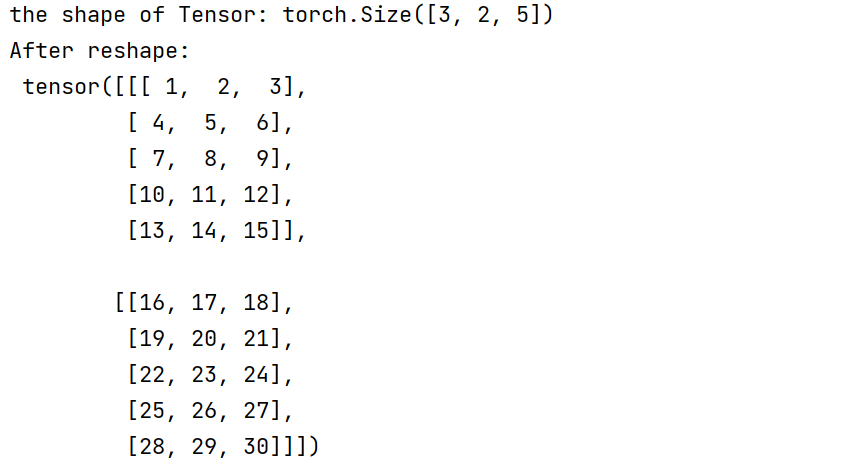
从输出结果看,将张量从[3, 2, 5]的形状reshape为[2, 5, 3]的形状时,张量内的数据不会发生改变,元素顺序也没有发生改变,只有数据形状发生了改变。
在指定新的shape时存在一些技巧:
- -1 表示这个维度的值是从Tensor的元素总数和剩余维度自动推断出来的。因此,有且只有一个维度可以被设置为-1。
- 0 表示该维度的元素数量与原值相同,因此shape中0的索引值必须小于Tensor的维度(索引值从 0 开始计,如第 1 维的索引值是 0,第二维的索引值是 1)。
例如:
# 直接指定目标 shape
origin:[3, 2, 5] reshape:[3, 10] actual: [3, 10]
# 转换为 1 维,维度根据元素总数推断出来是 3*2*5=30
origin:[3, 2, 5] reshape:[-1] actual: [30]
# 转换为 2 维,固定一个维度 5,另一个维度根据元素总数推断出来是 30÷5=6
origin:[3, 2, 5] reshape:[-1, 5]      actual: [6, 5]
# reshape:[0, -1]中 0 的索引值为 0,按照规则
# 转换后第 0 维的元素数量与原始 Tensor 第 0 维的元素数量相同,为3
# 第 1 维的元素数量根据元素总值计算得出为 30÷3=10。
origin:[3, 2, 5] reshape:[0, -1]      actual: [3, 10]
# reshape:[3, 1, 0]中 0 的索引值为 2
# 但原 Tensor 只有 2 维,无法找到与第 3 维对应的元素数量,因此出错。
origin:[3, 2] reshape:[3, 1, 0]       error:
另外还可以通过如下方式改变shape:
- torch.squeeze:可实现Tensor的降维操作,即把Tensor中尺寸为1的维度删除。
- torch.unsqueeze:可实现Tensor的升维操作,即向Tensor中某个位置插入尺寸为1的维度。
- torch.flatten,将Tensor的数据在指定的连续维度上展平。
- torch.transpose,对Tensor的数据进行重排。
2.索引和切片
通过索引或切片方式可访问或修改Tensor。
(1) 「访问Tensor」
import torch
ndim_2_Tensor = torch.tensor([[0, 1, 2, 3],
                               [4, 5, 6, 7],
                               [8, 9, 10, 11]])
print("Origin Tensor:\n", ndim_2_Tensor.numpy())
#索引或切片的第一个值对应第 0 维,第二个值对应第 1 维,
#依次类推,如果某个维度上未指定索引,则默认为 :
#所以下面两种操作结果一样
print("First row:", ndim_2_Tensor[0].numpy())
print("First row:", ndim_2_Tensor[0, :].numpy())
print("First column:", ndim_2_Tensor[:, 0].numpy())
print("Last column:", ndim_2_Tensor[:, -1].numpy())
print("All element:\n", ndim_2_Tensor[:].numpy())
print("First row and second column:", ndim_2_Tensor[0, 1].numpy())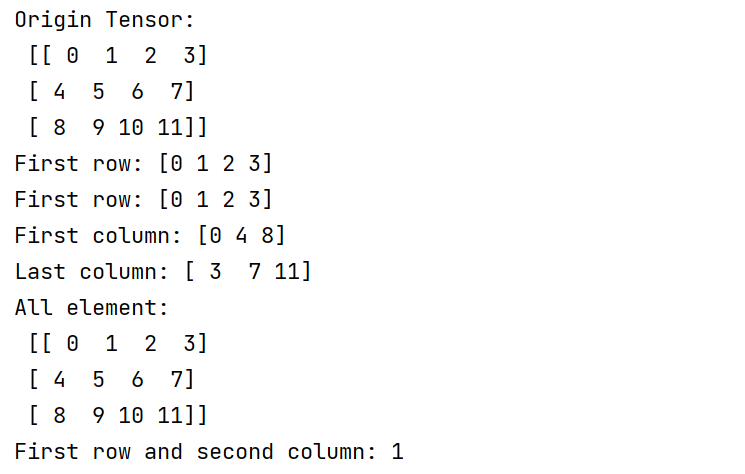
(2) 「修改Tensor」
与访问张量类似,可以在单个或多个轴上通过索引或切片操作来修改张量。
import torch
ndim_2_Tensor = torch.ones([2, 3])
ndim_2_Tensor = ndim_2_Tensor.to(torch.float32)
print('Origin Tensor:\n ', ndim_2_Tensor)
# 修改第1维为0
ndim_2_Tensor[0] = 0
print('change Tensor:\n ', ndim_2_Tensor)
# 修改第1维为2.1
ndim_2_Tensor[0:1] = 2.1
print('change Tensor:\n ', ndim_2_Tensor)
# 修改全部Tensor
ndim_2_Tensor[...] = 3
print('change Tensor:\n ', ndim_2_Tensor)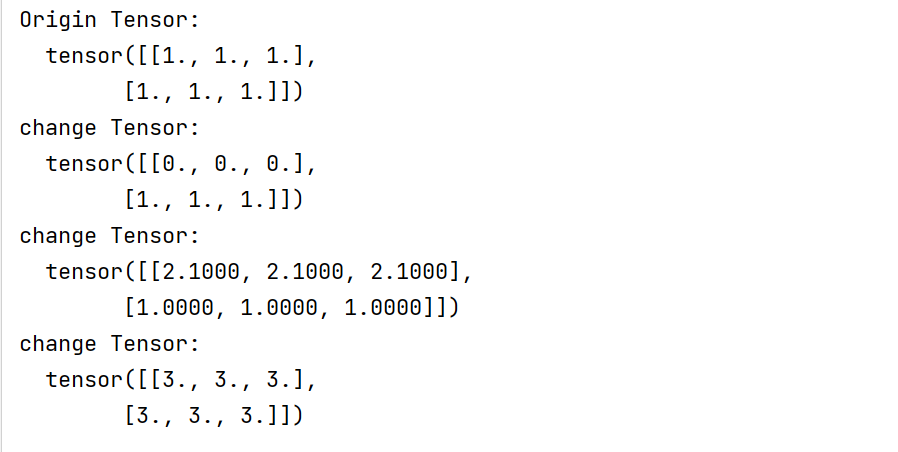
3.Tensor运算
张量支持包括基础数学运算、逻辑运算、矩阵运算等100余种运算操作。
数学运算:
x.abs()                       # 逐元素取绝对值
x.ceil()                      # 逐元素向上取整
x.floor()                     # 逐元素向下取整
x.round()                     # 逐元素四舍五入
x.exp()                       # 逐元素计算自然常数为底的指数
x.log()                       # 逐元素计算x的自然对数
x.reciprocal()                # 逐元素求倒数
x.square()                    # 逐元素计算平方
x.sqrt()                      # 逐元素计算平方根
x.sin()                       # 逐元素计算正弦
x.cos()                       # 逐元素计算余弦
x.add(y)                      # 逐元素加
x.subtract(y)                 # 逐元素减
x.multiply(y)                 # 逐元素乘(积)
x.divide(y)                   # 逐元素除
x.mod(y)                      # 逐元素除并取余
x.pow(y)                      # 逐元素幂
x.max()                       # 指定维度上元素最大值,默认为全部维度
x.min()                       # 指定维度上元素最小值,默认为全部维度
x.prod()                      # 指定维度上元素累乘,默认为全部维度
x.sum()                       # 指定维度上元素的和,默认为全部维度
逻辑运算:
x.isfinite()                  # 判断Tensor中元素是否是有限的数字,即不包括inf与nan
x.equal_all(y)                # 判断两个Tensor的全部元素是否相等,并返回形状为[1]的布尔类Tensor
x.equal(y)                    # 判断两个Tensor的每个元素是否相等,并返回形状相同的布尔类Tensor
x.not_equal(y)                # 判断两个Tensor的每个元素是否不相等
x.less_than(y)                # 判断Tensor x的元素是否小于Tensor y的对应元素
x.less_equal(y)               # 判断Tensor x的元素是否小于或等于Tensor y的对应元素
x.greater_than(y)             # 判断Tensor x的元素是否大于Tensor y的对应元素
x.greater_equal(y)            # 判断Tensor x的元素是否大于或等于Tensor y的对应元素
x.allclose(y)                 # 判断两个Tensor的全部元素是否接近
矩阵运算:
x.t()                         # 矩阵转置
x.transpose([1, 0])           # 交换第 0 维与第 1 维的顺序
x.norm('fro')                 # 矩阵的弗罗贝尼乌斯范数
x.dist(y, p=2)                # 矩阵(x-y)的2范数
x.matmul(y)                   # 矩阵乘法
4.Tensor广播机制
深度学习任务中,通常不可避免会遇到需要使用较小形状的Tensor与较大形状的Tensor执行计算的情况。此时,则需要将较小形状的Tensor扩展到与较大形状的Tensor一样的形状,以便于匹配计算,但是又「不会」对较小形状Tensor进行「数据拷贝」操作,从而「提升算法实现的运算效率」。这即是广播机制。
Tensor广播机制通常遵循如下规则:
- 每个 Tensor 至少为一维 Tensor。
- 从最后一个维度向前开始比较两个Tensor的形状,需要满足如下条件才能进行广播:
- 两个Tensor的维度大小相等;或者其中一个Tensor的维度为1;或者其中一个Tensor的维度不存在。
例如:
两个Tensor的形状一致,可以广播。
import torch

x = torch.ones((2, 3, 4))
y = torch.ones((2, 3, 4))
z = x + y
print(z)
# tensor([[[2., 2., 2., 2.],
         [2., 2., 2., 2.],
         [2., 2., 2., 2.]],

         [[2., 2., 2., 2.],
         [2., 2., 2., 2.],
         [2., 2., 2., 2.]]])
print(z.shape)
# torch.Size([2, 3, 4])
从最后一个维度向前依次比较:第一次y的维度大小为1,第二次x的维度大小为1,第三次x和y的维度大小相等,第四次y的维度不存在,所以x和y可以广播。
import torch

x = torch.ones((2, 3, 1, 5))
y = torch.ones((3, 4, 1))

z = x + y
print(z.shape)
# torch.Size([2, 3, 4, 5])
从最后一个维度向前依次比较:第一次比较:4不等于6,不可广播。
x = torch.ones((2, 3, 4))
y = torch.ones((2, 3, 6))
# z = x + y
# ValueError: (InvalidArgument) Broadcast dimension mismatch.
两个Tensor进行广播后的结果Tensor的形状计算规则如下:
- 如果两个 Tensor 的形状的长度不一致,会在较小长度的形状矩阵前部添加 1,直到两个 Tensor 的形状长度相等。
- 保证两个 Tensor 形状相等之后,每个维度上的结果维度就是当前维度上的较大值。
例如,y的形状长度为2,小于x的形状长度3,因此会在 y 的形状前部添加 1,结果就是 y 的形状变为[1, 3, 1]。广播之后z的形状为[2,3,4],且z的每一维度上的尺寸,将取x和y对应维度上尺寸的较大值,如第0维x的尺寸为2,y的尺寸为1,则z的第0维尺寸为2。
import torch

x = torch.ones((2, 1, 4))
y = torch.ones((3, 1))
z = x + y
print(z.shape)
# torch.Size([2, 3, 4])
广播机制运行过程如下图:
 图片
图片


