
hi, 大家好, 我是徐小夕. 上篇文章和大家分享了刚开发完的可视化搭建产品——橙子试卷. 收到了很多用户的反馈和建议, 其中有一个建议我觉得非常有意思, 所以花了一天时间研究和实现了这个用户需求。
具体需求如下:
对于高等数学类课程的试卷, 能不能实现编辑数学公式的功能呢?
经过了一系列的调研和可行性分析, 我觉得这个需求非常有价值, 而且应用面很广, 技术上从 web 的角度也是可以实现的, 所以我花了一点时间实现了它。
在文章末尾我也会把集成了数学公式的可视化编辑器地址分享给大家, 供大学学习参考。
接下里我会和大家分享一下如何从零实现一个支持数学公式编辑器的组件, 并集成到 vue3 项目中。
数学公式编辑器的技术实现
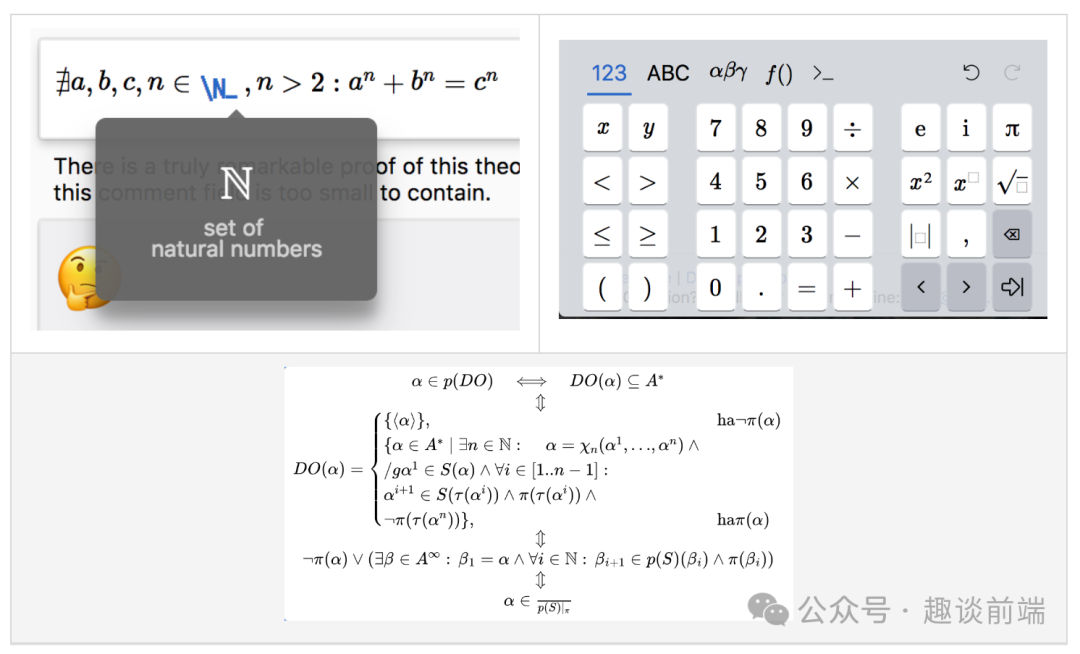
首先要想实现展示我们熟知的数学公式, 在 web 里我们需要了解以下几种表示法:
- latex
- mathml
- ascimath
以上三种表示法实际上都是标记语言, 通过特定的语法格式来优雅的展示数学公式, 简单举例如下:
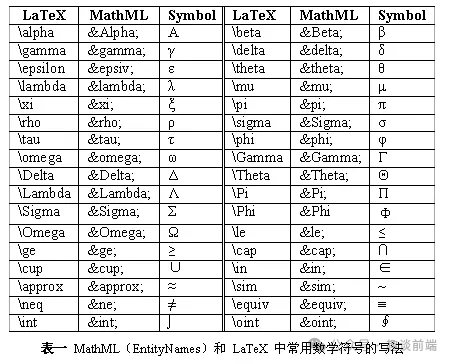
如果大家熟悉这些标记语言, 我们就可以很容易的使用前端开源库 MathJax 来编写数学公式。

具体使用如下:
<template>
  <div class="Formula">
    <p id="math"></p>
    <p ref="math" v-html=“str”></p>
  </div>
</template>

<script>
export default {
  name: 'Formula',
  data() {
    return {
      str: ''
    }
  },
  mounted() {
    this.$nextTick(() => {
      // typesetPromise 需要 [] 包裹
      this.str = '\\[x = {-b \\pm \\sqrt{b^2-4ac} \\over 2a}.\\]'
      window.MathJax.typesetPromise([this.$refs.math]).catch(err => err)

      // tex2chtml 不需要 [] 包裹
      const str = `x = {-b \\pm \\sqrt{b^2-4ac} \\over 2a}`
      document
        .querySelector('#math')
        .appendChild(window.MathJax.tex2chtml(str))
    })
  }
}
</script>
但是作为极具产品观念的我来说, 让用户学习这些标记语言是非常痛苦的, 所以我们要想一种更简单的方式, 让用户不用学习, 也能可视化的编写复杂数学公式。
我研究了一些成熟的库之后发现, 有一个开源库非常适合我的“简单化”诉求, 它就是——mathlive。
MathLive 是一个功能强大的 Web 组件,它提供了一个易于使用的界面来编辑数学公式。

但是网上它的文档和在 vue3 中的使用非常稀少, 可以说是完全没有. 因为我做的橙子试卷搭建平台采用 vue3 来实现的, 所以我需要研究一种支持 vue3 的方案。
好在我找到了它们纯英文版的文档, 咬了一遍它的文档之后, 对 MathLive 有了更深的理解。
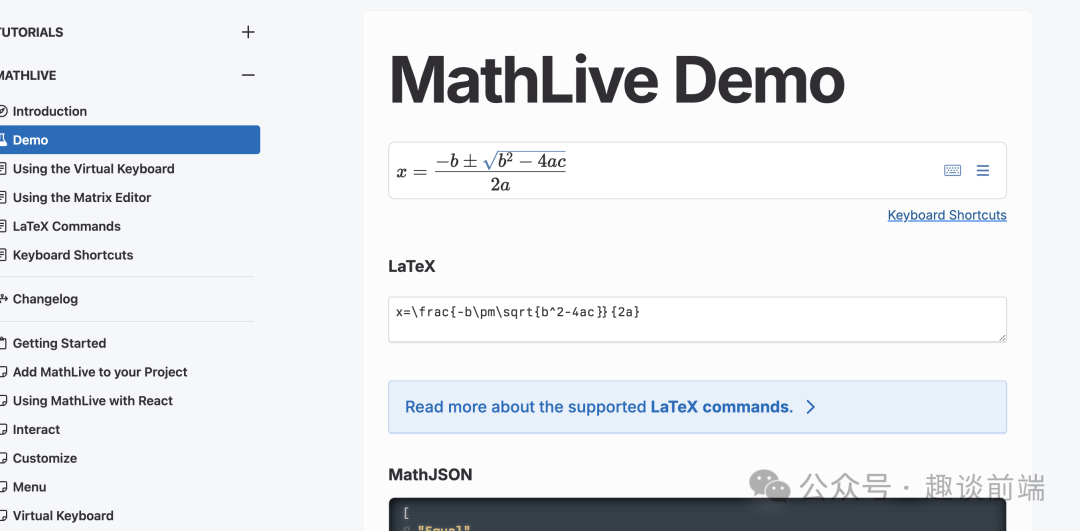
文档里提供了原生 webcomponent 的使用方法 和 react的使用案例, 好在我有5年多的 react 驾龄, 看起来还是非常顺手的. 下面我就直接分享如何把它集成到 vue3 项目里. 感兴趣的朋友可以直接拿来应用到自己的项目里。
1、安装和引入MathLive组件
我们可以用 npm 或者 yarn 或者 pnpm(推荐) 安装:
pnpm install mathlive接下来我们来注册一下组件:
import * as MathLive from 'mathlive';
import VueMathfield from '@/assets/vue-mathlive.mjs';

app.use(VueMathfield, MathLive);
这样我们就可以在全局使用 mathlive 公式编辑器组件了。
2、在项目中使用

为了实现上图的效果, 我们需要在页面里定义组件:
<mathlive-mathfield
  :options="{ smartFence: false }"
  @input="handleChange"
  :value="content"
>
  {{ content }}
</mathlive-mathfield>
这个是 mathlive 默认是引入标签, 当然我们可以修改它的定义, 如果你是 react 选手, 也可以直接这么使用:
// d.ts
declare global {
  namespace JSX {
    interface IntrinsicElements {
      'math-field': React.DetailedHTMLProps<React.HTMLAttributes<MathfieldElement>, MathfieldElement>;
    }
  }
}

// app.tsx
import "./App.css";
import "//unpkg.com/mathlive";
import { useState } from "react";

function App() {
  const [value, setValue] = useState<string>("");

  return (
    <div className="App">
      <math-field
        onInput={
          (evt: React.ChangeEvent<HTMLElement>) =>
            setValue(evt.target.value)
        }
      >
        {value}
      </math-field>
      <p>Value: {value}</p>
    </div>
  );
}

export default App;
接下来就来学习一下它的属性, 下面是 vue 版的 props, 非常重要, 大家可以收藏一下:

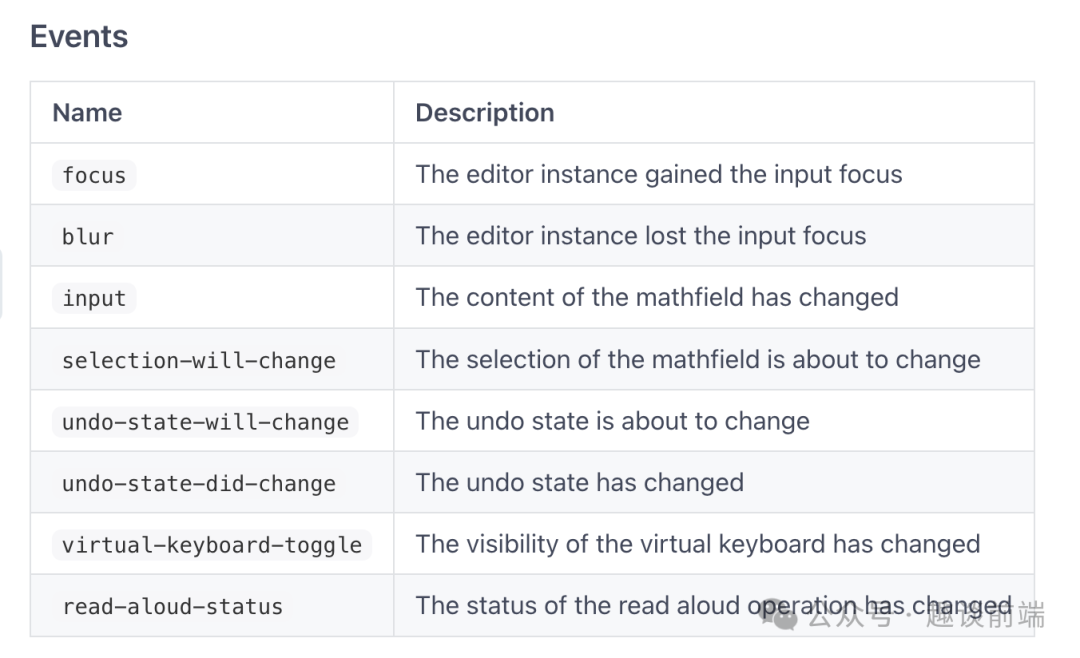
这里我整理了几个常用的api:
- value 组件绑定的值。
- input 输入内容时的监听函数, 用来更新和获取value。
- options 组件选项属性, 比如编辑模式, 可读性等, 非常重要。
当然如果你想修改它的显示样式, 可以通过操作 dom 或属性, 也可以直接用 css 覆盖:
.content {
  :deep(math-field) {
    width: 100%;
  }
}
通过以上步骤, 基本上能实现我们上面分享的公式编辑器了:
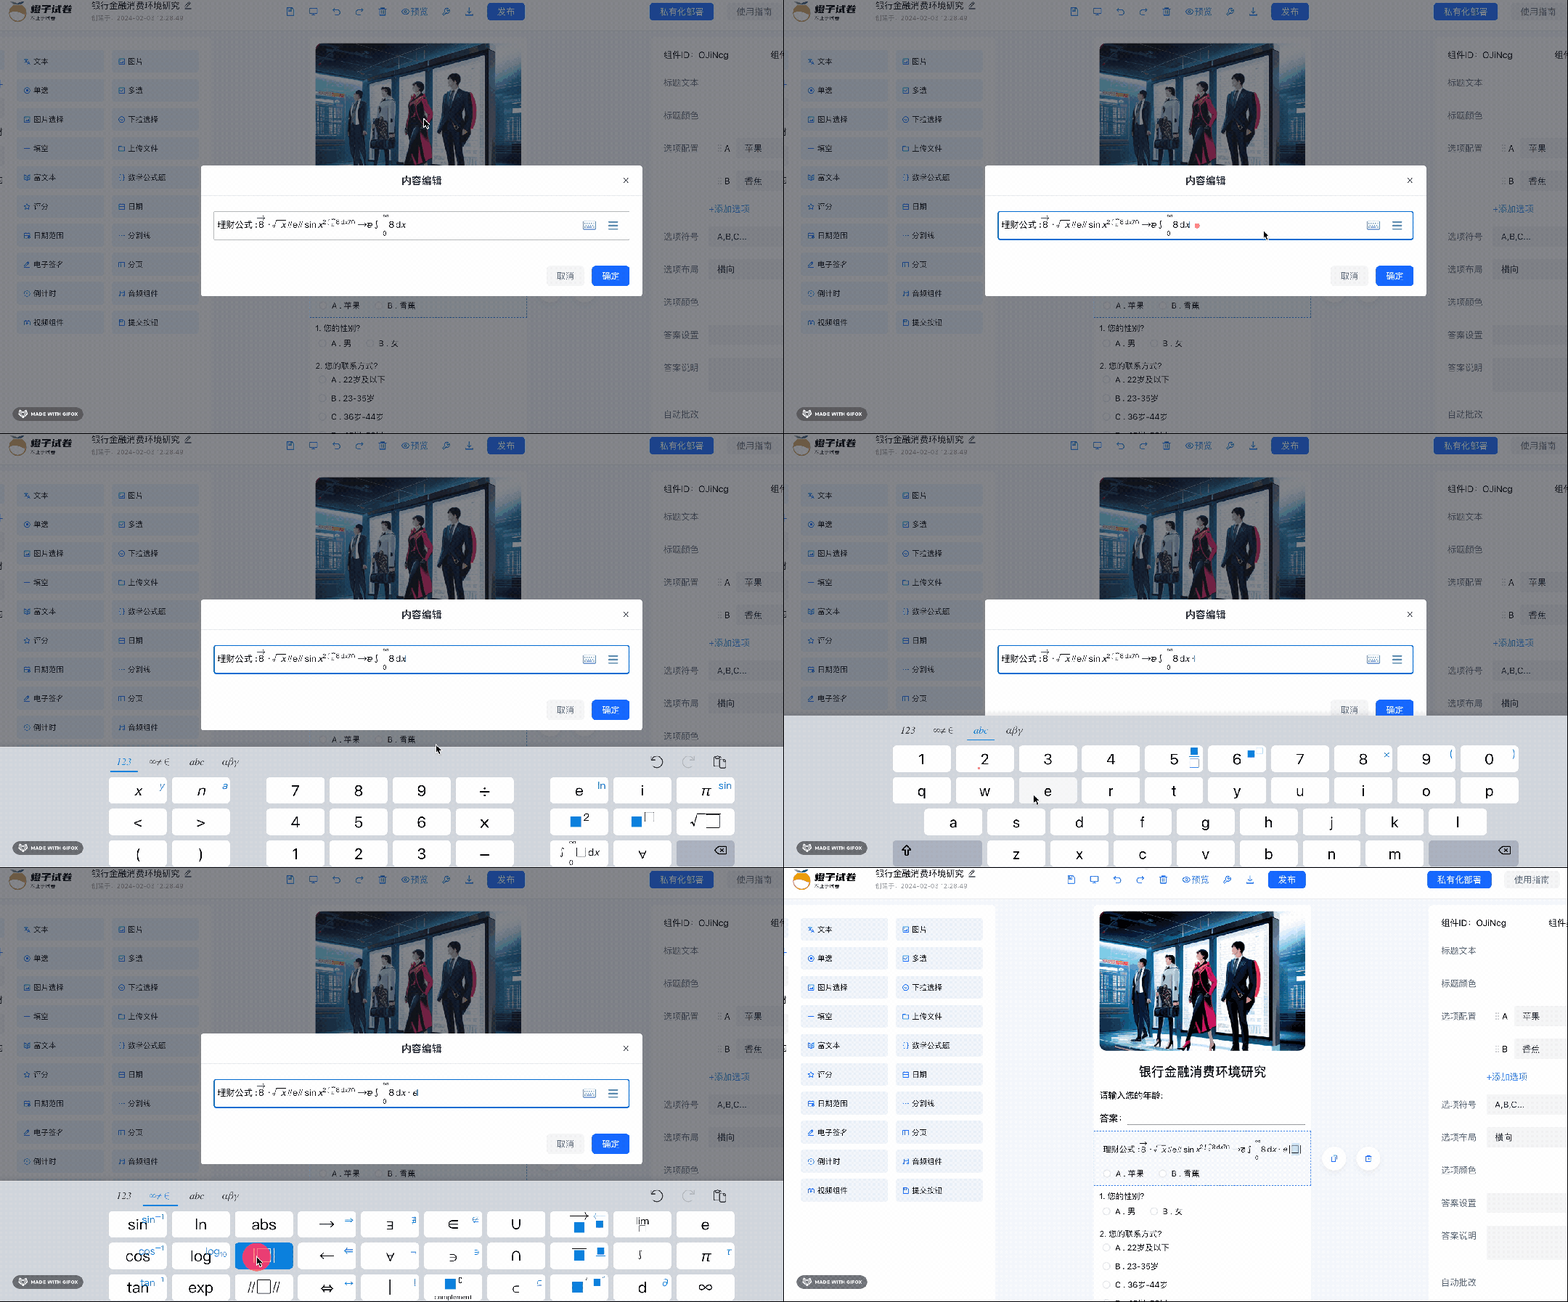
快速集成到可视化搭建平台
接下来分享一下如何集成到我们的橙子试卷零代码搭建平台中。
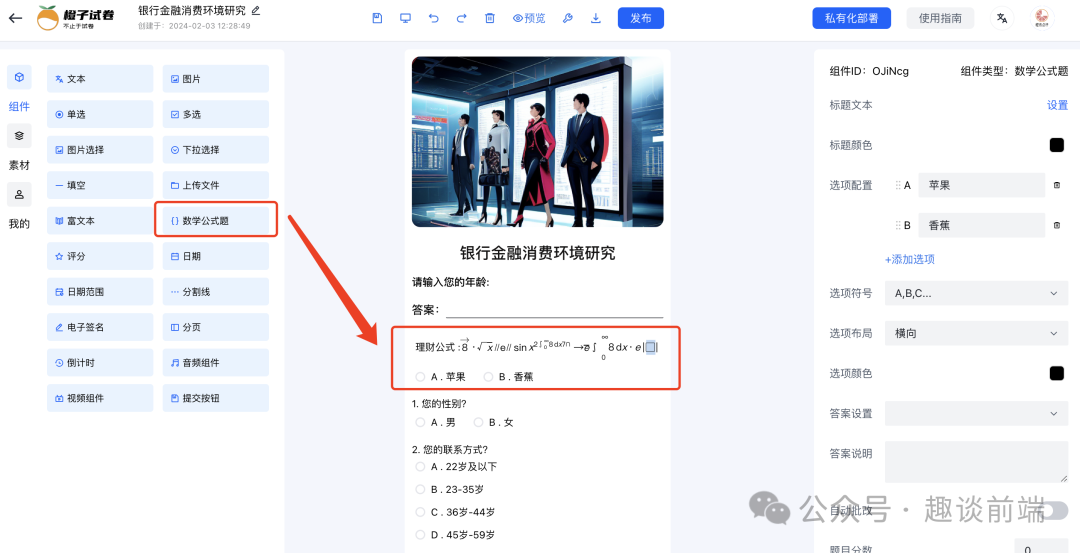
首先我们需要先在物料库中添加数学公式编辑器组件, 具体思路如下:
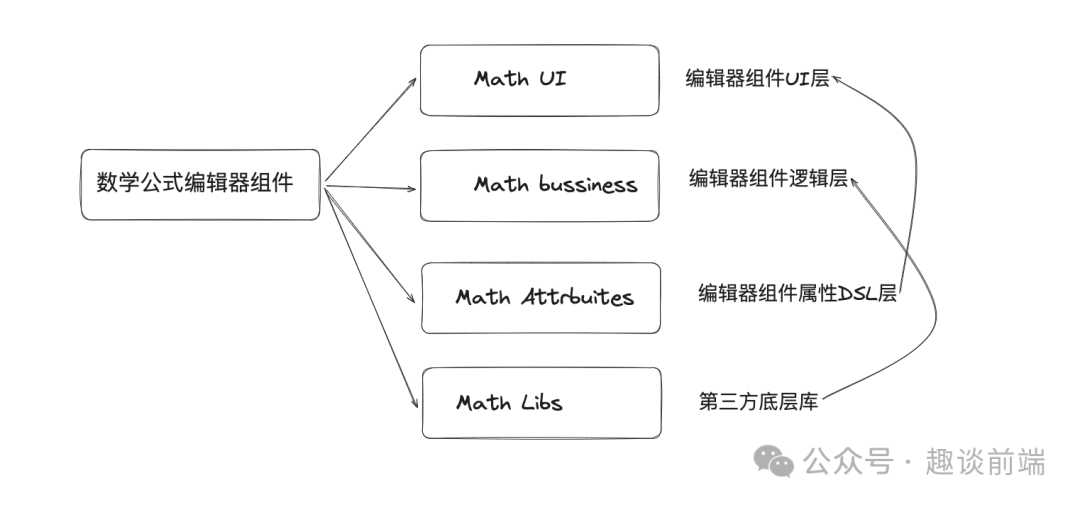
UI代码:
<template>
  <div>
    <div class="title" :style="{ color: editorStore.data[index].titleColor }">
      <mathlive-mathfield
        :options="{
          smartFence: false,
          readOnly: true,
        }"
      >
        {{ editorStore.data[index].titleText }}
      </mathlive-mathfield>
    </div>
    <a-radio-group
      :direction="editorStore.data[index].direction"
      v-model="editorStore.data[index].value"
    >
      <a-radio
        v-for="item in editorStore.data[index].options"
        :value="item.label"
        :key="item.label"
        :style="{ '--radio-options-color': editorStore.data[index].optionsColor }"
        @click.stop
      >
        {{ item.label }} . {{ item.value }}</a-radio
      >
    </a-radio-group>
    <Message
      :value="editorStore.data[index].value"
      :answer="editorStore.data[index].answer"
      :auto="editorStore.data[index].auto"
      :analysis="editorStore.data[index].analysis"
    />
  </div>
</template>
其中我们需要关注 mathlive-mathfield 的一个属性: readonly, 它是让我们把 latex 渲染成可视的数学公式的必备属性, 否则我们只能在编辑模式下看到数学公式了。
接下来我们来编写组件配置层代码, 具体效果如下:

当我们编辑标题时, 会打开公式编辑器:

这部分我们是通过配置DSL自动生成的属性面板, 这块的知识我在分享H 5-Dooring 零代码实现原理时有具体的介绍, 这里就不一一分析了, 直接上代码:
export default class Math {
    component: any;
    constructor(id: string, arr=[{label:'A',value:'苹果'},{label:'B',value:'香蕉'}]) {
        this.component = {
            component: 'math',
            type: 'editor.math',
            id,
            check: true,
            titleText: '数学题目',
            titleColor: 'black',
            options: arr,
            symbol: 'A,B,C...',
            direction: 'horizontal',
            optionsColor:'black',
            answer:undefined,
            analysis: '',
            auto: '',
            value:undefined,
            margin: [10, 10, 10, 10],
            scores:0,
            required:false,
            attrbite: [
                {
                    name: 'editor.titleText',
                    field: 'titleText',
                    component: 'math'
                },
                {
                    name: 'editor.titleColor',
                    field: 'titleColor',
                    component: 'color',
                    props: {
                        type: 'color'
                    }
                },
                {
                    name: 'editor.optionConfig',
                    field: 'options',
                    component: 'options',
                    props: {
                        options:arr
                    }
                },
                {
                    name: 'editor.optionSymbol',
                    field: 'symbol',
                    component: 'select',
                    props: {
                        options: [
                            {label:'A,B,C...',value:'A,B,C...'},
                            {label:'1,2,3...',value:'1,2,3...'},
                            {label:'a,b,c...',value:'a,b,c...'},
                            {label:'I,II,III...',value:'I,II,III...'}
                        ],
                    }
                },
                {
                    name: 'editor.optionDirection',
                    field: 'direction',
                    component: "select",
                    props: {
                        options: [{ label:'editor.horizontal', value: 'horizontal' }, { label: 'editor.vertical', value: 'vertical' }],
                    }
                },
                {
                    name: 'editor.optionsColor',
                    field: 'optionsColor',
                    component: 'color',
                    props: {
                        type: 'color'
                    }
                },
                {
                    name: 'editor.answerSettings',
                    field: 'answer',
                    component: 'select-lable',
                },
                {
                    name: 'editor.answerillustrate',
                    field: 'analysis',
                    component: 'textarea'
                },
                {
                    name: 'editor.grading',
                    field: 'auto',
                    component: 'switch'
                },
                {
                    name: 'editor.scores',
                    field: 'scores',
                    component: 'numberInput',
                    props: {
                        min: 0
                    }
                },
                {
                    name: 'editor.required',
                    field: 'required',
                    component: 'switch'
                },
                {
                    name: 'editor.margin',
                    field: 'margin',
                    component: "padding",
                    props: {
                        min: 0,
                        type:'margin'
                    }
                },
            ]
        }
    }
}
这样我们就能把编辑器组件成功变成一个零代码可消费的组件, 当然这离不开我实现的零代码渲染引擎, 这块我会在后面的文章中详细分享.
以上我们就实现了橙子试卷 可视化搭建系统的数学公式编辑器功能,
体验地址: https://turntip.cn/formManager。


