一、前言
自华为宣布HarmonyOS NEXT全面启动,近期新浪、B站、小红书、支付宝等各领域头部企业纷纷启动鸿蒙原生应用开发。据媒体统计,如今Top20的应用里,已经有近一半开始了鸿蒙原生应用开发。虽然目前HarmonyOS NEXT还未面向个人开发者开放,但我们可以体验并使用最新的API9和开发工具,尝试开发元服务,这个鸿蒙新的应用形态。体验未来在HarmonyOS NEXT上实现的应用开发。但需要注意的是, 基于API9开发的应用或元服务是不可以适配HarmonyOS NEXT版本的,大家也可以期待一下明年推出的适配HarmonyOS NEXT新版本。
本文主要是基于蜜蜂AI元服务的开发案例:主要的功能有
元服务内部功能:
- 提供两个Tabs,首页和我的。
- 用户只有登录之后才可以去使用蜜蜂AI的功能。
- 目前现有的知识库包括知识百科小助手,节日小助手,文本翻译小助手,产品名称小助手,以及道歉信小助手等。
- 用户使用小助手之后,我们可以保存对话到列表内,下次快速的进行访问。
元服务卡片:
- 提供2-4的卡片,卡片界面展示每日妙语,点击即可刷新。
- 提供1-2的卡片,实现快速访问首页。
- 提供2-2卡片,可以快速使用包括知识百科小助手,节日小助手,文本翻译小助手,产品名称小助手。
- 提供4-4卡片,可以快速到达登陆页面,访问小助手等。
1、HarmonyOS
HarmonyOS是华为公司开发的操作系统,它的设计理念是面向未来的全场景智慧体验,可在各种设备上运行,包括手机、平板电脑、智能手表、智能音箱等。HarmonyOS采用分布式技术,可以将不同设备之间的计算资源连接起来,实现设备间的协同工作,提高系统的性能和稳定性。此外,HarmonyOS还拥有高度自适应的界面、多屏协同等特性,使用户能够在不同设备上实现无缝的体验。
2、元服务
在万物互联时代,人均持有设备量不断攀升,设备和场景的多样性,使应用开发变得更加复杂、应用入口更加多样。在此背景下,应用提供方和用户迫切需要一种新的服务提供方式,使应用开发更简单、服务(如听音乐、打车等)的获取和使用更便捷。为此,HarmonyOS除支持传统方式的需要安装的应用(以下简称传统应用)外,还支持更加方便快捷的免安装的应用(即元服务)。
3、介绍AppGallery Connect(AGC)
AppGallery Connect(简称AGC)致力于为应用的创意、开发、分发、运营、经营各环节提供一站式服务,构建全场景智慧化的应用生态体验。
4、蜜蜂AI元服务助手背景
目前AI正火,而我自己也想将鸿蒙和AI做一结合,于是有了蜜蜂这个作品。
元服务与传统应用对比
项目 | 元服务 | 传统应用 |
软件包形态 | App Pack(.app) | App Pack(.app) |
分发平台 | 由应用市场(AppGallery)管理和分发 | 由应用市场(AppGallery)管理和分发 |
安装后有无桌面icon | 无桌面icon,但可手动添加到桌面,显示形式为服务卡片 | 有桌面icon |
HAP免安装要求 | 所有HAP(包括Entry HAP和Feature HAP)均需满足免安装要求 | 所有HAP(包括Entry HAP和Feature HAP)均为非免安装的 |
新建元服务应用。
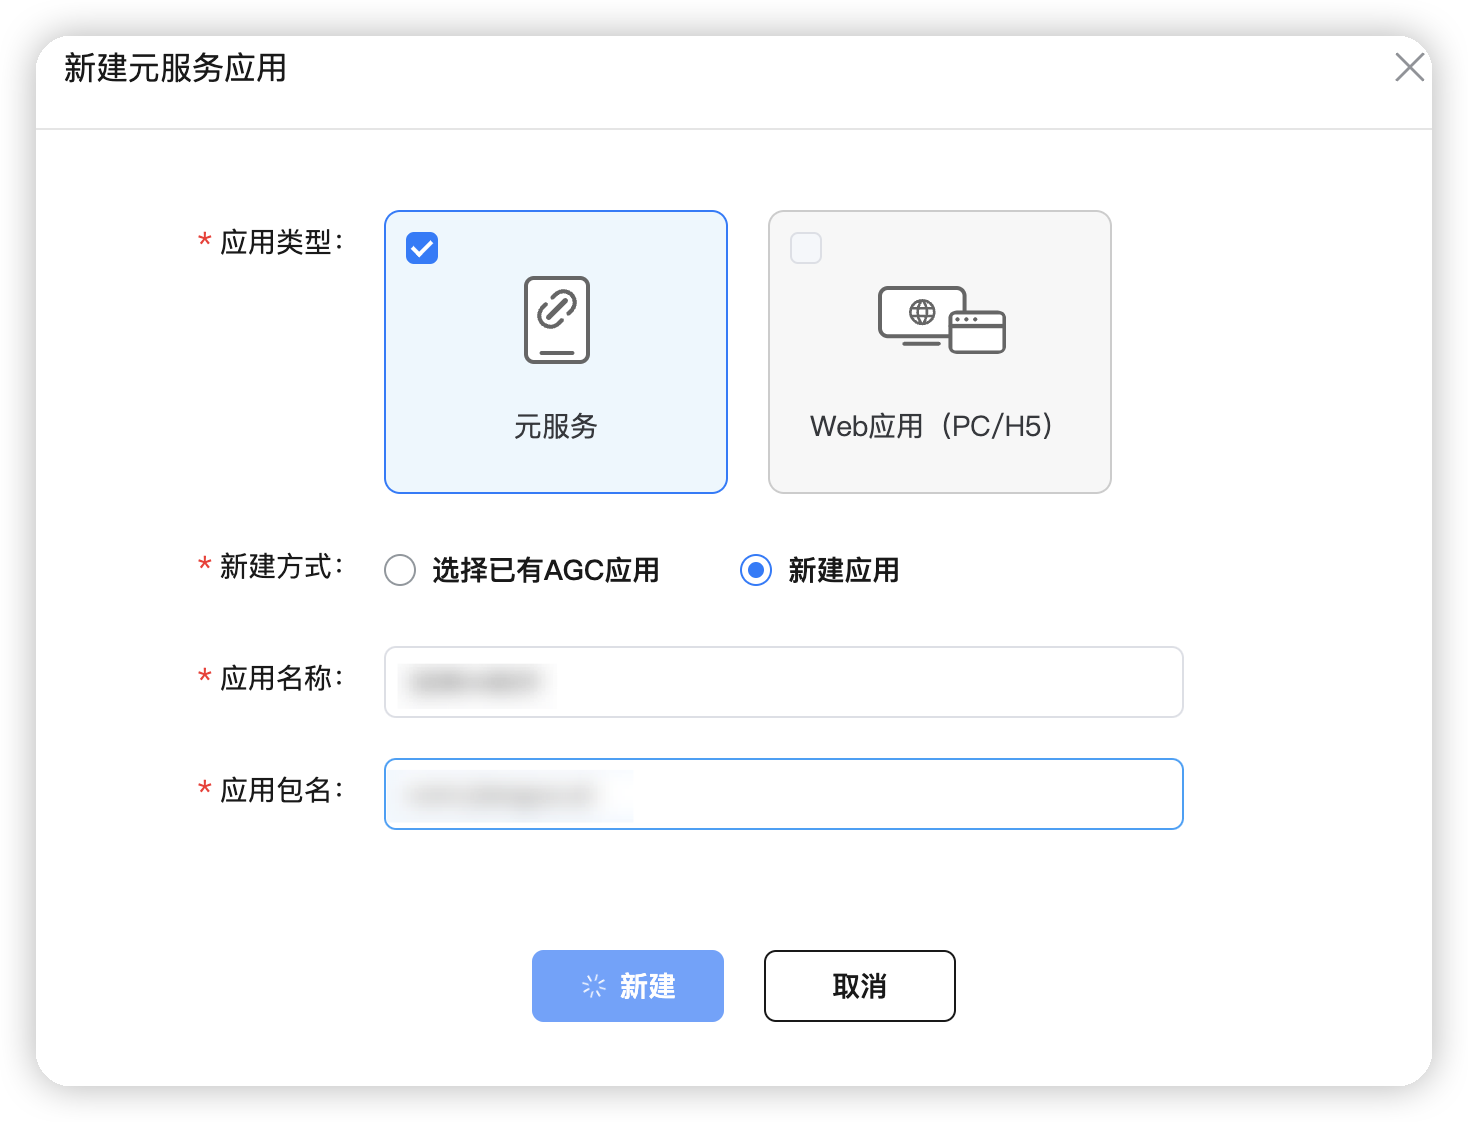
开通:
AI平台https://fulitimes.com/登陆账号17752170152
https://ai.fulitimes.com/model?modelId=
如何运行
二、准备工作
1、HarmonyOS应用开发环境
工欲善其事,必先利其器,我们首先要做的就是搭建开发环境。
这里面我们分为三步走。
(1)环境安装
首先在这边安装最新的IDE:
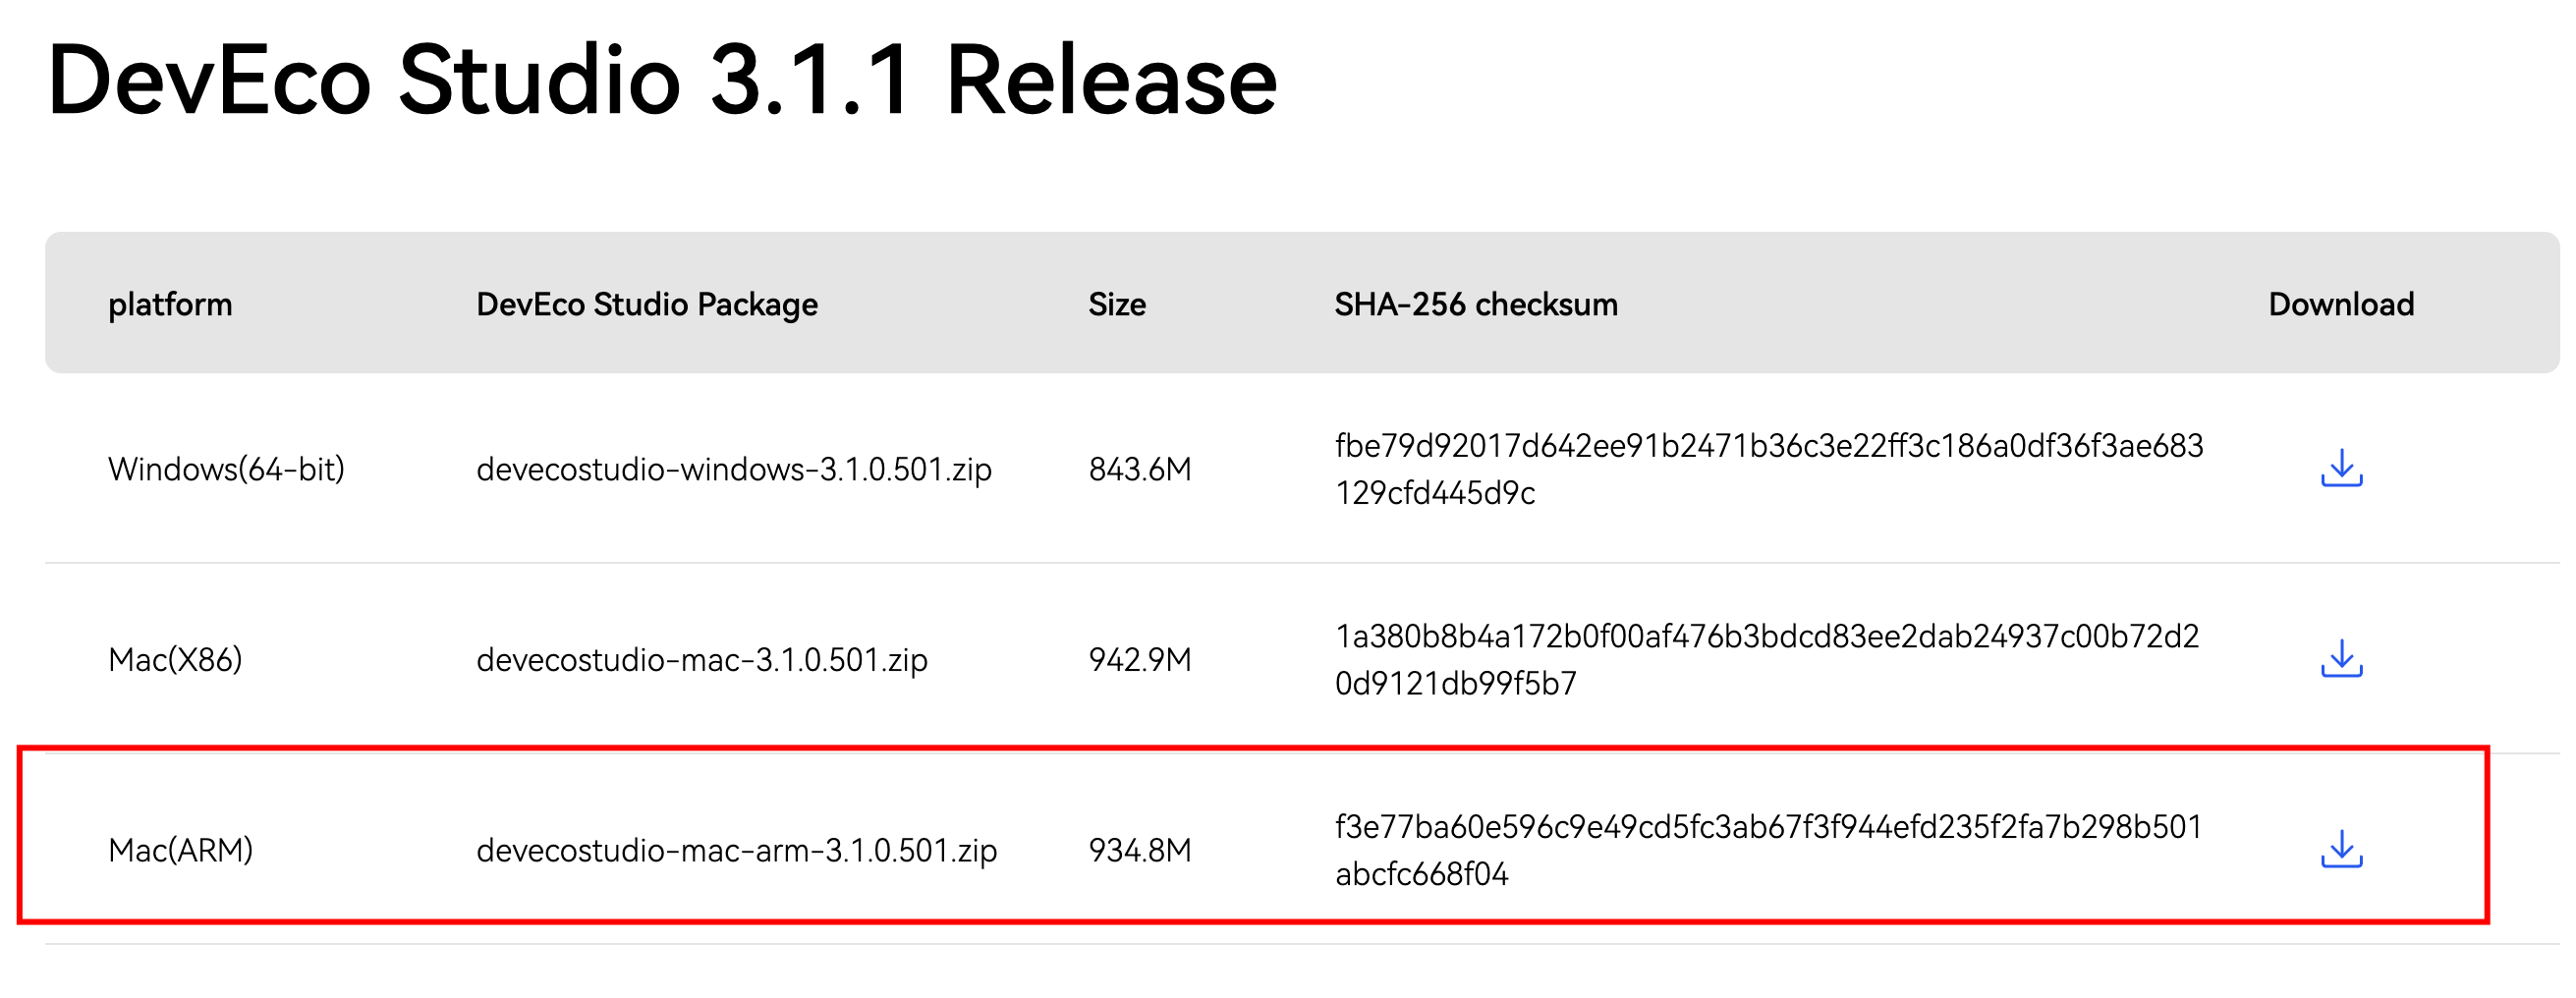
下载链接:https://developer.harmonyos.com/cn/develop/deveco-studio/#download。
我的是M1,所以我们下载这一个就可以。
(2)环境配置
下载完成之后,我们就开始配置开发环境。下载SDK及工具链,首次使用DevEco Studio,工具的配置向导会引导您下载SDK及工具链。配置向导默认下载 API Version 9的SDK及工具链,我们选择默认就好。
下载nodejs和ohpm,记得最好HarmonyOS SDK路径中不能包含中文字符。
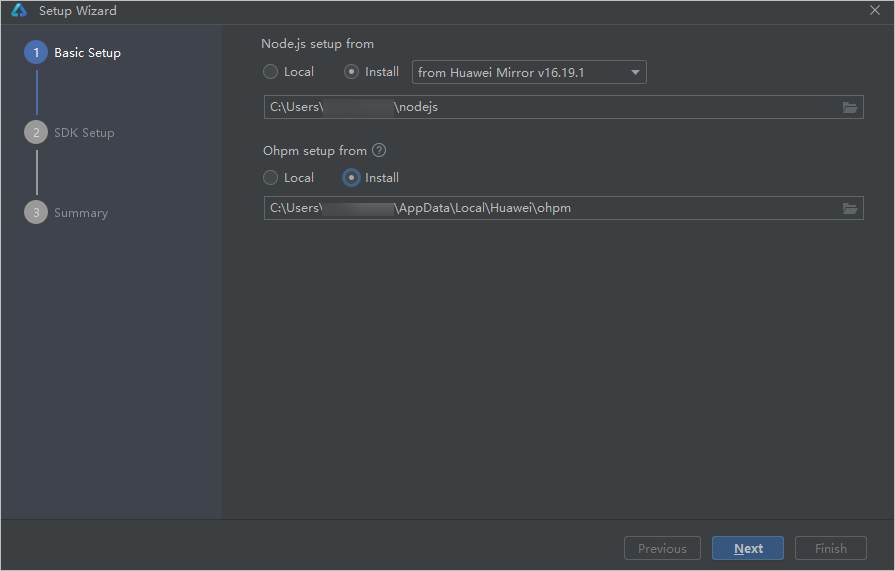
下载完成之后,我们下载HarmonyOS SDK。
在弹出的SDK下载信息页面,单击Next,并在弹出的License Agreement窗口,阅读License协议,需同意License协议后,单击Next。
目前最新的应该是3.2.13.5。
确认设置项的信息,点击Next开始安装。
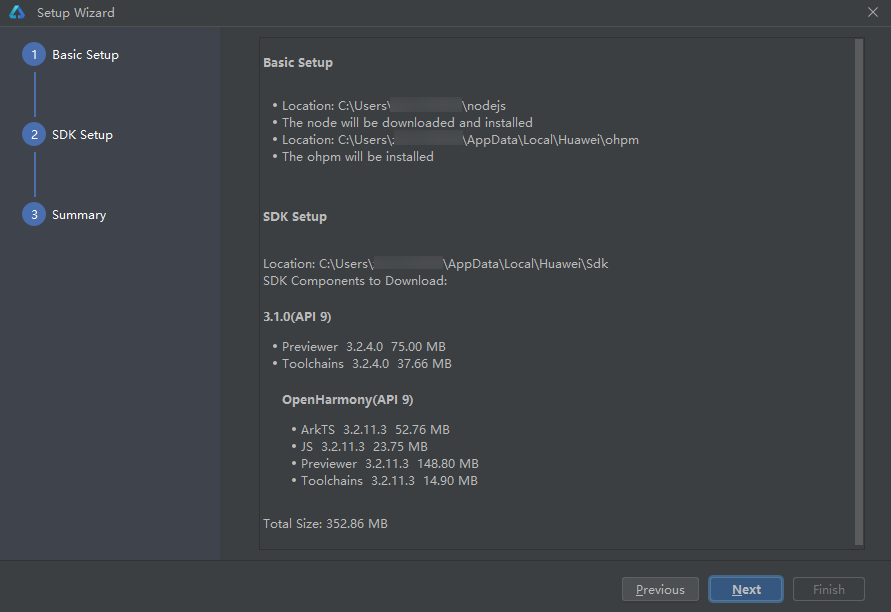
等待Node.js、ohpm和SDK下载完成后,单击Finish,界面会进入到DevEco Studio欢迎页。
(3)创建HelloWord
在DevEco Studio的欢迎页,选择Create Project开始创建一个新工程。
根据工程创建向导,在HarmonyOS页签,选择“Empty Ability”模板,单击Next。
单击Next,各个参数保持默认值即可,单击Finish。
(4)运行Helloword
将搭载HarmonyOS手机与电脑连接。
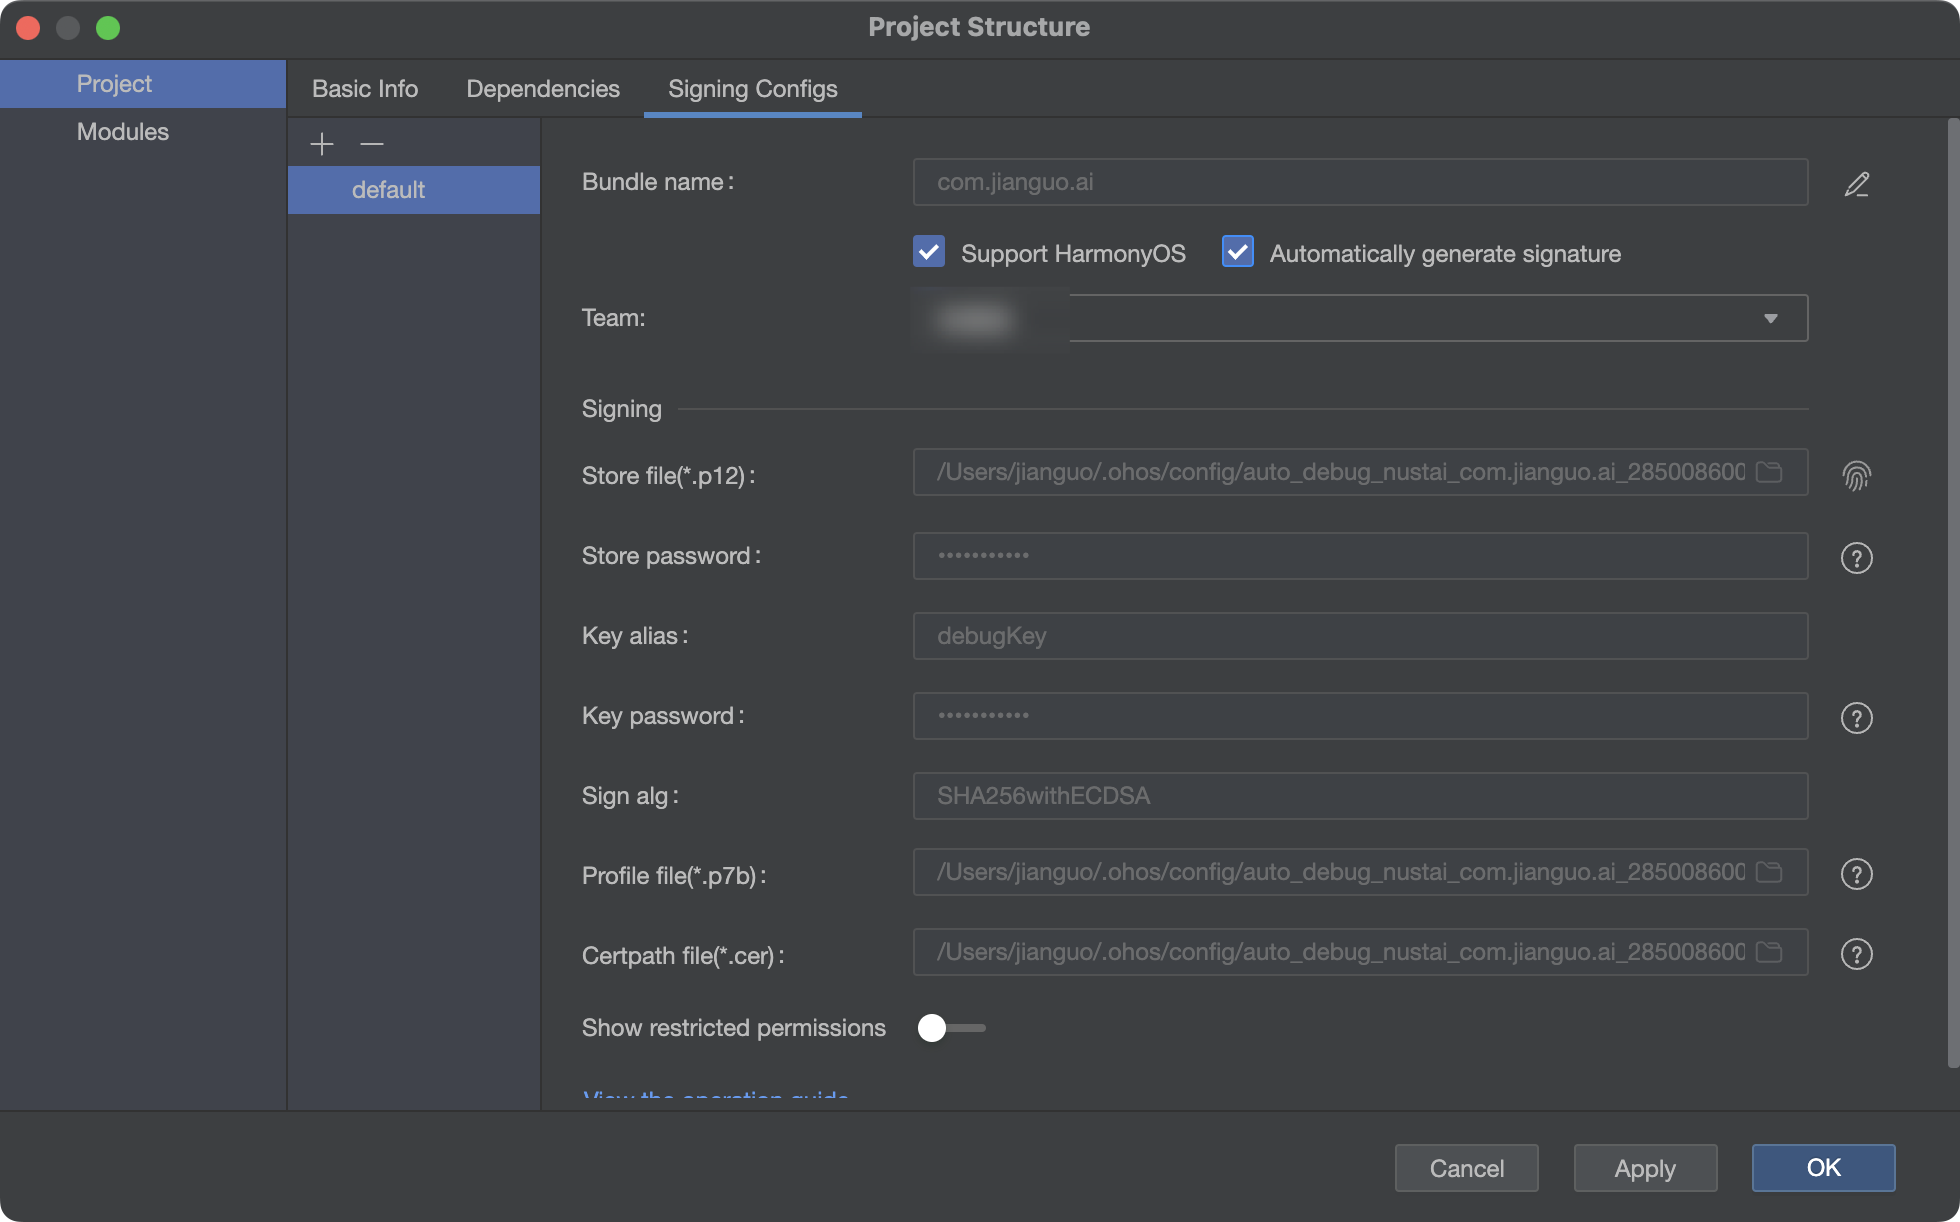
单击File>Project Structure >Project > SigningConfigs界面勾选“支持HarmonyOS,以及Automatically generate signature”,等待自动签名完成即可,单击OK。如右所示:。
在编辑窗口右上角的工具栏,单击运行,等待编译完成即可便运行在设备上。
这个时候真机就可以看到HelloWord。接下来我们就创建蜜蜂AI元服务。
2、创建蜜蜂AI元服务
这里我们的模版就不再选空模板了,而是直接选择最后一个端云一体化模版
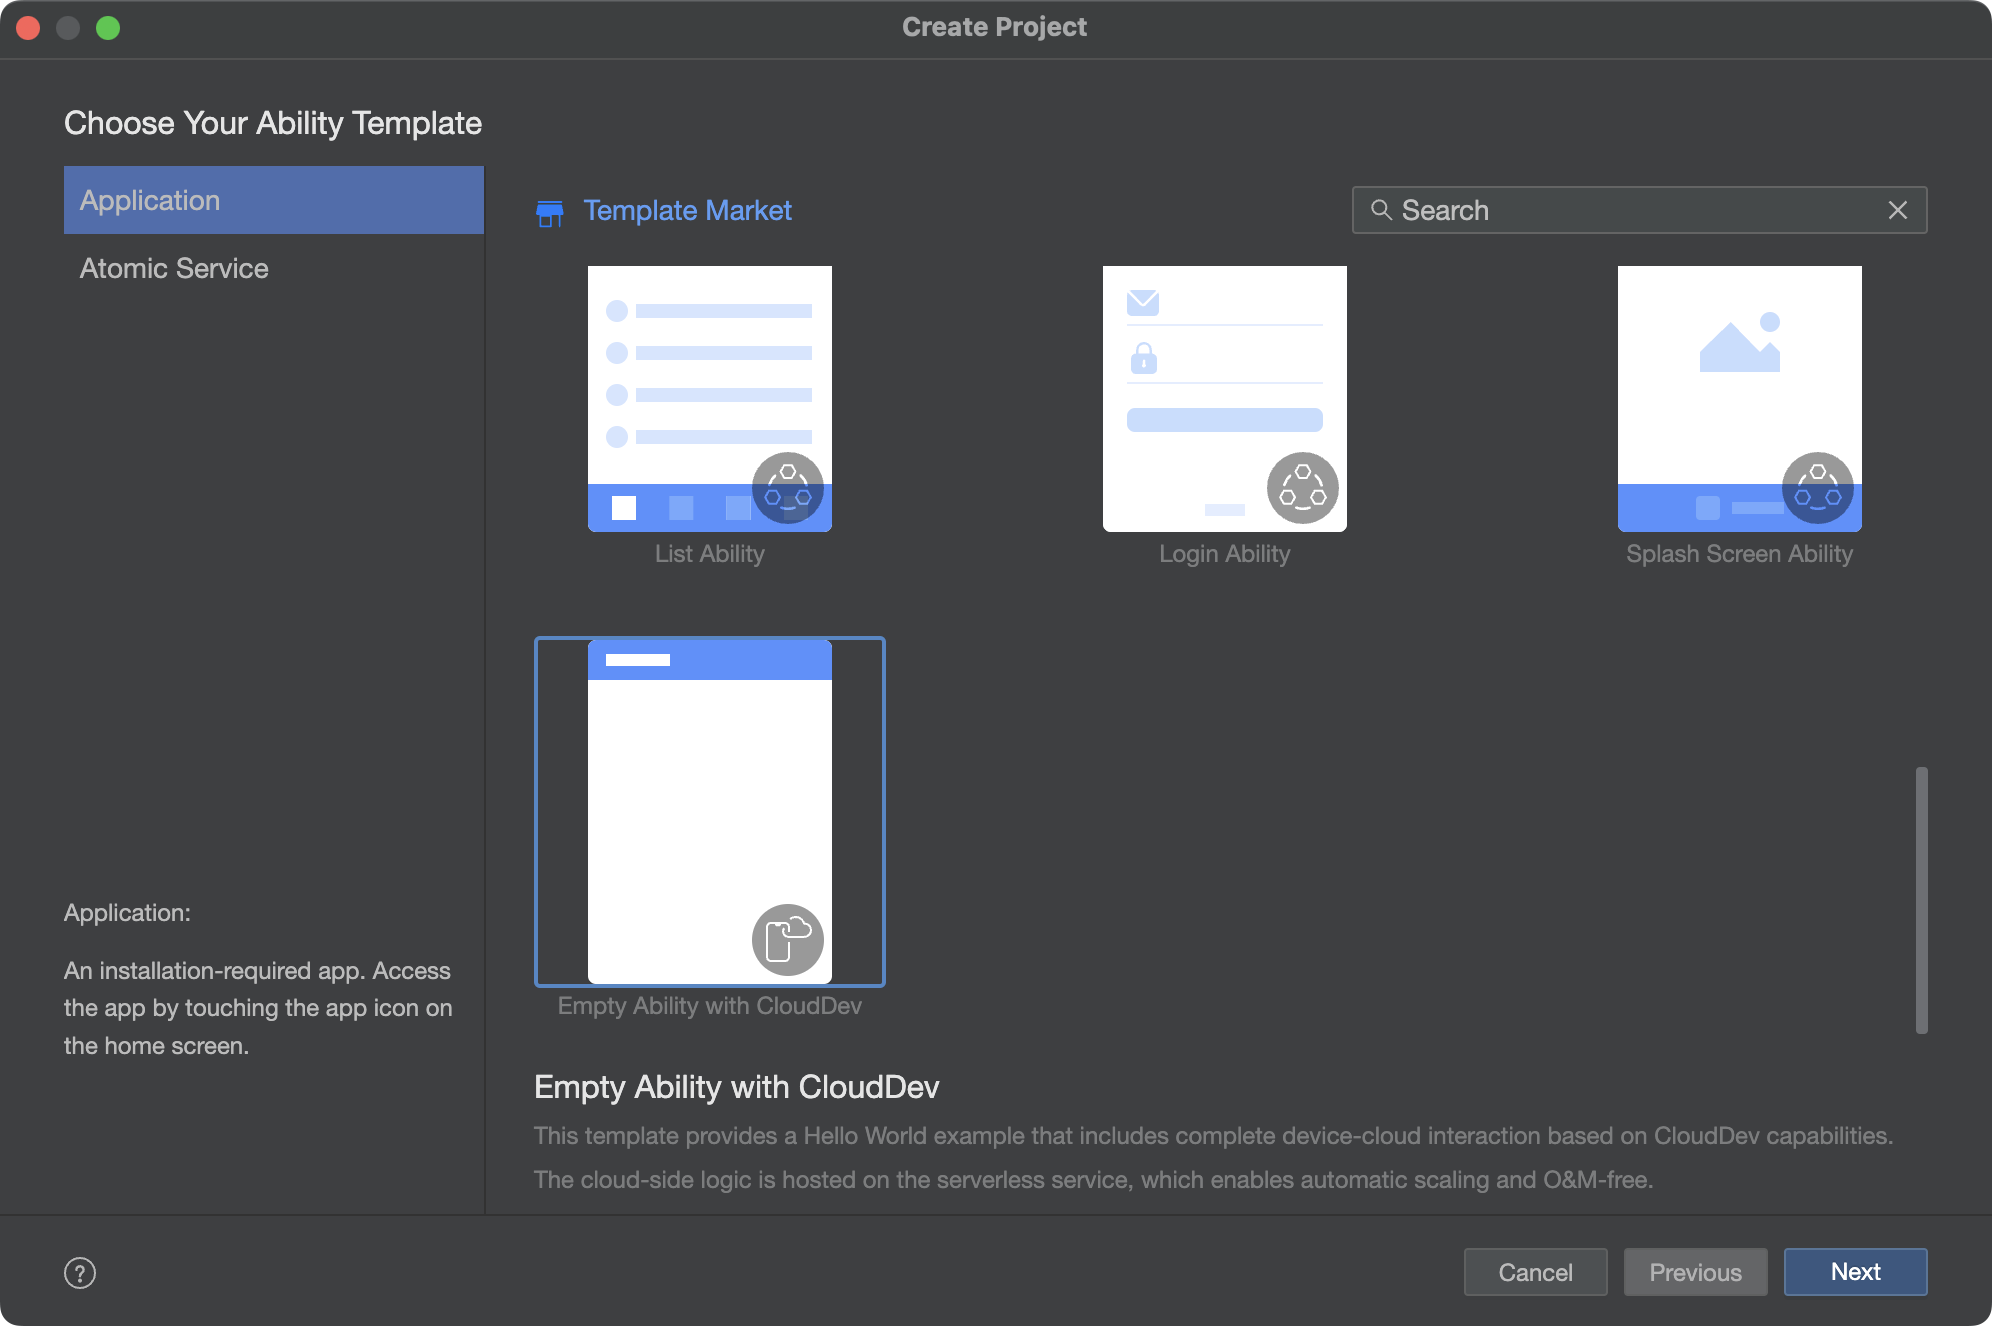
然后其他的就按照上面的配置就可以。完成项目的配置。
这里有个区别就是我们需要关联云资源。所以我们创建的应用包名要牢记,这个要在后面我们云端配置的时候使用。
为工程关联云开发所需的资源,即在DevEco Studio中选择您的华为开发者账号加入的开发者团队,将该团队在AGC的同包名应用关联到当前工程,具体操作如下:
- 若尚未登录DevEco Studio,单击“Sign in”,拉起浏览器在弹出的账号登录页面,使用已实名认证的华为开发者账号完成登录。
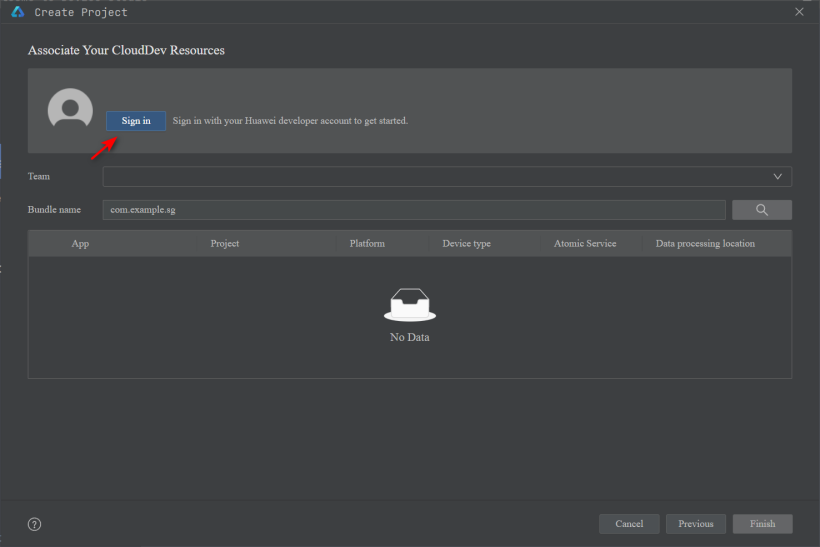
单击“Team”下拉框,选择开发团队。选中团队后,系统根据工程包名自动查询团队下的同包名应用。若为首次创建且团队下未创建同包名的应用,则提示需要在AGC平台创建应用。
单击“AppGallery Connect”打开AGC应用创建向导,填写应用信息,单击“确认”按钮创建应用。
完成以上操作后,DevEco Studio即可获取到同包名应用对应的项目信息。
3、AGC配置
我们登陆云侧,创建元服务。
然后我们开通手机登陆和邮箱登录服务。
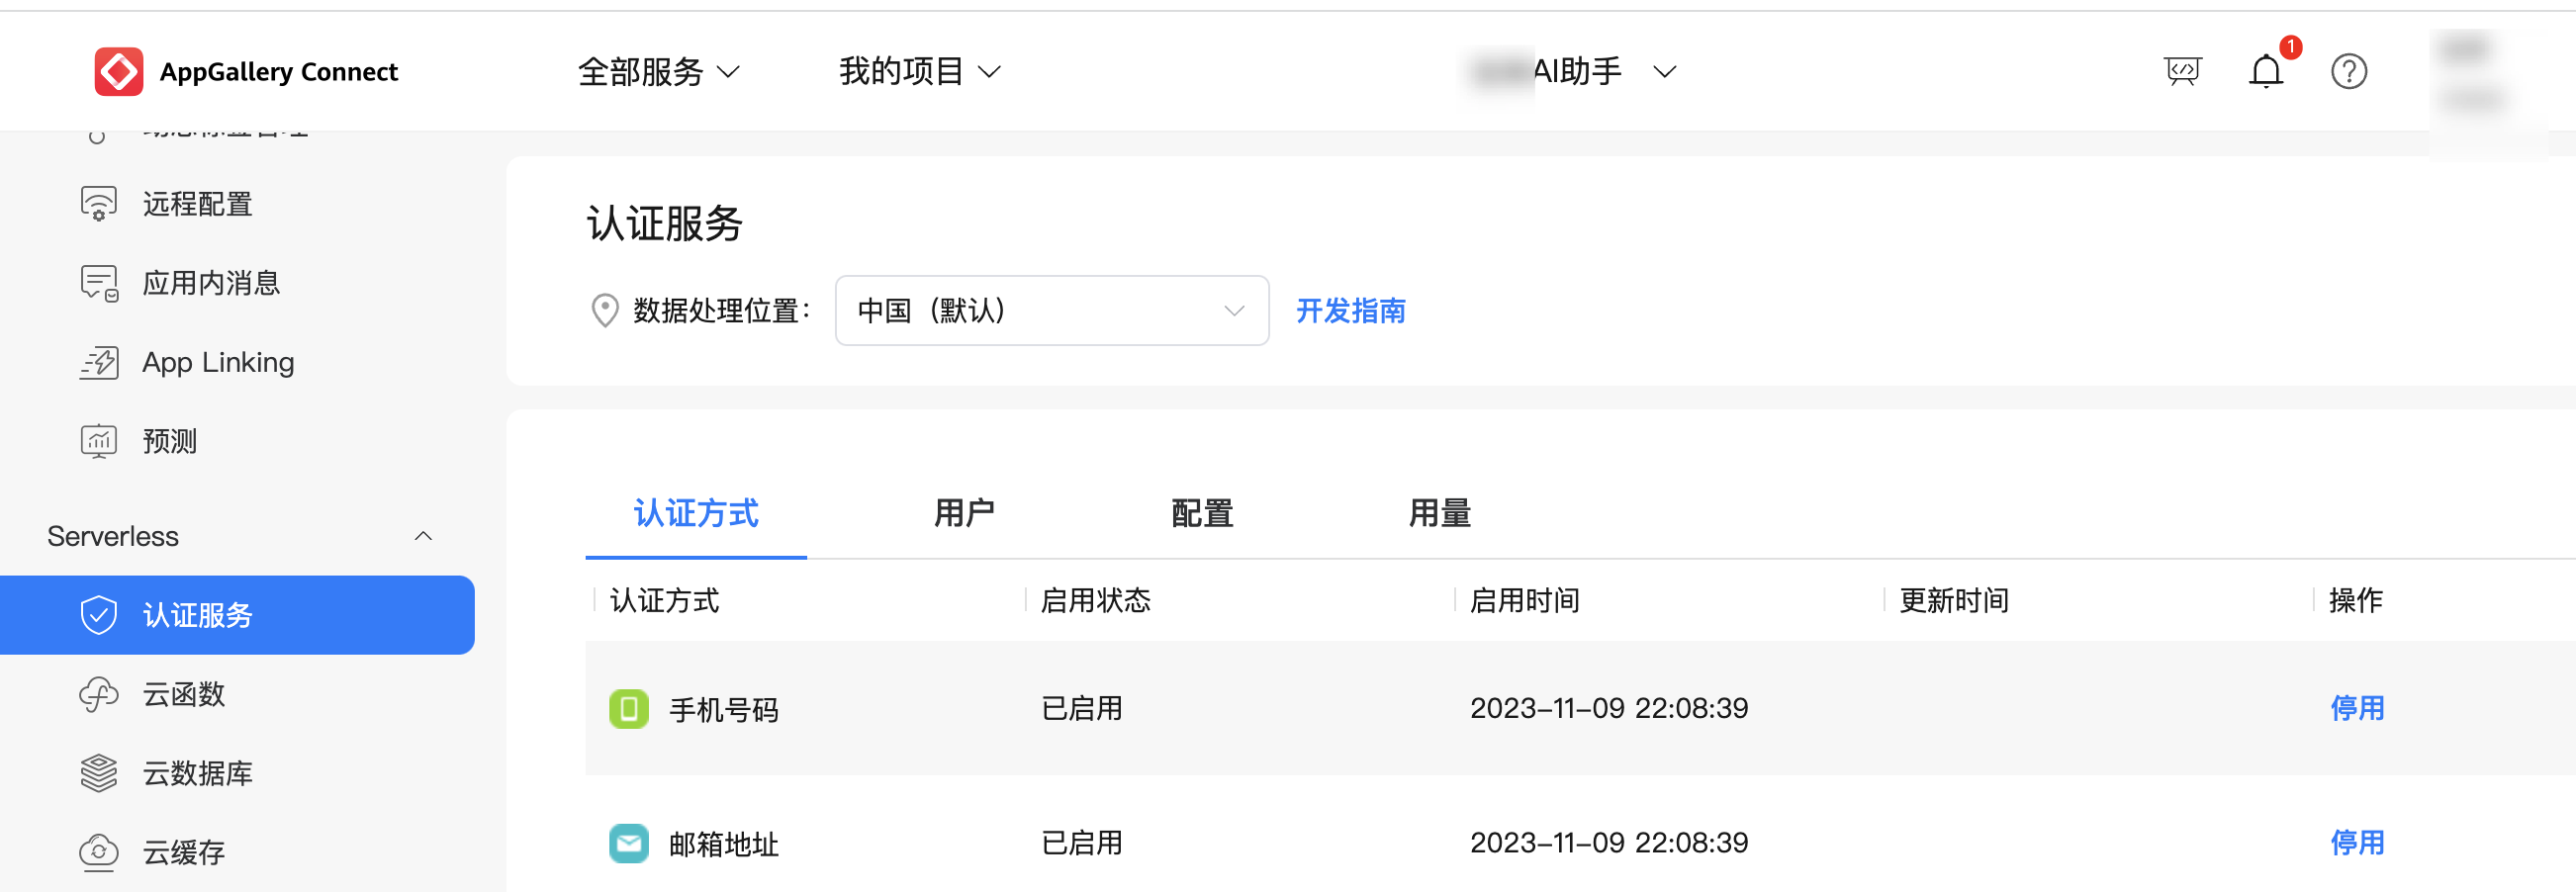
三、实现登录
当前AGC认证服务为HarmonyOS应用/服务提供的登录认证方式有手机、邮箱两种方式。本工程使用“手机号码+验证码”的方式作为应用的登录入口。而且我们在前面已经开通。
在登陆这一块,用户首次登陆的时候,我们会首先利用首选项检查他的登陆状态。
首选项工具类
/**
* 首选项操作类
*/
import { PreferenceDBUtil } from '../utils/PreferencesDBUtil';
const preDbService = new PreferenceDBUtil();
preDbService.getPreStorage();
export const getDBPre = async (key: string) => {
const value = await preDbService.getPreVal(key);
return value;
}
export const putDBPre = async (key: string, value: string) => {
await preDbService.putPreData(key, value);
}
然后跳用调用AGConnectAuth.requestEmailVerifyCode申请验证码,在entry/src/main/ets/services/Auth.ts认证工具类中添加邮箱验证码获取方法。
import { MainPage } from "@hw-agconnect/auth-component-ohos"
import router from '@ohos.router'
import { LogUtil } from '../common/utils/LogUtil';
import { Constants } from '../common/Constants';
import { putPre } from '../common/service/PreService';
import { UserInfo } from '../common/UserInfo';
@Entry
@Component
struct Index {
@State icon: Resource = router.getParams()['icon'];
@State isAgreement:boolean = router.getParams()['isAgreement'];
@State agreementContent:string = router.getParams()['agreementContent'];
@State onSuccess: Function = router.getParams()['onSuccess'];
@State onError: Function = router.getParams()['onError'];
build() {
Column() {
MainPage({
icon: this.icon,
agreement: {
isAgreement: this.isAgreement,
agreementContent: this.agreementContent,
},
onSuccess: async (user) => {
LogUtil.info(`登录用户信息:${JSON.stringify(user)}`);
const loginUser = user['user'];
const userInfo: UserInfo = {
uid: loginUser['uid'],
email: loginUser['email'],
phone: loginUser['phone'] === undefined ? "" : loginUser['phone'].split('-')[1],
displayName: loginUser['displayName'] === undefined ? "" : loginUser['displayName'],
photoUrl: loginUser['photoUrl'] === undefined ? "/common/imgs/ic_user.svg" : loginUser['photoUrl']
}
await putPre(Constants.LOGIN_USER_KEY, JSON.stringify(userInfo));
router.back();
},
onError: (err) => {
LogUtil.error(`登录用户信息:${JSON.stringify(err)}`);
}
})
}
}
aboutToAppear() {
}
}
未登录弹窗
/**
* 未登录弹窗
*/
import common from '@ohos.app.ability.common';
import router from '@ohos.router';
import { GlobalConstant } from '../common/constants/GlobalConstant';
@CustomDialog
export struct LoginTipDialogView {
loginTipCtrl: CustomDialogController;
build() {
Column({ space: GlobalConstant.SIZE_8 }) {
Row({ space: GlobalConstant.SIZE_4 }) {
Image($r('app.media.ic_tip'))
.width(GlobalConstant.SIZE_32)
.height(GlobalConstant.SIZE_32)
Text('温馨提示')
.fontSize($r('app.float.font_size_24'))
.fontColor($r('app.color.tip_color'))
.fontWeight(FontWeight.Bolder)
}
.width(GlobalConstant.PAGE_FULL)
.height(GlobalConstant.SIZE_64)
.padding({ left: GlobalConstant.SIZE_16 })
Text('您还未登录,请登录后体验功能!')
.height(GlobalConstant.SIZE_48)
.fontSize(Color.Black)
.fontSize($r('app.float.font_size_18'))
.fontWeight(FontWeight.Normal)
Row({ space: GlobalConstant.SIZE_8 }) {
Button('退出', { type: ButtonType.Normal })
.borderRadius(GlobalConstant.SIZE_4)
.backgroundColor($r('app.color.embellishment_color'))
.fontColor($r('app.color.text_color_9'))
.onClick(() => {
const ctx = getContext(this) as common.UIAbilityContext;
ctx.terminateSelf();
})
Button('去登录', { type: ButtonType.Normal })
.borderRadius(GlobalConstant.SIZE_4)
.backgroundColor($r('app.color.embellishment_color'))
.fontColor($r('app.color.auxiliary_color'))
.onClick(() => {
this.loginTipCtrl.close();
router.pushUrl({
params:{
isAgreement: true,
agreementContent: "",
icon: "",
type: ["HWID_VERIFY_CODE","PHONE"]
},
url: '@bundle:com.jianguo.ai/common/ets/LoginComponent/LoginPage',
})
})
}
.width(GlobalConstant.PAGE_FULL)
.justifyContent(FlexAlign.Center)
}
.width(GlobalConstant.PAGE_96)
.padding({ bottom: GlobalConstant.SIZE_20 })
.borderRadius(GlobalConstant.SIZE_16)
.backgroundColor(Color.White)
}
}
四、实现蜜蜂AI助手页面
我们这个应用主要的一个功能就是AI助手,所以这一块我们分为三块。
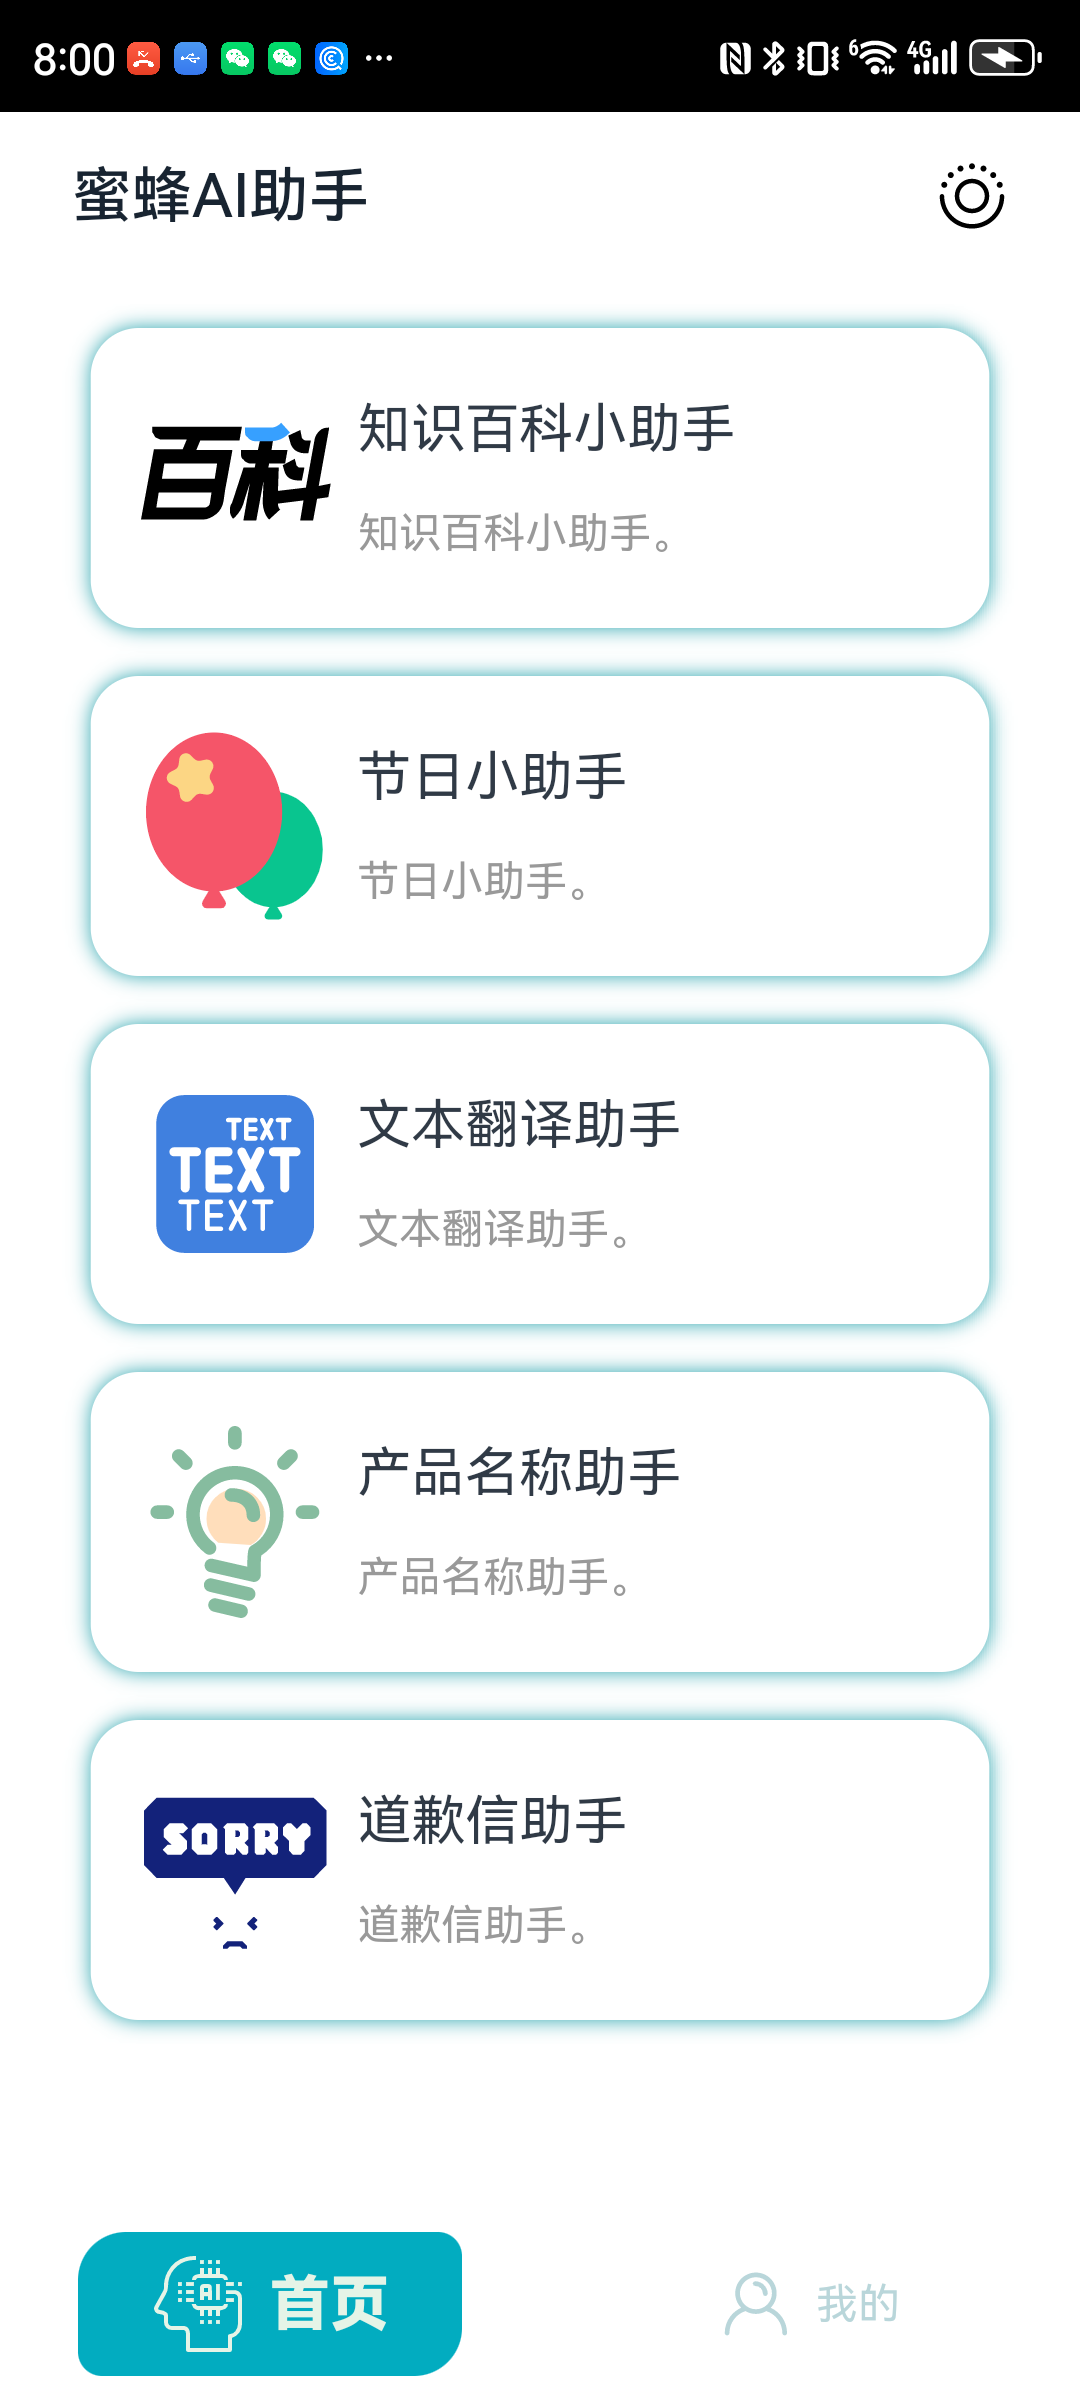
1、蜜蜂AI列表页
关于列表页,我们使用一个列表就可以。
/**
* 首页
*/
import { ConfigConstant } from '../common/constants/ConfigConstant'
import { GlobalConstant } from '../common/constants/GlobalConstant'
import { AiAppConfig } from '../common/dto/AiAppConfig';
import router from '@ohos.router'
import { getDBPre } from '../common/api/PreDbService';
@Component
export struct HomeView {
@State aiAppList: Array<AiAppConfig> = ConfigConstant.DEFAULT_AI_APP_LIST;
}
build() {
Column() {
List() {
ForEach(this.aiAppList, (item: AiAppConfig) => {
ListItem() {
Row({ space: GlobalConstant.SIZE_8 }) {
Row() {
Image(item.avatar)
.width(GlobalConstant.SIZE_64)
.height(GlobalConstant.SIZE_64)
.borderRadius(GlobalConstant.SIZE_32)
}
.height(GlobalConstant.PAGE_FULL)
.layoutWeight(1)
Column({ space: GlobalConstant.SIZE_16 }) {
Text(item.name)
.fontSize($r('app.float.font_size_18'))
Text(item.intro)
.fontSize($r('app.float.font_size_14'))
.fontColor($r('app.color.text_color_9'))
}
.height(GlobalConstant.PAGE_FULL)
.layoutWeight(3)
.justifyContent(FlexAlign.Center)
.alignItems(HorizontalAlign.Start)
}
.width(GlobalConstant.PAGE_96)
.height(GlobalConstant.SIZE_100)
.paddingStyle()
.borderRadius(GlobalConstant.SIZE_16)
.shadow({
radius: GlobalConstant.SIZE_16,
color: $r('app.color.main_color')
})
.onClick(() => {
router.pushUrl({
url: "pages/detail/index",
params: {
"AiAppConfig": item
}
})
})
}
.width(GlobalConstant.PAGE_FULL)
.paddingStyle()
.borderRadius(GlobalConstant.SIZE_16)
})
}
.listDirection(Axis.Vertical)
}
.width(GlobalConstant.PAGE_FULL)
.height(GlobalConstant.PAGE_FULL)
.padding(GlobalConstant.SIZE_8)
}
}
效果图
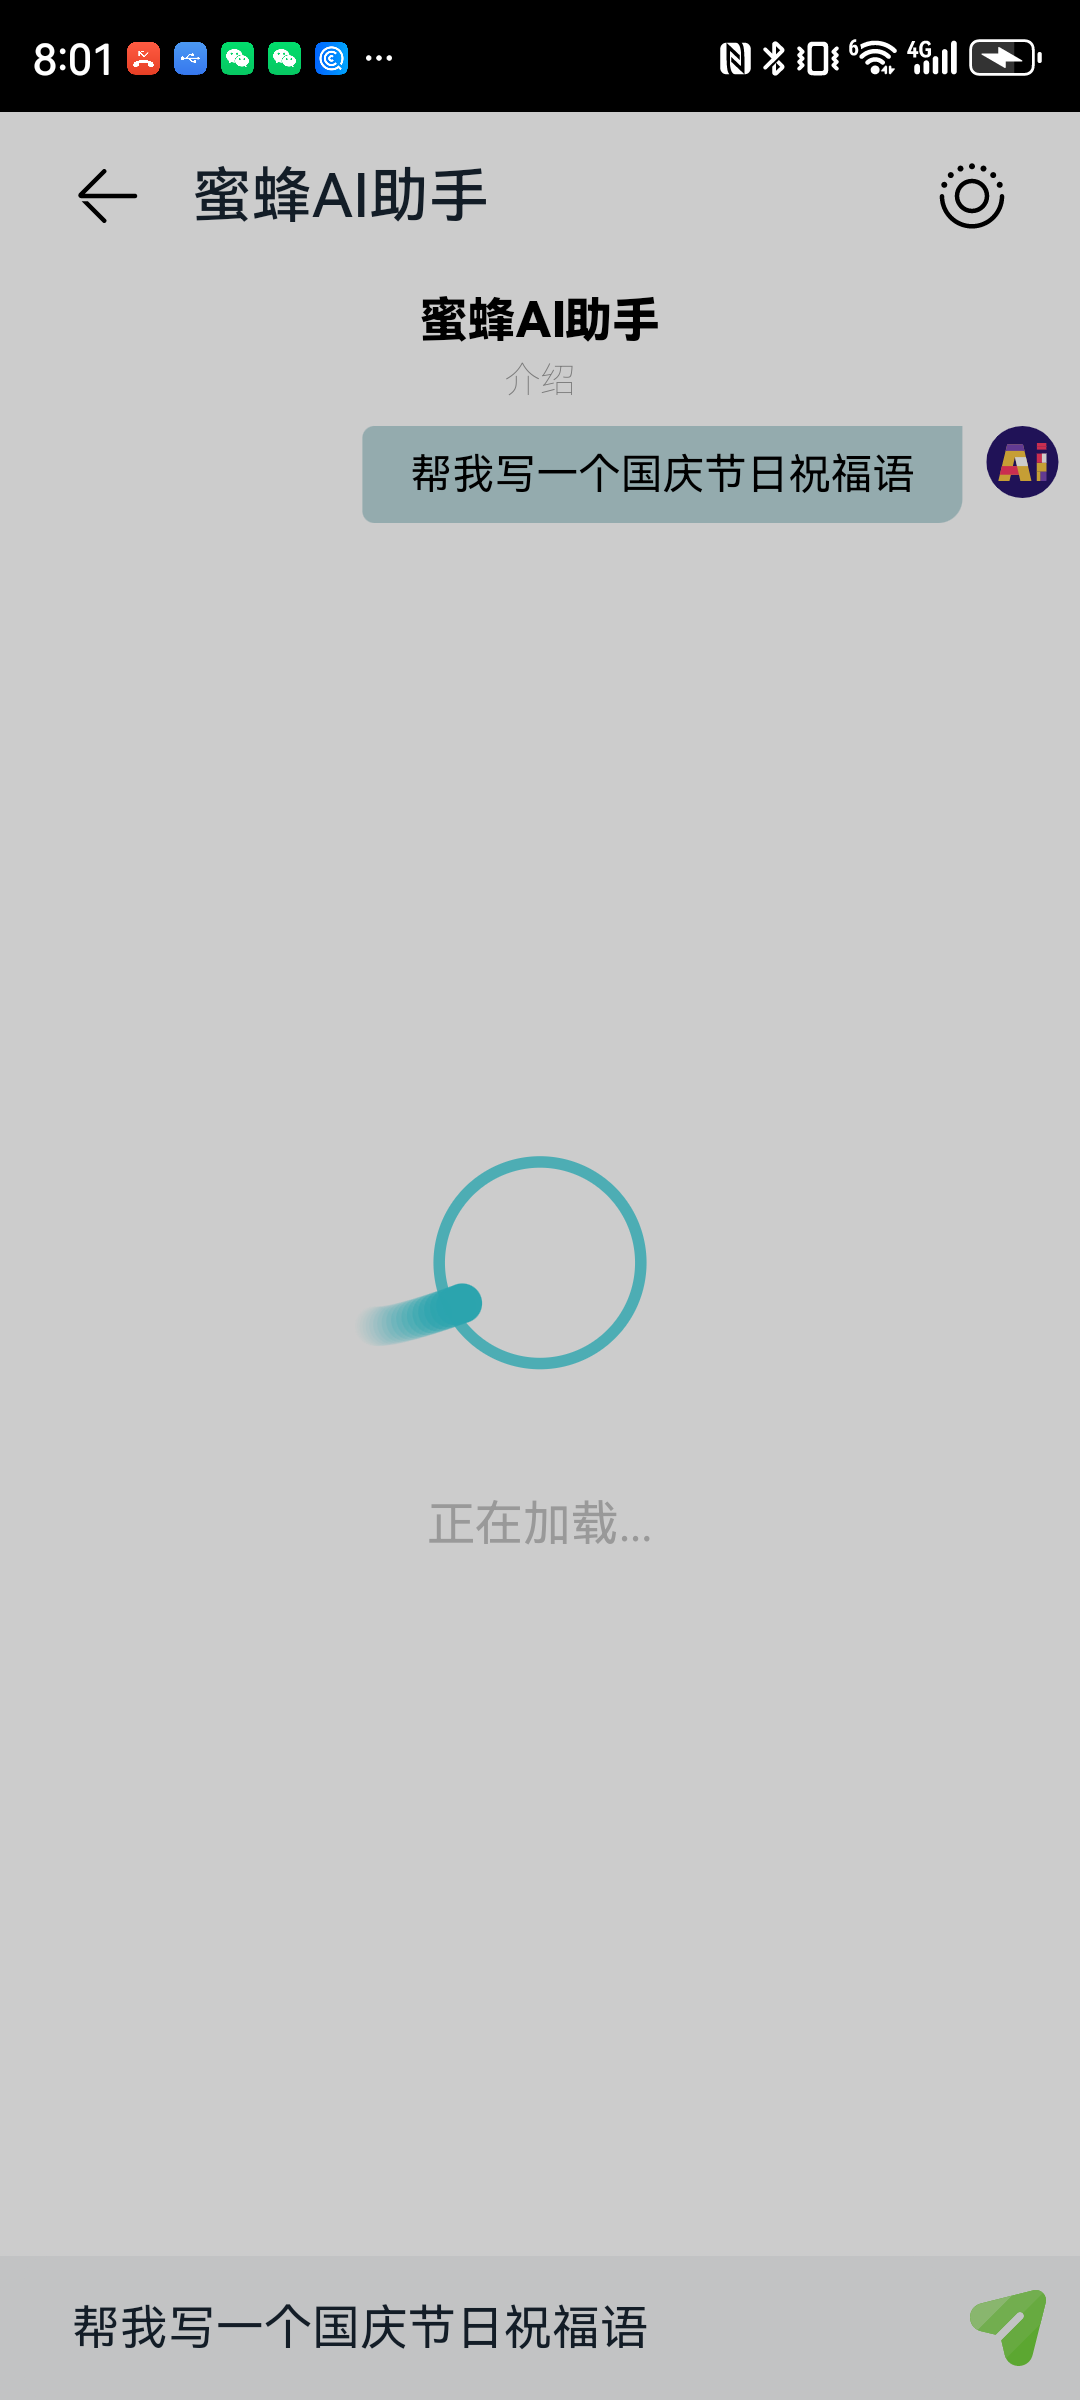
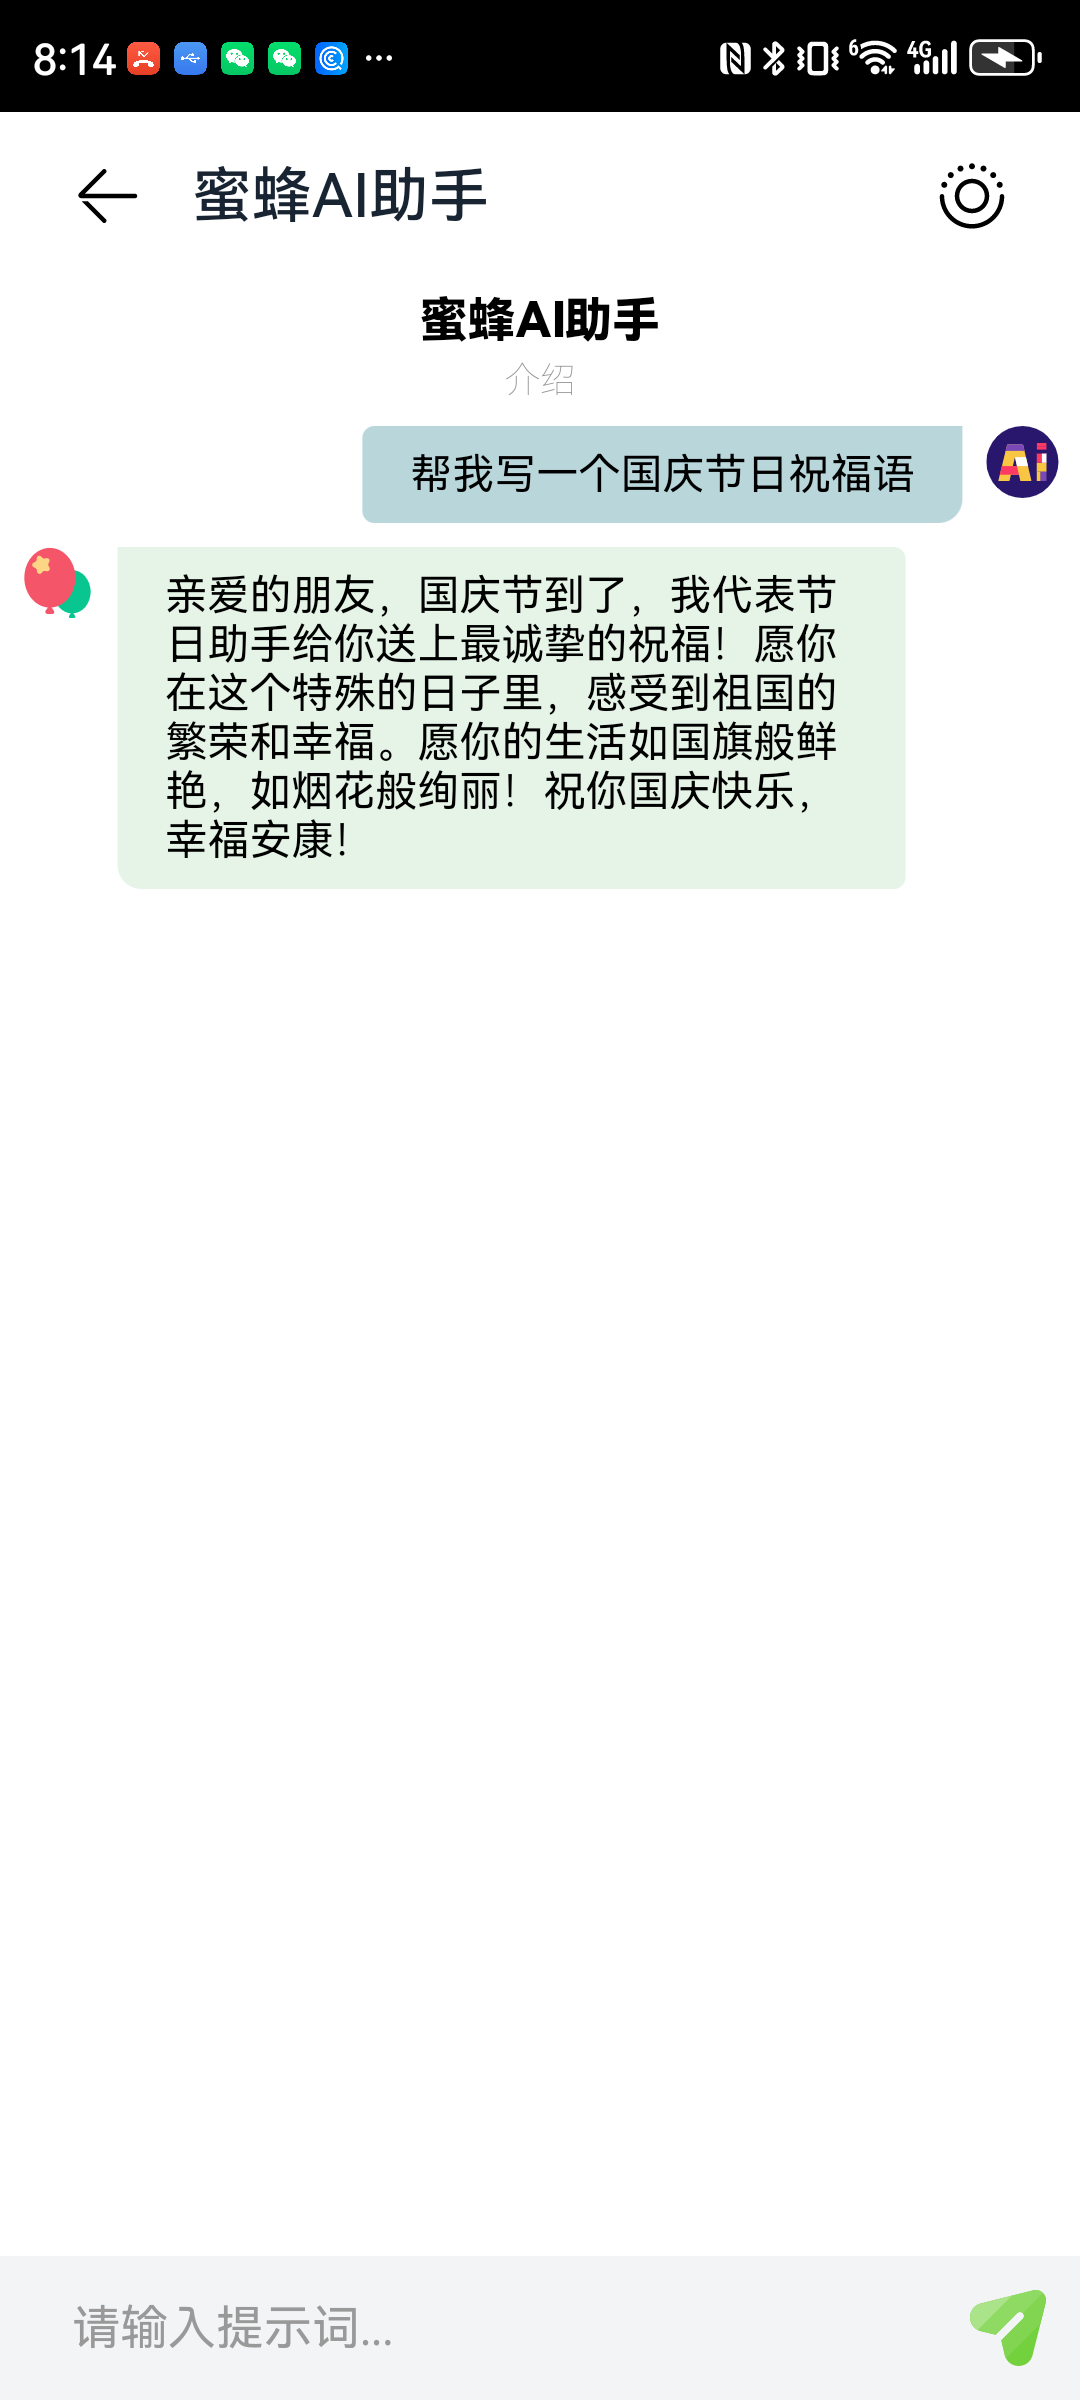
2、对话页
关键代码
build() {
Column({ space: GlobalConstant.SIZE_8 }) {
Stack({ alignContent: Alignment.Bottom }) {
Column() {
Column({ space: GlobalConstant.SIZE_4 }) {
Text("蜜蜂AI助手")
.fontSize($r('app.float.font_size_16'))
.fontColor(Color.Black)
.fontWeight(FontWeight.Bolder)
Text("介绍")
.fontSize($r('app.float.font_size_12'))
.fontColor($r('app.color.text_color_9'))
.fontWeight(FontWeight.Lighter)
}
.width(GlobalConstant.PAGE_FULL)
.justifyContent(FlexAlign.Center)
.padding({
top: GlobalConstant.SIZE_4,
bottom: GlobalConstant.SIZE_8
})
Scroll() {
Column({ space: GlobalConstant.SIZE_8 }) {
ForEach(this.chatContentArr, (chat: ChatInfo) => {
if (chat.role === "assistant") {
Row() {
Row({ space: GlobalConstant.SIZE_8 }) {
Image(chat.avatar)
.width(GlobalConstant.SIZE_24)
.height(GlobalConstant.SIZE_24)
Row() {
Text(chat.content)
.fontSize($r('app.float.font_size_14'))
.fontColor(Color.Black)
}
.width(chat.content.length > 15 ? GlobalConstant.PAGE_76 : 'auto')
.backgroundColor($r('app.color.embellishment_color'))
.padding({
left: GlobalConstant.SIZE_16,
right: GlobalConstant.SIZE_16,
top: GlobalConstant.SIZE_8,
bottom: GlobalConstant.SIZE_8
})
.borderRadius({
topRight: GlobalConstant.SIZE_4,
bottomLeft: GlobalConstant.SIZE_8,
bottomRight: GlobalConstant.SIZE_4
})
}
.justifyContent(FlexAlign.Start)
.alignItems(VerticalAlign.Top)
}
.width(GlobalConstant.PAGE_FULL)
.justifyContent(FlexAlign.Start)
}
if (chat.role === "user") {
Row() {
Row({ space: GlobalConstant.SIZE_8 }) {
Row() {
Text(chat.content)
.fontSize($r('app.float.font_size_14'))
.fontColor(Color.Black)
}
.width(chat.content.length > 15 ? GlobalConstant.PAGE_76 : 'auto')
.backgroundColor($r('app.color.tab_default_color'))
.padding({
left: GlobalConstant.SIZE_16,
right: GlobalConstant.SIZE_16,
top: GlobalConstant.SIZE_8,
bottom: GlobalConstant.SIZE_8
})
.borderRadius({
topLeft: GlobalConstant.SIZE_4,
bottomLeft: GlobalConstant.SIZE_4,
bottomRight: GlobalConstant.SIZE_8
})
Image(chat.avatar)
.width(GlobalConstant.SIZE_24)
.height(GlobalConstant.SIZE_24)
}
.justifyContent(FlexAlign.End)
.alignItems(VerticalAlign.Top)
}
.width(GlobalConstant.PAGE_FULL)
.justifyContent(FlexAlign.End)
}
})
}.width(GlobalConstant.PAGE_FULL)
}
.width(GlobalConstant.PAGE_96)
.scrollable(ScrollDirection.Vertical)
.flexShrink(1)
}
.width(GlobalConstant.PAGE_FULL)
.height(GlobalConstant.PAGE_FULL)
.padding({ bottom: GlobalConstant.SIZE_50 })
Row({ space: GlobalConstant.SIZE_8 }) {
TextInput({ placeholder: "请输入提示词...", text: this.inputValue })
.height(GlobalConstant.SIZE_48)
.fontSize($r('app.float.font_size_16'))
.placeholderFont({ size: $r('app.float.font_size_16') })
.placeholderColor($r('app.color.text_color_9'))
.borderRadius($r('app.float.size_8'))
.backgroundColor($r('app.color.card_bg_color'))
.flexShrink(1)
.onChange((value: string) => {
this.inputValue = value;
})
Image($r('app.media.ic_send'))
.width(GlobalConstant.SIZE_32)
.height(GlobalConstant.SIZE_32)
.onClick(async () => {
this.loadingCtrl.open();
if (this.inputValue === "") {
promptAction.showToast({
message: "发送内容不能为空!"
})
return;
}
await this.getAiResult();
})
}
.width(GlobalConstant.PAGE_FULL)
.padding({
left: GlobalConstant.SIZE_8,
right: GlobalConstant.SIZE_8
})
.backgroundColor($r('app.color.card_bg_color'))
}
.width(GlobalConstant.PAGE_FULL)
.height(GlobalConstant.PAGE_FULL)
}
.width(GlobalConstant.PAGE_FULL)
.height(GlobalConstant.PAGE_FULL)
}
效果图
加载中:
问答后:
五、服务卡片
1、服务卡片
服务卡片(以下简称“卡片”)是一种界面展示形式,可以将应用的重要信息或操作前置到卡片,以达到服务直达、减少体验层级的目的。卡片常用于嵌入到其他应用(当前卡片使用方只支持系统应用,如桌面)中作为其界面显示的一部分,并支持拉起页面、发送消息等基础的交互功能。
服务卡片架构
下图为服务卡片架构。
另外了解卡片概念有助于我们更好的使用服务卡片。
卡片的基本概念:
- 卡片使用方:如上图中的桌面,显示卡片内容的宿主应用,控制卡片在宿主中展示的位置。
- 应用图标:应用入口图标,点击后可拉起应用进程,图标内容不支持交互。
- 卡片:具备不同规格大小的界面展示,卡片的内容可以进行交互,如实现按钮进行界面的刷新、应用的跳转等。
- 卡片提供方:包含卡片的应用,提供卡片的显示内容、控件布局以及控件点击处理逻辑。
- FormExtensionAbility:卡片业务逻辑模块,提供卡片创建、销毁、刷新等生命周期回调。
- 卡片页面:卡片UI模块,包含页面控件、布局、事件等显示和交互信息。
动态卡片事件能力说明
针对动态卡片,ArkTS卡片中提供了postCardAction()接口用于卡片内部和提供方应用间的交互,当前支持router、message和call三种类型的事件,仅在卡片中可以调用。后面我们也会用到这一块的内容。
2、服务卡片创建方式
创建工程时,选择Atomic Service,默认自带卡片,也可以在创建工程后右键新建卡片。
另外就是我们可能不止一个卡片,所以,后续我们可以这样创建服务卡片。
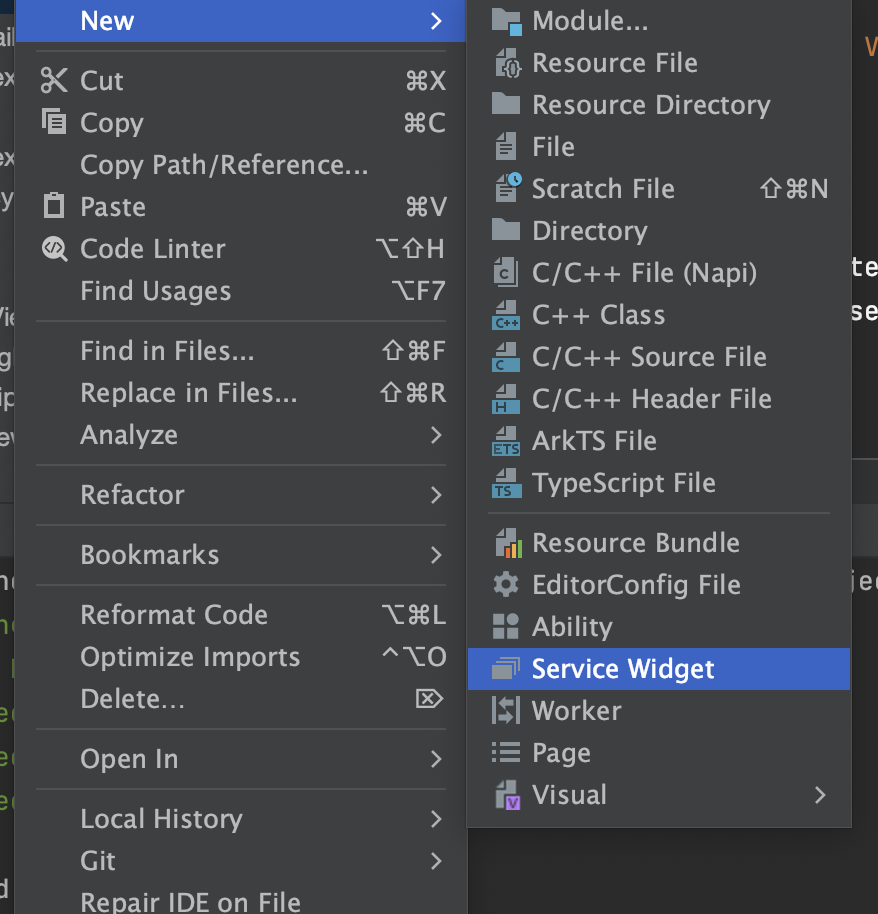
卡片相关的配置文件主要包含FormExtensionAbility的配置和卡片的配置两部分。
卡片需要在module.json5配置文件中的extensionAbilities标签下,配置FormExtensionAbility相关信息。FormExtensionAbility需要填写metadata元信息标签,其中键名称为固定字符串“ohos.extension.form”,资源为卡片的具体配置信息的索引。
{
"module": {
...
"extensionAbilities": [
{
"name": "EntryFormAbility",
"srcEntry": "./ets/entryformability/EntryFormAbility.ets",
"label": "$string:EntryFormAbility_label",
"description": "$string:EntryFormAbility_desc",
"type": "form",
"metadata": [
{
"name": "ohos.extension.form",
"resource": "$profile:form_config"
}
]
}
]
}
}
卡片的具体配置信息。在上述FormExtensionAbility的元信息(“metadata”配置项)中,可以指定卡片具体配置信息的资源索引。例如当resource指定为$profile:form_config时,会使用开发视图的resources/base/profile/目录下的form_config.json作为卡片profile配置文件。内部字段结构说明如下表所示。
卡片form_config.json配置文件
属性名称 | 含义 | 数据类型 | 是否可缺省 |
name | 表示卡片的名称,字符串最大长度为127字节。 | 字符串 | 否 |
description | 表示卡片的描述。取值可以是描述性内容,也可以是对描述性内容的资源索引,以支持多语言。字符串最大长度为255字节。 | 字符串 | 可缺省,缺省为空。 |
src | 表示卡片对应的UI代码的完整路径。当为ArkTS卡片时,完整路径需要包含卡片文件的后缀,如:“./ets/widget/pages/WidgetCard.ets”。当为JS卡片时,完整路径无需包含卡片文件的后缀,如:“./js/widget/pages/WidgetCard” | 字符串 | 否 |
uiSyntax | 表示该卡片的类型,当前支持如下两种类型:- arkts:当前卡片为ArkTS卡片。- hml:当前卡片为JS卡片。 | 字符串 | 可缺省,缺省值为hml |
window | 用于定义与显示窗口相关的配置。 | 对象 | 可缺省,缺省值见表2。 |
isDefault | 表示该卡片是否为默认卡片,每个UIAbility有且只有一个默认卡片。- true:默认卡片。- false:非默认卡片。 | 布尔值 | 否 |
colorMode | 表示卡片的主题样式,取值范围如下:- auto:跟随系统的颜色模式值选取主题。- dark:深色主题。- light:浅色主题。 | 字符串 | 可缺省,缺省值为“auto”。 |
supportDimensions | 表示卡片支持的外观规格,取值范围:- 1 * 2:表示1行2列的二宫格。- 2 * 2:表示2行2列的四宫格。- 2 * 4:表示2行4列的八宫格。- 4 * 4:表示4行4列的十六宫格。 | 字符串数组 | 否 |
defaultDimension | 表示卡片的默认外观规格,取值必须在该卡片supportDimensions配置的列表中。 | 字符串 | 否 |
updateEnabled | 表示卡片是否支持周期性刷新(包含定时刷新和定点刷新),取值范围:- true:表示支持周期性刷新,可以在定时刷新(updateDuration)和定点刷新(scheduledUpdateTime)两种方式任选其一,当两者同时配置时,定时刷新优先生效。- false:表示不支持周期性刷新。 | 布尔类型 | 否 |
scheduledUpdateTime | 表示卡片的定点刷新的时刻,采用24小时制,精确到分钟。> 说明:> updateDuration参数优先级高于scheduledUpdateTime,两者同时配置时,以updateDuration配置的刷新时间为准。 | 字符串 | 可缺省,缺省时不进行定点刷新。 |
updateDuration | 表示卡片定时刷新的更新周期,单位为30分钟,取值为自然数。当取值为0时,表示该参数不生效。当取值为正整数N时,表示刷新周期为30*N分钟。> 说明:> updateDuration参数优先级高于scheduledUpdateTime,两者同时配置时,以updateDuration配置的刷新时间为准。 | 数值 | 可缺省,缺省值为“0”。 |
formConfigAbility | 表示卡片的配置跳转链接,采用URI格式。 | 字符串 | 可缺省,缺省值为空。 |
metadata | 表示卡片的自定义信息,参考Metadata数组标签。 | 对象 | 可缺省,缺省值为空。 |
dataProxyEnabled | 表示卡片是否支持卡片代理刷新,取值范围:- true:表示支持代理刷新。- false:表示不支持代理刷新。设置为true时,定时刷新和下次刷新不生效,但不影响定点刷新。 | 布尔类型 | 可缺省,缺省值为false。 |
isDynamic | 表示此卡片是否为动态卡片(仅针对ArkTS卡片生效)。- true:为动态卡片 。- false:为静态卡片。 | 布尔类型 | 可缺省,缺省值为true。 |
transparencyEnabled | 表示是否支持卡片使用方设置此卡片的背景透明度(仅对系统应用的ArkTS卡片生效。)。- true:支持设置背景透明度 。- false:不支持设置背景透明度。 | 布尔类型 | 可缺省,缺省值为false。 |
{
"forms": [
{
"uiSyntax": "arkts",
"isDefault": true,
"defaultDimension": "1*2",
"scheduledUpdateTime": "00:00",
"src": "./ets/jianguoaizhushoutuijian/jianguoaizhushoutuijian.ets",
"name": "jianguoaizhushoutuijian",
"description": "蜜蜂AI助手推荐",
"window": {
"designWidth": 720,
"autoDesignWidth": true
},
"supportDimensions": [
"1*2"
],
"updateEnabled": true,
"updateDuration": 0
},
{
"uiSyntax": "arkts",
"isDefault": false,
"defaultDimension": "2*2",
"src": "./ets/jianguoaizhushou/jianguoaizhushou.ets",
"name": "jianguoaizhushou",
"description": "蜜蜂AI助手,帮你所帮",
"window": {
"designWidth": 720,
"autoDesignWidth": true
},
"supportDimensions": [
"2*2"
],
"updateEnabled": false,
"updateDuration": 0
},
{
"name": "poetry",
"description": "蜂蜜AI助手助你学妙语.",
"src": "./ets/poetry/pages/PoetryCard.ets",
"uiSyntax": "arkts",
"window": {
"designWidth": 720,
"autoDesignWidth": true
},
"colorMode": "auto",
"isDefault": false,
"updateEnabled": false,
"scheduledUpdateTime": "10:30",
"updateDuration": 1,
"defaultDimension": "2*4",
"supportDimensions": [
"2*4"
]
},
{
"name": "history",
"description": "蜂蜜AI助手历史记录",
"src": "./ets/history/pages/HistoryCard.ets",
"uiSyntax": "arkts",
"window": {
"designWidth": 720,
"autoDesignWidth": true
},
"colorMode": "auto",
"isDefault": false,
"updateEnabled": false,
"scheduledUpdateTime": "10:30",
"updateDuration": 1,
"defaultDimension": "4*4",
"supportDimensions": [
"4*4"
]
}
]
}
3、实现2*2/2*4/4*4服务卡片
1-2卡片
首先我们来看1-2卡片的实现。
@Entry
@Component
struct Jianguoaizhushoutuijian {
private readonly PAGE_FULL: string = "100%";
private readonly SIZE_4: number = 4;
build() {
Row({ space: this.SIZE_4 }) {
Image('/common/imgs/ic_user.svg')
.width($r('app.float.size_32'))
.height($r('app.float.size_32'))
Column() {
Text('蜜蜂AI助手')
.fontSize($r('app.float.font_size_14'))
.fontColor($r('app.color.main_color'))
.fontWeight(FontWeight.Bolder)
Text('知识百科/文本翻译/...')
.fontSize($r('app.float.font_size_12'))
.fontColor($r('app.color.text_color_9'))
}
.height(this.PAGE_FULL)
.justifyContent(FlexAlign.Center)
.alignItems(HorizontalAlign.Start)
}
.width(this.PAGE_FULL)
.height(this.PAGE_FULL)
.padding({
left: $r('app.float.size_8'),
right: $r('app.float.size_8')
})
.onClick(() => {
postCardAction(this, {
"action": "router",
"abilityName": "EntryAbility",
"params": {}
});
})
}
}
效果
实现效果如图所示:
原理
我可以用router来进行跳转,默认不传递任何参数,就会跳转到首页。
.onClick(() => {
postCardAction(this, {
"action": "router",
"abilityName": "EntryAbility",
"params": {}
});
})
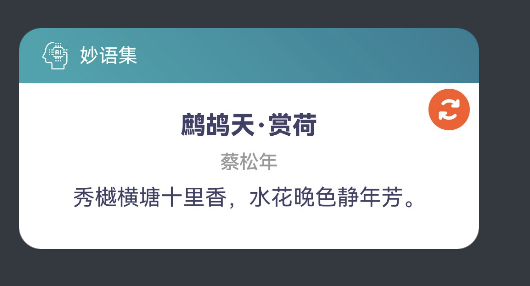
2-4的卡片
我们来看妙语集这一个2-4卡片的实现。
完整代码
const storage = new LocalStorage();
@Entry(storage)
@Component
struct PoetryCard {
readonly PAGE_FULL: string = "100%";
readonly PRE_96: string = "96%";
readonly SIZE_40: number = 40;
readonly SIZE_30: number = 30;
readonly SIZE_20: number = 20;
readonly SIZE_16: number = 16;
readonly SIZE_8: number = 8;
readonly SIZE_4: number = 4;
@LocalStorageProp("poetry") poetry: any = {
content: "秀樾横塘十里香,水花晚色静年芳。",
author: "蔡松年",
origin: "鹧鸪天·赏荷",
category: "古诗文-四季-夏天"
};
build() {
Column() {
Row({ space: this.SIZE_8 }) {
Image("/common/imgs/ic_ai_home.svg")
.width(this.SIZE_20)
.height(this.SIZE_20)
.fillColor($r('app.color.text_font_color'))
Text('妙语集')
.fontSize($r('app.float.font_size_14'))
.fontColor($r('app.color.text_font_color'))
}
.width(this.PAGE_FULL)
.height(this.SIZE_40)
.linearGradient({
angle: 45,
colors: [[$r('app.color.main_color'), 0.1], [$r('app.color.auxiliary_color'), 1.0]]
})
.padding({
left: this.SIZE_16,
right: this.SIZE_16
})
Column() {
Stack({ alignContent: Alignment.TopEnd }) {
Column({ space: this.SIZE_8 }) {
Text(this.poetry['origin'])
.fontSize($r('app.float.font_size_18'))
.fontWeight(FontWeight.Bolder)
.fontColor($r('app.color.text_color_title'))
Text(this.poetry['author'])
.fontSize($r('app.float.font_size_14'))
.fontWeight(FontWeight.Medium)
.fontColor($r('app.color.text_color_9'))
Text(this.poetry['content'])
.fontSize($r('app.float.font_size_16'))
.fontColor($r('app.color.text_color_title'))
}
.width(this.PRE_96)
.height(this.PRE_96)
.justifyContent(FlexAlign.Center)
Button({ type: ButtonType.Capsule }) {
Image($r('app.media.ic_refreshing'))
.width(this.SIZE_20)
.height(this.SIZE_20)
.fillColor(Color.White)
}
.width(this.SIZE_30).height(this.SIZE_30)
.backgroundColor($r('app.color.tip_color'))
.onClick(() => {
postCardAction(this, {
'action': 'message',
'params': {
'function': 'refreshing'
}
})
})
}
}
.width(this.PAGE_FULL)
.flexShrink(1)
.padding({top: this.SIZE_4, bottom: this.SIZE_8})
}
.width(this.PAGE_FULL)
.height(this.PAGE_FULL)
}
}
效果
原理
我们是如何实现数据刷新的呢?
我们首先判断返回的functionName,如果是refreshing,那么我们就去请求网络接口,并完成数据的显示和刷新。具体的关键代码如下所示。
if (functionName === "refreshing") {
fetchGetPoetry().then((ret) => {
let formData = {
poetry: {}
}
LogUtil.info(`widget refreshing: ${ret}`);
const result = JSON.parse(ret as string);
if (result.code === 200) {
const poetry: PoetryDto = result['data'];
formData.poetry = poetry;
}
let formBD = formBindingData.createFormBindingData(formData);
formProvider.updateForm(formId, formBD);
})
}
4-4的卡片
完整代码:
@Entry
@Component
struct HistoryCard {
readonly PAGE_FULL: string = "100%";
readonly PRE_96: string = "96%";
readonly SIZE_81: number = 81;
readonly SIZE_64: number = 64;
readonly SIZE_48: number = 48;
readonly SIZE_32: number = 32;
readonly SIZE_24: number = 24;
readonly SIZE_16: number = 16;
readonly SIZE_8: number = 8;
readonly SIZE_4: number = 4;
readonly DEFAULT_AI_APP_LIST: Array<AiAppConfig> = [
{
appId: "6548c7fdeb28cf9c75531f66",
chatId: "",
name: "知识百科小助手",
avatar: "/common/imgs/ic_wiki.svg",
intro: "知识百科小助手。"
},
{
appId: "65488134eb28cf9c75530e48",
chatId: "",
name: "节日小助手",
avatar: "/common/imgs/ic_festival.svg",
intro: "节日小助手。"
},
{
appId: "65487d64eb28cf9c75530cd2",
chatId: "",
name: "文本翻译助手",
avatar: "/common/imgs/ic_document.svg",
intro: "文本翻译助手。"
},
{
appId: "654ed429ab7249585cd2cab7",
chatId: "",
name: "产品名称助手",
avatar: "/common/imgs/ic_product.svg",
intro: "产品名称助手。"
},
{
appId: "654ed4c3ab7249585cd2caf4",
chatId: "",
name: "道歉信助手",
avatar: "/common/imgs/ic_sorry.svg",
intro: "道歉信助手。"
}
];
build() {
Column({ space: this.SIZE_8 }) {
Row({ space: this.SIZE_4 }) {
Image($r('app.media.ic_history'))
.width(this.SIZE_24)
.height(this.SIZE_24)
.fillColor($r('app.color.main_color'))
Text('查看历史数据')
.fontSize($r('app.float.font_size_16'))
.fontColor($r('app.color.main_color'))
.fontWeight(FontWeight.Bolder)
}
.width(this.PAGE_FULL)
.height(this.SIZE_48)
.padding({ left: this.SIZE_16 })
Column() {
GridRow({
columns: 3,
gutter: { x: this.SIZE_4, y: this.SIZE_4 }
}) {
ForEach(this.DEFAULT_AI_APP_LIST, (item: AiAppConfig) => {
GridCol() {
Column({ space: this.SIZE_8 }) {
Image(item.avatar)
.width(this.SIZE_32)
.height(this.SIZE_32)
.fillColor($r('app.color.main_color'))
Text(item.name)
.fontSize($r('app.float.font_size_12'))
.fontColor($r('app.color.auxiliary_color'))
.fontWeight(FontWeight.Bold)
}
.width(this.PAGE_FULL)
.height(this.SIZE_81)
.justifyContent(FlexAlign.Center)
.onClick(() => {
postCardAction(this, {
'action': 'router',
'abilityName': 'HistoryAbility',
'params': {
'targetPage': 'history',
'aiApp': item
}
})
})
}
.borderRadius(this.SIZE_8)
.padding({
left: this.SIZE_4,
right: this.SIZE_4,
top: this.SIZE_8,
bottom: this.SIZE_4
})
.shadow({
radius: this.SIZE_8,
color: $r('app.color.tab_default_color')
})
})
}
}
.width(this.PRE_96)
.justifyContent(FlexAlign.Center)
.alignItems(HorizontalAlign.Center)
.flexShrink(1)
}
.width(this.PAGE_FULL)
.height(this.PAGE_FULL)
}
}
/**
* AI应用配置
*/
interface AiAppConfig {
appId: string; // AI应用AppId
chatId: string; // 会话窗口ID
name: string; // AI应用名称
avatar: string; // AI应用LOGO
intro?: string; // AI应用介绍
}
interface ChatHistory {
chat: AiAppConfig;
total: number;
}
效果
原理
在卡片中使用postCardAction接口的router能力,能够快速拉起卡片提供方应用的指定UIAbility,因此UIAbility较多的应用往往会通过卡片提供不同的跳转按钮,实现一键直达的效果。
通常使用按钮控件来实现页面拉起。
@Entry
@Component
struct WidgetCard {
build() {
Column() {
Button('跳转')
.onClick(() => {
console.info('Jump to EntryAbility funA');
postCardAction(this, {
action: 'router',
abilityName: 'EntryAbility', // 只能跳转到当前应用下的UIAbility
params: {
targetPage: 'funA' // 在EntryAbility中处理这个信息
}
});
})
}
.width('100%')
.height('100%').justifyContent(FlexAlign.SpaceAround)
}
}
- 在UIAbility中接收router事件并获取参数,根据传递的params不同,选择拉起不同的页面。
import UIAbility from '@ohos.app.ability.UIAbility';
import window from '@ohos.window';
import Want from '@ohos.app.ability.Want';
import Base from '@ohos.base';
import AbilityConstant from '@ohos.app.ability.AbilityConstant';
let selectPage: string = "";
let currentWindowStage: window.WindowStage | null = null;
export default class EntryAbility extends UIAbility {
// 如果UIAbility第一次启动,在收到Router事件后会触发onCreate生命周期回调
onCreate(want: Want, launchParam: AbilityConstant.LaunchParam) {
// 获取router事件中传递的targetPage参数
console.info("onCreate want:" + JSON.stringify(want));
if (want.parameters?.params !== undefined) {
let params: Record<string, string> = JSON.parse(want.parameters?.params.toString());
console.info("onCreate router targetPage:" + params.targetPage);
selectPage = params.targetPage;
}
}
// 如果UIAbility已在后台运行,在收到Router事件后会触发onNewWant生命周期回调
onNewWant(want: Want, launchParam: AbilityConstant.LaunchParam) {
console.info("onNewWant want:" + JSON.stringify(want));
if (want.parameters?.params !== undefined) {
let params: Record<string, string> = JSON.parse(want.parameters?.params.toString());
console.info("onNewWant router targetPage:" + params.targetPage);
selectPage = params.targetPage;
}
if (currentWindowStage != null) {
this.onWindowStageCreate(currentWindowStage);
}
}
onWindowStageCreate(windowStage: window.WindowStage) {
let targetPage: string;
// 根据传递的targetPage不同,选择拉起不同的页面
switch (selectPage) {
case 'funA':
targetPage = 'pages/FunA';
break;
case 'funB':
targetPage = 'pages/FunB';
break;
default:
targetPage = 'pages/Index';
}
if (currentWindowStage === null) {
currentWindowStage = windowStage;
}
windowStage.loadContent(targetPage, (err: Base.BusinessError) => {
if (err && err.code) {
console.info('Failed to load the content. Cause: %{public}s', JSON.stringify(err));
return;
}
});
}
};
六、总结
通过蜜蜂AI助手元服务的开发,我们体验到了端云一体化带来的便捷,尤其注册登陆这一块,有了云端的接入,我们可以很快的加入。另外在项目里我们还用到了低码能力,不用一行代码,就完成了手机号登陆的功能。
本次鸿蒙和AI的结合,给了我新的体验。大家也可以自行尝试下HarmonyOS的开发,会给你带来不一样的体验。