Linux从源码分析ldconfig命令对可执行文件缓存信息的读取原理(缓存文件的读)

系统 Linux
本文主要通过解读Linux的ldconfig命令的关键代码,分析了ldconfig命令是如何实现读取缓存文件 /etc/ld.so.cache 的内容的。

今日问题:Linux的ldconfig -p命令可打印出系统缓存已记录的所有动态库的信息。那么这个功能是如何实现的?

本文主要通过解读Linux的ldconfig命令的关键代码,分析了ldconfig命令是如何实现读取缓存文件 /etc/ld.so.cache 的内容的。本文涉及到的ldconfig的cache.c 代码文件网址[1],在参考资料里。

ldconfig 使用的 /etc/ld.so.cache 文件,曾出现过两个版本:

1.老版本的缓存文件格式 老版本指libc5 格式的动态库,在glibc 2.0/2.1版本时采用的格式。缓存文件内容由cache_file类型的数据结构填充,其定义为

struct cache_file
{
  char magic[sizeof CACHEMAGIC - 1];
  unsigned int nlibs; /* 记录的条数*/
  struct file_entry libs[0];
};

2.新版本的的缓存文件格式 新版本指glibc 2.2及之后版本的。缓存文件内容由cache_file_new数据结构填充。定义为:

struct cache_file_new
{
  char magic[sizeof CACHEMAGIC_NEW - 1];
  char version[sizeof CACHE_VERSION - 1];
  uint32_t nlibs;  /* 记录的条数 */
  uint32_t len_strings;  /* Size of string table. */

  /* flags & cache_file_new_flags_endian_mask is one of the values
     cache_file_new_flags_endian_unset, cache_file_new_flags_endian_invalid,
     cache_file_new_flags_endian_little, cache_file_new_flags_endian_big.

     The remaining bits are unused and should be generated as zero and
     ignored by readers.  */
  uint8_t flags;

  uint8_t padding_unsed[3]; /* Not used, for future extensions.  */

  /* File offset of the extension directory.  See struct
     cache_extension below.  Must be a multiple of four.  */
  uint32_t extension_offset;

  uint32_t unused[3];  /* Leave space for future extensions
       and align to 8 byte boundary.  */
  struct file_entry_new libs[0]; /* Entries describing libraries.  */
  /* After this the string table of size len_strings is found. */
};

glibc-ld.so.cache1.1��� 以上输出信息确实以glibc-ld.so.cache开始,所以我用的Ubuntu22.04系统的ldconfig的缓存文件内容是新格式的。

ldconfig代码的cache.c 文件里是这样根据magic的不同用if(){} else{}处理的:

if (memcmp (cache->magic, CACHEMAGIC, sizeof CACHEMAGIC - 1)) {///当属于老版本时,按这里的方式处理 /* This can only be the new format without the old one. */ cache_new = (struct cache_file_new *) cache;

if (memcmp (cache_new->magic, CACHEMAGIC_NEW, sizeof CACHEMAGIC_NEW - 1)

在glibc-2.35的代码中已用英文说明了,glibc2.2格式的,能兼容glibc2.2之前的缓存文件内容。这里说的兼容,是依赖于代码检测实现的:由于两种结构体都以magic作为第一个项目,来识别缓存文件类型。再根据magic值的不同,对后续数据段采用不同的处理方式。老magic的定义为#define CACHEMAGIC "ld.so-1.7.0",新magic的定义为#define CACHEMAGIC_NEW "glibc-ld.so.cache"。也就是老版本 cache_file 的文件头部以字符串ld.so-1.7.0开始,新版本cache_file_new 的文件头部以字符串glibc-ld.so.cache开始。这点我们可以用head -c 命令查看下/etc/ld.so.cache文件的头部30个字符串旧可以验证了:

# head -c 30  /etc/ld.so.cache
glibc-ld.so.cache1.1���

以上输出信息确实以glibc-ld.so.cache开始,所以我用的Ubuntu22.04系统的ldconfig的缓存文件内容是新格式的。

ldconfig代码的cache.c 文件里是这样根据magic的不同用if(){} else{}处理的:

if (memcmp (cache->magic, CACHEMAGIC, sizeof CACHEMAGIC - 1))
    {///当属于老版本时,按这里的方式处理
      /* This can only be the new format without the old one.  */
      cache_new = (struct cache_file_new *) cache;

      if (memcmp (cache_new->magic, CACHEMAGIC_NEW, sizeof CACHEMAGIC_NEW - 1)
   || memcmp (cache_new->version, CACHE_VERSION,
        sizeof CACHE_VERSION - 1))
 error (EXIT_FAILURE, 0, _("File is not a cache file.\n"));
      check_new_cache (cache_new);
      format = 1;
      /* This is where the strings start.  */
      cache_data = (const char *) cache_new;
    }
  else
    {//当属于新版本缓存文件的时候,按下面内容处理
      ……省略
    }

在知道了 缓存文件类型(magic标记)后,就可以开始根据格式标准,逐条读/写每条记录了,这是ldconfig的重头戏。

先看对cache文件的读取效果,以 ldconfig -p命令打印出缓存文件的所有记录的结果为例:

# ldconfig -p
1525 libs found in cache `/etc/ld.so.cache
……
  libGLESv1_CM.so (libc6,x86-64) => /lib/x86_64-linux-gnu/libGLESv1_CM.so
  libGL.so.1 (libc6,x86-64) => /lib/x86_64-linux-gnu/libGL.so.1
  libGL.so (libc6,x86-64) => /lib/x86_64-linux-gnu/libGL.so
……

这里每条都是一个动态库的名称、格式(libc6等格式)、CPU架构、所在路径的记录。

缓存文件中的这么一条记录,对应的结构体,旧版本的为file_entry,新版本的为file_entry_new。它们的定义分别为:

struct file_entry
{
  int32_t flags;  /* This is 1 for an ELF library.  */
  uint32_t key, value;  /* String table indices.  */
};

以及新版本的 file_entry格式:

struct file_entry_new ///文件记录的新格式,增加了OS版本、硬件信息
{
  union
  {
    /* Fields shared with struct file_entry.  */
    struct file_entry entry;
    /* Also expose these fields directly.  */
    struct
    {
      int32_t flags;  /* This is 1 for an ELF library.  */
      uint32_t key, value; /* String table indices.  */
    };
  };
  uint32_t osversion;  /* Required OS version.  */
  uint64_t hwcap;  /* Hwcap entry.  */
};

继续分析【读缓存文件】的简要流程:

使用了 mmap() 函数,将 /etc/ld.so.cache 缓存文件整体读入内存:

struct cache_file *cache
    = mmap (NULL, st.st_size, PROT_READ, MAP_PRIVATE, fd, 0);

这是通过mmap()函数,将打开的缓存文件(open(/etc/ld.so.cache)的句柄fd)的数据映射到内存,由于文件数据就是按struct cache_file_new结构体格式填充的,所以mmap()后,就可以按这个结构体去解析各个条目。2. 判断magic,新老magic分流处理。3. 如果是新的magic,则按struct cache_file_new数据结构解析。4. 对于新格式,遍历读取数据、打印:

……
else{
      struct cache_extension_all_loaded ext;
      if (……)错误处理;

      /* Print everything.  */
      for (unsigned int i = 0; i < cache_new->nlibs; i++)
 {
   const char *hwcaps_string
     = glibc_hwcaps_string (&ext, cache, cache_size,
       &cache_new->libs[i]);
    
   print_entry (cache_data + cache_new->libs[i].key,
         cache_new->libs[i].flags,
         cache_new->libs[i].osversion,
         cache_new->libs[i].hwcap, hwcaps_string,
         cache_data + cache_new->libs[i].value);
 }
      print_extensions (&ext);
}

这里关键内容是:

  • cache_data,代表了mmap()读取到的缓存文件内容;以cache_data的地址为初始地址,按偏移量cache_new->libs[i].key 相加后,可得到每条file_entry_new的入口,然后分别打印出记录内容,就实现了 ldconfig -p 的代码功能。
  • 动态库的条数,等于 cache_new->nlibs 这个变量的值。作为for循环遍历时的条件。
  • cache_new->libs[i].key 这里的key,在struct file_entry_new中的定义是:
uint32_t key, value;  /* String table indices.  */

key相当于第i条动态库记录的目录索引。通过索引可以查到value。在实现时,key和value都是数字,这个数字代表字符串相对于cache_data这个首地址的字节偏移量,例如key->value 即 cache_new->libs[i].key, cache_new->libs[i].value 43256 -> 43234
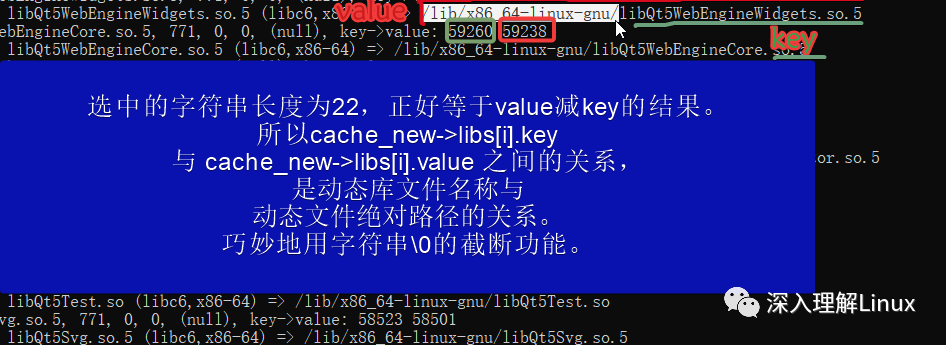
总之,通过对结构体的合理使用,将缓存文件内容解析后,可打印出缓存文件中记录的所有已知动态库文件的信息。

void print_cache (const char *cache_name) 的函数代码结束之前,还做了一下内存回收工作:

  /* Cleanup.  */
  munmap (cache, cache_size);
  close (fd);

首先使用munmap()函数,将之前已映射内存数据做一下清除;然后关闭打开的cache缓存文件描述符。

本文主要通过解读Linux的ldconfig命令的关键代码,分析了ldconfig命令是如何实现读取缓存文件 /etc/ld.so.cache 的内容的。本文涉及到的ldconfig的cache.c 代码文件网址[1],在参考资料里。

参考资料

[1]ldconfig的cache.c 代码文件网址: https://sourceware.org/git/?p=glibc.git;a=blob;f=elf/cache.c;h=8149f889bab9f9cb32a50e349991ba821e4db0dd;hb=HEAD

责任编辑:赵宁宁 来源: 深入理解Linux
相关推荐

2009-06-20 09:21:37

UNIXLINUX

2012-01-05 10:37:40

Java

2021-01-06 05:29:57

虚拟内存文件

2023-03-31 23:31:06

.go文本文件

2023-12-27 08:27:03

Linuxldconfig命令

2015-02-02 11:03:12

2010-02-22 18:04:27

CentOS mpla

2021-01-12 10:10:41

shell脚本Linux命令

2011-08-09 10:24:19

可执行文件病毒病毒

2022-05-11 14:50:34

Python解包执行文件

2021-01-08 08:06:19

脚本Shell文件

2017-02-07 10:22:53

2024-08-12 16:42:50

二进制工具系统

2024-05-06 00:00:00

Go文件瘦身代码

2009-04-16 10:37:17

Javaexejar

2024-05-21 12:01:39

.NET 6开发

2021-01-14 22:17:09

PythonLinux工具

2022-05-20 08:55:02

py文件exepython

2023-12-18 09:21:22

开发静态编译Linux

2023-09-04 07:14:36

点赞
收藏

51CTO技术栈公众号