在当今的技术领域中,“下云”的概念正逐渐抬头,像David Heinemeier Hansson[1](37signals公司的联合创始人, Ruby on Rails的Creator)就直接将公司所有的业务都从公有云搬迁到了自建的数据中心[2]中。虽说大多数企业不会这么“极端”,但随着企业对云原生架构采用的广泛与深入,不可避免地面临着对云服务的依赖。云服务在过去的几年中被广泛应用于构建灵活、可扩展的应用程序和基础设施,为企业提供了许多便利和创新机会。然而,随着业务规模的增长和数据量的增加,云服务的成本也随之上升。企业开始意识到,对云服务的依赖已经成为一个值得重新评估的议题。云服务的开销可能占据了企业可用的预算的相当大部分。为了保持竞争力并更好地控制成本,企业需要寻找方法来减少对云服务的依赖,寻找更经济的解决方案,同时确保仍能获得所需的性能、安全性和可扩展性。
在这样的背景下,我们的关注点是选择一款适宜的API网关,从主流功能特性的角度来评估候选者的支持。API网关作为现代云原生应用架构中的关键组件,扮演着连接前端应用和后端服务的中间层,负责管理、控制和保护API的访问。它的功能特性对于确保API的安全性、可靠性和可扩展性至关重要。
尽管API网关并不是一个新鲜事物了,但对于那些长期依赖于云供应商的服务的人来说,它似乎变得有些“陌生”。因此,本文旨在帮助我们重新理解API网关的主要特性,并获得对API网关选型的能力,以便在停止使用云供应商服务之前,找到一个合适的替代品^_^。
1. API网关回顾
API网关是现代应用架构中的关键组件之一,它的存在简化了应用程序的架构,并为客户端提供一个单一的访问入口,并进行相关的控制、优化和管理。API网关可以帮助企业实现微服务架构、提高系统的可扩展性和安全性,并提供更好的开发者体验和用户体验。
1.1 API网关的演化
随着互联网的快速发展和企业对API的需求不断增长,API网关作为一种关键的中间层技术逐渐崭露头角并经历了一系列的演进和发展。这里将API网关的演进历史粗略分为以下几个阶段:
- API网关之前的早期阶段
在互联网发展的早期阶段,大多数应用程序都是以单体应用的形式存在[3]。后来随着应用规模的扩大和业务复杂性的增加,单体应用的架构变得不够灵活和可扩展,面向服务架构(Service-Oriented Architecture,SOA)逐渐兴起,企业开始将应用程序拆分成一组独立的服务。这个时期,每个服务都是独立对外暴露API,客户端也是通过这些API直接访问服务,但这会导致一些安全性、运维和扩展性的问题。之后,企业也开始意识到需要一种中间层来管理和控制这种客户端到服务的通信行为,并确保服务的可靠性和安全性,于是开始有了API网关的概念。
- API网关的兴起
早期的API网关,其主要功能就是单纯的路由和转发。API网关将请求从客户端转发到后端服务,并将后端服务的响应返回给客户端。在这个阶段,API网关的功能非常简单,主要用于解决客户端和后端服务之间的通信问题。
- API网关的成熟
随着微服务架构的兴起和API应用的不断发展,企业开始将应用程序进一步拆分成更小的、独立部署的微服务。每个对外暴露的微服务都有自己的API,并通过API网关进行统一管理和访问。API网关在微服务架构中的作用变得更加重要,它的功能也逐渐丰富起来了。
在这一阶段,它不仅负责路由和转发请求,API网关还增加了安全和治理的功能,可以满足几个不同领域的微服务需求。比如:API网关可以通过身份认证、授权、访问控制等功能来保护API的安全;通过基于重试、超时、熔断的容错机制等来对API的访问进行治理;通过日志记录、基于指标收集以及Tracing等对API的访问进行观测与监控;支持实时的服务发现等。
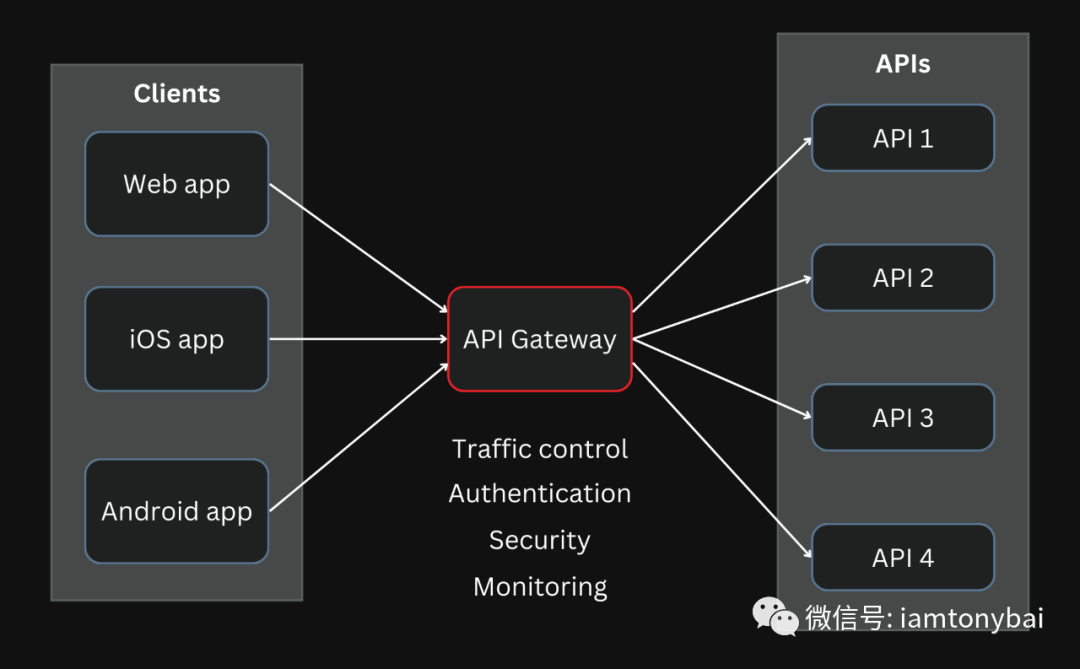 API网关(图来自网络)
- API网关的云原生化
随着云原生技术的发展,如容器化和服务网格(Service Mesh)等,API网关也在不断演进和适应新的环境。在云原生环境中,API网关实现了与容器编排系统(如Kubernetes)和服务网格集成,其自身也可以作为一个云原生服务来部署,以实现更高的可伸缩性、弹性和自动化。同时,新的技术和标准也不断涌现,如GraphQL和gRPC等,API网关也增加了对这些新技术的集成和支持。
1.2 API网关的主要功能特性
从上面的演化历史我们看到:API网关的演进使其从最初简单的请求转发角色,逐渐成为整个API管理和微服务架构中的关键组件。它不仅扮演着API管理层与后端服务层之间的适配器,也是云原生架构中不可或缺的基础设施,使微服务管理更加智能化和自动化。下面是现代API网关承担的主要功能特性,我们后续也会基于这些特性进行示例说明:
- 请求转发和路由
- 身份认证和授权
- 流量控制和限速
- 高可用与容错处理
- 监控和可观测性
2. 那些主流的API网关
下面是来自CNCF Landscape[4]中的主流API网关集合(截至2023.11月),图中展示了关于各个网关的一些细节,包括star数量和背后开发的公司或组织:
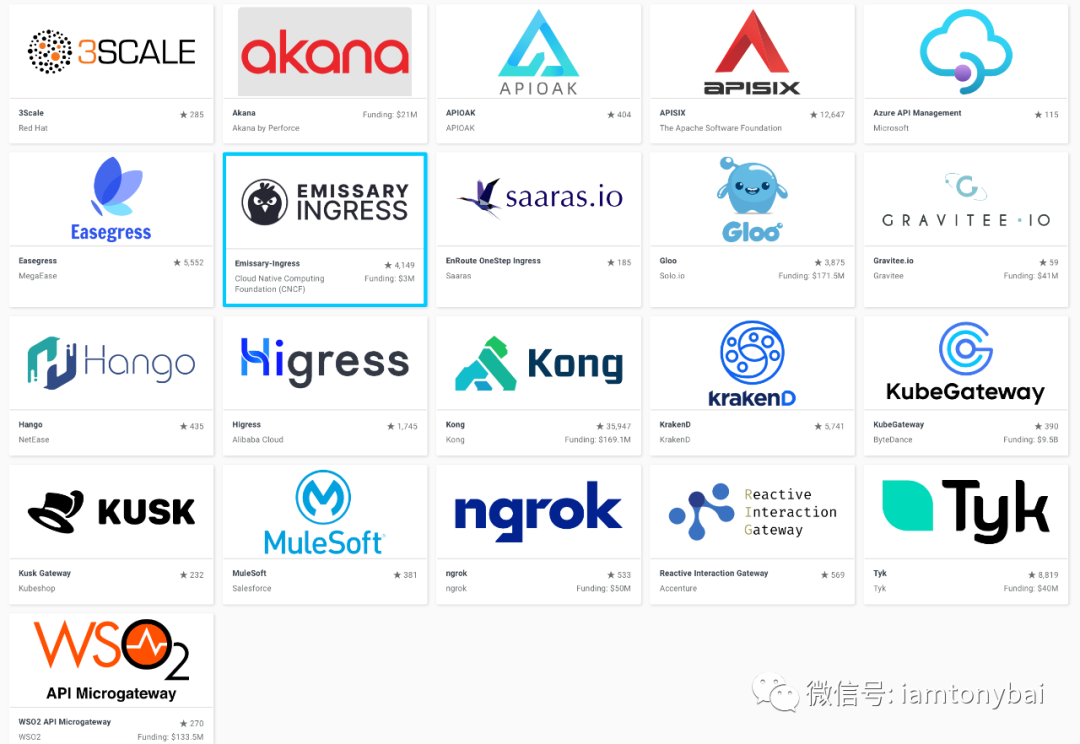 图片
图片
主流的API网关还有各大公有云提供商的实现,比如:Amazon的API Gateway[5]、Google Cloud的API Gateway[6]以及上图中的Azure API Management等,但它们不在我们选择范围之内;虽然被CNCF收录,但多数API网关受到的关注并不高,超过1k star的不到30%,这些不是很受关注或dev不是那么active的项目也无法在生产环境担当关键角色;而像APISIX[7]、Kong[8]这两个受关注很高的网关,它们是建构在Nginx之上实现的,技术栈与我们不契合;而像EMISSARY INGRESS[9]、Gloo等则是完全云原生化或者说是Kubernetes Native的,无法在无Kubernetes的基于VM或裸金属的环境下部署和运行。
好吧,剩下的只有几个Go实现的API Gateway了,在它们之中,我们选择用Tyk API网关[10]来作为后续API功能演示的示例。
注:这并不代表Tyk API网关就要比其他Go实现的API Gateway优秀[11],只是它的资料比较齐全,适合在本文中作演示罢了。
3. API网关主要功能特性示例(Tyk API网关版本)
3.1 Tyk API网关简介
记得在至少5年前就知道Tyk API网关[12]的存在,印象中它是使用Go语言开发的早期的那批API网关之一。Tyk从最初的纯开源项目,到如今由背后商业公司支持,以Open Core模式开源[13]的网关,一直保持了active dev的状态。经过多年的演进,它已经一款功能强大的开源兼商业API管理和网关解决方案[14],提供了全面的功能和工具,帮助开发者有效地管理、保护和监控API。同时,Tyk API网关支持多种安装部署方式,即可以单一程序的方式放在物理机或VM上运行,也可以支持容器部署,通过docker-compose[15]拉起,亦可以通过Kubernetes Operator[16]将其部署在Kubernetes中,这也让Tyk API网关具备了在各大公有云上平滑迁移的能力。
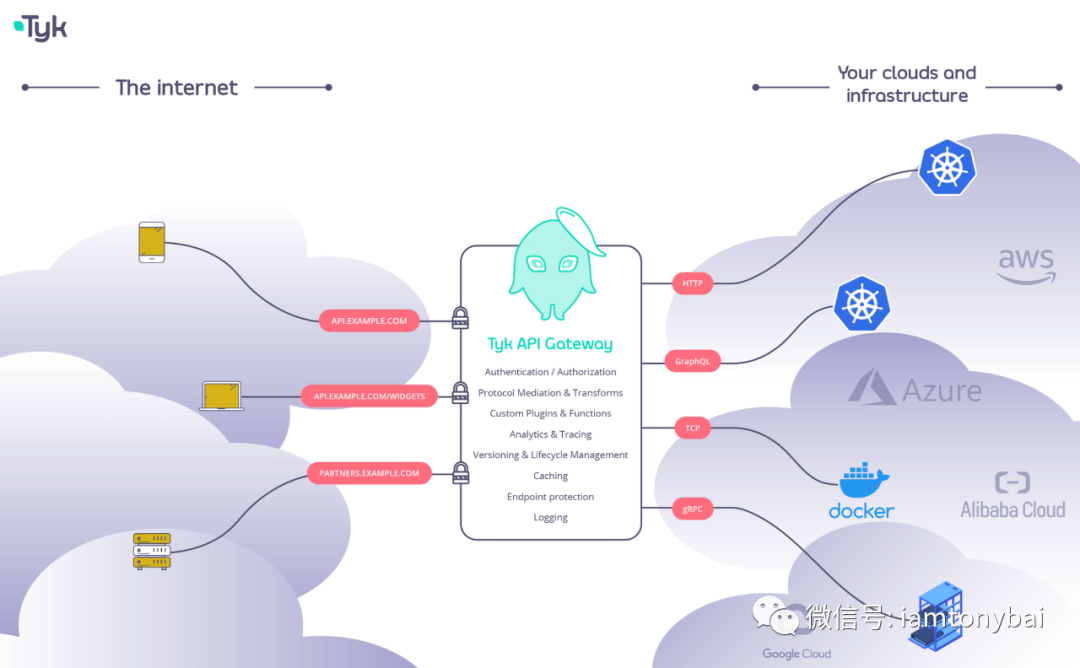 图片
图片
关于Tyk API网关开源版本的功能详情[17],可以点击左边超链接到其官网查阅,这里不赘述。
3.2 安装Tyk API网关
下面我们就来安装一下Tyk API网关,我们直接在VM上安装,VM上的环境是CentOS 7.9。Tyk API提供了很多中安装方法,这里使用CentOS的yum包管理工具安装Tyk API网关[18],大体步骤如下(演示均以root权限操作)。
3.2.1 创建tyk gateway软件源
默认的yum repo中是不包含tyk gateway的,我们需要在/etc/yum.repos.d下面创建一个新的源,即新建一个tyk_tyk-gateway.repo文件,其内容如下:
[tyk_tyk-gateway]
name=tyk_tyk-gateway
baseurl=https://packagecloud.io/tyk/tyk-gateway/el/7/$basearch
repo_gpgcheck=1
gpgcheck=0
enabled=1
gpgkey=https://packagecloud.io/tyk/tyk-gateway/gpgkey
sslverify=1
sslcacert=/etc/pki/tls/certs/ca-bundle.crt
metadata_expire=300

[tyk_tyk-gateway-source]
name=tyk_tyk-gateway-source
baseurl=https://packagecloud.io/tyk/tyk-gateway/el/7/SRPMS
repo_gpgcheck=1
gpgcheck=0
enabled=1
gpgkey=https://packagecloud.io/tyk/tyk-gateway/gpgkey
sslverify=1
sslcacert=/etc/pki/tls/certs/ca-bundle.crt
metadata_expire=300
接下来我们执行下面命令来创建tyk_tyk-gateway这个repo的YUM缓存:
$yum -q makecache -y --disablerepo='*' --enablerepo='tyk_tyk-gateway'
导入 GPG key 0x5FB83118:
 用户ID     : "https://packagecloud.io/tyk/tyk-gateway (https://packagecloud.io/docs#gpg_signing) <support@packagecloud.io>"
 指纹       : 9179 6215 a875 8c40 ab57 5f03 87be 71bd 5fb8 3118
 来自       : https://packagecloud.io/tyk/tyk-gateway/gpgkey
repo配置和缓存完毕后,我们就可以安装Tyk API Gateway了:
$yum install -y tyk-gateway安装后的tky-gateway将以一个systemd daemon服务[19]的形式存在于主机上,程序意外退出或虚机重启后,该服务也会被systemd自动拉起。通过systemctl status命令可以查看服务的运行状态:
# systemctl status tyk-gateway
● tyk-gateway.service - Tyk API Gateway
   Loaded: loaded (/usr/lib/systemd/system/tyk-gateway.service; enabled; vendor preset: disabled)
   Active: active (running) since 日 2023-11-19 20:22:44 CST; 12min ago
 Main PID: 29306 (tyk)
    Tasks: 13
   Memory: 19.6M
   CGroup: /system.slice/tyk-gateway.service
           └─29306 /opt/tyk-gateway/tyk --conf /opt/tyk-gateway/tyk.conf

11月 19 20:34:54 iZ2ze18rmx2avqb5xgb4omZ tyk[29306]: time="Nov 19 20:34:54" level=error msg="Connection to Redis faile...b-sub
11月 19 20:35:04 iZ2ze18rmx2avqb5xgb4omZ tyk[29306]: time="Nov 19 20:35:04" level=error msg="cannot set key in pollerC...ured"
11月 19 20:35:04 iZ2ze18rmx2avqb5xgb4omZ tyk[29306]: time="Nov 19 20:35:04" level=error msg="Redis health check failed...=main
Hint: Some lines were ellipsized, use -l to show in full.
3.2.2 安装redis
我们看到tyk-gateway已经成功启动,但从其服务日志来看,它在连接redis时报错了!tyk gateway默认将数据存储在redis中,为了让tyk gateway正常运行,我们还需要安装redis!这里我们使用容器的方式安装和运行一个redis服务:
$docker pull redis:6.2.14-alpine3.18
$docker run -d --name my-redis -p 6379:6379 redis:6.2.14-alpine3.18
e5d1ec8d5f5c09023d1a4dd7d31d293b2d7147f1d9a01cff8eff077c93a9dab7
拉取并运行redis后,我们通过redis-cli验证一下与redis server的连接:
# docker run -it --rm redis:6.2.14-alpine3.18  redis-cli -h 192.168.0.24
192.168.0.24:6379>
我们看到可以正常连接!但此时Tyk Gateway仍然无法与redis正常连接,我们还需要对Tyk Gateway做一些配置调整!
3.2.3 配置Tyk Gateway
yum默认将Tyk Gateway安装到/opt/tyk-gateway下面,这个路径下的文件布局如下:
$tree -F -L 2 .
.
├── apps/
│   └── app_sample.json
├── coprocess/
│   ├── api.h
│   ├── bindings/
│   ├── coprocess_common.pb.go
│   ├── coprocess_mini_request_object.pb.go
│   ├── coprocess_object_grpc.pb.go
│   ├── coprocess_object.pb.go
│   ├── coprocess_response_object.pb.go
│   ├── coprocess_return_overrides.pb.go
│   ├── coprocess_session_state.pb.go
│   ├── coprocess_test.go
│   ├── dispatcher.go
│   ├── grpc/
│   ├── lua/
│   ├── proto/
│   ├── python/
│   └── README.md
├── event_handlers/
│   └── sample/
├── install/
│   ├── before_install.sh*
│   ├── data/
│   ├── init_local.sh
│   ├── inits/
│   ├── post_install.sh*
│   ├── post_remove.sh*
│   ├── post_trans.sh
│   └── setup.sh*
├── middleware/
│   ├── ottoAuthExample.js
│   ├── sampleMiddleware.js
│   ├── samplePostProcessMiddleware.js
│   ├── samplePreProcessMiddleware.js
│   ├── testPostVirtual.js
│   ├── testVirtual.js
│   └── waf.js
├── policies/
│   └── policies.json
├── templates/
│   ├── breaker_webhook.json
│   ├── default_webhook.json
│   ├── error.json
│   ├── monitor_template.json
│   └── playground/
├── tyk*
└── tyk.conf
其中tyk.conf就是tyk gateway的配置文件,我们先看看其默认的内容:
$cat /opt/tyk-gateway/tyk.conf
{
  "listen_address": "",
  "listen_port": 8080,
  "secret": "xxxxxx",
  "template_path": "/opt/tyk-gateway/templates",
  "use_db_app_configs": false,
  "app_path": "/opt/tyk-gateway/apps",
  "middleware_path": "/opt/tyk-gateway/middleware",
  "storage": {
    "type": "redis",
    "host": "redis",
    "port": 6379,
    "username": "",
    "password": "",
    "database": 0,
    "optimisation_max_idle": 2000,
    "optimisation_max_active": 4000
  },
  "enable_analytics": false,
  "analytics_config": {
    "type": "",
    "ignored_ips": []
  },
  "dns_cache": {
    "enabled": false,
    "ttl": 3600,
    "check_interval": 60
  },
  "allow_master_keys": false,
  "policies": {
    "policy_source": "file"
  },
  "hash_keys": true,
  "hash_key_function": "murmur64",
  "suppress_redis_signal_reload": false,
  "force_global_session_lifetime": false,
  "max_idle_connections_per_host": 500
}
我们看到:storage下面存储了redis的配置信息,我们需要将redis的host配置修改为我们的VM地址:
"host": "192.168.0.24",然后重启Tyk Gateway服务:
$systemctl daemon-reload
$systemctl restart tyk-gateway
之后,我们再查看tyk gateway的运行状态:
systemctl status tyk-gateway
● tyk-gateway.service - Tyk API Gateway
   Loaded: loaded (/usr/lib/systemd/system/tyk-gateway.service; enabled; vendor preset: disabled)
   Active: active (running) since 一 2023-11-20 06:54:07 CST; 41s ago
 Main PID: 20827 (tyk)
    Tasks: 15
   Memory: 24.8M
   CGroup: /system.slice/tyk-gateway.service
           └─20827 /opt/tyk-gateway/tyk --conf /opt/tyk-gateway/tyk.conf

11月 20 06:54:07 iZ2ze18rmx2avqb5xgb4omZ tyk[20827]: time="Nov 20 06:54:07" level=info msg="Loading API configurations...=main
11月 20 06:54:07 iZ2ze18rmx2avqb5xgb4omZ tyk[20827]: time="Nov 20 06:54:07" level=info msg="Tracking hostname" api_nam...=main
11月 20 06:54:07 iZ2ze18rmx2avqb5xgb4omZ tyk[20827]: time="Nov 20 06:54:07" level=info msg="Initialising Tyk REST API ...=main
11月 20 06:54:07 iZ2ze18rmx2avqb5xgb4omZ tyk[20827]: time="Nov 20 06:54:07" level=info msg="API bind on custom port:0"...=main
11月 20 06:54:07 iZ2ze18rmx2avqb5xgb4omZ tyk[20827]: time="Nov 20 06:54:07" level=info msg="Checking security policy: ...fault
11月 20 06:54:07 iZ2ze18rmx2avqb5xgb4omZ tyk[20827]: time="Nov 20 06:54:07" level=info msg="API Loaded" api_id=1 api_n...ip=--
11月 20 06:54:07 iZ2ze18rmx2avqb5xgb4omZ tyk[20827]: time="Nov 20 06:54:07" level=info msg="Loading uptime tests..." p...k-mgr
11月 20 06:54:07 iZ2ze18rmx2avqb5xgb4omZ tyk[20827]: time="Nov 20 06:54:07" level=info msg="Initialised API Definition...=main
11月 20 06:54:07 iZ2ze18rmx2avqb5xgb4omZ tyk[20827]: time="Nov 20 06:54:07" level=warning msg="All APIs are protected ...=main
11月 20 06:54:07 iZ2ze18rmx2avqb5xgb4omZ tyk[20827]: time="Nov 20 06:54:07" level=info msg="API reload complete" prefix=main
Hint: Some lines were ellipsized, use -l to show in full.
从服务日志来看,现在Tyk Gateway可以正常连接redis并提供服务了!我们也可以通过下面的命令验证网关的运行状态:
$curl localhost:8080/hello
{"status":"pass","version":"5.2.1","description":"Tyk GW","details":{"redis":{"status":"pass","componentType":"datastore","time":"2023-11-20T06:58:57+08:00"}}}
“/hello”是Tyk Gateway的内置路由,由Tyk网关自己提供服务。
到这里Tyk Gateway的安装和简单配置就结束了,接下来,我们就来看看API Gateway的主要功能特性,并借助Tyk Gateway来展示一下这些功能特性。
注:查看Tyk Gateway的运行日志,可以使用journalctl -u tyk-gateway -f命令实时follow最新日志输出。
3.3 功能特性:请求转发与路由
请求转发和路由是API Gateway的主要功能特性之一,API Gateway可以根据请求的路径、方法、查询参数等信息将请求转发到相应的后端服务,其内核与反向代理类似,不同之处在于API Gateway增加了“API”这层抽象,更加专注于构建、管理和增强API。
下面我们来看看Tyk如何配置API路由,我们首先创建一个新API。
3.3.1 创建一个新API
Tyk开源版支持两种创建API的方式,一种是通过调用Tyk的控制类API[20],一种则是通过传统的配置文件,放入特定目录下[21]。无论哪种方式添加完API,最终都要通过Tyk Gateway热加载(hot reload)或重启才能生效。
注:Tyk Gateway的商业版本提供Dashboard,可以以图形化的方式管理API,并且商业版本的API定义会放在Postgres或MongoDB中,我们这里用开源版本,只能手工管理了,并且API定义只能放在文件中。
下面,我们就来在Tyk上创建一个新的API路由,该路由示例的示意图如下:
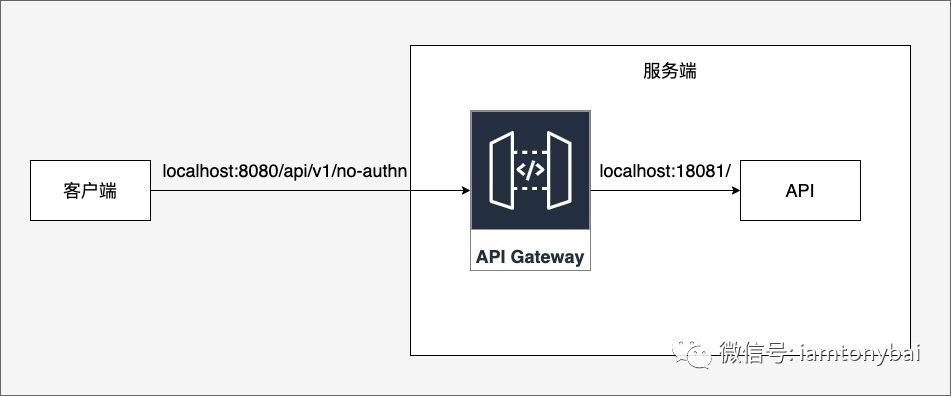 图片
图片
在未添加新API之前,我们使用curl访问一下该API路径:
$curl localhost:8080/api/v1/no-authn
Not Found
Tyk Gateway由于找不到API路由,返回Not Found。接下来,我们采用调用tyk gateway API的方式来添加路由:
$curl -v -H "x-tyk-authorization: {tyk gateway secret}" \
  -s \
  -H "Content-Type: application/json" \
  -X POST \
  -d '{
    "name": "no-authn-v1",
    "slug": "no-authn-v1",
    "api_id": "no-authn-v1",
    "org_id": "1",
    "use_keyless": true,
    "auth": {
      "auth_header_name": "Authorization"
    },
    "definition": {
      "location": "header",
      "key": "x-api-version"
    },
    "version_data": {
      "not_versioned": true,
      "versions": {
        "Default": {
          "name": "Default",
          "use_extended_paths": true
        }
      }
    },
    "proxy": {
      "listen_path": "/api/v1/no-authn",
      "target_url": "http://localhost:18081/",
      "strip_listen_path": true
    },
    "active": true
}' http://localhost:8080/tyk/apis | python -mjson.tool

* About to connect() to localhost port 8080 (#0)
*   Trying ::1...
* Connected to localhost (::1) port 8080 (#0)
> POST /tyk/apis HTTP/1.1
> User-Agent: curl/7.29.0
> Host: localhost:8080
> Accept: */*
> x-tyk-authorization: {tyk gateway secret}
> Content-Type: application/json
> Content-Length: 797
>
} [data not shown]
* upload completely sent off: 797 out of 797 bytes
< HTTP/1.1 200 OK
< Content-Type: application/json
< Date: Wed, 22 Nov 2023 05:38:40 GMT
< Content-Length: 53
<
{ [data not shown]
* Connection #0 to host localhost left intact
{
    "action": "added",
    "key": "no-authn-v1",
    "status": "ok"
}
从curl返回结果我们看到:API已经被成功添加。这时tyk gateway的安装目录/opt/tyk-gateway的子目录apps下会新增一个名为no-authn-v1.json的配置文件,这个文件内容较多,有300行,这里就不贴出来了,这个文件就是新增的no-authn API的定义文件[22]。
不过此刻,Tyk Gateway还需热加载后才能为新的API提供服务,调用下面API可以触发Tyk Gateway的热加载:
$curl -H "x-tyk-authorization: {tyk gateway secret}" -s http://localhost:8080/tyk/reload/group | python -mjson.tool
{
    "message": "",
    "status": "ok"
}
注:即便触发热加载成功,但如果body中的json格式错,比如多了一个结尾逗号,Tyk Gateway是不会报错的!
API路由创建完毕并生效后,我们再来访问一下API:
$ curl localhost:8080/api/v1/no-authn
{
    "error": "There was a problem proxying the request"
}
我们看到:Tyk Gateway返回的已经不是“Not Found”了!现在我们创建一下no-authn这个API服务,考虑到适配更多后续示例,这里建立这样一个http server:
// api-gateway-examples/httpserver

func main() {
    // 解析命令行参数
    port := flag.Int("p", 8080, "Port number")
    apiVersion := flag.String("v", "v1", "API version")
    apiName := flag.String("n", "example", "API name")
    flag.Parse()

    // 注册处理程序
    http.HandleFunc("/", func(w http.ResponseWriter, r *http.Request) {
        fmt.Println(*r)
        fmt.Fprintf(w, "Welcome api: localhost:%d/%s/%s\n", *port, *apiVersion, *apiName)
    })

    // 启动HTTP服务器
    addr := fmt.Sprintf(":%d", *port)
    log.Printf("Server listening on port %d\n", *port)
    log.Fatal(http.ListenAndServe(addr, nil))
}
我们启动一个该http server的实例:
$go run main.go -p 18081 -v v1 -n no-authn
2023/11/22 22:02:42 Server listening on port 18081
现在我们再通过tyk gateway调用一下no-authn这个API:
$curl localhost:8080/api/v1/no-authn
Welcome api: localhost:18081/v1/no-authn
我们看到这次路由通了!no-authn API返回了期望的结果!
3.3.2 负载均衡
如果no-authn API存在多个服务实例,Tyk Gateway也可以将请求流量负载均衡到多个no-authn服务实例上去,下图是Tyk Gateway进行请求流量负载均衡[23]的示意图:
要实现负责均衡,我们需要调整no-authn API的定义,这次我们直接修改/opt/tyk-gateway/apps/no-authn-v1.json,变更的配置主要有三项:
// /opt/tyk-gateway/apps/no-authn-v1.json

  "proxy": {
    "preserve_host_header": false,
    "listen_path": "/api/v1/no-authn",
    "target_url": "",                  // (1) 改为""
    "disable_strip_slash": false,
    "strip_listen_path": true,
    "enable_load_balancing": true,     // (2) 改为true
    "target_list": [                   // (3) 填写no-authn服务实例列表
      "http://localhost:18081/",
      "http://localhost:18082/",
      "http://localhost:18083/"
    ],
修改完配置后,调用Tyk的控制类API使之生效,然后我们启动三个no-authn的API实例:
$go run main.go -p 18081 -v v1 -n no-authn
$go run main.go -p 18082 -v v1 -n no-authn
$go run main.go -p 18083 -v v1 -n no-authn
接下来,我们多次调用curl访问no-authn API:
$curl localhost:8080/api/v1/no-authn
Welcome api: localhost:18081/v1/no-authn
$curl localhost:8080/api/v1/no-authn
Welcome api: localhost:18082/v1/no-authn
$curl localhost:8080/api/v1/no-authn
Welcome api: localhost:18083/v1/no-authn

$curl localhost:8080/api/v1/no-authn
Welcome api: localhost:18081/v1/no-authn
$curl localhost:8080/api/v1/no-authn
Welcome api: localhost:18082/v1/no-authn
$curl localhost:8080/api/v1/no-authn
Welcome api: localhost:18083/v1/no-authn
我们看到:Tyk Gateway在no-authn API的各个实例之间做了等权重的轮询。如果我们停掉实例3,再来访问该API,我们将得到下面结果:
$curl localhost:8080/api/v1/no-authn
Welcome api: localhost:18081/v1/no-authn
$curl localhost:8080/api/v1/no-authn
Welcome api: localhost:18082/v1/no-authn
$curl localhost:8080/api/v1/no-authn
Bad Request

$curl localhost:8080/api/v1/no-authn
Welcome api: localhost:18081/v1/no-authn
$curl localhost:8080/api/v1/no-authn
Welcome api: localhost:18082/v1/no-authn
$curl localhost:8080/api/v1/no-authn
Bad Request
注:Tyk Gateway商业版通过Dashboard支持配置带权重的RR负载均衡算法[24]。
我们看到:实例3已经下线,但Tyk Gateway并不会跳过该已经下线的实例,这在生产环境会给客户端带来不一致的响应。
3.3.3 服务实例存活检测(uptime test)
Tyk Gateway在开启负载均衡的时候,也提供了对后端服务实例的存活检测机制,当某个服务实例down了后,负载均衡机制会绕过该实例将请求发到下一个处于存活状态的实例;而当down机实例恢复后,Tyk Gateway也能及时检测到服务实例上线,并将其加入流量负载调度。
支持存活检测(uptime test)的API定义配置如下:
// /opt/tyk-gateway/apps/no-authn-v1.json

"uptime_tests": {
    "disable": false,
    "poller_group":"",
    "check_list": [
      {
        "url": "http://localhost:18081/"
      },
      {
        "url": "http://localhost:18082/"
      },
      {
        "url": "http://localhost:18083/"
      }
    ],
    "config": {
      "enable_uptime_analytics": true,
      "failure_trigger_sample_size": 3,
      "time_wait": 300,
      "checker_pool_size": 50,
      "expire_utime_after": 0,
      "service_discovery": {
        "use_discovery_service": false,
        "query_endpoint": "",
        "use_nested_query": false,
        "parent_data_path": "",
        "data_path": "",
        "port_data_path": "",
        "target_path": "",
        "use_target_list": false,
        "cache_disabled": false,
        "cache_timeout": 0,
        "endpoint_returns_list": false
      },
      "recheck_wait": 0
    }
}

"proxy": {
    ... ...
    "enable_load_balancing": true,
    "target_list": [
      "http://localhost:18081/",
      "http://localhost:18082/",
      "http://localhost:18083/"
    ],
    "check_host_against_uptime_tests": true,
    ... ...
}
我们新增了uptime_tests的配置,uptime_tests的check_list中的url的值要与proxy中target_list中的值完全一样,这样Tyk Gateway才能将二者对应上。另外proxy的check_host_against_uptime_tests要设置为true。
这样配置并生效后,等我们将服务实例3停掉后,后续到no-authn的请求就只会转发到实例1和实例2了。而当恢复实例3运行后,Tyk Gateway又会将流量分担到实例3上。
3.3.4 动态负载均衡
上面负载均衡示例中target_list中的目标实例的IP和端口的手工配置的,而在云原生时代,我们经常会基于容器承载API服务实例,当容器因故退出,并重新启动一个新容器时,IP可能会发生变化,这样上述的手工配置就无法满足要求,这就对API Gateway提出了与服务发现组件集成的要求:通过服务发现组件动态获取服务实例的访问列表,进而实现动态负载均衡[25]。
Tyk Gateway内置了主流服务发现组件(比如Etcd、Consul、ZooKeeper等)的对接能力,鉴于环境所限,这里就不举例了,大家可以在Tyk Gateway的服务发现示例文档页面[26]找到与不同服务发现组件对接时的配置示例。
3.3.5 IP访问限制
针对每个API,API网关还提供IP访问限制的特性,比如Tyk Gateway就提供了IP白名单[27]和IP黑名单[28]功能,通常二选一开启一种限制即可。
以白名单为例,即凡是在白名单中的IP才被允许访问该API。下面是白名单配置样例:
// /opt/tyk-gateway/apps/no-authn-v1.json

  "enable_ip_whitelisting": true,
  "allowed_ips": ["12.12.12.12", "12.12.12.13", "12.12.12.14"],
生效后,当我们访问no-authn API时,会得到下面错误:
$curl localhost:8080/api/v1/no-authn
{
    "error": "access from this IP has been disallowed"
}
如果开启的是黑名单,那么凡是在黑名单中的IP都被禁止访问该API,下面是黑名单配置样例:
// /opt/tyk-gateway/apps/no-authn-v1.json

  "enable_ip_blacklisting": true,
  "blacklisted_ips": ["12.12.12.12", "12.12.12.13", "12.12.12.14", "127.0.0.1"],
生效后,当我们访问no-authn API时,会得到如下结果:
$curl 127.0.0.1:8080/api/v1/no-authn
{
    "error": "access from this IP has been disallowed"
}
到目前为止,我们的API网关和定义的API都处于“裸奔”状态,因为没有对客户端进行身份认证,任何客户端都可以访问到我们的API,显然这不是我们期望的,接下来,我们就来看看API网关的一个重要功能特性:身份认证与授权。
3.4 功能特性:身份认证和授权
在《通过实例理解Go Web身份认证的几种方式[29]》一文中,我们提到过:建立全局的安全通道是任何身份认证方式的前提。
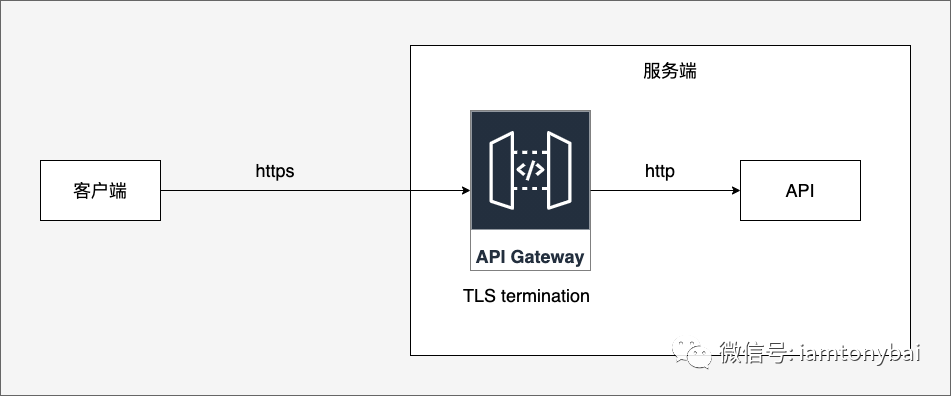
3.4.1 建立安全通道,卸载TLS证书
Tyk Gateway支持在Gateway层面统一配置TLS证书[30],同时也起到在Gateway卸载TLS证书的作用:
 图片
图片
这次我们要在tyk.conf中进行配置,才能在Gateway层面生效。这里我们借用《通过实例理解Go Web身份认证的几种方式[31]》一文中生成的几个证书(大家可以在https://github.com/bigwhite/experiments/tree/master/authn-examples/tls-authn/make_certs下载),并将它们放到/opt/tyk-gateway/certs/下面:
$ls /opt/tyk-gateway/certs/
server-cert.pem  server-key.pem
然后,我们在/opt/tyk-gateway/tyk.conf文件中增加下面配置:
// /opt/tyk-gateway/tyk.conf

  "http_server_options": {
    "use_ssl": true,
    "certificates": [
      {
        "domain_name": "server.com",
        "cert_file": "./certs/server-cert.pem",
        "key_file": "./certs/server-key.pem"
      }
    ]
  }
之后,重启tyk gateway服务,使得tyk.conf的配置修改生效。
注:在/etc/hosts中设置server.com为127.0.0.1。
现在我们用之前的http方式访问一下no-authn的API:
$curl server.com:8080/api/v1/no-authn
Client sent an HTTP request to an HTTPS server.
由于全局启用了HTTPS,采用http方式的请求将被拒绝。我们换成https方式访问:
// 不验证服务端证书
$curl -k https://server.com:8080/api/v1/no-authn
Welcome api: localhost:18081/v1/no-authn

// 验证服务端的自签证书
$curl --cacert ./inter-cert.pem https://server.com:8080/api/v1/no-authn
Welcome api: localhost:18081/v1/no-authn
3.4.2 Mutual TLS双向认证
在《通过实例理解Go Web身份认证的几种方式[32]》一文中,我们介绍的第一种身份认证方式就是TLS双向认证,那么Tyk Gateway对MTLS的支持如何呢?Tyk官方文档[33]提到它既支持client mTLS[34],也支持upstream mTLS[35]。
我们更关心的是client mTLS,即客户端在与Gateway建连后,Gateway会使用Client CA验证客户端的证书!我最初认为这个Client CA的配置是在tyk.conf中,但找了许久,也没有发现配置Client CA的地方。
在no-authn API的定义文件(no-authn-v1.json)中,我们做如下配置改动:
"use_mutual_tls_auth": true,
  "client_certificates": [
      "/opt/tyk-gateway/certs/inter-cert.pem"
  ],
但使用下面命令访问API时报错:
$curl --key ./client-key.pem --cert ./client-cert.pem --cacert ./inter-cert.pem https://server.com:8080/api/v1/no-authn
{
    "error": "Certificate with SHA256 bc8717c0f2ea5a0b81813abb3ec42ef8f9bf60da251b87243627d65fb0e3887b not allowed"
}
如果将"client_certificates"的配置中的inter-cert.pem改为client-cert.pem,则是可以的,但个人感觉这很奇怪,不符合逻辑,将tyk gateway的文档、issue甚至代码翻了又翻,也没找到合理的配置client CA的位置。
Tyk Gateway支持多种身份认证方式[36],下面我们来看一种使用较为广泛的方式:JWT Auth。
主要JWT身份认证方式的原理和详情,可以参考我之前的文章《通过实例理解Go Web身份认证的几种方式[37]》。
3.4.3 JWT Token Auth
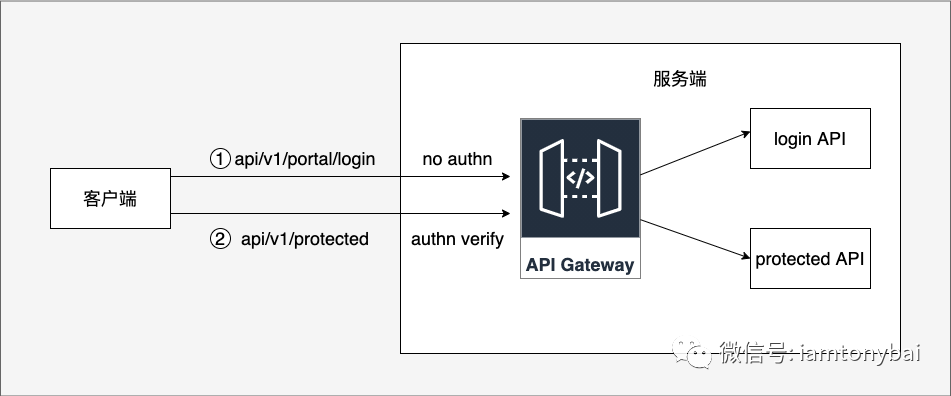
下面是我为这个示例做的一个示意图:
 图片
图片
这是我们日常开发中经常遇到的场景,即通过portal用用户名和密码登录后便可以拿到一个jwt token,然后后续的访问功能API的请求仅携带该jwt token即可。API Gateway对于portal/login API不做任何身份认证;而对后续的功能API请求,通过共享的secret(也称为static secret)对请求中携带的jwt token进行签名验证。
portal/login API由于不进行authn,这样其配置与前面的no-authn API几乎一致,只是API名称、路径和target_list有不同:
// apps/portal-login-v1.json

{
  "name": "portal-login-v1",
  "slug": "portal-login-v1",
  "listen_port": 0,
  "protocol": "",
  "enable_proxy_protocol": false,
  "api_id": "portal-login-v1",
  "org_id": "1",
  "use_keyless": true,
  ... ...
  "proxy": {
    "preserve_host_header": false,
    "listen_path": "/api/v1/portal/login",
    "target_url": "",
    "disable_strip_slash": false,
    "strip_listen_path": true,
    "enable_load_balancing": true,
    "target_list": [
      "http://localhost:28084"
    ],
    "check_host_against_uptime_tests": true,
  ... ...
}
对应的portal login API也不复杂:
// api-gateway-examples/portal-login/main.go

package main

import (
 "log"
 "net/http"
 "time"

 "github.com/golang-jwt/jwt/v5"
)

func main() {
 // 创建一个基本的HTTP服务器
 mux := http.NewServeMux()

 username := "admin"
 password := "123456"
 key := "iamtonybai"

 // for uptime test
 mux.HandleFunc("/health", func(w http.ResponseWriter, req *http.Request) {
  w.WriteHeader(http.StatusOK)
 })

 // login handler
 mux.HandleFunc("/", func(w http.ResponseWriter, req *http.Request) {
  // 从请求头中获取Basic Auth认证信息
  user, pass, ok := req.BasicAuth()
  if !ok {
   // 认证失败
   w.WriteHeader(http.StatusUnauthorized)
   return
  }

  // 验证用户名密码
  if user == username && pass == password {
   // 认证成功,生成token
   token := jwt.NewWithClaims(jwt.SigningMethodHS256, jwt.MapClaims{
    "username": username,
    "iat":      jwt.NewNumericDate(time.Now()),
   })
   signedToken, _ := token.SignedString([]byte(key))
   w.Write([]byte(signedToken))
  } else {
   // 认证失败
   http.Error(w, "Invalid username or password", http.StatusUnauthorized)
  }
 })

 // 监听28084端口
 err := http.ListenAndServe(":28084", mux)
 if err != nil {
  log.Fatal(err)
 }
}
运行该login API服务后,我们用curl命令获取一下jwt token:
$curl -u 'admin:123456' -k https://server.com:8080/api/v1/portal/login
eyJhbGciOiJIUzI1NiIsInR5cCI6IkpXVCJ9.eyJpYXQiOjE3MDA3NTEyODEsInVzZXJuYW1lIjoiYWRtaW4ifQ.-wC8uPsLHDxSXcEMxIxJ8O2l3aWtWtWKvhtmuHmgIMA
现在我们再来建立protected API:
// apps/protected-v1.json

{
  "name": "protected-v1",
  "slug": "protected-v1",
  "listen_port": 0,
  "protocol": "",
  "enable_proxy_protocol": false,
  "api_id": "protected-v1",
  "org_id": "1",
  "use_keyless": false,    // 设置为false, gateway才会进行jwt的验证
  ... ...
  "enable_jwt": true,      // 开启jwt
  "use_standard_auth": false,
  "use_go_plugin_auth": false,
  "enable_coprocess_auth": false,
  "custom_plugin_auth_enabled": false,
  "jwt_signing_method": "hmac",        // 设置alg为hs256
  "jwt_source": "aWFtdG9ueWJhaQ==",    // 设置共享secret: base64("iamtonybai")
  "jwt_identity_base_field": "username", // 设置代表请求中的用户身份的字段,这里我们用username
  "jwt_client_base_field": "",
  "jwt_policy_field_name": "",
  "jwt_default_policies": [
     "5e189590801287e42a6cf5ce"        // 设置security policy,这个似乎是jwt auth必须的
  ],
  "jwt_issued_at_validation_skew": 0,
  "jwt_expires_at_validation_skew": 0,
  "jwt_not_before_validation_skew": 0,
  "jwt_skip_kid": false,
  ... ...
  "version_data": {
    "not_versioned": true,
    "default_version": "",
    "versions": {
      "Default": {
        "name": "Default",
        "expires": "",
        "paths": {
          "ignored": null,
          "white_list": null,
          "black_list": null
        },
        "use_extended_paths": true,
        "extended_paths": {
          "persist_graphql": null
        },
        "global_headers": {
          "username": "$tyk_context.jwt_claims_username" // 设置转发到upstream的请求中的header字段username
        },
        "global_headers_remove": null,
        "global_response_headers": null,
        "global_response_headers_remove": null,
        "ignore_endpoint_case": false,
        "global_size_limit": 0,
        "override_target": ""
      }
    }
  },
  ... ...
  "enable_context_vars": true, // 开启上下文变量
  "config_data": null,
  "config_data_disabled": false,
  "tag_headers": ["username"], // 设置header
  ... ...
}
这个配置就相对复杂许多,也是翻阅了很长时间资料才验证通过的配置。JWT Auth必须有关联的policy设置,我们在tyk gateway开源版中要想设置policy,需要现在tyk.conf中做如下设置:
// /opt/tyk-gateway/tyk.conf

  "policies": {
    "policy_source": "file",
    "policy_record_name": "./policies/policies.json"
  },
而policies/policies.json的内容如下:
// /opt/tyk-gateway/policies/policies.json
{
 "5e189590801287e42a6cf5ce": {
  "rate": 1000,
  "per": 1,
  "quota_max": 100,
  "quota_renewal_rate": 60,
  "access_rights": {
   "protected-v1": {
    "api_name": "protected-v1",
    "api_id": "protected-v1",
    "versions": [
     "Default"
    ]
   }
  },
  "org_id": "1",
  "hmac_enabled": false
 }
}
上述设置完毕并重启tyk gateway生效后,且protected api服务也已经启动时,我们访问一下该API服务:
$curl -H "Authorization: Bearer eyJhbGciOiJIUzI1NiIsInR5cCI6IkpXVCJ9.eyJpYXQiOjE3MDA3NTEyODEsInVzZXJuYW1lIjoiYWRtaW4ifQ.-wC8uPsLHDxSXcEMxIxJ8O2l3aWtWtWKvhtmuHmgIMA" -k https://server.com:8080/api/v1/protected
invoke protected api ok
我们看到curl发出的请求成功通过了Gateway的验证!并且通过protected API输出的请求信息来看,Gateway成功解析出username,并将其作为Header中的字段传递给了protected API服务实例:
http.Request{Method:"GET", URL:(*url.URL)(0xc0002f6240), Proto:"HTTP/1.1", ProtoMajor:1, ProtoMinor:1, Header:http.Header{"Accept":[]string{"*/*"}, "Accept-Encoding":[]string{"gzip"}, "Authorization":[]string{"Bearer eyJhbGciOiJIUzI1NiIsInR5cCI6IkpXVCJ9.eyJpYXQiOjE3MDA3NTEyODEsInVzZXJuYW1lIjoiYWRtaW4ifQ.-wC8uPsLHDxSXcEMxIxJ8O2l3aWtWtWKvhtmuHmgIMA"}, "User-Agent":[]string{"curl/7.29.0"}, "Username":[]string{"admin"}, "X-Forwarded-For":[]string{"127.0.0.1"}}, Body:http.noBody{}, GetBody:(func() (io.ReadCloser, error))(nil), ContentLength:0, TransferEncoding:[]string(nil), Close:false, Host:"localhost:28085", Form:url.Values(nil), PostForm:url.Values(nil), MultipartForm:(*multipart.Form)(nil), Trailer:http.Header(nil), RemoteAddr:"[::1]:55583", RequestURI:"/", TLS:(*tls.ConnectionState)(nil), Cancel:(<-chan struct {})(nil), Response:(*http.Response)(nil), ctx:(*context.cancelCtx)(0xc0002e34f0)}如果不携带Authorization头字段或jwt的token是错误的,那么结果将如下所示:
$ curl -k https://server.com:8080/api/v1/protected
{
    "error": "Authorization field missing"
}

$ curl -k -H "Authorization: Bearer xxx" https://server.com:8080/api/v1/protected
{
    "error": "Key not authorized"
}
一旦通过API Gateway的身份认证,上游的API服务就会拿到客户端身份,有了唯一身份后,就可以进行授权操作[38]了,其实policy设置本身也是一种授权访问控制。Tyk Gateway自身也支持RBAC等模型[39],也支持与OPA(open policy agent)等的集成,但更多是在商业版的tyk dashboard下完成的,这里也就不重点说明了。
下面的Gateway的几个主要功能特性由于试验环境受限以及文章篇幅考量,我不会像上述例子这么细致的说明了,只会简单说明一下。
3.5 功能特性:流量控制与限速
Tyk Gateway内置提供了强大的流量控制功能,可以通过全局级别和API级别的限速[40]来管理请求流量。此外,Tyk Gateway 还支持请求配额(request quota)[41]来限制每个用户或应用程序在一个时间周期内的请求次数。
流量不仅和请求速度和数量有关系,与请求的大小也有关系,Tyk Gateway还支持在全局层面和API层面设置Request的size limit[42],以避免超大包对网关运行造成不良影响。
3.6 功能特性:高可用与容错处理
在许多情况下,我们要为客户确保服务水平(service level),比如:最大往返时间、最大响应时延等。Tyk Gateway提供了一系列功能,可帮助我们确保网关的高可用运行和SLA服务水平。
Tyk支持健康检查[43],这对于确定Tyk Gateway的状态极为重要,没有健康检查,就很难知道网关的实际运行状态如何。
Tyk Gateway还内置了断路器(circuit breaker)[44],这个断路器是基于比例的,因此如果y个请求中的x请求都失败了,断路器就会跳闸,例如,如果x = 10,y = 100,则阈值百分比为10%。当失败比例到达10%时,断路器就会切断流量,同时跳闸还会触发一个事件,我们可以记录和处理该事件。
当upstream的服务响应迟迟不归时,Tyk Gateway还可以设置强制超时[45],可以确保服务始终在给定时间内响应。这在高可用性系统中非常重要,因为在这种系统中,响应性能至关重要,这样才能干净利落地处理错误。
3.7 功能特性:监控与可观测性
微服务时代,可观测性对运维以及系统高可用的重要性不言而喻。Tyk Gateway在多年的演化过程中,也逐渐增加了对可观测的支持,
可观测主要分三大块:
- log
Tyk Gateway支持设置输出日志的级别(log level),默认是info级别。Tyk输出的是结构化日志,这使得它可以很好的与其他日志收集查询系统集成,Tyk支持与主流的日志收集工具对接[46],包括:logstash、sentry、Graylog、Syslog等。
- metrics
度量数据是反映网关系统健康状况、错误计数和类型、IT基础设施(服务器、虚拟机、容器、数据库和其他后端组件)及其他流程的硬件资源数据的重要参考。运维团队可以通过使用监控工具来利用实时度量的数据[47],识别运行趋势、在系统故障时设置警报、确定问题的根本原因并缓解问题。
Tyk Gateway内置了对主流metrics采集方案Prometheus+Grafana的支持[48],可以在网关层面以及对API进行实时度量数据采集和展示。
- tracing
Tyk Gateway从5.2版本开始支持了与服务Tracing界的标准:OpenTelemetry的集成[49],这样你可以使用多种支持OpenTelemetry的Tracing后端,比如Jaeger、Datadog等。Tracing可在Gateway层面开启,也可以延展到API层面。
4. 小结
本文对已经相对成熟的API网关技术做了回顾,对API网关的演进阶段、主流特性以及当前市面上的主流API网关进行了简要说明,并以Go实现的Tyk Gateway社区开源版为例,以示例方式对API网关的主要功能做了介绍。
总体而言,Tyk Gateway是一款功能强大,社区相对活跃并有商业公司支持的产品,文档很丰富,但从实际使用层面,这些文档对Tyk社区版本的使用者来说并不友好,指导性不足(更多用商业版的Dashboard说明,与配置文件难于对应),就像本文例子中那样,为了搞定JWT认证,笔者着实花了不少时间查阅资料,甚至阅读源码。
Tyk Gateway的配置设计平坦,没有层次和逻辑,感觉是随着时间随意“堆砌”上去的。并且配置文件更新时,如果出现格式问题,Tyk Gateway并不报错,让人难于确定配置是否真正生效了,只能用Tyk Gateway的控制API[50]去查询结果来验证,非常繁琐低效。
本文涉及的源码可以在这里[51]下载,文中涉及的一些tyk gateway api和security policy的配置也可以在其中查看。
5. 参考资料
- Leaving the Cloud[52] - https://37signals.com/podcast/leaving-the-cloud/
- The Past, Present, and Future of API Gateways[53] - https://www.infoq.com/articles/past-present-future-api-gateways/
- How moving from AWS to Bare-Metal saved us 230,000/yr[54] - https://blog.oneuptime.com/moving-from-aws-to-bare-metal/
- A Comprehensive Guide to API Gateways, Kubernetes Gateways, and Service Meshes[55] - https://navendu.me/posts/gateway-and-mesh/
- Use API gateways in microservices[56] - https://learn.microsoft.com/en-us/azure/architecture/microservices/design/gateway
- The Tyk API Gateway and Postman[57] - https://blog.postman.com/the-tyk-api-gateway-and-postman/
- Getting Started with Tyk API Gateway with Keycloak[58] - https://javascript.plainenglish.io/getting-started-to-tyk-api-gateway-with-keycloak-16307435584a
- Observing your API traffic with Tyk, Elasticsearch & Kibana[59] - https://medium.com/@asoorm/observing-your-api-metrics-with-tyk-elasticsearch-kibana-74e8fd946c39
- Set up JWT token in tyk gateway[60] - https://community.tyk.io/t/set-up-jwt-token-in-tyk-gateway/6572/9
参考资料
[1] David Heinemeier Hansson: https://dhh.dk/
[2] 将公司所有的业务都从公有云搬迁到了自建的数据中心: https://37signals.com/podcast/leaving-the-cloud/
[3] 以单体应用的形式存在: https://tonybai.com/2023/10/09/service-weaver-coding-in-monolithic-deploy-in-microservices/
[4] CNCF Landscape: https://https://landscape.cncf.io
[5] Amazon的API Gateway: https://aws.amazon.com/cn/api-gateway/
[6] Google Cloud的API Gateway: https://cloud.google.com/api-gateway
[7] APISIX: https://apisix.apache.org/
[8] Kong: https://konghq.com/
[9] EMISSARY INGRESS: https://github.com/emissary-ingress/emissary
[10] Tyk API网关: https://tyk.io/blog/res-api-management-vendor-comparisons/
[11] 不代表Tyk API网关就要比其他Go实现的API Gateway优秀: https://tyk.io/blog/enter-the-leader-tyk-recognised-as-a-leader-in-gartners-2023-magic-quadrant-for-api-management/
[12] Tyk API网关: https://github.com/TykTechnologies/tyk
[13] Open Core模式开源: https://opensource.com/article/21/11/open-core-vs-open-source
[14] 开源兼商业API管理和网关解决方案: https://tyk.io/docs/tyk-oss-gateway/
[15] docker-compose: https://tonybai.com/2021/11/26/build-all-in-one-runtime-environment-with-docker-compose
[16] Kubernetes Operator: https://tonybai.com/2022/08/15/developing-kubernetes-operators-in-go-part1
[17] Tyk API网关开源版本的功能详情: https://tyk.io/docs/tyk-oss-gateway/
[18] 使用CentOS的yum包管理工具安装Tyk API网关: https://tyk.io/docs/tyk-oss/ce-redhat-rhel-centos/
[19] systemd daemon服务: https://tonybai.com/2016/12/27/when-docker-meets-systemd/
[20] 调用Tyk的控制类API: https://tyk.io/docs/getting-started/create-api/#tutorial-create-an-api-with-the-tyk-gateway-api
[21] 通过传统的配置文件,放入特定目录下: https://tyk.io/docs/getting-started/create-api/#tutorial-create-an-api-in-file-based-mode
[22] API的定义文件: https://tyk.io/docs/tyk-gateway-api/api-definition-objects/
[23] 请求流量负载均衡: https://tyk.io/docs/planning-for-production/ensure-high-availability/load-balancing/
[24] 支持配置带权重的RR负载均衡算法: https://tyk.io/docs/planning-for-production/ensure-high-availability/load-balancing/
[25] 动态负载均衡: https://tyk.io/docs/planning-for-production/ensure-high-availability/service-discovery/
[26] 服务发现示例文档页面: https://tyk.io/docs/planning-for-production/ensure-high-availability/service-discovery/examples/
[27] IP白名单: https://tyk.io/docs/tyk-apis/tyk-gateway-api/api-definition-objects/ip-whitelisting/
[28] IP黑名单: https://tyk.io/docs/tyk-apis/tyk-gateway-api/api-definition-objects/ip-blacklisting/
[29] 通过实例理解Go Web身份认证的几种方式: https://tonybai.com/2023/10/23/understand-go-web-authn-by-example
[30] 统一配置TLS证书: https://tyk.io/docs/basic-config-and-security/security/tls-and-ssl/
[31] 通过实例理解Go Web身份认证的几种方式: https://tonybai.com/2023/10/23/understand-go-web-authn-by-example/
[32] 通过实例理解Go Web身份认证的几种方式: https://tonybai.com/2023/10/23/understand-go-web-authn-by-example
[33] Tyk官方文档: https://tyk.io/docs/basic-config-and-security/security/mutual-tls/
[34] client mTLS: https://tyk.io/docs/basic-config-and-security/security/mutual-tls/client-mtls
[35] upstream mTLS: https://tyk.io/docs/basic-config-and-security/security/mutual-tls/upstream-mtls
[36] Tyk Gateway支持多种身份认证方式: https://tyk.io/docs/apim-best-practice/api-security-best-practice/authentication/
[37] 通过实例理解Go Web身份认证的几种方式: https://tonybai.com/2023/10/23/understand-go-web-authn-by-example/
[38] 授权操作: https://tonybai.com/2023/11/04/understand-go-web-authz-by-example/
[39] 支持RBAC等模型: https://tyk.io/docs/tyk-dashboard/rbac/#understanding-the-concept-of-users-and-permissions
[40] 全局级别和API级别的限速: https://tyk.io/docs/basic-config-and-security/control-limit-traffic/rate-limiting/
[41] 支持请求配额(request quota): https://tyk.io/docs/basic-config-and-security/control-limit-traffic/request-quotas/
[42] 设置Request的size limit: https://tyk.io/docs/basic-config-and-security/control-limit-traffic/request-size-limits/
[43] Tyk支持健康检查: https://tyk.io/docs/planning-for-production/ensure-high-availability/health-check/
[44] 内置了断路器(circuit breaker): https://tyk.io/docs/planning-for-production/ensure-high-availability/circuit-breakers/
[45] 设置强制超时: https://tyk.io/docs/planning-for-production/ensure-high-availability/enforced-timeouts/
[46] Tyk支持与主流的日志收集工具对接: https://tyk.io/docs/log-data/#logging
[47] 使用监控工具来利用实时度量的数据: https://tyk.io/docs/planning-for-production/monitoring/
[48] 对主流metrics采集方案Prometheus+Grafana的支持: https://tyk.io/blog/service-level-objectives-for-your-apis-with-tyk-prometheus-and-grafana/
[49] 支持了与服务Tracing界的标准:OpenTelemetry的集成: https://tyk.io/docs/product-stack/tyk-gateway/advanced-configurations/distributed-tracing/open-telemetry/open-telemetry-overview/
[50] Tyk Gateway的控制API: https://tyk.io/docs/tyk-gateway-api/
[51] 这里: https://github.com/bigwhite/experiments/tree/master/api-gateway-examples
[52] Leaving the Cloud: https://37signals.com/podcast/leaving-the-cloud/
[53] The Past, Present, and Future of API Gateways: https://www.infoq.com/articles/past-present-future-api-gateways/
[54] How moving from AWS to Bare-Metal saved us 230,000/yr: https://blog.oneuptime.com/moving-from-aws-to-bare-metal/
[55] A Comprehensive Guide to API Gateways, Kubernetes Gateways, and Service Meshes: https://navendu.me/posts/gateway-and-mesh/
[56] Use API gateways in microservices: https://learn.microsoft.com/en-us/azure/architecture/microservices/design/gateway
[57] The Tyk API Gateway and Postman: https://blog.postman.com/the-tyk-api-gateway-and-postman/
[58] Getting Started with Tyk API Gateway with Keycloak: https://javascript.plainenglish.io/getting-started-to-tyk-api-gateway-with-keycloak-16307435584a
[59] Observing your API traffic with Tyk, Elasticsearch & Kibana: https://medium.com/@asoorm/observing-your-api-metrics-with-tyk-elasticsearch-kibana-74e8fd946c39
[60] Set up JWT token in tyk gateway: https://community.tyk.io/t/set-up-jwt-token-in-tyk-gateway/6572/9
[61] “Gopher部落”知识星球: https://public.zsxq.com/groups/51284458844544
[62] 链接地址: https://m.do.co/c/bff6eed92687


