前言
在Spring boot项目中,凡是标记有@Component、@Controller、@Service、@Configuration、@Bean等注解的类,Spring boot都会在容器启动的时候,自动创建bean并纳入到Spring容器中进行管理,这样就可以使用@Autowired等注解,在需要使用bean的业务类中进行注入。这里起到关键作用的就是@ComponentScan,这是一个bean扫描注解,默认扫描的目录是启动类所在包下的所有包及子包,也就是说凡是标记了@Componetn等注解类,Spring boot都会自动创建bean纳入Spring容器管理。
问题
一个问题来了,是什么呢?如果我封装了一套公共的业务组件,也想把些组件类放到Spring容器里,方便在业务里注入使用,这时候应该怎么办呢?
解决方法
最先想到的就是,应该就是更新@ComponentScan的扫描路径了吧,除了这个还有没有更好方法呢?答案是有的,且听我细细道来的。
主要是两种方式:
第一种:Spring.factories
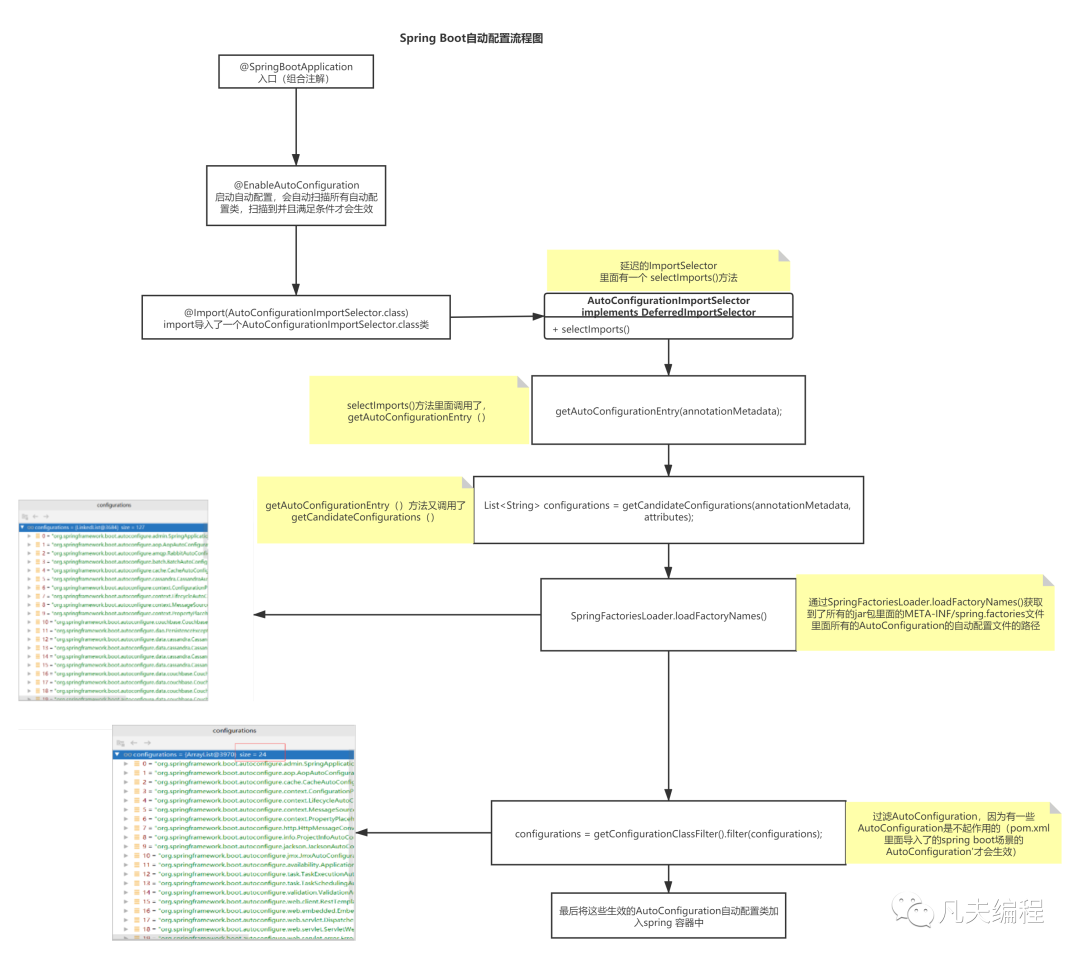
如果了解过Spring boot的自动装配的原理以及如何自定义自己的starter,对这个配置文件应该会很熟悉,Spring boot能够实现开箱即用,省去了许多繁琐的配置,spring-boot-autoconfigure.jar下的/META-INF/spring.factories配置文件起了关键作用。那个类里有什么呢?仔细会发现spring.factories中配置信息是key-value的形式,key是spring中预留的扩展点配置接口的全限定类名,vlue则是具体的配置类的全限定类名,如果有多个配置类,则以英文逗号隔开;
如果公共的业务组件封装好了,就可以在resources目录下,创建/META-INF/spring.factories配置文件,并实现Spring预留的扩展点配置接口,使用的时候引入到项目中,然后在Spring容器启动的时候,会读取classpath下所有的spring.factories中的配置类,然后纳入到Spring容器中。当然这个处理过程是很复杂的,这里不过多展开,我在网上找到了一张图,可以帮助你很好的理解整个过程,有兴趣的小伙们,不妨根据图上内容,再结合spring源码再深入研究一下。
 图片
图片
第二种:org.springframework.boot.autoconfigure.AutoConfiguration.imports
其实org.springframework.boot.autoconfigure.AutoConfiguration.imports文件功能和Sping.factories的作用是一样的,这个用法是Spring boot2.7以后出现的,目的也是为引入外部的jar,把外部bean纳入到Spring容器,实现外部组件与Spring的集成,主要的区别在于引入的方式有些不同,spring.factories这种方式是在resources下创建/META-INF/spring.factories配置文件,内部是key-value的形式,这种则是创建/META-INF/spring/org.springframework.boot.autoconfigure.AutoConfiguration.imports,内部是具体的要导入到Spring环境的中的配置类。
两种方式有一些区别,不过都是用来实现自动装配的。
mybatis与Springboot
SpringBoot和MyBatis的集成主要也是利用了SpringBoot的自动配置特性和MyBatis的映射特性。
在SpringBoot中,通过开启自动配置,系统会在ConfigurationClassPostProcessor这个BeanFactory的后置处理器中,读取spring.factories配置文件中的org.springframework.boot.autoconfigure.EnableAutoConfiguration,读取到所有的自动配置类进行注册。
而对于MyBatis,我们主要是通过MapperScan这个注解来注册Mapper。在SpringBoot中,如果某个类使用了@MapperScan注解,那么Spring会自动扫描该类所在的包,并将扫描到的Mapper接口注册到Spring容器中。这样,我们就可以在Service中使用@Autowired将Mapper注入,从而使用Mapper提供的方法对数据库进行操作。
此外,SpringBoot还集成了MyBatis的别名和类型处理器。这是通过扫描@Alias和@TypeAlias注解来实现的,它们可以帮助我们将类型进行转换,使得我们可以在MyBatis中使用更方便的类型,比如使用String代替硬编码的SQL语句。
示例
项目里也经常会用到reids,这里举一个实例,以把redis与Springboot的集成,封装成一个starter。
Redis在Springboot中的配置类
/**
 * Redis 配置类
 */
@AutoConfiguration
public class RedisAutoConfiguration {


    /**
     * 创建 RedisTemplate Bean,使用 JSON 序列化方式
     */
    @Bean
    public RedisTemplate<String, Object> redisTemplate(RedisConnectionFactory factory) {
        // 创建 RedisTemplate 对象
        RedisTemplate<String, Object> template = new RedisTemplate<>();
        // 设置 RedisConnection 工厂。😈 它就是实现多种 Java Redis 客户端接入的秘密工厂。感兴趣的胖友,可以自己去撸下。
        template.setConnectionFactory(factory);
        // 使用 String 序列化方式,序列化 KEY 。
        template.setKeySerializer(RedisSerializer.string());
        template.setHashKeySerializer(RedisSerializer.string());
        // 使用 JSON 序列化方式(库是 Jackson ),序列化 VALUE 。
        template.setValueSerializer(buildRedisSerializer());
        template.setHashValueSerializer(buildRedisSerializer());
        return template;
    }


    public static RedisSerializer<?> buildRedisSerializer() {
        RedisSerializer<Object> json = RedisSerializer.json();
        // 解决 LocalDateTime 的序列化
        ObjectMapper objectMapper = (ObjectMapper) ReflectUtil.getFieldValue(json, "mapper");
        objectMapper.registerModules(new JavaTimeModule());
        return json;
    }
}
resources目录下创建/META-INF/spring/org.springframework.boot.autoconfigure.AutoConfiguration.imports文件,并填写配置类的全限定名称
com.example.redis.config.RedisAutoConfiguration


