一、问题描述
当我们的业务发展到一定阶段的时候,系统的复杂度往往会非常高,不再是一个简单的单体应用所能够承载的,随之而来的是系统架构的不断升级与演变。一般对于大型的To C的互联网企业来说,整个系统都是构建于微服务的架构之上,原因是To C的业务有着天生的微服务化的诉求:需求迭代快、业务系统多、领域划分多、链路调用关系复杂、容忍延迟低、故障传播快。微服务化之后带来的问题也很明显:服务的管理复杂、链路的梳理复杂、系统故障会在整个链路中迅速传播。
这里我们不讨论链路的依赖或服务的管理等问题,本次要解决的问题是怎么防止单个系统故障影响整个系统。这是一个复杂的问题,因为服务的传播特性,一个服务出现故障,其他依赖或被依赖的服务都会受到影响。为了找到解决问题的办法,我们试着通过5why提问法来找答案。
PS:这里说的系统故障,是特指由于慢调用、慢查询等影响系统性能而导致的系统故障。
问:怎么防止单个系统故障影响整个系统?
答:避免单个系统的故障的传播。
问:怎么避免故障的传播?
答:找到系统故障的原因,解决故障。
问:怎么找到系统故障的原因?
答:找到并优化系统中耗时长的方法。
问:怎么找到系统中耗时长的方法?
答:通过对特定方法做AOP拦截。
问:怎么对特定方法做AOP拦截?
答:通过字节码增强的方式对目标方法做拦截并植入内联代码。
通过5why提问法,我们得到了解决问题的方法,我们需要对目标方法做AOP拦截,统计业务方法及各个子方法的耗时,得到所有方法的耗时分布,快速定位到比较慢的方法,最后找出业务系统的性能瓶颈在哪里。
二 、方案选型
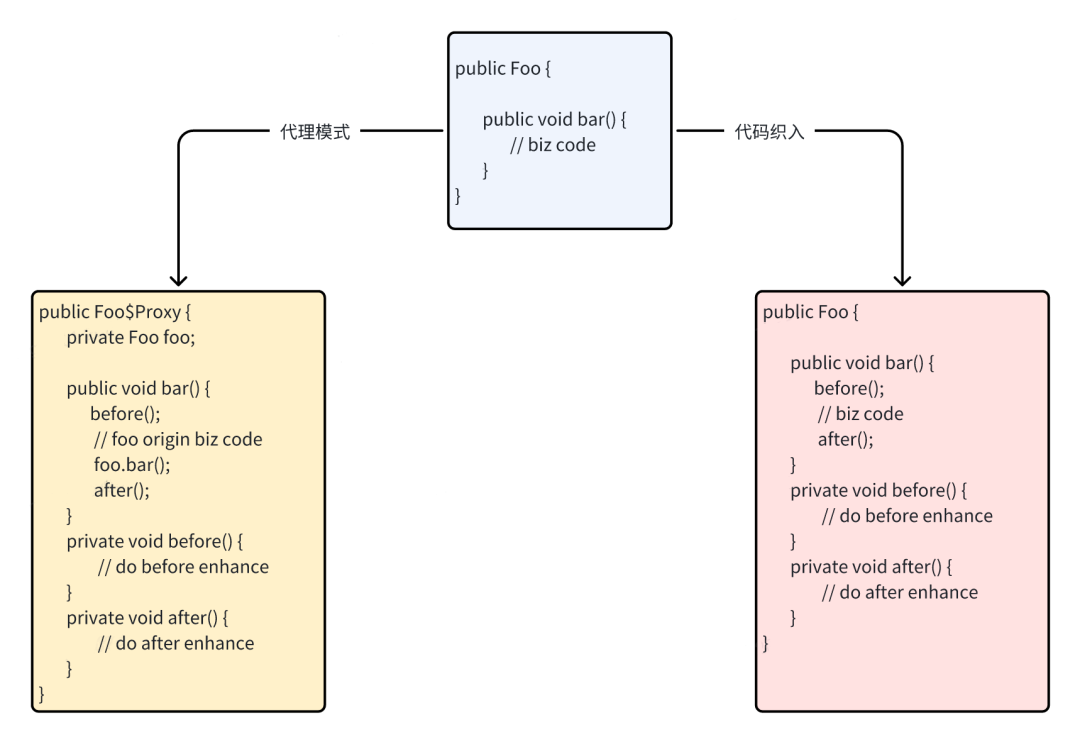
如果在网上搜一下“AOP的实现方式”,你会得到大致相同的结果:AOP的实现方式是通过动态代理或Cglib代理。其实这不太准确,准确的来说,AOP可以通过代理或Advice两种方式来实现。请注意这里说的Advice并不是Spring所依赖的aspectj中的Advice,而是一种代码织入的技术,它与代理的区别在于,代码织入技术不需要创建代理类。
如果用图形表示的话,可以更简单更直观的感受到两者的区别。代码织入的方式,不会创建代理类,而是直接在目标方法的方法体的前后织入一段内联的代码,以达到增强的效果,如下图所示:
 图片
图片
我选择代码织入技术而不是AOP,原因是可以避免创建大量的代理类增加元空间的内存占用,另外代码织入技术更底层一些,能实现的能力更强,此外内联代码会随着原方法一起执行,性能也更好。
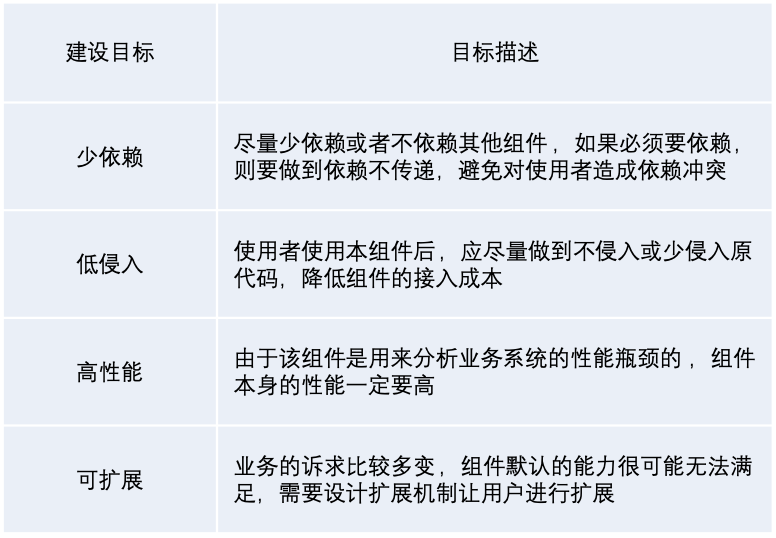
有了具体的技术选型的方案之后,我们还需要确定该方案的建设目标,以下整理了一些基本的目标:
 图片
图片
三、技术方案
代码织入的时机也有多种方式,比如Lombok是通过在编译器对代码进行织入,主要依赖的是在 Javac 编译阶段利用“Annotation Processor”,对自定义的注解进行预处理后生成代码然后织入;其他的像CGLIB、ByteBuddy等框架是在运行时对代码进行织入的,主要依赖的是Java Agent技术,通过JVMTI的接口实现在运行时对字节码进行增强。
本次的技术方案,用一句话可以概括为:通过字节码增强,对指定的目标方法进行拦截,并在方法前后织入一段内联代码,在内联代码中计算目标方法的耗时,最后将统计到的方法信息进行分析。
项目结构
整个方案的代码实现非常简单,用一个图描述如下:
 图片
图片
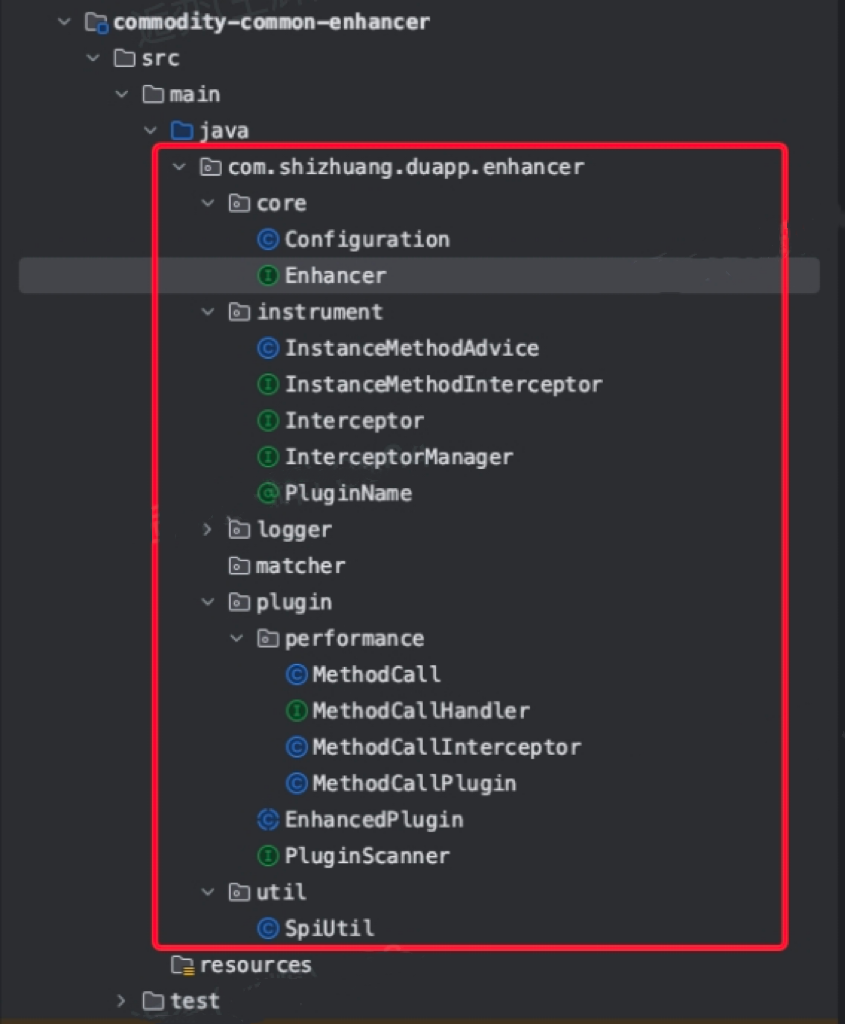
项目的代码结构如下所示,核心代码非常少:
 图片
图片
核心组件
其中Enhancer是增强器的入口类,在增强器启动时会扫描所有的插件:EnhancedPlugin。
EnhancedPlugin表示的是一个执行代码增强的插件,其中定义了几个抽象方法,需要由用户自己实现:
/**
 * 执行代码增强的插件
 *
 * @auther houyi.wh
 * @date 2023-08-15 20:12:01
 * @since 0.0.1
 */
public abstract class EnhancedPlugin {


    /**
     * 匹配特定的类型
     *
     * @return 类型匹配器
     * @since 0.0.1
     */
    public abstract ElementMatcher.Junction<TypeDescription> typeMatcher();


    /**
     * 匹配特定的方法
     *
     * @return 方法匹配器
     * @since 0.0.1
     */
    public abstract ElementMatcher.Junction<MethodDescription> methodMatcher();


    /**
     * 负责执行增强逻辑的拦截器
     *
     * @return 拦截器
     * @since 0.0.1
     */
    public abstract Class<? extends Interceptor> interceptorClass();


}
此外EnhancedPlugin中还需要指定一个Interceptor,一个Interceptor是对目标方法执行代码增强的拦截器,主要的拦截逻辑定义在Interceptor中。
增强原理
扫描到EnhancedPlugin之后,会构建ByteBuddy的AgentBuilder,主要的构建过程为:
1、找到所有匹配的类型
2、找到所有匹配的方法
3、传入执行代码增强的Transformer
最后通过AgentBuilder.install方法将增强的代码Transformer,传递给Instrumentation实例,实现运行时的字节码retransformation。
这里的Transformer是由Advice负责实现的,而在Advice中实现了增强逻辑的dispatch,即根据不同的EnhancedPlugin可以将增强逻辑交给指定的Interceptor拦截器去实现,主要在拦截器中抽象了两个方法。一个是beforeMethod,负责在目标方法调用之前进行拦截:
/**
 * 在方法执行前进行切面
 *
 * @param pluginName 绑定在该目标方法上的插件名称
 * @param target     目标方法所属的对象,需要注意的是@Advice.This不能标识构造方法
 * @param method     目标方法
 * @param arguments  方法参数
 * @return 方法执行返回的临时数据
 * @since 0.0.1
 */
@Advice.OnMethodEnter
public static <T> T beforeMethod(
        // 接收动态传递过来的参数
        @PluginName String pluginName,
        // optinotallow=true,表示this注解可以接收:构造方法或静态方法(会将this赋值为null),而不报错
        @Advice.This(optional = true) Object target,
        // 目标方法
        @Advice.Origin Method method,
        // nullIfEmpty=true,表示可以接收空参数
        @Advice.AllArguments(nullIfEmpty = true) Object[] arguments
) {
    String[] parameterNames = new String[]{};
    T transmitResult = null;
    try {
        InstanceMethodInterceptor<T> interceptor = getInterceptor(pluginName);
        // 执行beforeMethod的拦截逻辑
        transmitResult = interceptor.beforeMethod(target, method, parameterNames, arguments);
    } catch (Throwable e) {
        InternalLogger.AutoDetect.INSTANCE.error("InstanceMethodAdvice beforeMethod occurred error", e);
    }
    return transmitResult;
}
一个是afterMethod,负责在目标方法被调用之后进行拦截:
/**
 * 在方法执行后进行切面
 *
 * @param pluginName     绑定在该目标方法上的插件名称
 * @param transmitResult beforeMethod所传递过来的临时数据
 * @param originResult   目标方法原始返回结果,如果目标方法是void型,则originResult为null
 * @param throwable      目标方法抛出的异常
 */
@Advice.OnMethodExit(onThrowable = Throwable.class)
public static <T> void afterMethod(
        // 接收动态传递过来的参数
        @PluginName String pluginName,
        // beforeMethod传递过来的临时数据
        @Advice.Enter T transmitResult,
        // typing=DYNAMIC,表示可以接收void类型的方法
        @Advice.Return(typing = Assigner.Typing.DYNAMIC) Object originResult,
        // 目标方法自己抛出的运行时异常,可以在方法中进行捕获,看具体的需求
        @Advice.Thrown Throwable throwable
) {
    try {
        InstanceMethodInterceptor<T> interceptor = getInterceptor(pluginName);
        // 执行afterMethod的拦截逻辑
        interceptor.afterMethod(transmitResult, originResult);
    } catch (Throwable e) {
        InternalLogger.AutoDetect.INSTANCE.error("InstanceMethodAdvice afterMethod occurred error", e);
    }
}
Advice的特点是:不会更改目标类的字节码结构,比如:不会增加字段、方法,不会修改方法的参数等等。
四、方案实现
该增强组件是一个轻量化的通用的增强包,几乎可以实现你能想到的任意功能,本次我们的需求是要采集特定目标方法的方法耗时,以便分析出方法的性能瓶颈。
定义插件
基于该组件我们需要实现两个类:一个是插件,一个是拦截器。
插件中主要实现的是两个方法:匹配特定的类型,匹配特定的方法。
这里的类型匹配或方法匹配,是采用的ByteBuddy的ElementMatcher,它是一个非常灵活的匹配器,在ElementMatchers中有很多内置的匹配实现,只要你能想到的匹配方式,通过它几乎都能实现匹配。
匹配特定的类型目前我定义了两种匹配方式,一种是根据类名(或者包名),一种是根据方法上的注解,具体的代码实现如下:
public class MethodCallPlugin extends EnhancedPlugin {


    private final List<String> anyClassNameStartWith;
    private final List<String> anyAnnotationNameOnMethod;


    /**
     * 方法调用拦截插件
     *
     * @param anyClassNameStartWith     任何包路径,或者全限定类名
     * @param anyAnnotationNameOnMethod 任何方法上的注解的全限定名称
     */
    public MethodCallPlugin(List<String> anyClassNameStartWith, List<String> anyAnnotationNameOnMethod) {
        boolean nameStartWithInvalid = anyClassNameStartWith == null || anyClassNameStartWith.isEmpty();
        boolean annotationNameOnMethodInvalid = anyAnnotationNameOnMethod == null || anyAnnotationNameOnMethod.isEmpty();
        if (nameStartWithInvalid && annotationNameOnMethodInvalid) {
            throw new IllegalArgumentException("anyClassNameStartWith and anyAnnotationNameOnMethod can't be both empty");
        }
        this.anyClassNameStartWith = anyClassNameStartWith;
        this.anyAnnotationNameOnMethod = anyAnnotationNameOnMethod;
    }


    @Override
    public ElementMatcher.Junction<TypeDescription> typeMatcher() {
        ElementMatcher.Junction<TypeDescription> anyTypes = none();
        if (anyClassNameStartWith != null && !anyClassNameStartWith.isEmpty()) {
            for (String classNameStartWith : anyClassNameStartWith) {
                // 根据类的前缀或者全限定类名进行匹配
                anyTypes = anyTypes.or(nameStartsWith(classNameStartWith));
            }
        }
        if (anyAnnotationNameOnMethod != null && !anyAnnotationNameOnMethod.isEmpty()) {
            ElementMatcher.Junction<MethodDescription> methodsWithAnnotation = none();
            for (String annotationNameOnMethod : anyAnnotationNameOnMethod) {
                // 根据方法上是否有特定注解进行匹配
                methodsWithAnnotation = methodsWithAnnotation.or(isAnnotatedWith(named(annotationNameOnMethod)));
            }
            anyTypes = anyTypes.or(declaresMethod(methodsWithAnnotation));
        }
        return anyTypes;
    }
}匹配特定方法的逻辑就比较简单了,可以匹配除了构造方法之外的任意方法:public class MethodCallPlugin extends EnhancedPlugin {
@Override
public ElementMatcher.Junction<MethodDescription> methodMatcher() {
return any().and(not(isConstructor()));
}
}实现拦截器
类型匹配和方法都匹配到之后,就需要实现方法增强的拦截器了:
我们需要获取方法调用的信息,包括方法名、调用堆栈及深度、调用的耗时,所以我们需要定义三个ThreadLocal用来保存方法调用的堆栈:
/**
 * 方法调用信息的拦截器
 * 在方法调用之前进行拦截,将方法调用信息封装后,放入堆栈中,
 * 在方法调用之后,从堆栈中将所有方法取出来,按照进入堆栈的顺序进行排序,
 * 得到方法调用信息的列表,最后将该列表交给{@link MethodCallHandler}进行处理
 * 如果用户指定了自己的{@link MethodCallHandler}则优先使用用户自定义的Handler进行处理
 * 否则使用SDK内置的{@link MethodCallHandler.PrintLogHandler}进行处理,即将方法调用信息打印到日志中
 *
 * @auther houyi.wh
 * @date 2023-08-16 10:16:48
 * @since 0.0.1
 */
public class MethodCallInterceptor implements InstanceMethodInterceptor<MethodCall> {


    /**
     * 当前方法进入方法栈的顺序
     * 用以最后一个方法出栈后,进行方法调用栈的排序
     *
     * @since 0.0.1
     */
    private static final ThreadLocal<AtomicInteger> methodEnterStackOrderThreadLocal = new TransmittableThreadLocal<AtomicInteger>() {
        @Override
        protected AtomicInteger initialValue() {
            return new AtomicInteger(0);
        }
    };


    /**
     * 当前方法调用栈
     *
     * @since 0.0.1
     */
    private static final ThreadLocal<Deque<MethodCall>> methodStackThreadLocal = new ThreadLocal<Deque<MethodCall>>() {
        @Override
        protected Deque<MethodCall> initialValue() {
            return new ArrayDeque<>();
        }
    };


    /**
     * 当前方法栈中所有方法调用的信息
     *
     * @since 0.0.1
     */
    private static final ThreadLocal<List<MethodCall>> methodCallThreadLocal = new ThreadLocal<List<MethodCall>>() {
        @Override
        protected ArrayList<MethodCall> initialValue() {
            return new ArrayList<>();
        }
    };

}
这里主要使用了三个ThreadLocal来保存方法调用过程中的数据:方法的完整堆栈、方法进入堆栈的顺序、方法的调用信息列表,为什么使用ThreadLocal而不是TransmittableThreadLocal,这里先按下不表,后面我们通过具体的例子来分析下原因。
紧接着,我们需要定义方法进入前的拦截逻辑,将方法调用信息压入堆栈中:
@Override
public MethodCall beforeMethod(Object target, Method method, String[] parameters, Object[] arguments) {
    // 排除掉各种非法拦截到的方法
    if (target == null) {
        return null;
    }
    String methodName = target.getClass().getName() + ":" + method.getName() + "()";
    Deque<MethodCall> methodCallStack = methodStackThreadLocal.get();
    // 当前方法进入整个方法调用栈的顺序
    int methodEnterOrder = methodEnterStackOrderThreadLocal.get().addAndGet(1);
    // 当前方法在整个方法栈中的深度
    int methodInStackDepth = methodCallStack.size() + 1;


    MethodCall methodCall = MethodCall.Default.of()
            .setMethodName(methodName)
            .setCallTime(System.nanoTime())
            .setThreadName(Thread.currentThread().getName())
            .setCurrentMethodEnterStackOrder(methodEnterOrder)
            .setCurrentMethodInStackDepth(methodInStackDepth);
    // 将当前方法的调用信息压入调用栈
    methodCallStack.push(methodCall);
    return methodCall;
}
最后在方法退出时,我们需要从ThreadLocal中取出方法调用信息,并做相关的处理:
@Override
public void afterMethod(MethodCall transmitResult, Object originResult) {
    if (target == null) {
        return null;
    }
    Deque<MethodCall> methodCallStack = methodStackThreadLocal.get();
    MethodCall lastMethodCall = methodCallStack.pop();
    // 毫秒单位的耗时
    double costTimeInMills = (double) (System.nanoTime() - lastMethodCall.getCallTime()) / 1000000.0;
    lastMethodCall.setCostInMills(costTimeInMills);


    List<MethodCall> methodCallList = methodCallThreadLocal.get();
    methodCallList.add(lastMethodCall);
    // 如果堆栈空了,则说明最顶层的方法已经退出了
    if (methodCallStack.isEmpty()) {
        // 对方法调用列表进行排序
        sortMethodCallList(methodCallList);
        // 获取MethodCallHandler对MethodCall的信息进行处理
        MethodCallHandler methodCallHandler = Configuration.Global.getGlobal().getMethodCallHandler();
        methodCallHandler.handle(methodCallList);


        // 方法退出时,将ThreadLocal中保存的内容清空掉,而不是将ThreadLocal remove,
        // 因为如果每次方法退出时,都将ThreadLocal都清空,当下一个方法再进入时又需要初始化新的ThreadLocal,性能会有损耗
        methodCallStack.clear();
        methodCallList.clear();
        // 将临时保存的方法调用顺序清空
        methodEnterStackOrderThreadLocal.get().set(0);
    }
}


private void sortMethodCallList(List<MethodCall> methodCallList) {
    methodCallList.sort(new Comparator<MethodCall>() {
        @Override
        public int compare(MethodCall o1, MethodCall o2) {
            // 根据每个方法进入方法栈的顺序进行排序
            return Integer.compare(o1.getCurrentMethodEnterStackOrder(), o2.getCurrentMethodEnterStackOrder());
        }
    });
}
需要注意的是,这里我定义了一个MethodCallHandler接口,该接口可以实现对采集到的方法调用信息的处理,用户可以自定义自己的MethodCallHandler。组件中也提供了默认的实现,即将采集到的方法调用信息打印到日志中:
五、方案测试
普通方法
我们定义一个方法调用的测试样例类,其中定义了很多普通的方法,如下所示:
public class MethodCallExample {
    public void costTime1() {
        System.out.println("costTime1");
        randomSleep();
        innerCostTime1();
    }
    public void costTime2() {
        System.out.println("costTime2");
        randomSleep();
        innerCostTime2();
    }
    public void costTime3() {
        System.out.println("costTime3");
        randomSleep();
    }
    public void innerCostTime1() {
        System.out.println("innerCostTime1");
        randomSleep();
    }
    public void innerCostTime2() {
        System.out.println("innerCostTime2");
        randomSleep();
    }
    private void randomSleep() {
        Random random = new Random();
        try {
            Thread.sleep(random.nextInt(100));
        } catch (InterruptedException e) {
            throw new RuntimeException(e);
        }
    }
}
启动Enhancer,并调用测试样例中的方法:
public static void main(String[] args) {
    MethodCallPlugin plugin = new MethodCallPlugin(Collections.singletonList("com.shizhuang.duapp.enhancer.example"), null);
    Enhancer enhancer = Enhancer.Default.INSTANCE;
    enhancer.enhance(Configuration.of().setPlugins(Collections.singletonList(plugin)));


    MethodCallExample example = new MethodCallExample();
    example.costTime1();
    example.costTime2();
    example.costTime3();

    try {
        // 这里主要是防止主线程提前结束
        Thread.sleep(5000);
    } catch (InterruptedException e) {
        throw new RuntimeException(e);
    }
}
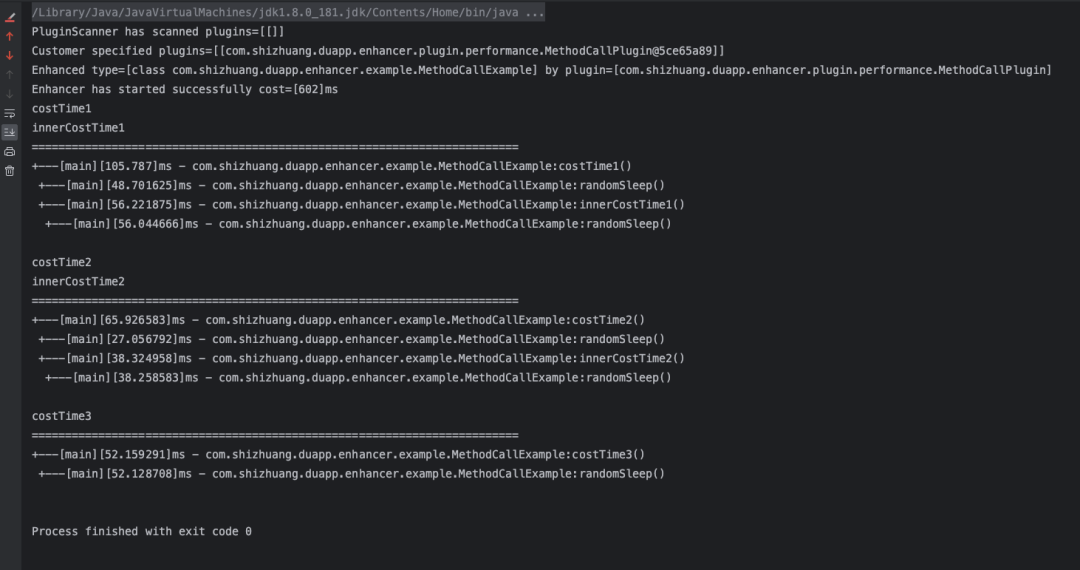
执行后,可以得到如下的结果:
 图片
图片
从结果上看已经可以满足绝大多数的情况了,我们拿到了每个方法的调用耗时,以及整个方法的调用堆栈信息。
但是这里的方法都是同步方法,如果有异步方法,会怎么样呢?
异步方法
我们将其中一个方法改成异步线程执行:
private void randomSleep() {
    new Thread(() -> {
        Random random = new Random();
        try {
            Thread.sleep(random.nextInt(100));
        } catch (InterruptedException e) {
            throw new RuntimeException(e);
        }
    }).start();
}
再次执行后,得到如下的结果: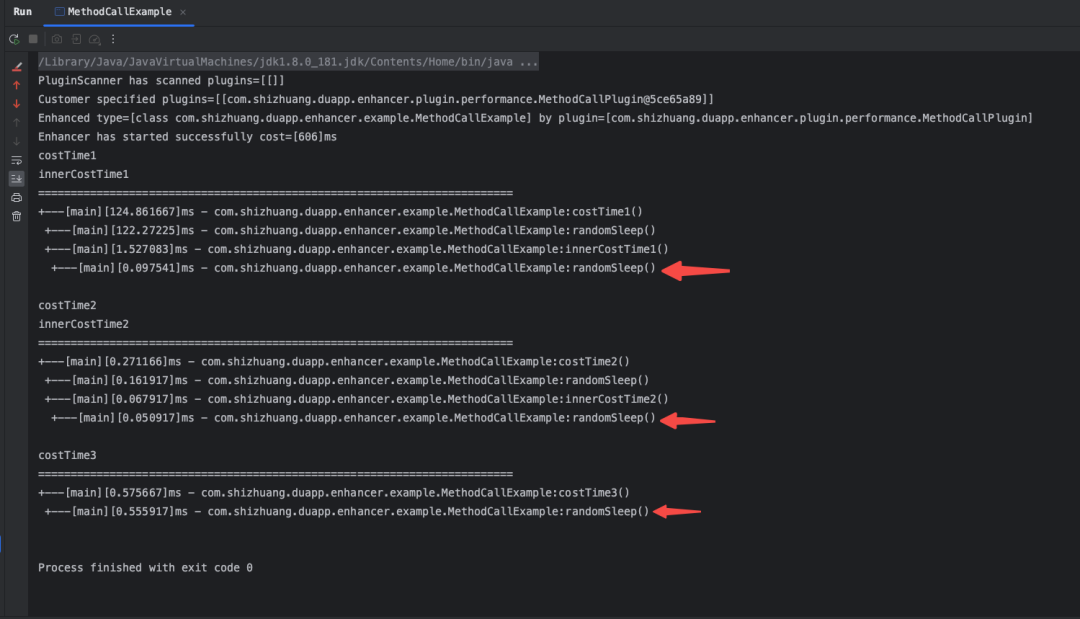 图片
图片
从结果中可以看到,因为randomSleep方法中通过Thread变成了异步执行,而增强器拦截到的randomSleep实际是Thread.start()的方法耗时,Thread内部的Runnable的方法耗时没有采集到。
Lambda表达式
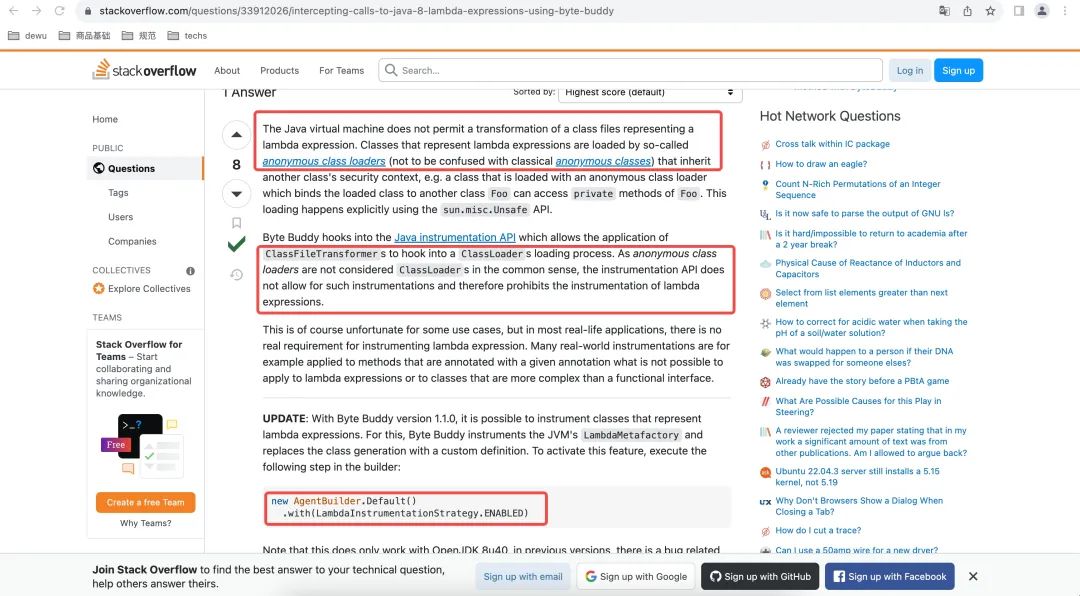
为什么Runnable的方法耗时没有采集到呢?原因是Runnable内部是一个lambda表达式,生成的是一个匿名方法,而匿名方法的默认是无法被拦截到的。
具体的原因可以参考这篇文章:
https://stackoverflow.com/questions/33912026/intercepting-calls-to-java-8-lambda-expressions-using-byte-buddy
ByteBuddy的作者解释了lambda的特殊性,包括为什么无法对lambda做instrument,以及ByteBuddy为了实现对lambda表达式的拦截做了一些支持。
 图片
图片
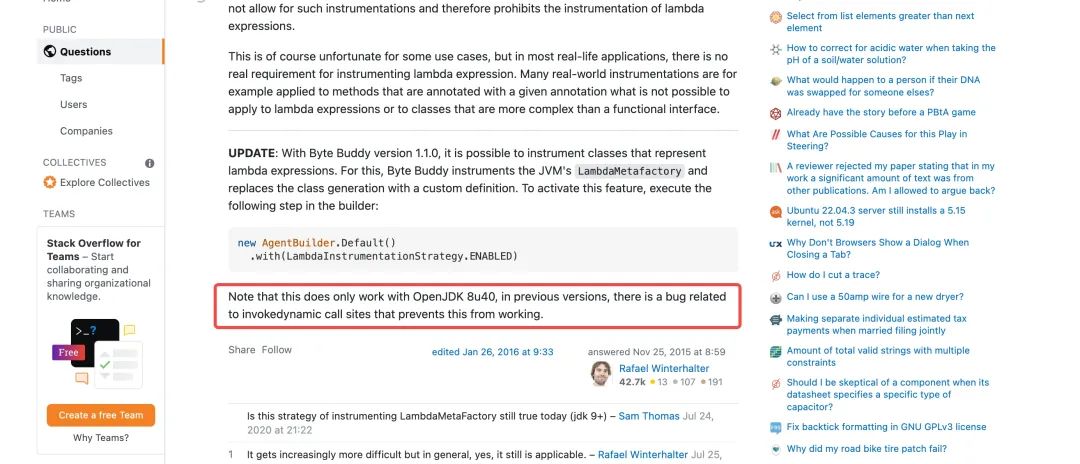
不过只在OpenJDK8u40版本以上才能生效,因为之前版本的JDK在invokedynamic指令上有bug。
 图片
图片
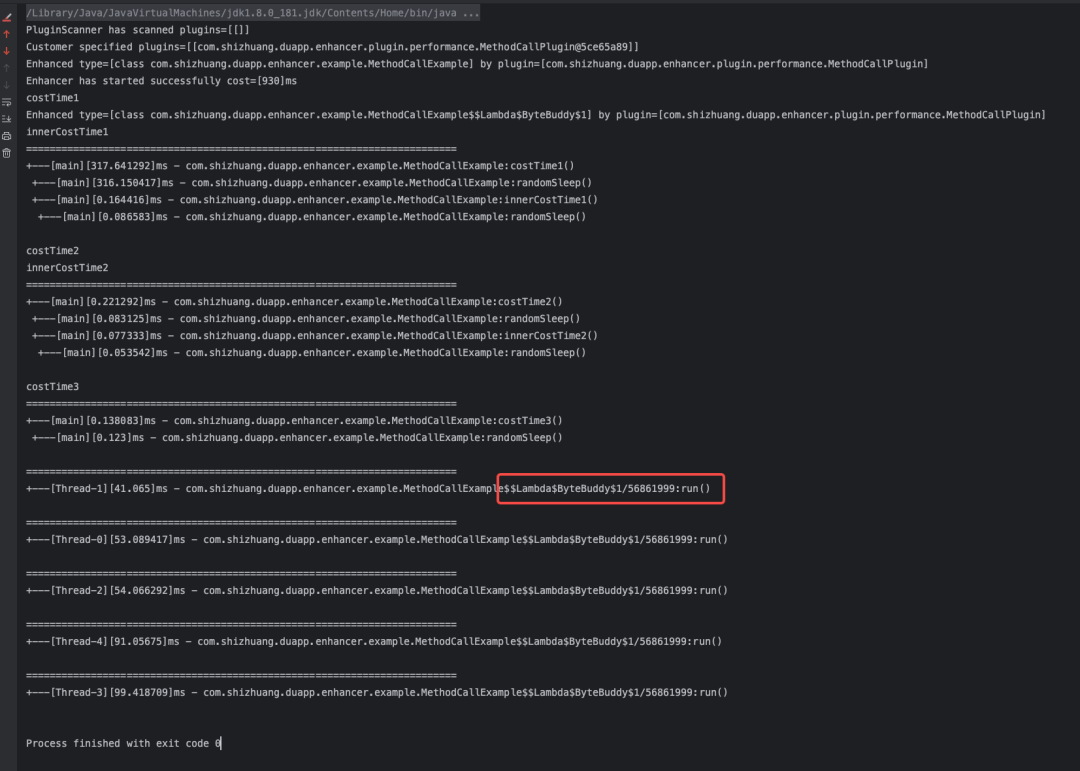
我们打开这个Lambda的策略开关:
 图片
图片
可以拦截到lambda表达式生成的匿名方法了:
 图片
图片
如果我们不打开Lambda的策略开关,也可以将匿名方法实现为具名方法:
private void randomSleep() {
    new Thread(() -> {
        doSleep();
    }).start();
}


private void doSleep() {
    Random random = new Random();
    try {
        Thread.sleep(random.nextInt(100));
    } catch (InterruptedException e) {
        throw new RuntimeException(e);
    }
}
甚至可以拦截到lambda方法中的具名方法:
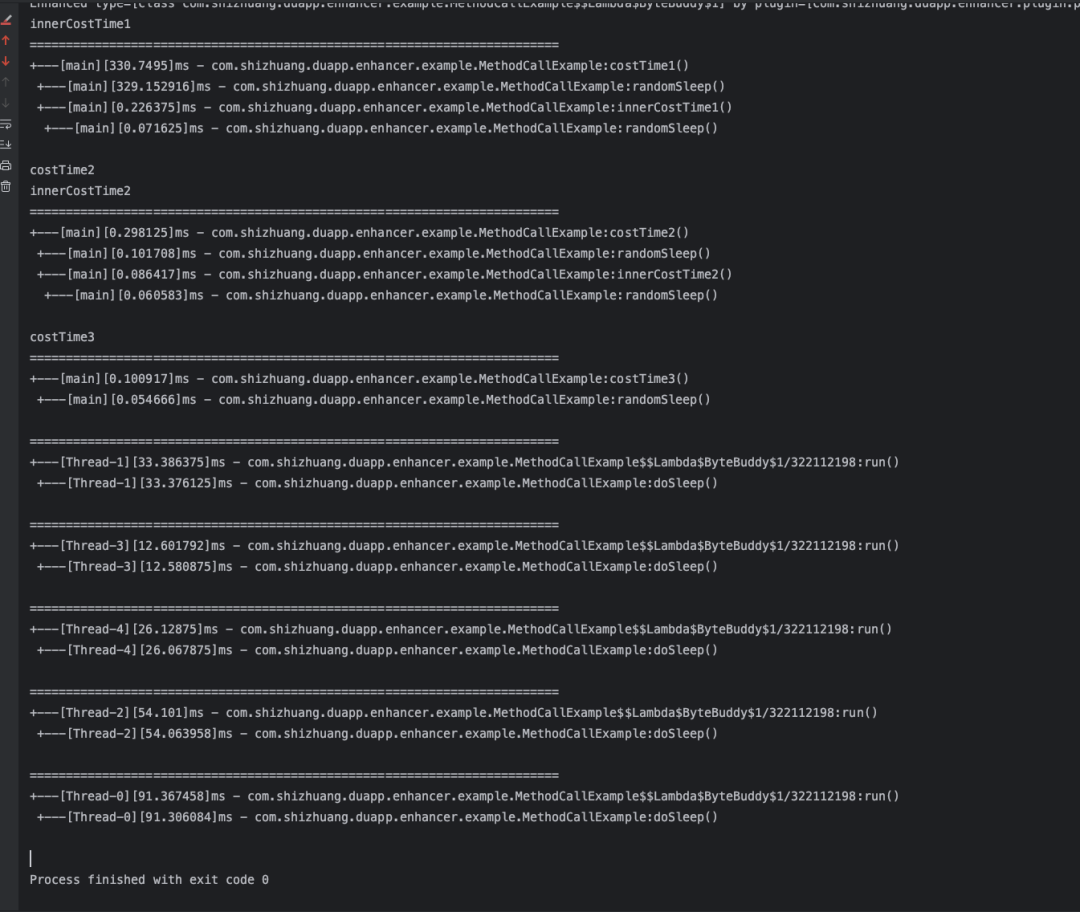 图片
图片
TransmittableThreadLocal
上面我提了一个问题,为什么拦截器中保存方法调用信息的ThreadLocal不用TransmittableThreadLocal,而是用普通的ThreadLocal,这里我们把拦截器中的代码改一下:
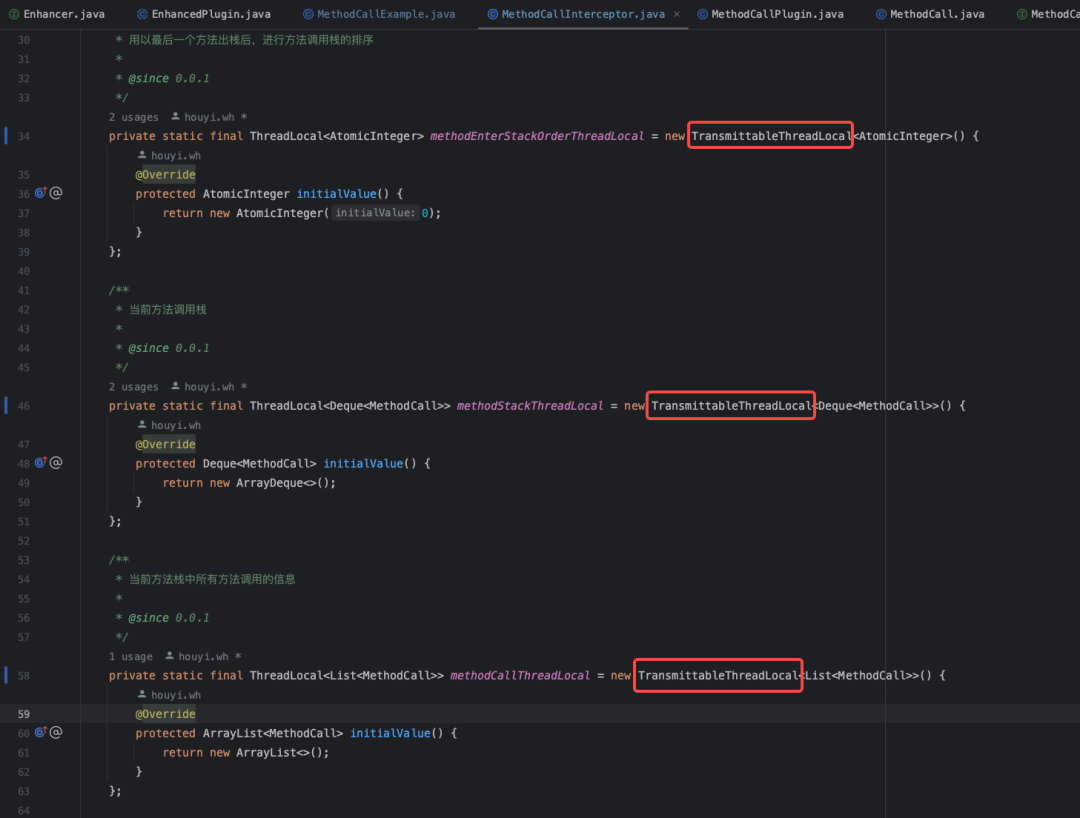 图片
图片
执行后发现效果如下:
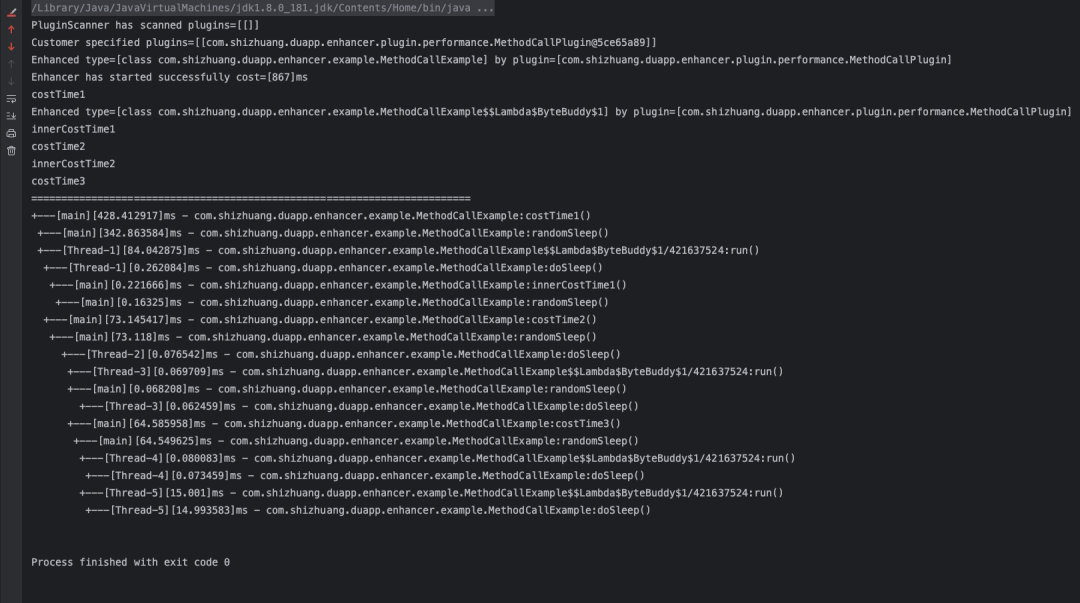 图片
图片
可以看到异步方法和主方法合并到一起了,原因是我们保存方法调用堆栈信息使用了TransmittableThreadLocal,而TTL是会在主子线程中共享变量的,当主线程中的costTime1方法还未退出堆栈时,子线程中的doSleep方法已经进入堆栈了,所以导致堆栈信息一直未清空,而我们是在每个方法退出时判断当前线程中的堆栈是否为空,如果为空则说明方法调用的最顶层方法已经退出了,但是TTL导致堆栈不为空,只有当所有方法执行完毕后堆栈才为空,所以出现了这样的情况。所以这里保存方法调用堆栈的ThreadLocal需要用原生的ThreadLocal。
串联主子线程
那么怎么实现一个方法的主方法在不同的主子线程中串起来呢?
通过常规的共享堆栈的方案无法实现主子线程中的方法的串联,那么可以通过TraceId来实现方法的串联,链路追踪的技术方案中提供了TraceId和rpcId两字字段,分别用来表示一个请求的唯一链路以及每个方法在该链路中的顺序(通过rpcId来表示)。这里我们只需要利用链路追踪里面的TraceId来串联同一个方法即可。具体的原理可以描述如下:
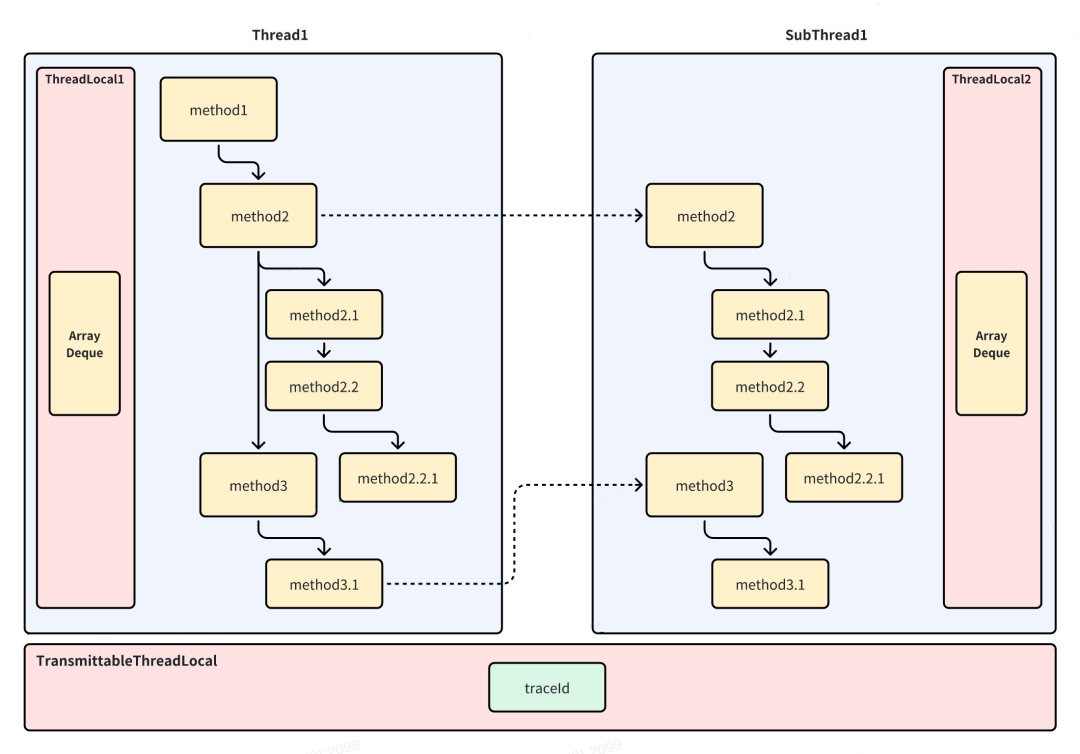 图片
图片
由于不同的链路追踪的实现方式不同,我这里定义了一个Tracer接口,由用户指定具体的Tracer实现:
/**
 * 链路追踪器
 *
 * @auther houyi.wh
 * @date 2023-08-22 14:59:50
 * @since 0.0.1
 */
public interface Tracer {


    /**
     * 获取链路id
     *
     * @return 链路id
     * @since 0.0.1
     */
    String getTraceId();


    /**
     * 一个空的实现类
     * @since 0.0.1
     */
    enum Empty implements Tracer {
        INSTANCE;


        @Override
        public String getTraceId() {
            return "";
        }
    }
}
然后在Configuration中设置该Tracer:
// 启动代码增强
Enhancer enhancer = Enhancer.Default.INSTANCE;
Configuration config = Configuration.of()
      // 指定自定义的Tracer
      .setTracer(yourTracer)
      .xxx() // 其他配置项
      ;
enhancer.enhance(config);
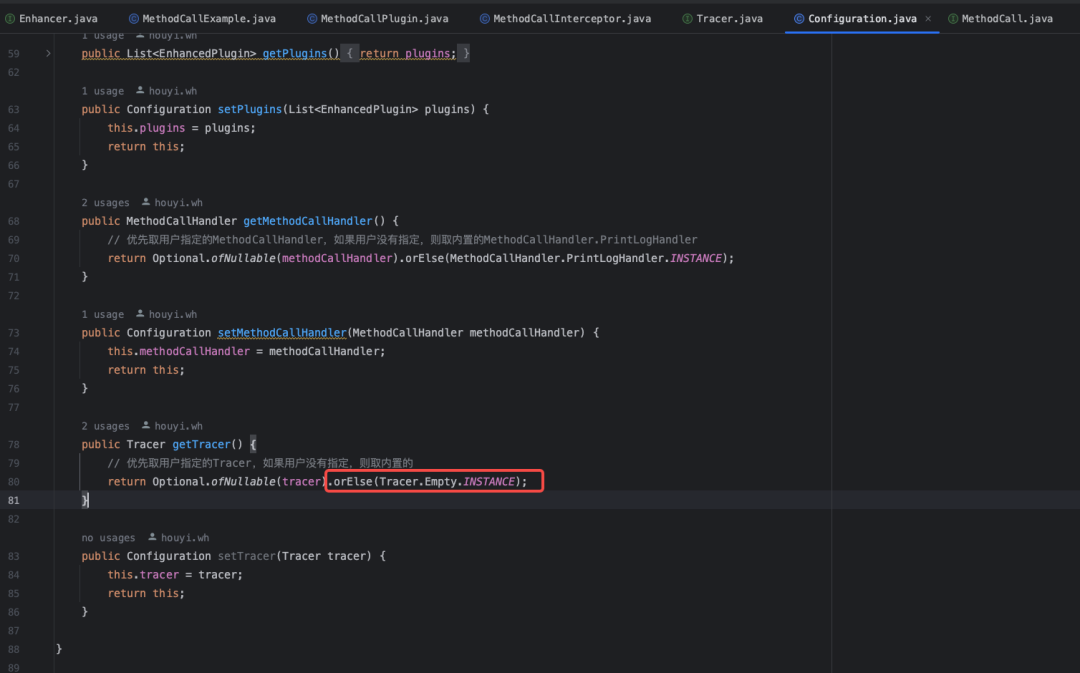
需要注意的是,如果不指定Tracer,则会默认使用内置的空实现:
 图片
图片
六、性能测试
该组件的主要是通过拦截器进行代码增强,因为我们需要对拦截器的beforeMethod和afterMethod进行性能测试,通常常规的性能测试,是通过JMH基准测试工具来做的。
我们定义一个基准测试的类:
/*
 * 因为 JVM 的 JIT 机制的存在,如果某个函数被调用多次之后,JVM 会尝试将其编译成为机器码从而提高执行速度。
 * 所以为了让 benchmark 的结果更加接近真实情况就需要进行预热
 * 其中的参数 iterations 是预热轮数
 */
@Warmup(iterations = 1)
/*
 * 基准测试的类型:
 * Throughput:吞吐量,指1s内可以执行多少次操作
 * AverageTime:调用时间,指1次调用所耗费的时间
 */
@BenchmarkMode({Mode.AverageTime, Mode.Throughput})
/*
 * 测试的一些度量
 * iterations:进行测试的轮次
 * time:每轮进行的时长
 * timeUnit:时长单位
 */
@Measurement(iterations = 2, time = 1)
/*
 * 基准测试结果的时间类型。一般选择秒、毫秒、微秒。
 */
@OutputTimeUnit(TimeUnit.MILLISECONDS)
/*
 * fork出几个进场进行测试。
 * 如果 fork 数是 2 的话,则 JMH 会 fork 出两个进程来进行测试。
 */
@Fork(value = 2)
/*
 * 每个进程中测试线程的个数。
 */
@Threads(8)
/*
 * State 用于声明某个类是一个“状态”,然后接受一个 Scope 参数用来表示该状态的共享范围。
 * 因为很多 benchmark 会需要一些表示状态的类,JMH 允许你把这些类以依赖注入的方式注入到 benchmark 函数里。
 * Scope 主要分为三种:
 * Thread - 该状态为每个线程独享。
 * Group - 该状态为同一个组里面所有线程共享。
 * Benchmark - 该状态在所有线程间共享。
 */
@State(Scope.Benchmark)
public class MethodCallInterceptorBench {


    private MethodCallInterceptor methodCallInterceptor;
    private Object target;
    private Method method;
    private String[] parameters;
    private Object[] arguments;


    @Setup
    public void prepare() {
        methodCallInterceptor = new MethodCallInterceptor();
        target = new MethodCallExample();
        try {
            method = target.getClass().getMethod("costTime1");
        } catch (NoSuchMethodException e) {
            throw new RuntimeException(e);
        }
        parameters = null;
        arguments = null;
    }


    @Benchmark
    public void testMethodCallInterceptor_beforeMethod() {
        methodCallInterceptor.beforeMethod(target, method, parameters, arguments);
    }


    public static void main(String[] args) throws RunnerException {
        Options opt = new OptionsBuilder()
                .include(MethodCallInterceptorBench.class.getSimpleName())
                .build();


        new Runner(opt).run();
    }


}
基准测试的结果如下: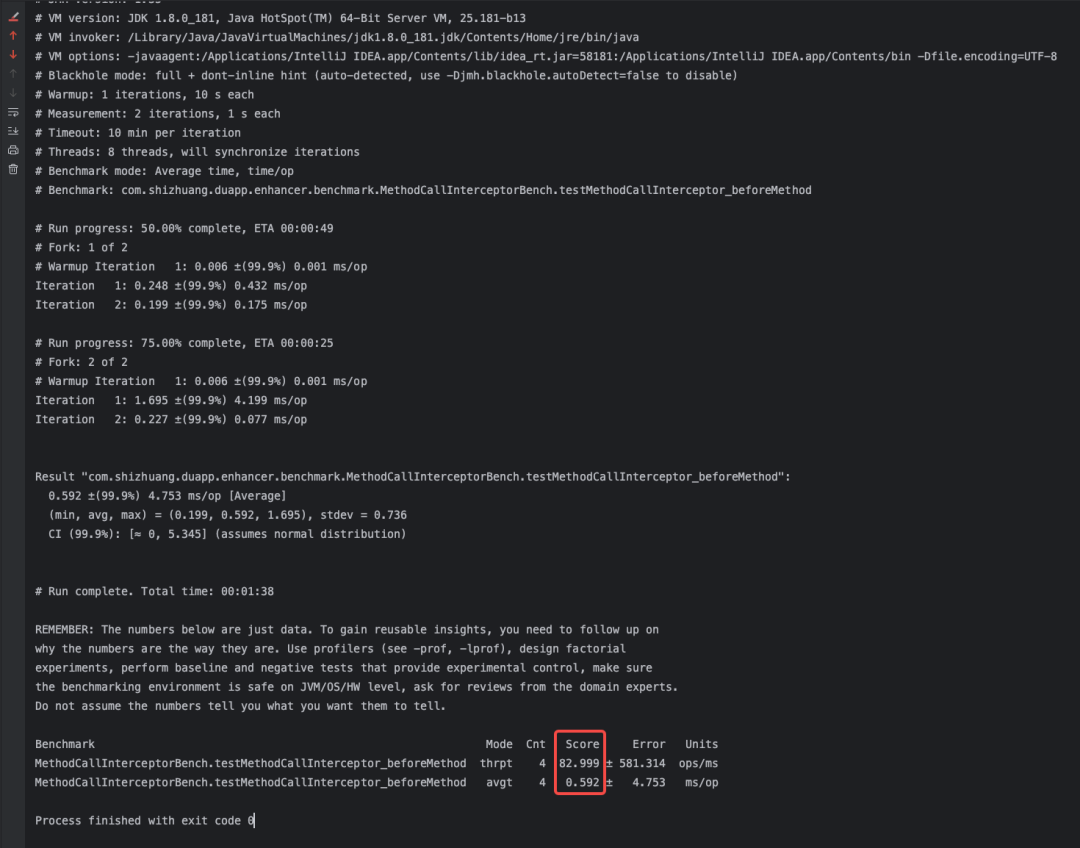 图片
图片
针对beforeMethod方法做了吞吐量和平均耗时的测试,每次调用的平均耗时为0.592ms,而吞吐量则为1ms内可以执行82.99次调用。
七、使用方式
引入该Enhancer组件的依赖:
<dependency>
    <groupId>com.shizhuang.duapp</groupId>
    <artifactId>commodity-common-enhancer</artifactId>
    <version>${commodity-common-enhancer-version}</version>
</dependency>
使用很简单,只需要在项目启动之后,调用代码增强的方法即可,对现有的业务代码几乎无侵入。
不指定配置信息,直接启动:
public class CommodityAdminApplication {
    public static void main(String[] args) {
        SpringApplication.run(CommodityAdminApplication.class, args);
        // 启动代码增强
        Enhancer enhancer = Enhancer.Default.INSTANCE;
        enhancer.enhance(null);
    }
}
指定配置信息启动:
public class CommodityAdminApplication {
    public static void main(String[] args) {
        SpringApplication.run(CommodityAdminApplication.class, args);
        // 启动代码增强
        Enhancer enhancer = Enhancer.Default.INSTANCE;
        Configuration config = Configuration.of()
              .setPlugins(Collections.singletonList(plugin))
              .xxx() // 其他配置项
              ;
        enhancer.enhance(config);
    }
}
实现方法耗时过滤
比如你只想对方法耗时大于xx毫秒的方法进行分析,你可以在定义的MethodCallHandler中引入ark配置,然后过滤出耗时大于xx毫秒的方法,如:
enum MyCustomHandler implements MethodCallHandler {
    INSTANCE;

    private double maxCostTime() {
        // 这里可以通过动态配置想要分析的方法耗时的最小值
        return 500;
    }


    @Override
    public void handle(List<MethodCall> methodCallList) {
        logger.info("=========================================================================");
        // 检查方法耗时超过xx时,才打印
        MethodCall firstMethodCall = methodCallList.stream().findFirst().orElse(null);
        if (firstMethodCall == null) {
            return;
        }
        // 方法耗时
        double costInMills = firstMethodCall.getCostInMills();
        int currentMethodEnterStackOrder = firstMethodCall.getCurrentMethodEnterStackOrder();
        // 如果整体的方法小于500毫秒,则直接放弃
        if (currentMethodEnterStackOrder == 1 && costInMills < maxCostTime()) {
            return;
        }
        // 然后在这里实现方法耗时的打印
        logger.info(getMethodCallInfo(methodCallList));
    }
}
实现整体开关控制
比如你想通过动态开关来控制对方法耗时的统计分析,可以实现MethodCallSwither接口,然后在Configuration中传入自定义的MethodCallSwitcher,如下所示:
请注意,如果用户不指定MethodCallSwitcher,SDK会使用内置的MethodCallSwitcher.NeverStop 实现,表示永远不会停止采集。
/**
 * 是否停止采集MethodCall的开关
 *
 * @auther houyi.wh
 * @date 2023-08-27 18:56:47
 * @since 0.0.1
 */
public interface MethodCallSwitcher {


    /**
     * 是否停止对方法的MethodCall的采集
     * 如果返回true,则会停止对方法MethodCall的采集
     *
     * @return true:停止采集 false:继续采集
     */
    boolean stopScratch();


    /**
     * 永远不停止采集
     */
    enum NeverStop implements MethodCallSwitcher {
        INSTANCE;


        @Override
        public boolean stopScratch() {
            // 一直进行采集
            return false;
        }
    }


}
八、扩展能力
用户如果想要实现自己的扩展能力,只需要实现EnhancedPlugin,以及Interceptor即可。
实现自定义插件
通过如下方式实现自定义插件:
public MyCustomePlugin extends EnhancedPlugin {

    @Override
    public ElementMatcher.Junction<TypeDescription> typeMatcher() {
      // 实现类型匹配
    }

    @Override
    public ElementMatcher.Junction<MethodDescription> methodMatcher() {
      // 实现方法匹配
    }

    @Override
    public Class<? extends Interceptor> interceptorClass() {
      // 指定拦截器
      return MyInterceptor.class;
    }
}
实现拦截器
通过如下方式实现自定义拦截器:// 临时传递数据的对象
public class Carrier {
}
public class MyInterceptor implements InstanceMethodInterceptor<Carrier> {
@Override
public Carrier beforeMethod(Object target, Method method, String[] parameters, Object[] arguments) {
// 实现方法调用前拦截
}
@Override
public void afterMethod(Carrier transmitResult, Object originResult) {
// 实现方法调用后拦截
}
}启用插件
最后在项目启动时,启用自定义的插件,如下所示:
public class CommodityAdminApplication {
    public static void main(String[] args) {
        SpringApplication.run(CommodityAdminApplication.class, args);
        // 启动代码增强
        Enhancer enhancer = Enhancer.Default.INSTANCE;
        Configuration config = Configuration.of()
              // 指定自定义的插件
              .setPlugins(Collections.singletonList(new MyCustomePlugin()))
              .xxx() // 其他配置项
              ;
        enhancer.enhance(config);
    }
}
九、总结与规划
本篇文章我们介绍了在项目中遇到的性能诊断的需求和场景,并提供了一种通过插桩的方式对具体方法进行分析的技术方案,介绍了方案中遇到的难点以及解决方法,以及实际使用过程中可能存在的扩展场景。
未来我们将使用Enhancer在运行时动态的获取应用系统的性能分析数据,比如通过对某些性能有问题的嫌疑代码进行增强,提取到性能分析的数据后,最后结合Grafana大盘,展示出系统的性能大盘。


