Vue 3 稳定已经有一段时间了。许多代码库正在生产中使用它,其他人最终也必须进行迁移。我有机会与它一起工作,并记录了我的错误,这可能是你想避免的。
1.使用响应式助手声明基本类型
数据声明曾经很简单,但现在有多个辅助工具可用。现在的一般规则是:
- 使用 reactive 代替 Object, Array, Map, Set
- 使用 ref 代替 String, Number, Boolean
对于原始值使用响应式会导致警告,并且该值不会被设置为响应式:
/* DOES NOT WORK AS EXPECTED */
<script setup>
import { reactive } from "vue";

const count = reactive(0);
</script>
[Vue warn]: value cannot be made reactive
事例:https://codesandbox.io/s/jolly-ishizaka-ud946f?file=/src/App.vue
矛盾的是,反过来却行得通!例如,使用 ref 声明 Array 将在内部调用 reactive 。
2.解构失去响应式值
让我们想象一下,有一个具有计数器和一个按钮以增加计数器的响应式对象。
<template>
  Counter: {{ state.count }}
  <button @click="add">Increase</button>
</template>

<script>
import { reactive } from "vue";
export default {
  setup() {
    const state = reactive({ count: 0 });

    function add() {
      state.count++;
    }

    return {
      state,
      add,
    };
  },
};
</script>
这个过程相当直接,也能如预期般工作,但你可能会想利用 JavaScript 的解构特性来进行下面的操作。
/* DOES NOT WORK AS EXPECTED */
<template>
  <div>Counter: {{ count }}</div>
  <button @click="add">Increase</button>
</template>

<script>
import { reactive } from "vue";
export default {
  setup() {
    const state = reactive({ count: 0 });

    function add() {
      state.count++;
    }

    return {
      ...state,
      add,
    };
  },
};
</script>
地址:https://codesandbox.io/s/gracious-ritchie-sfpswc?file=/src/App.vue
代码看起来一样,根据我们以前的经验,应该可以运行,但实际上,Vue 的反应性跟踪是基于属性访问的。这意味着我们不能赋值或解构一个响应性对象,因为与第一个引用的响应性连接会丢失。这是使用 reactive helper 的限制之一。
3.对".value"属性感到困惑
使用 ref 的怪癖之一可能很难适应。Ref 接受一个值并返回一个响应式对象。该值在对象内部在 .value 属性下可用。
const count = ref(0)

console.log(count) // { value: 0 }
console.log(count.value) // 0

count.value++
console.log(count.value) // 1
但是在模板中使用时,引用会被解包, .value 不需要。
<script setup>
import { ref } from 'vue'

const count = ref(0)

function increment() {
  count.value++
}
</script>

<template>
  <button @click="increment">
    {{ count }} // no .value needed
  </button>
</template>
但请注意!解包(Unwrapping)只能在顶层属性上有效。下面的代码片段将产生 [object Object]。
// DON'T DO THIS
<script setup>
import { ref } from 'vue'

const object = { foo: ref(1) }

</script>

<template>
  {{ object.foo + 1 }}  // [object Object]
</template>
正确使用 ".value" 需要时间。尽管我偶尔会忘记它,但我发现我自己最初比需要的时候用得更频繁。
4. Emitted Events
自 Vue 初始版本以来,子组件可以使用 emits 与父组件通信。只需要添加一个自定义监听器来监听事件即可。
this.$emit('my-event')<my-component @my-event="doSomething" />现在需要使用 defineEmits 宏来声明emits。
<script setup>
const emit = defineEmits(['my-event'])
emit('my-event')
</script>
记住的另一件事是,无论是 defineEmits 还是 defineProps (用于声明props),都不需要导入。当使用 script setup. 时,它们会自动可用。
<script setup>
const props = defineProps({
  foo: String
})

const emit = defineEmits(['change', 'delete'])
// setup code
</script>
5.声明额外选项
有一些 Options API 方法的属性在 script setup 中不受支持。
- name
- inheritAttrs
- 插件或库需要的自定义选项
解决方案是在同一组件中定义两个不同的脚本,如脚本设置RFC中所定义的那样:
<script>
  export default {
    name: 'CustomName',
    inheritAttrs: false,
    customOptions: {}
  }
</script>

<script setup>
  // script setup logic
</script>
6.使用 Reactivity Transform
响应性转换是 Vue 3 的一项实验性但有争议的特性,其目标是简化声明组件的方式。这个想法是利用编译时转换来自动解包 ref 并使 .value 变得过时。但现在已经被取消,并将在 Vue 3.3 中被移除。它仍然会以一个包的形式存在,但由于它不是 Vue 核心的一部分,所以最好不要在它上面投入时间。
7. 定义异步组件
异步组件以前是通过将它们包含在一个函数中来声明的。
const asyncModal = () => import('./Modal.vue')自 Vue 3 开始,异步组件需要使用 defineAsyncComponent 辅助函数进行显式定义:
import { defineAsyncComponent } from 'vue'

const asyncModal = defineAsyncComponent(() => import('./Modal.vue'))
8. 在模板中使用不必要的包装器
在Vue 2中,组件模板需要一个单一的根元素,这有时会引入不必要的包装器:
<!-- Layout.vue -->
<template>
  <div>
    <header>...</header>
    <main>...</main>
    <footer>...</footer>
  </div>
</template>
这不再是问题,因为现在支持多个根元素。🥳
<!-- Layout.vue -->
<template>
  <header>...</header>
  <main v-bind="$attrs">...</main>
  <footer>...</footer>
</template>
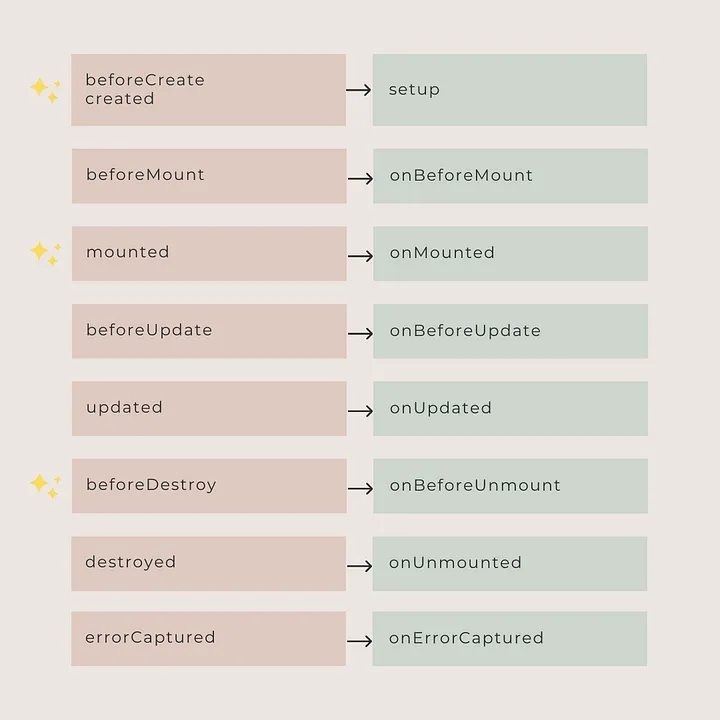
9. 使用错误的生命周期事件。
所有组件生命周期事件都被重命名,要么通过添加 on 前缀,要么完全更改名称。可以在以下图形中检查所有更改。

10. Skipping the Documentation
最后,官方文档已经进行了重大改版,以反映新的 API,并包含许多有价值的注解、指南和最佳实践。即使你是一名经验丰富的 Vue 2 工程师,通过阅读这个文档,你肯定能学到一些新的东西。
每个框架都有一个学习曲线,Vue 3的曲线无疑比Vue 2更陡峭。我仍然不确定版本之间的迁移工作是否值得,但组合API更加清晰,一旦掌握了它,就会感觉很自然。


