
想了解更多关于开源的内容,请访问:
51CTO 开源基础软件社区
https://ost.51cto.com
前言
本文将介绍如何使用cpp编写用于小型系统的app。
一、ability相关介绍
Ability是应用所具备能力的抽象,也是应用程序的重要组成部分。Ability是系统调度应用的最小单元,是能够完成一个独立功能的组件。一个应用可以包含一个或多个Ability。其中ability又分为Page类型的和Service类型的,前者是为用户提供人机交互能力的,后者是提供后台任务机制的,简单来讲就是Page带界面,Service不带界面。这里将重点介绍Page类型的ability。
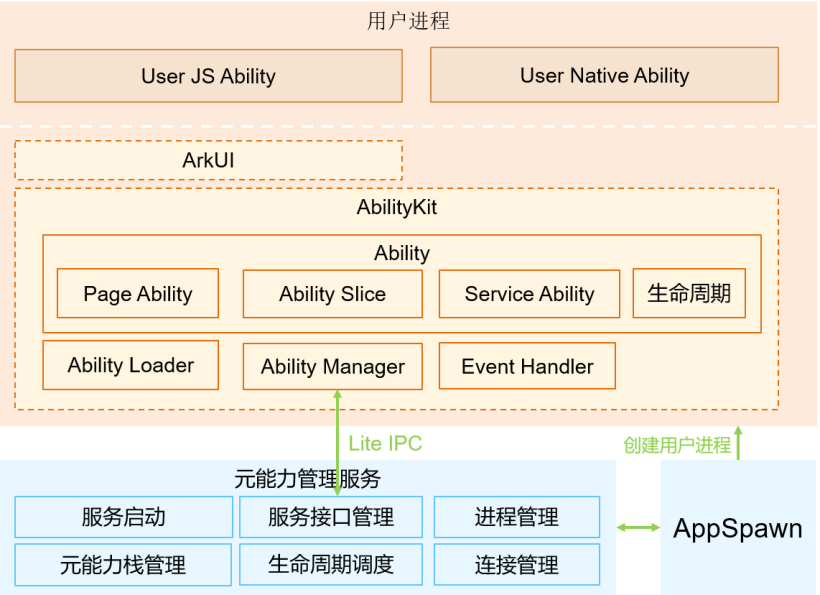
使用到的子系统有ability子系统、包管理子系统和图形ui子系统。ability子系统是管理OpenHarmony应用运行状态的开发框架;包管理子系统是OpenHarmony为开发者提供的安装包管理框架;图形ui子系统提供基础UI组件和容器类组件。
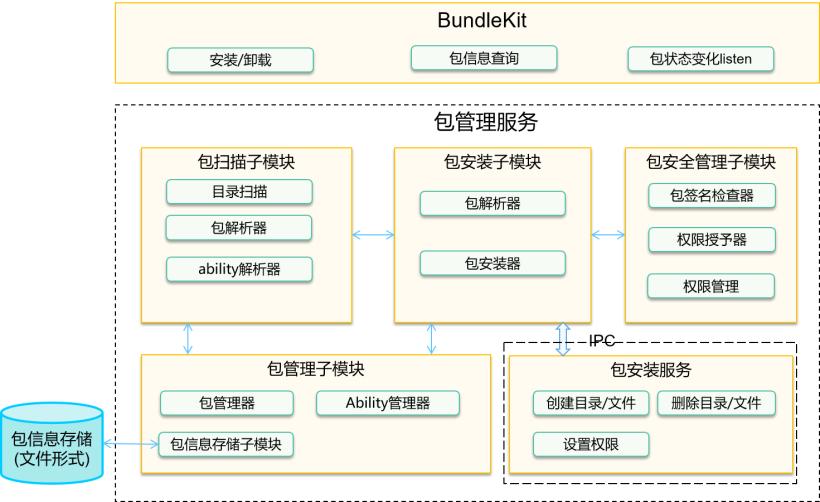
二、简单实现1、ability和abilityslice
1、ability和abilityslice
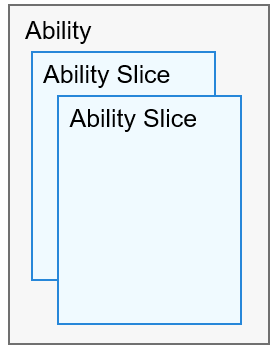
abilityslice是单个页面及其控制逻辑的总和,是Page类型Ability特有的组件,一个Page类型的Ability可以包含多个AbilitySlice,此时,这些页面提供的业务能力应当是高度相关的。
2、生命周期
整体流程下来大致有OnStart()、OnAvtive()、OnInactive()、OnBackground()和OnStop()五阶段。abilityslice生命周期与ability相似,但是仍要区分。

3、hello world
./helloworld/
├── config.json                         //配置文件
├── resource                            //资源
└── src                                 //主要文件
    ├── include
    │   ├── main_ability.h
    │   └── main_ability_slice.h
    └── main
        ├── main_ability.cpp
        └── main_ability_slice.cpp
首先定义并注册ability。
// main_ability.h
#ifndef HELLO_MAIN_ABILITY_H
#define HELLO_MAIN_ABILITY_H

#include "ability_loader.h"

namespace OHOS {
class MainAbility : public Ability {
protected:
    void OnStart(const Want &want) override; //Want结构体,ability的相关信息
    /*
     * 由于在这里我们只要简单的展示helloworld标签,其它函数不需要重载。
     */
    // void OnInactive() override;
    // void OnActive(const Want &want) override;
    // void OnBackground() override;
    // void OnStop() override;
};
}

#endif
//main_ability.cpp
#include "main_ability.h"

namespace OHOS {
REGISTER_AA(MainAbility) //使用REGISTER_AA注册ability

void MainAbility::OnStart(const Want &want)
{
    printf("This is MainAbility OnStart status!\r\n");
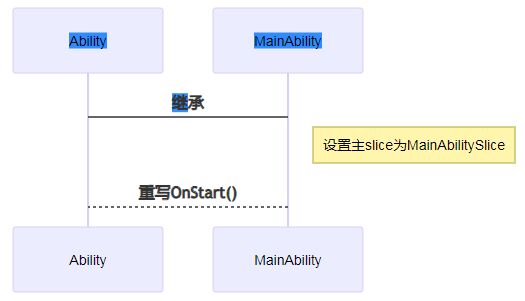
    SetMainRoute("MainAbilitySlice"); //设置主页面为MainAbilitySlice,这要与后续的slice名字匹配

    Ability::OnStart(want);
}
}
最后编写slice界面。
//main_ability_slice.h
#ifndef HELLO_ABILITY_SLICE_H
#define HELLO_ABILITY_SLICE_H

#include "ability_loader.h"
#include "ability_manager.h"
#include "bundle_manager.h"
#include "components/ui_label.h"

namespace OHOS {
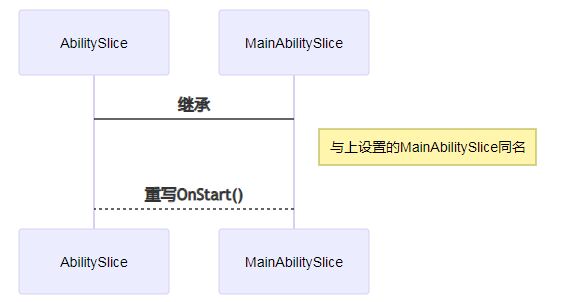
class MainAbilitySlice : public AbilitySlice { //创建AbilitySlice类 与上面同名
public:
    MainAbilitySlice() = default;
    virtual ~MainAbilitySlice();

protected:
    void OnStart(const Want &want) override;
    /*
     * 同理
     */
    // void OnInactive() override;
    // void OnActive(const Want &want) override;
    // void OnBackground() override;
    // void OnStop() override;
};
}
#endif
//main_ability_slice.cpp
#include "main_ability_slice.h"
const int screen_width = 720;
const int screen_height = 1280;

namespace OHOS {
REGISTER_AS(MainAbilitySlice)

MainAbilitySlice::~MainAbilitySlice()
{
    printf("This is ~MainAbilitySlice!\r\n");
}

void MainAbilitySlice::OnStart(const Want& want)
{
    AbilitySlice::OnStart(want);
    RootView* rootView_ = RootView::GetWindowRootView(); //创建底层界面
    rootView_->SetPosition(0, 0, screen_width, screen_height);
    rootView_->SetStyle(STYLE_BACKGROUND_COLOR, Color::ColorTo32(Color::Black()));
    rootView_->SetFocusable(true);
    rootView_->SetInterceptFocus(false);

    UILabel* label = new UILabel(); //创建label写入Hello World
    label->SetPosition(0, 0, 720, 64);
    label->SetText("Hello World!");
    label->SetFont("SourceHanSansSC-Regular.otf", 64);
    label->SetStyle(STYLE_TEXT_COLOR, Color::ColorTo32(Color::White()));

    rootView_->Add(label); //将label放入rootView

    SetUIContent(rootView_); //设置显示RootView UI
}
}
#endif
4、config.json的编写
//config.json
{
    "app": {
        "bundleName": "com.sample.hello",
        "vendor": "sample",
        "version": {
            "code": 1,
            "name": "1.0"
        },
        "apiVersion": {
            "compatible": 3,
            "target": 4
        }
    },
    "deviceConfig": {
        "default": {
        }
    },
    "module": {
        "package": "com.sample.hello",
        "name": ".MyHarmonyAbilityPackage",
        "deviceType": [
            "phone",
            "tv",
            "tablet",
            "pc",
            "car",
            "smartWatch",
            "sportsWatch",
            "smartVision"
        ],
        "distro": {
            "deliveryWithInstall": true,
            "moduleName": "hello",
            "moduleType": "entry"
        },
        "abilities": [ //ability配置声明
            {
                "name": "MainAbility",
                "label": "hello world app",
                "launchType": "standard",
                "type": "page",
                "visible": true
            }
        ]
    }
}
三、hap编译
1、通过BUILD.gn与系统一并编译。
使用到编译链中的hap_pack,添加配置 import(“//build/lite/config/hap_pack.gni”)
import("//build/lite/config/hap_pack.gni")

shared_library("hello") {
  sources = [
    "src/main/main_ability.cpp",
    "src/main/main_ability_slice.cpp"
  ] #将主要文件编译出库

  deps = [
    "${aafwk_lite_path}/frameworks/ability_lite:aafwk_abilitykit_lite",
    "${appexecfwk_lite_path}/frameworks/bundle_lite:bundle",
    "//foundation/graphic/ui:lite_ui",
    "//foundation/graphic/utils:lite_graphic_utils",
    "//foundation/systemabilitymgr/samgr_lite/samgr:samgr",
  ]

  include_dirs = [
    "src/include",
    "${aafwk_lite_path}/interfaces/kits/ability_lite",
    "${aafwk_lite_path}/interfaces/kits/want_lite",
    "${appexecfwk_lite_path}/interfaces/kits/bundle_lite",
  ]

  ldflags = [ "-shared" ]
  ldflags += [ "-lstdc++" ]
  ldflags += [ "-L$ohos_root_path/sysroot/usr/lib" ]
  ldflags += [ "-Wl,-rpath-link=$ohos_root_path/sysroot/usr/lib" ]
  ldflags += [
    "-lui",
    "-lability",
  ] #添加依赖

  defines = [
    "ENABLE_WINDOW=1",
    "ABILITY_WINDOW_SUPPORT",
    "OHOS_APPEXECFWK_BMS_BUNDLEMANAGER",
  ] #配置定义
}

hap_pack("hello_hap") { #打包成hap
  deps = [ ":hello" ]
  mode = "hap"
  json_path = "config.json"
  ability_so_path = "$root_out_dir/libhello.so" #编译后的库文件
  force = "true"
  cert_profile = "com.huawei.launcher_AppProvision_release.p7b" #由于不清楚获取证书方法 先用源码案例自带的证书代替
  resources_path = "resources"
  hap_name = "hello"
}
2、 通过app_packing_tool单独编译
该打包工具在源码目录developtools/packing_tool/jar下。
主要参数如下:
命令参数 | 对应的资源文件 | 说明 | 是否可缺省 |
–mode | - | 为“hap”字段,打包生成Hap | 否 |
–json-path | 清单文件config.json | - | 否 |
–ability-so-path | 主功能so文件 | - | 是 |
–out-path | - | 生成的Hap包输出路径,默认为当前目录 | 是 |
具体操作:
还是得先将动态库编译出来。
然后将动态库libhello.so和config.json放到一个文件夹里。
./out/
├── config.json
└── libhello.so
最后使用java -jar app_packing_tool.jar 进行打包 如下:
java -jar app_packing_tool.jar |
--mode hap |
--json-path ./config.json |
--ability-out-path ./libhello.so |
--out-path ./hello.hap
四、hap安装
1、安装命令bm
由于小型系统不支持使用HDC工具,我们需要使用到bm命令进行安装程序。
bm set -s disable //取消签名安装。
bm install -p system/internal/hello.hap //使用BUILD.gn一起编译的hap默认会在这个路径,如果使用工具打包的,视情况填写路径。
2、相关参数
# bm
Usage: install hap-path [options]
Description:
        --help|-h                   help menu
        --happath|-p           location of the hap to install
Usage: uninstall bundle-name [options]
Description:
        --help|-h                   help menu
        --bundlename|-n           name of the bundle to uninstall
Usage: dump [options]
Option Description:
        --help|-h                   help menu
        --list|-l                   app list
        --bundlename|-n           dump installed hap's info
        --metadatakey|-m           dump bundleNames match metaData key
Usage: set [options]
Option Description:
        --externalmode|-e status    enable externalmode
        --debugmode|-d  status      enable debugmode
        --signmode|-s  status      enable signmode
小型系统的bm指令是标准系统的阉割版。
安装成功后就可以打开该app,部分小型系统的设备屏幕没有触摸功能和鼠标驱动,我们可以使用aa命令来启动app。
aa start -p com.sample.hello -n MainAbility //包名和ability名都在config.json中定义
# aa
Usage:
aa start -p bundlename -n ability_name
aa stopability -p bundlename -n ability_name
aa terminate -p bundlename
aa dump -p bundlename -n ability_name -e extra_option
aa dump -a

Options:
 -h (--help)                Show the help information.             [eg: aa -h]
 -p (--bundlename)          Appoint the bundlename name.           [eg: -p com.huawei]
 -n (--abilityname)         Appoint the ability name.              [eg: -n MyAbility]
 -a (--all)                 [Unnecessary]dump all ability info.    [eg: -a]
 -e (--extra)               [Unnecessary]extra info when dump.     [eg: -e]

Commands:
aa start                    Start the target ability.
aa stopability              Stop the target service ability.
aa terminate                Terminate the target app.
aa dump                     Dump ability
总结
使用cpp编写用户应用程序,我们可以更方便有效的调用南向接口,这将会在开发和调试的过程中给我们带来极大的便利。
想了解更多关于开源的内容,请访问:
51CTO 开源基础软件社区
https://ost.51cto.com


