
背景
当前的开源日志包有很多,像go中的标准库log包、glog、logrus、zap。它们每种日志包都有相应的应用场景。四种日志包相关对比如下所示:
标准库log | 功能简单,不支持日志级别、日志格式。但是使用简单,易于快速上手。大型项目较少使用 |
glog | 提供了日志包的基本功能,像日志级别、格式等。适合一些小项目 |
logrus | 功能强大,不仅实现了基本日志功能,还提供了很多高级功能。适合大型项目 |
zap | 功能强大,性能高,适合对日志性能要求高的项目。另外zap的子包zapcore提供了很多底层日志接口,适合二次开发 |
从头开发一个日志包,可以让我们了解日志包的底层逻辑,使得我们对日志包有定制需求的时候,可以能够基于开源的日志包实现我们的功能。所以本文以cuslog为例,看看如何实现我们自己的日志包(代码:
https://github.com/marmotedu/gopractise-demo/tree/master/log/cuslog)。
代码结构
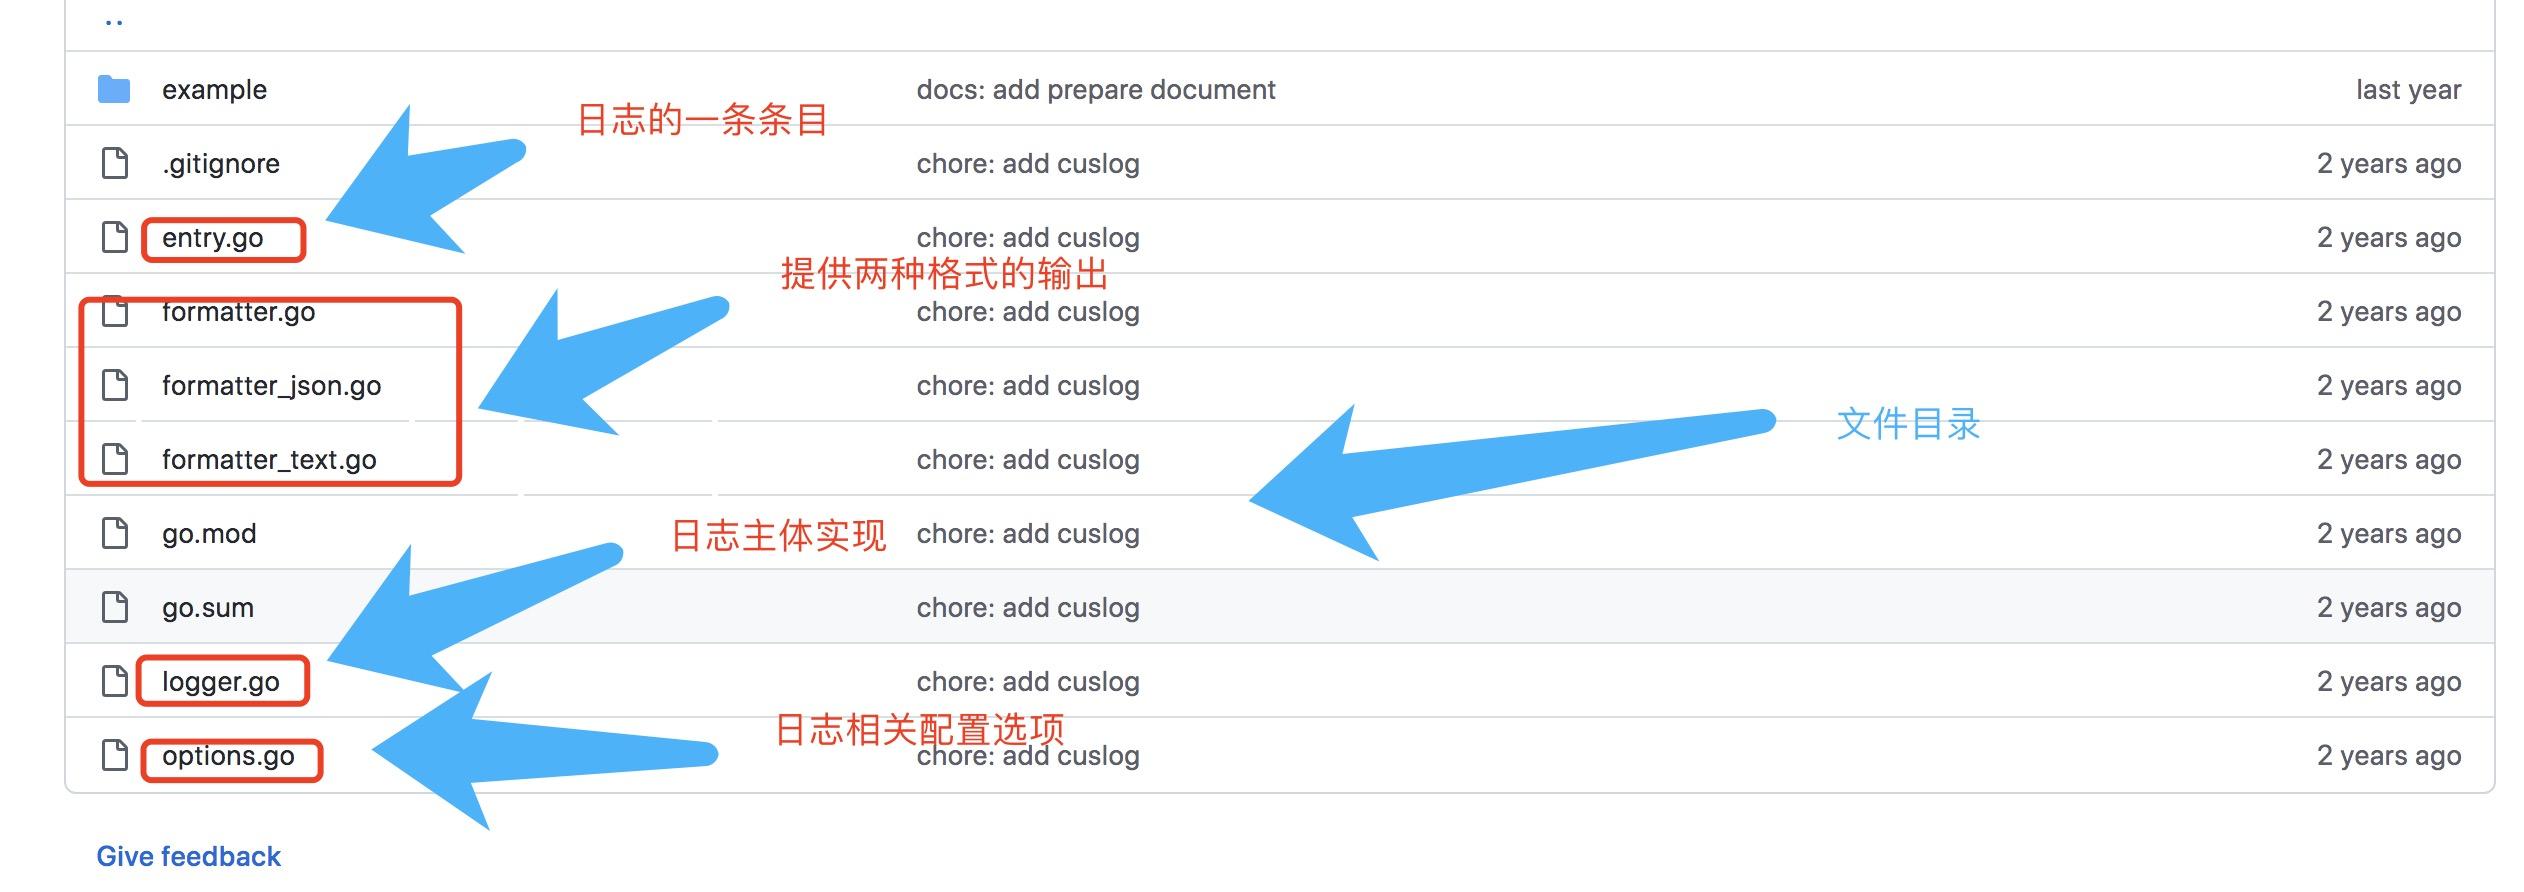
cuslog目录代码结构
cuslog代码结构
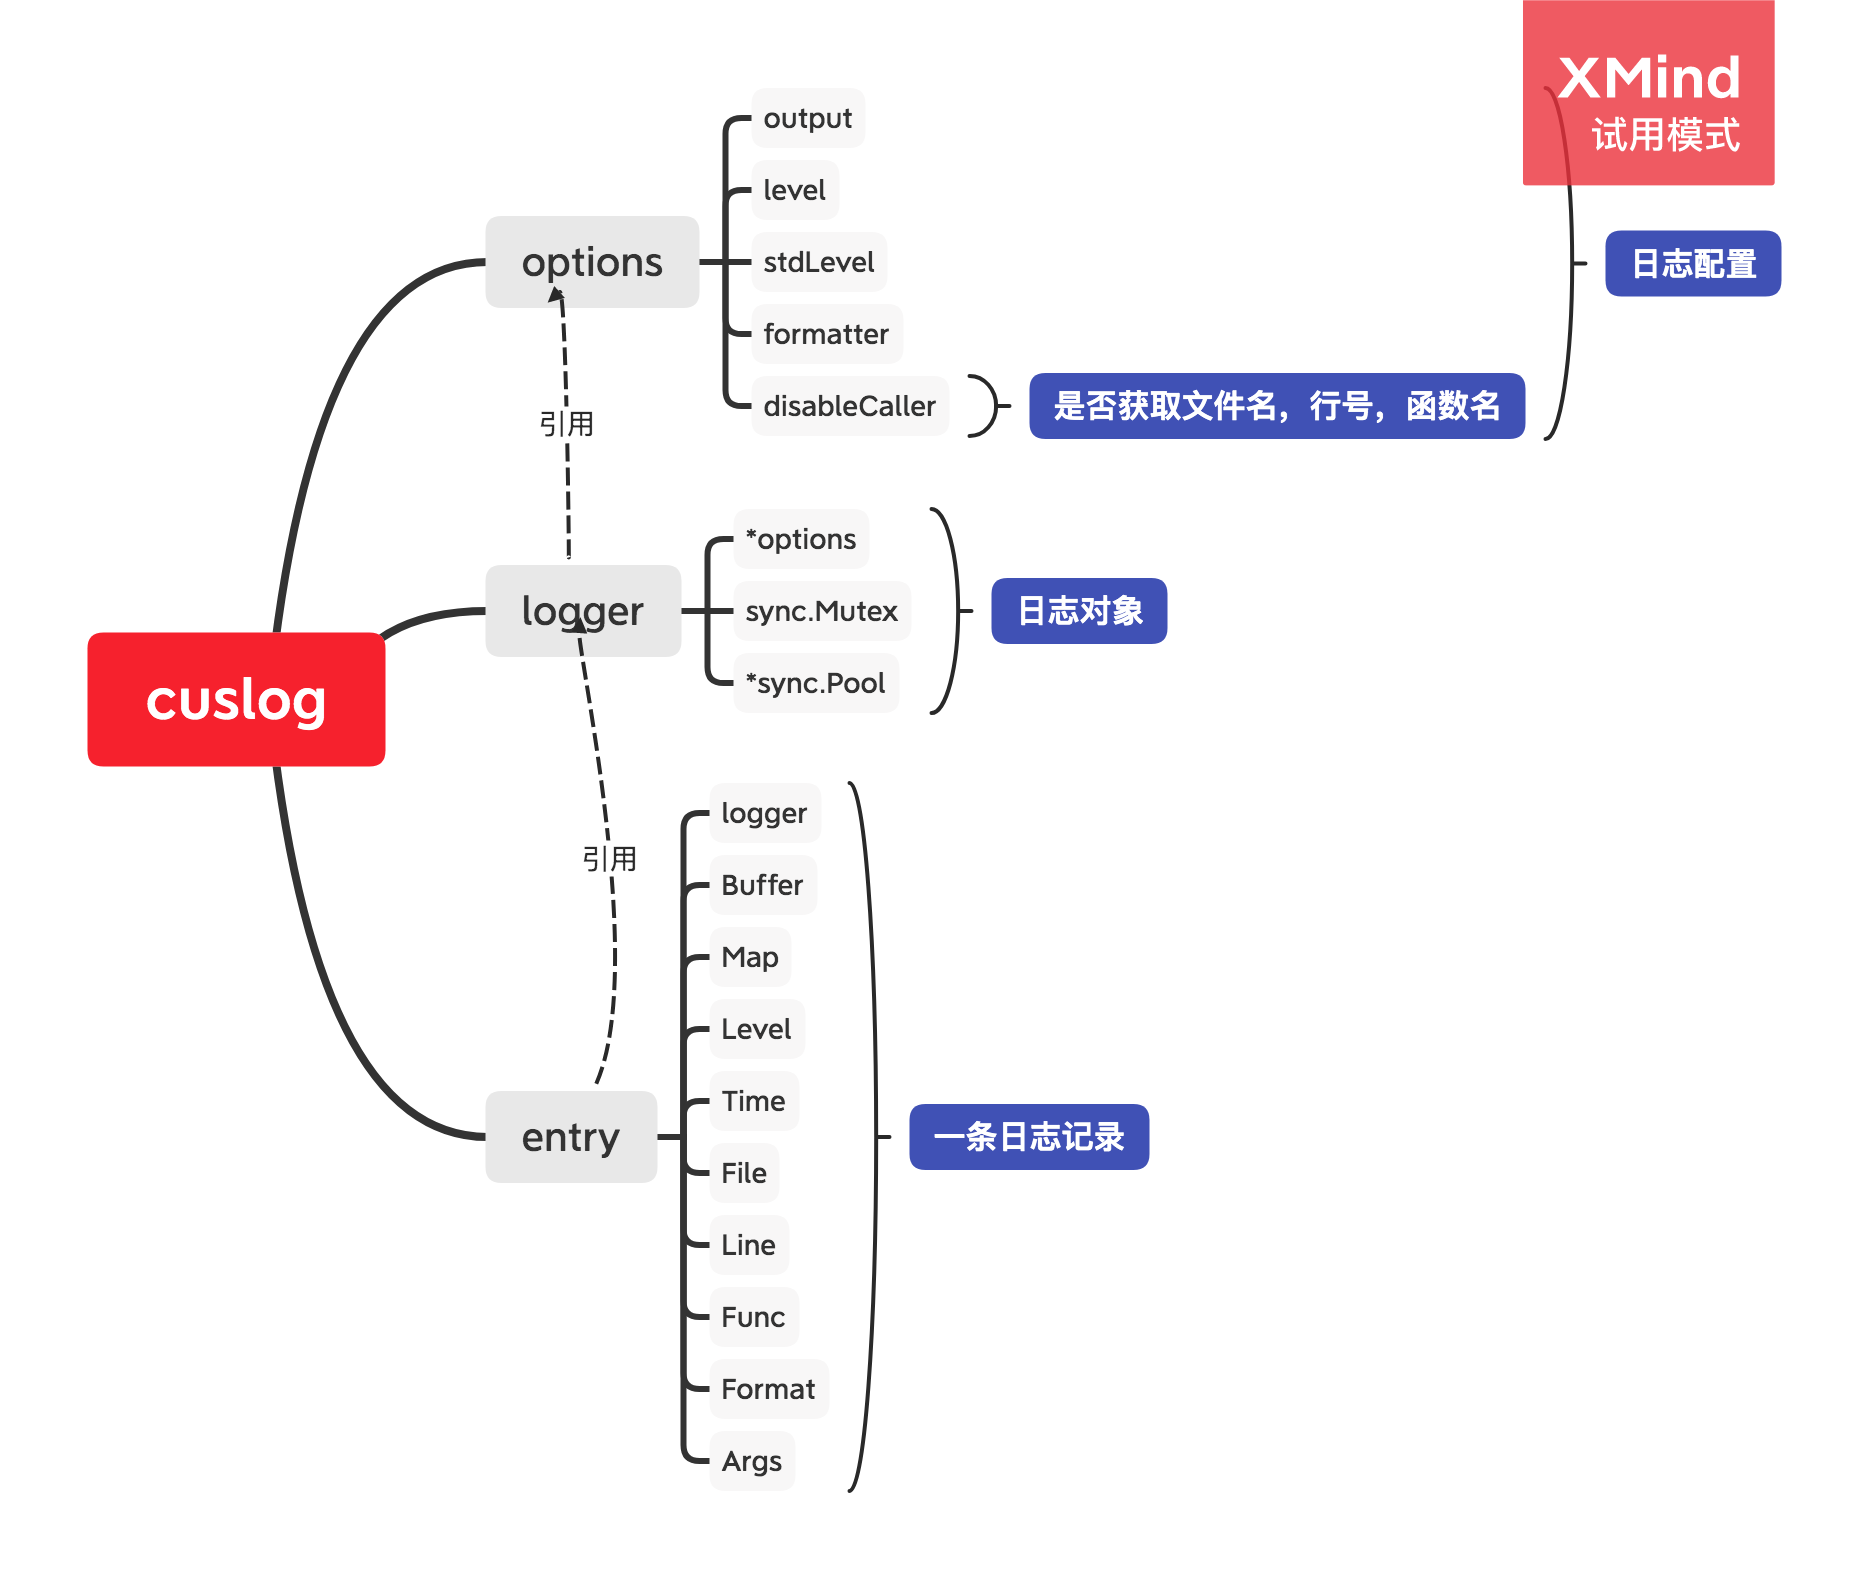
要实现一个日志包,就需要实现下面三个基本的对象,Entry,Logger,Options。
Entry
代码:
https://github.com/marmotedu/gopractise-demo/blob/master/log/cuslog/entry.go。
//构造函数
func entry(logger *logger) *Entry {
  return &Entry{logger: logger, Buffer: new(bytes.Buffer), Map: make(map[string]interface{}, 5)}
}
/*entry主要方法是write方法,它首先通过e.logger.opt.level 与 level的比较,来判断
是否要将日志输出,其中DEBUG最低,FATAL最高,这个从
https://github.com/marmotedu/gopractise-demo/blob/master/log/cuslog/options.go#L19
中可以看到。
*/
func (e *Entry) write(level Level, format string, args ...interface{}) {
  if e.logger.opt.level > level {
    return
  }
  e.Time = time.Now()
  e.Level = level
  e.Format = format
  e.Args = args
  if !e.logger.opt.disableCaller {
    if pc, file, line, ok := runtime.Caller(2); !ok {
      e.File = "???"
      e.Func = "???"
    } else {
      e.File, e.Line, e.Func = file, line, runtime.FuncForPC(pc).Name()
      e.Func = e.Func[strings.LastIndex(e.Func, "/")+1:]
    }
  }
  e.format()
  e.writer()
  e.release()
}
- 1.
- 2.
- 3.
- 4.
- 5.
- 6.
- 7.
- 8.
- 9.
- 10.
- 11.
- 12.
- 13.
- 14.
- 15.
- 16.
- 17.
- 18.
- 19.
- 20.
- 21.
- 22.
- 23.
- 24.
- 25.
- 26.
- 27.
- 28.
- 29.
- 30.
Entry的write方法实现了将它Buffer中的数据,写入到它的logger所配置的output中。
Logger
代码:
https://github.com/marmotedu/gopractise-demo/blob/master/log/cuslog/logger.go。
/*创建方法,通过sync.Pool缓存对象,提升性能,initOptions是用于初始化logger的options的
各种属性*/
func New(opts ...Option) *logger {
  logger := &logger{opt: initOptions(opts...)}
  logger.entryPool = &sync.Pool{New: func() interface{} { return entry(logger) }}
  return logger
}
Options
代码:
https://github.com/marmotedu/gopractise-demo/blob/68e100ee78a3093e6f2434439e7d4b143b9ebf60/log/cuslog/options.go。
/*opts 参数是一系列的用于设置options属性的函数,比如下面的WithOutput和WithLevel
都是这种函数,initOptions会接收这些函数作为输入,对o = &options{}进行设置*/
type Option func(*options)

func initOptions(opts ...Option) (o *options) {
  o = &options{}
  for _, opt := range opts {
    opt(o)
  }

  if o.output == nil {
    o.output = os.Stderr
  }

  if o.formatter == nil {
    o.formatter = &TextFormatter{}
  }

  return
}

func WithOutput(output io.Writer) Option {
  return func(o *options) {
    o.output = output
  }
}

func WithLevel(level Level) Option {
  return func(o *options) {
    o.level = level
  }
}
- 1.
- 2.
- 3.
- 4.
- 5.
- 6.
- 7.
- 8.
- 9.
- 10.
- 11.
- 12.
- 13.
- 14.
- 15.
- 16.
- 17.
- 18.
- 19.
- 20.
- 21.
- 22.
- 23.
- 24.
- 25.
- 26.
- 27.
- 28.
- 29.
- 30.
- 31.
- 32.
应用
通过下面的代码,我们看看整个代码是如何串起来的。
// 输出到文件
  fd, err := os.OpenFile("test.log", os.O_APPEND|os.O_CREATE|os.O_WRONLY, 0644)
  if err != nil {
    log.Fatalln("create file test.log failed")
  }
  defer fd.Close()

  l := cuslog.New(cuslog.WithLevel(cuslog.InfoLevel),
    cuslog.WithOutput(fd),
    cuslog.WithFormatter(&cuslog.JsonFormatter{IgnoreBasicFields: false}),
  )
  l.Info("custom log with json formatter")
- 1.
- 2.
- 3.
- 4.
- 5.
- 6.
- 7.
- 8.
- 9.
- 10.
- 11.
- 12.
- 上面的整体实现是,将"custom log with json formatter"这段字符串写入到指定文件里面
- 1到6行创建并打开文件
- 重点是8行,cuslog.WithLevel(cuslog.InfoLevel)、cuslog.WithOutput(fd)、cuslog.WithFormatter(&cuslog.JsonFormatter{IgnoreBasicFields: false})三个函数调用,返回三个函数func(o *options),这些函数都是Option类型,因为type Option func(*options)。
- 然后调用cuslog.New,这个函数上面也给出了,它里面通过initOptions依次调用上面的Option函数,对options对象进行设置,然后把options赋给opt, 并创建logger. logger := &logger{opt: initOptions(opts...)}
- 最后调用l.Info("custom log with json formatter")把字符串输出到文件中.整个调用链是l.info===>通过l的pool获取entry===>调用entry的write(InfoLevel, FmtEmptySeparate, args...),在这个write函数里面,只有infoLevel比logger.level优先级大或相等,才输出。并且通过runtime.Caller(2)获取最上层调用info时的,文件名,行号,函数名等信息。因为这个地方有2层嵌套才调用到entry的write,所以runtime.Caller(2)的参数是2
总结
上面的代码实现了基本的日志功能,包括日志级别、日志格式配置、输出文件或标准输出的设置。但是一些高级的功能,比如按级别分类输出,Hook能力,结构化日志。这些目前都不支持。