OpenGL渲染出来的数据并不能直接显示到屏幕上,需要适配对接OpenHarmony的窗口系统,OpenHarmony提供了NativeWindow的API接口用以创建窗口,我们调用GPU渲染之后的数据就可以采用这个API接口进行显示。

想了解更多关于开源的内容,请访问:
51CTO 开源基础软件社区
https://ost.51cto.com
上一篇文章讲解了编译开源gpu驱动,并把gpu驱动添加到编译框架中,此时理论上gpu已经可以调用,但是我们需要一些手段进行测试,以确认gpu能够正常工作。这里分享我用过的两个测试程序,glmark2和一个简单的三角形绘制程序。
移植GPU过程中受到开源社区里各位大神的指导,特别是AlgoIdeas和lhl,特此鸣谢。
1、简单绘制三角形程序
该测试程序程序来自AlgoIdeas大神,文末附有AlgoIdeas的原文连接,大家可以进一步细读,关键代码AlgoIdeas帖子里面已经提供下载,请大家去原帖下载,原版程序是基于dayu200开发板的,在此我讲解如何进行适配其他设备。
(1)适配OpenHarmony窗口系统
OpenGL渲染出来的数据并不能直接显示到屏幕上,需要适配对接OpenHarmony的窗口系统,OpenHarmony提供了NativeWindow的API接口用以创建窗口,我们调用GPU渲染之后的数据就可以采用这个API接口进行显示。
下载native_window_wrapper.zip解压放到。
【foundation/window/window_manager】目录下,因OH版本更新,部分配置需要修改并添加部件信息,修改后的BUILD.gn如下:
# Copyright (c) Hisilicon Technologies Co., Ltd. 2021-2021. All rights reserved
import("//build/ohos.gni")

ohos_shared_library("native_window_wrapper") {
  sources = ["native_window_wrapper.cpp"]
  include_dirs = [
      "."
  ]

  cflags = [
    "-Wall",
    "-Werror",
    "-Wno-cast-qual",
    "-Wno-pointer-arith",
    "-Wno-unused-parameter",
    "-Wno-unused-variable",
    "-Wno-delete-incomplete",
  ]

  deps = [
    "//foundation/window/window_manager/wm:libwm",
    "//foundation/graphic/graphic_2d/frameworks/surface:surface",
    "//foundation/graphic/graphic_2d/rosen/modules/render_service_client:librender_service_client",
  ]

# 添加OH部件配置
  part_name = "window_manager"
  subsystem_name = "window"
}
(2)修改Makefile适配Mesa3d
原版例子是适配rk3568的闭源驱动的,我们需要修改适配Mesa3d,以及适配64位系统。
下载native_window_ohos.zip解压放到OH项目根目录。
Makefile修改适配32位程序,rpi4举例。
#修改OHOS_ROOT为自己的目录
OHOS_ROOT = /home/algoideas/openharmony/master
改为
OHOS_ROOT = /home/diemit/OpenHarmony

#修改三处--sysroot
--sysroot=$(OHOS_ROOT)/out/a311d/obj/third_party/musl
改为
--sysroot=$(OHOS_ROOT)/out/rpi4/obj/third_party/musl

#修改lib链接
CLIBS += -L$(OHOS_ROOT)/device/soc/rockchip/hardware/gpu/lib -lmali-bifrost-g52-g2p0-ohos
CLIBS += -L$(OHOS_ROOT)/out/rk3568/packages/phone/system/lib -lhilog -lsurface.z -lutils.z

改为
CLIBS += -L$(OHOS_ROOT)/device/soc/broadcom/bcm2711/standard/hardware/gpu/lib -lgallium_dri
CLIBS += -L$(OHOS_ROOT)/out/rpi4/packages/phone/system/lib -lhilog -lsurface.z -lutils.z
Makefile修改适配64位程序,小米6举例。
#修改OHOS_ROOT为自己的目录
OHOS_ROOT = /home/algoideas/openharmony/master
改为
OHOS_ROOT = /home/diemit/OpenHarmony

#修改三处--sysroot
--sysroot=$(OHOS_ROOT)/out/a311d/obj/third_party/musl
改为
--sysroot=$(OHOS_ROOT)/out/sagit/obj/third_party/musl

#修改lib链接
CLIBS += -L$(OHOS_ROOT)/device/soc/rockchip/hardware/gpu/lib -lmali-bifrost-g52-g2p0-ohos
CLIBS += -L$(OHOS_ROOT)/out/rk3568/packages/phone/system/lib -lhilog -lsurface.z -lutils.z

改为
CLIBS += -L$(OHOS_ROOT)/device/soc/qualcomm/msm8998/hardware/gpu/lib64 -lgallium_dri
CLIBS += -L$(OHOS_ROOT)/out/sagit/packages/phone/system/lib64 -lhilog -lsurface.z -lutils.z

#修改
CFLAGS :=
#删除
  -march=armv7-a \
  -mfloat-abi=softfp \
  -mtune=generic-armv7-a \
  -mfpu=neon \
  -mthumb \
#修改
  --target=arm-linux-ohosmusl \
改为
  --target=aarch64-linux-ohosmusl \
(3)编译为可执行程序,加入OH编译框架
进入native_window_ohos目录执行make命令。
cd native_window_ohos
make
复制生成好的native_main程序到board仓下的自定义目录,我的是test下的native_window_ohos,然后配置BUILD.gn,添加native_main为预编译程序。
ohos_prebuilt_executable("native_main") {
  source = "native_window_ohos/native_main"
  part_name = "qualcomm_products"
  install_images = [ "system" ]
  install_enable = true
}
重新编译系统,刷机之后使用串口工具输入命令直接运行
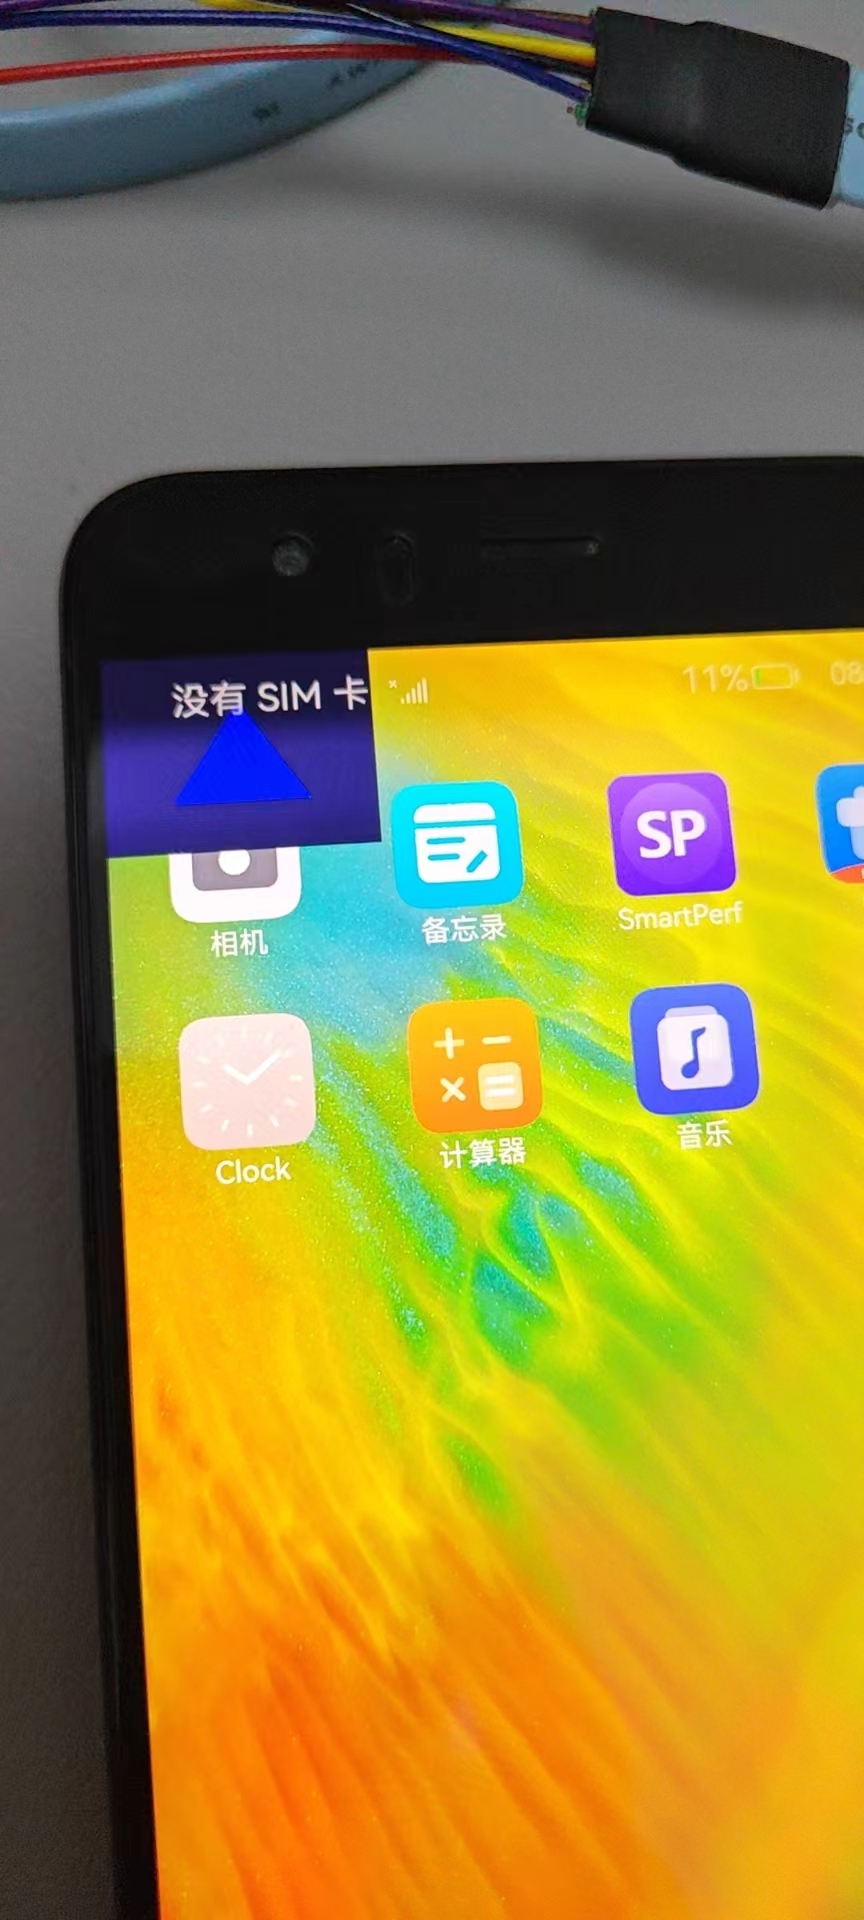
如果一切正常,屏幕左上角会显示通过OpenGL接口调用GPU绘制的三角形,颜色会有异常这个无所谓,三角形能正确显示就证明Mesa3d已经正确配置。

2、使用glmark2
glmark2是一个经典的图形测试程序,lhl大神gitee仓中有一份移植的代码,但是有部分没有实现,这里我描述一下如何把glmark2适配到OpenHarmony。
(1)适配ohos
lhl/glmark2_2 (gitee.com)
去lhl大神的仓库下载glmark2的源码,删除ohos文件夹,复制我们之前适配mesa3d修改好的ohos文件夹,然后修改编译的python脚本。
ohos/build_ohos64.py:
修改
    run_build_cmd += '-Dplatforms=ohos -Degl-native-platform=ohos -Ddri-drivers= -Dgallium-drivers=freedreno \
                      -Dvulkan-drivers= -Dgbm=enabled -Degl=enabled -Dcpp_rtti=false -Dglx=disabled -Dtools= -Ddri-search-path=/vendor/lib64/chipsetsdk '
修改后
    run_build_cmd += '-Dflavors=ohos-glesv2 '

其他保持不变
(2)适配OpenHarmony本地窗口
glmark2在OpenHarmony平台不能直接显示,需要对接OpenHarmony的NativeWindow,需要预先完成章节1.1的适配,同时在glmark2中实现对窗口的调用。
修改glmark2程序中的,添加ohos_wrapper_linker.cpp
src/meson.build:
native_ohos_lib = static_library(
         'native-ohos',
         'native-state-ohos.cpp',
  +      'ohos_wrapper_linker.cpp',
         dependencies: [libmatrix_headers_dep],
         )
     native_ohos_dep = declare_dependency(
src/ohos_wrapper_linker.cpp:
#include "ohos_wrapper_linker.h"
#include <dlfcn.h>
#include "log.h"

bool OhosWrapperLinker::Init()
{
    wrapperModule_ = dlopen(WRAPPER_LIB_NAME, RTLD_NOW | RTLD_NOLOAD);
    if (wrapperModule_ != nullptr) {
        Log::debug("Module '%s' already loaded \n", WRAPPER_LIB_NAME);
    } else {
        Log::debug("Loading module %s\n", WRAPPER_LIB_NAME);
        wrapperModule_ = dlopen(WRAPPER_LIB_NAME, RTLD_NOW);
        if (wrapperModule_ == nullptr) {
            Log::debug("Failed to load module: %s \n", dlerror());
            return false;
        }
    }

    using InitFunc = bool (*)(WrapperFunc *funcs);
    InitFunc func = reinterpret_cast<InitFunc>(dlsym(wrapperModule_, WRAPPER_FUNC_GET));
    if (func == nullptr) {
        Log::debug("Failed to lookup %s function: %s\n", WRAPPER_FUNC_GET, dlerror());
        dlclose(wrapperModule_);
        return false;
    }
    if (func(&wapperFuncs_)) {
        wrapper_ = wapperFuncs_.CreateWindowWrapper();
    } else {
        Log::debug("can not get wrapper functions \n");
        return false;
    }
    if (wrapper_ != nullptr) {
        Log::debug("wrapper init success\n");
        return true;
    }
    return false;
}

bool OhosWrapperLinker::CreateWindow(uint32_t w, uint32_t h)
{
    return wapperFuncs_.CreateWindow(wrapper_, w, h);
}

void* OhosWrapperLinker::GetWindow()
{
    return wapperFuncs_.GetNativeWindow(wrapper_);
}

void OhosWrapperLinker::SetVisibility(bool visible)
{
    wapperFuncs_.SetVisibility(wrapper_, visible);
}
src/ohos_wrapper_linker.h:
#include <cstdint>
extern "C" {
    typedef struct {
        void* (*CreateWindowWrapper)();
        bool (*CreateWindow)(void* wrapper, uint32_t w, uint32_t h);
        void* (*GetNativeWindow)(void* wrapper);
        void (*SetVisibility)(void* wrapper, bool visible);
        void (*DestroyWindowWrapper)(void* wrapper);
    } WrapperFunc;
}

class OhosWrapperLinker
{
public:
    bool Init();
    bool CreateWindow(uint32_t w, uint32_t h);
    void *GetWindow();
    void SetVisibility(bool visible);

private:
    static constexpr const char *WRAPPER_LIB_NAME = "libnative_window_wrapper.z.so";
    static constexpr const char *WRAPPER_FUNC_GET = "GetWrapperFunc";
    WrapperFunc wapperFuncs_;
    void* wrapper_ = nullptr;
    void *wrapperModule_ = nullptr;
};
修改glmark2,对接OpenHarmony窗口系统。
src/native-state-ohos.h:
#ifndef GLMARK2_NATIVE_STATE_OHOS_H_
  #define GLMARK2_NATIVE_STATE_OHOS_H_
  #include "native-state.h"
+#include "ohos_wrapper_linker.h"
  class NativeStateOhos : public NativeState
  {

  @@ -27,6 +28,9 @@ class NativeStateOhos : public NativeState

      /* Flips the display */
      void flip();
+ private:
+     OhosWrapperLinker wrapper;
+     WindowProperties properties_;
  };

  #endif // GLMARK2_NATIVE_STATE_OHOS_H_
src/native-state-ohos.cpp:
#include "native-state-ohos.h"
#include "log.h"

/* Initializes the native display */
bool NativeStateOhos::init_display()
{
    //Log::debug("%s@%s:%d", __FUNCTION__, __FILE__, __LINE__);
    return wrapper.Init();
}

/* Gets the native display */
void *NativeStateOhos::display()
{
    //Log::debug("%s@%s:%d", __FUNCTION__, __FILE__, __LINE__);
    return nullptr;
}

/* Creates (or recreates) the native window */
bool NativeStateOhos::create_window(WindowProperties const &properties)
{
    properties_ = properties;
    return wrapper.CreateWindow(properties.width, properties.height);
}

/*
 * Gets the native window and its properties.
 * The dimensions may be different than the ones requested.
 */
void *NativeStateOhos::window(WindowProperties &properties)
{
    properties = properties_;
    return wrapper.GetWindow();
}

/* Sets the visibility of the native window */
void NativeStateOhos::visible(bool v)
{
    wrapper.SetVisibility(v);
    return;
}

/* Whether the user has requested an exit */
bool NativeStateOhos::should_quit()
{
    return false;
}

/* Flips the display */
void NativeStateOhos::flip()
{
    return;
}
小米6适配的是arm64位编译环境,编译过程中src/gl-state-egl.cpp会报错,这里也顺便贴出解决办法。
-   native_display_ = reinterpret_cast<EGLNativeDisplayType>(native_display);
 +   native_display_ = static_cast<EGLNativeDisplayType>((intptr_t)native_display);
(3)编译为可执行程序,加入OH编译框架
在glmark2目录执行以下命令:
python ohos/build_ohos64.py ~/ohos_beta5 sagit ~/ohos_beta5/glmark2_2/
复制build-hos/install/bin下生成好的glmark2-es2-ohos程序到board仓下的自定义目录,我的是test下的glmark2,然后配置BUILD.gn,添加glmark2-es2-ohos为预编译程序。
ohos_prebuilt_executable("glmark2") {
  source = "glmark2/glmark2-es2-ohos"
  part_name = "qualcomm_products"
  install_images = [ "system" ]
  install_enable = true
}
重新编译系统,刷机,此时还不能直接运行glamrk2运行需要额外的模型资源跟纹理资源,复制build-hos/install/share/glmark2下的资源到data分区,对于小米6,我是进入twrp,挂载data分区,使用mtp程序直接拷贝到机器内部,对于树莓派4,我是读卡器插入到Linux主机,然后挂载tf卡的data分区,再拷贝到data分区内,最后在小米6对应的路径为/data/media/glmark2/,其他开发板如果打通了hdc可通过hdc传输文件,理论上也可以通过配置gn预置到某个目录,但是目前还没研究透,打包失败了,有知道的大神可以留言指导以下。
准备就绪后,使用串口执行以下命令:
默认分辨率运行800*600
glmark2-es2-ohos --data-path /data/media/glmark2/

指定分辨率1080*1920
glmark2-es2-ohos -s 1080*1920 --data-path /data/media/glmark2/
顺利的话可以在屏幕上看到glmark2的渲染窗口。

至此OpenGL接口的测试程序如何进行编译以及调用验证讲解完毕,希望能对大家有所帮助,下篇我会分享一下树莓派4与小米6在适配gpu时遇到的问题以及解决的过程。
参考资料
#DAYU200体验官#在开发板上,使用OpenGL相关API绘制基本图形流程-开源基础软件社区-51CTO.COM
想了解更多关于开源的内容,请访问:
51CTO 开源基础软件社区
https://ost.51cto.com


