最近陆续看到各社区上有关OpenHarmony媒体相机的使用开发文档,相机对于富设备来说必不可少,日常中我们经常使用相机完成拍照、人脸验证等。
OpenHarmony系统一个重要的能力就是分布式,对于分布式相机我也倍感兴趣,之前看到官方对分布式相机的一些说明,这里简单介绍下,有兴趣可以查看官方文档:分布式相机部件。
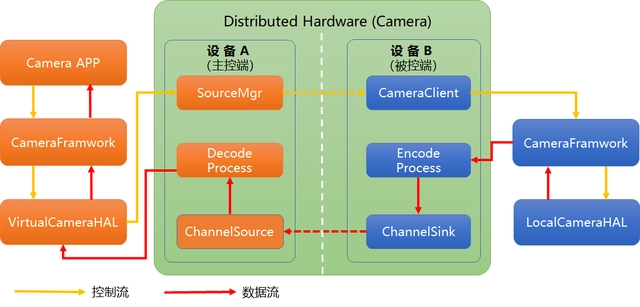
分布式框架图

分布式相机框架(Distributed Hardware)分为主控端和被控端。假设:设备B拥有本地相机设备,分布式组网中的设备A可以分布式调用设备B的相机设备。这种场景下,设备A是主控端,设备B是被控端,两个设备通过软总线进行交互。
- VirtualCameraHAL:作为硬件适配层(HAL)的一部分,负责和分布式相机框架中的主控端交互,将主控端CameraFramwork下发的指令传输给分布式相机框架的SourceMgr处理。
- SourceMgr:通过软总线将控制信息传递给被控端的CameraClient。
- CameraClient:直接通过调用被控端CameraFramwork的接口来完成对设备B相机的控制。
最后,从设备B反馈的预览图像数据会通过分布式相机框架的ChannelSink回传到设备A的HAL层,进而反馈给应用。通过这种方式,设备A的应用就可以像使用本地设备一样使用设备B的相机。
相关名词介绍
- 主控端(source):控制端,通过调用分布式相机能力,使用被控端的摄像头进行预览、拍照、录像等功能。
- 被控端(sink):被控制端,通过分布式相机接收主控端的命令,使用本地摄像头为主控端提供图像数据。
现在我们要实现分布式相机,在主控端调用被控端相机,实现远程操作相机,开发此应用的具体需求:
- 支持本地相机的预览、拍照、保存相片、相片缩略图、快速查看相片、切换摄像头(如果一台设备上存在多个摄像头时);
- 同一网络下,支持分布式pin码认证,远程连接;
- 自由切换本地相机和远程相机。
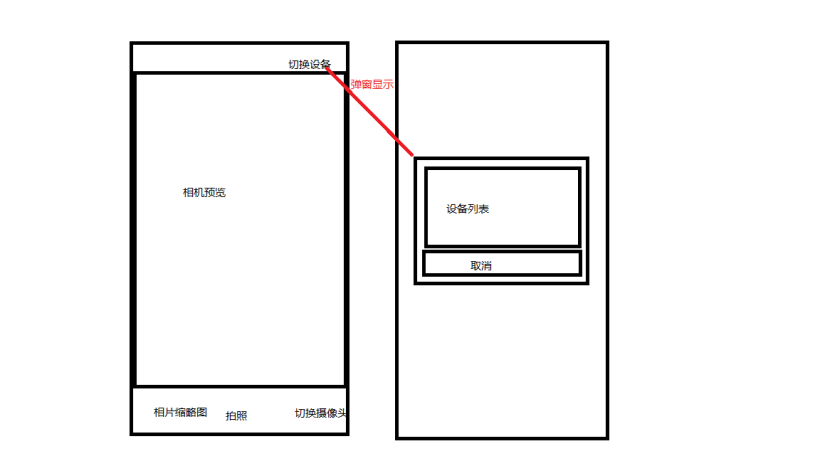
UI草图

从草图上看,我们简单的明应用UI布局的整体内容:
1、顶部右上角有个"切换设备"的按钮,点击 弹窗显示设备列表,可以实现设备认证与设备切换功能。
2、中间使用XComponent组件实现的相机预览区域。
3、底部分为三个部分。
- 相机缩略图:显示当前设备媒体库中最新的图片,点击相机缩略图按钮可以查看相关的图片。
- 拍照:点击拍照按钮,将相机当前帧保存到本地媒体库中。
- 切换摄像头:如果一台设备有多个摄像头时,例如相机有前后置摄像头,点击切换后会将当前预览的页面切换到另外一个摄像头的图像。
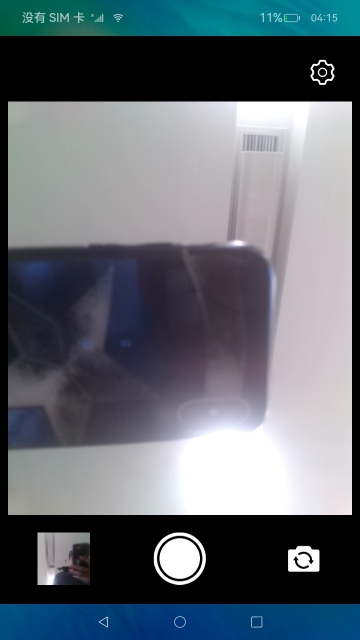
实现效果
演示视频地址–待发布https://ost.51cto.com/show/21218


开发环境
系统:OpenHarmony 3.2 beta4/OpenHarmony 3.2 beta5
设备:DAYU200
IDE:DevEco Studio 3.0 Release ,Build Version: 3.0.0.993, built on September 4, 2022
SDK:Full_3.2.9.2
开发模式:Stage
开发语言:ets
开发实践
本篇主要在应用层的角度实现分布式相机,实现远程相机与实现本地相机的流程相同,只是使用的相机对象不同,所以我们先完成本地相机的开发,再通过参数修改相机对象来启动远程相机。
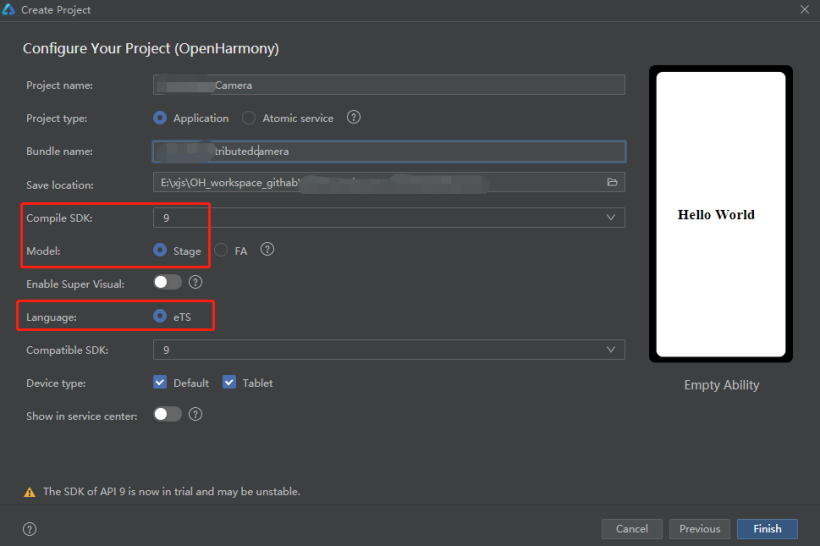
1、创建项目

2、权限声明
(1)module.json 配置权限
说明: 在module模块下添加权限声明,权限的详细说明。
"requestPermissions": [
  {
    "name": "ohos.permission.REQUIRE_FORM"
  },
  {
    "name": "ohos.permission.MEDIA_LOCATION"
  },
  {
    "name": "ohos.permission.MODIFY_AUDIO_SETTINGS"
  },
  {
    "name": "ohos.permission.READ_MEDIA"
  },
  {
    "name": "ohos.permission.WRITE_MEDIA"
  },
  {
    "name": "ohos.permission.GET_BUNDLE_INFO_PRIVILEGED"
  },
  {
    "name": "ohos.permission.CAMERA"
  },
  {
    "name": "ohos.permission.MICROPHONE"
  },
  {
    "name": "ohos.permission.DISTRIBUTED_DATASYNC"
  }
]
(2)在index.ets页面的初始化 aboutToAppear()申请权限
代码如下:
let permissionList: Array<string> = [
  "ohos.permission.MEDIA_LOCATION",
  "ohos.permission.READ_MEDIA",
  "ohos.permission.WRITE_MEDIA",
  "ohos.permission.CAMERA",
  "ohos.permission.MICROPHONE",
  "ohos.permission.DISTRIBUTED_DATASYNC"
]
 async aboutToAppear() {
    console.info(`${TAG} aboutToAppear`)
    globalThis.cameraAbilityContext.requestPermissionsFromUser(permissionList).then(async (data) => {
      console.info(`${TAG} data permissions: ${JSON.stringify(data.permissions)}`)
      console.info(`${TAG} data authResult: ${JSON.stringify(data.authResults)}`)
      // 判断授权是否完成
      let resultCount: number = 0
      for (let result of data.authResults) {
        if (result === 0) {
          resultCount += 1
        }
      }
      if (resultCount === permissionList.length) {
        this.isPermissions = true
      }
      await this.initCamera()
      // 获取缩略图
      this.mCameraService.getThumbnail(this.functionBackImpl)
    })
  }
这里有个获取缩略图的功能,主要是获取媒体库中根据时间排序,获取最新拍照的图片作为当前需要显示的缩略图,实现此方法在后面说CameraService类的时候进行详细介绍。
注意: 如果首次启动应用,在授权完成后需要加载相机,则建议授权放在启动页完成,或者在调用相机页面之前添加一个过渡页面,主要用于完成权限申请和启动相机的入口,否则首次完成授权后无法显示相机预览,需要退出应用再重新进入才可以正常预览,这里先简单说明下,文章后续会在问题环节详细介绍。
3、UI布局
说明: UI如前面截图所示,实现整体页面的布局。页面中主要使用到XComponent组件,用于EGL/OpenGLES和媒体数据写入,并显示在XComponent组件。参看:XComponent详细介绍
- onLoad():XComponent插件加载完成时的回调,在插件完成时可以获取**ID并初始化相机;
- XComponentController:XComponent组件控制器,可以绑定至XComponent组件,通过getXComponent/**aceId()获取XComponent对应的/**aceID。
代码如下:
@State @Watch('selectedIndexChange') selectIndex: number = 0
  // 设备列表
  @State devices: Array<deviceManager.DeviceInfo> = []
  // 设备选择弹窗
  private dialogController: CustomDialogController = new CustomDialogController({
    builder: DeviceDialog({
      deviceList: $devices,
      selectIndex: $selectIndex,
    }),
    autoCancel: true,
    alignment: DialogAlignment.Center
  })
  @State curPictureWidth: number = 70
  @State curPictureHeight: number = 70
  @State curThumbnailWidth: number = 70
  @State curThumbnailHeight: number = 70
  @State curSwitchAngle: number = 0
  @State Id: string = ''
  @State thumbnail: image.PixelMap = undefined
  @State resourceUri: string = ''
  @State isSwitchDeviceing: boolean = false // 是否正在切换相机
  private isInitCamera: boolean = false // 是否已初始化相机
  private isPermissions: boolean = false // 是否完成授权
  private componentController: XComponentController = new XComponentController()
  private mCurDeviceID: string = Constant.LOCAL_DEVICE_ID // 默认本地相机
  private mCurCameraIndex: number = 0 //  默认相机列表中首个相机
  private mCameraService = CameraService.getInstance()

  build() {
    Stack({ alignContent: Alignment.Center }) {
      Column() {
        Row({ space: 20 }) {
          Image($r('app.media.ic_camera_public_setting'))
            .width(40)
            .height(40)
            .margin({
              right: 20
            })
            .objectFit(ImageFit.Contain)
            .onClick(() => {
              console.info(`${TAG} click distributed auth.`)
              this.showDialog()
            })
        }
        .width('100%')
        .height('5%')
        .margin({
          top: 20,
          bottom: 20
        })
        .alignItems(VerticalAlign.Center)
        .justifyContent(FlexAlign.End)

        Column() {
          XComponent({
            id: 'componentId',
            type: 'xxxxace',
            controller: this.componentController
          }).onLoad(async () => {
            console.info(`${TAG} XComponent onLoad is called`)
            this.componentController.setXComponentxxxxaceSize({
              xxxxWidth: Resolution.DEFAULT_WIDTH,
              xxxxaceHeight: Resolution.DEFAULT_HEIGHT
            })
            this.id = this.componentController.getXComponentxxxxaceId()
            console.info(`${TAG} id: ${this.id}`)
            await this.initCamera()
          }).height('100%')
            .width('100%')
        }
        .width('100%')
        .height('75%')
        .margin({
          bottom: 20
        })

        Row() {
          Column() {
            Image(this.thumbnail != undefined ? this.thumbnail : $r('app.media.screen_pic'))
              .width(this.curThumbnailWidth)
              .height(this.curThumbnailHeight)
              .objectFit(ImageFit.Cover)
              .onClick(async () => {
                console.info(`${TAG} launch bundle com.ohos.photos`)
                await globalThis.cameraAbilityContext.startAbility({
                  parameters: { uri: 'photodetail' },
                  bundleName: 'com.ohos.photos',
                  abilityName: 'com.ohos.photos.MainAbility'
                })
                animateTo({
                  duration: 200,
                  curve: Curve.EaseInOut,
                  delay: 0,
                  iterations: 1,
                  playMode: PlayMode.Reverse,
                  onFinish: () => {
                    animateTo({
                      duration: 100,
                      curve: Curve.EaseInOut,
                      delay: 0,
                      iterations: 1,
                      playMode: PlayMode.Reverse
                    }, () => {
                      this.curThumbnailWidth = 70
                      this.curThumbnailHeight = 70
                    })
                  }
                }, () => {
                  this.curThumbnailWidth = 60
                  this.curThumbnailHeight = 60
                })
              })
          }
          .width('33%')
          .alignItems(HorizontalAlign.Start)

          Column() {
            Image($r('app.media.icon_picture'))
              .width(this.curPictureWidth)
              .height(this.curPictureHeight)
              .objectFit(ImageFit.Cover)
              .alignRules({
                center: {
                  align: VerticalAlign.Center,
                  anchor: 'center'
                }
              })
              .onClick(() => {
                this.takePicture()
                animateTo({
                  duration: 200,
                  curve: Curve.EaseInOut,
                  delay: 0,
                  iterations: 1,
                  playMode: PlayMode.Reverse,
                  onFinish: () => {
                    animateTo({
                      duration: 100,
                      curve: Curve.EaseInOut,
                      delay: 0,
                      iterations: 1,
                      playMode: PlayMode.Reverse
                    }, () => {
                      this.curPictureWidth = 70
                      this.curPictureHeight = 70
                    })
                  }
                }, () => {
                  this.curPictureWidth = 60
                  this.curPictureHeight = 60
                })
              })
          }
          .width('33%')

          Column() {
            Image($r('app.media.icon_switch'))
              .width(50)
              .height(50)
              .objectFit(ImageFit.Cover)
              .rotate({
                x: 0,
                y: 1,
                z: 0,
                angle: this.curSwitchAngle
              })
              .onClick(() => {
                this.switchCamera()
                animateTo({
                  duration: 500,
                  curve: Curve.EaseInOut,
                  delay: 0,
                  iterations: 1,
                  playMode: PlayMode.Reverse,
                  onFinish: () => {
                    animateTo({
                      duration: 500,
                      curve: Curve.EaseInOut,
                      delay: 0,
                      iterations: 1,
                      playMode: PlayMode.Reverse
                    }, () => {
                      this.curSwitchAngle = 0
                    })
                  }
                }, () => {
                  this.curSwitchAngle = 180
                })
              })
          }
          .width('33%')
          .alignItems(HorizontalAlign.End)

        }
        .width('100%')
        .height('10%')
        .justifyContent(FlexAlign.SpaceBetween)
        .alignItems(VerticalAlign.Center)
        .padding({
          left: 40,
          right: 40
        })
      }
      .height('100%')
      .width('100%')
      .padding(10)

      if (this.isSwitchDeviceing) {
        Column() {
          Image($r('app.media.load_switch_camera'))
            .width(400)
            .height(306)
            .objectFit(ImageFit.Fill)
          Text($r('app.string.switch_camera'))
            .width('100%')
            .height(50)
            .fontSize(16)
            .fontColor(Color.White)
            .align(Alignment.Center)
        }
        .width('100%')
        .height('100%')
        .backgroundColor(Color.Black)
        .justifyContent(FlexAlign.Center)
        .alignItems(HorizontalAlign.Center)
        .onClick(() => {

        })
      }
    }
    .height('100%')
    .backgroundColor(Color.Black)
  }
(1)启动系统相册
说明: 用户点击图片缩略图时需要启动图片查看,这里直接打开系统相册,查看相关的图片。
代码如下:
await globalThis.cameraAbilityContext.startAbility({
                  parameters: { uri: 'photodetail' },
                  bundleName: 'com.ohos.photos',
                  abilityName: 'com.ohos.photos.MainAbility'
                })
4、相机服务 CameraService.ts
(1)CameraService单例模式,用于提供操作相机相关的业务
代码如下:
private static instance: CameraService = null
    private constructor() {
        this.mThumbnailGetter = new ThumbnailGetter()
    }
    /**
     * 单例
     */
    public static getInstance(): CameraService {
        if (this.instance === null) {
            this.instance = new CameraService()
        }
        return this.instance
    }
(2)初始化相机
说明: 通过媒体相机提供的API(@ohos.multimedia.camera)getCameraManager()获取相机管理对象CameraManager,并注册相机状态变化监听器,实时更新相机状态,同时通过CameraManager…getSupportedCameras() 获取前期支持的相机设备集合,这里的相机设备包括当前设备上安装的相机设备和远程设备上的相机设备。
代码如下:
/**
     * 初始化
     */
    public async initCamera(): Promise<number> {
        console.info(`${TAG} initCamera`)
        if (this.mCameraManager === null) {
            this.mCameraManager = await camera.getCameraManager(globalThis.cameraAbilityContext)
            // 注册监听相机状态变化
            this.mCameraManager.on('cameraStatus', (cameraStatusInfo) => {
                console.info(`${TAG} camera Status: ${JSON.stringify(cameraStatusInfo)}`)
            })
            // 获取相机列表
            let cameras: Array<camera.CameraDevice> = await this.mCameraManager.getSupportedCameras()
            if (cameras) {
                this.mCameraCount = cameras.length
                console.info(`${TAG} mCameraCount: ${this.mCameraCount}`)
                if (this.mCameraCount === 0) {
                    return this.mCameraCount
                }
                for (let i = 0; i < cameras.length; i++) {
                    console.info(`${TAG} --------------Camera Info-------------`)
                    const tempCameraId: string = cameras[i].cameraId
                    console.info(`${TAG} camera_id: ${tempCameraId}`)
                    console.info(`${TAG} cameraPosition: ${cameras[i].cameraPosition}`)
                    console.info(`${TAG} cameraType: ${cameras[i].cameraType}`)
                    const connectionType = cameras[i].connectionType
                    console.info(`${TAG} connectionType: ${connectionType}`)
                    // CameraPosition 0-未知未知 1-后置 2-前置
                    // CameraType 0-未知类型 1-广角 2-超广角 3长焦 4-带景深信息
                    // connectionType 0-内置相机 1-USB连接相机 2-远程连接相机
                    // 判断本地相机还是远程相机
                    if (connectionType === camera.ConnectionType.CAMERA_CONNECTION_BUILT_IN) {
                        // 本地相机
                        this.displayCameraDevice(Constant.LOCAL_DEVICE_ID, cameras[i])
                    } else if (connectionType === camera.ConnectionType.CAMERA_CONNECTION_REMOTE) {
                        // 远程相机 相机ID格式 : deviceID__Camera_cameraID 例如:3c8e510a1d0807ea51c2e893029a30816ed940bf848754749f427724e846fab7__Camera_lcam001
                        const cameraKey: string = tempCameraId.split('__Camera_')[0]
                        console.info(`${TAG} cameraKey: ${cameraKey}`)
                        this.displayCameraDevice(cameraKey, cameras[i])
                    }
                }
                // todo test 选择首个相机
                this.mCurCameraDevice = cameras[0]
                console.info(`${TAG} mCurCameraDevice: ${this.mCurCameraDevice.cameraId}`)
            }
        }
        return this.mCameraCount
    }
    /**
     * 处理相机设备
     * @param key
     * @param cameraDevice
     */
    private displayCameraDevice(key: string, cameraDevice: camera.CameraDevice) {
        console.info(`${TAG} displayCameraDevice ${key}`)
        if (this.mCameraMap.has(key) && this.mCameraMap.get(key)?.length > 0) {
            console.info(`${TAG} displayCameraDevice has mCameraMap`)
            // 判断相机列表中是否已经存在此相机
            let isExist: boolean = false
            for (let item of this.mCameraMap.get(key)) {
                if (item.cameraId === cameraDevice.cameraId) {
                    isExist = true
                    break
                }
            }
            // 添加列表中没有的相机
            if (!isExist) {
                console.info(`${TAG} displayCameraDevice not exist , push ${cameraDevice.cameraId}`)
                this.mCameraMap.get(key).push(cameraDevice)
            } else {
                console.info(`${TAG} displayCameraDevice has existed`)
            }
        } else {
            let cameras: Array<camera.CameraDevice> = []
            console.info(`${TAG} displayCameraDevice push ${cameraDevice.cameraId}`)
            cameras.push(cameraDevice)
            this.mCameraMap.set(key, cameras)
        }
    }
(3)创建相机输入流
说明: CameraManager.createCameraInput()可以创建相机输出流CameraInput实例,CameraInput是在CaptureSession会话中使用的相机信息,支持打开相机、关闭相机等能力。
代码如下:
/**
     * 创建相机输入流
     * @param cameraIndex 相机下标
     * @param deviceId 设备ID
     */
    public async createCameraInput(cameraIndex?: number, deviceId?: string) {
        console.info(`${TAG} createCameraInput`)
        if (this.mCameraManager === null) {
            console.error(`${TAG} mCameraManager is null`)
            return
        }
        if (this.mCameraCount <= 0) {
            console.error(`${TAG} not camera device`)
            return
        }
        if (this.mCameraInput) {
            this.mCameraInput.release()
        }
        if (deviceId && this.mCameraMap.has(deviceId)) {
            if (cameraIndex < this.mCameraMap.get(deviceId)?.length) {
                this.mCurCameraDevice = this.mCameraMap.get(deviceId)[cameraIndex]
            } else {
                this.mCurCameraDevice = this.mCameraMap.get(deviceId)[0]
            }
        }
        console.info(`${TAG} mCurCameraDevice: ${this.mCurCameraDevice.cameraId}`)
        try {
            this.mCameraInput = await this.mCameraManager.createCameraInput(this.mCurCameraDevice)
            console.info(`${TAG} mCameraInput: ${JSON.stringify(this.mCameraInput)}`)
            this.mCameraInput.on('error', this.mCurCameraDevice, (error) => {
                console.error(`${TAG} CameraInput error: ${JSON.stringify(error)}`)
            })
            await this.mCameraInput.open()
        } catch (err) {
            if (err) {
                console.error(`${TAG} failed to createCameraInput`)
            }
        }
    }
(4)相机预览输出流
说明: CameraManager.createPreviewOutput() 创建预览输出流对象PreviewOutput,PreviewOutput继承CameraOutput,在CaptureSession会话中使用的输出信息,支持开始输出预览流、停止预览输出流、释放预览输出流等能力。
/**
     * 创建相机预览输出流
     */
    public async createPreviewOutput(Id: string, callback : PreviewCallBack) {
        console.info(`${TAG} createPreviewOutput`)
        if (this.mCameraManager === null) {
            console.error(`${TAG} createPreviewOutput mCameraManager is null`)
            return
        }
        this.Id = Id
        console.info(`${TAG} Id ${Id}}`)
        // 获取当前相机设备支持的输出能力
        let cameraOutputCap = await this.mCameraManager.getSupportedOutputCapability(this.mCurCameraDevice)
        if (!cameraOutputCap) {
            console.error(`${TAG} createPreviewOutput getSupportedOutputCapability error}`)
            return
        }
        console.info(`${TAG} createPreviewOutput cameraOutputCap ${JSON.stringify(cameraOutputCap)}`)
        let previewProfilesArray = cameraOutputCap.previewProfiles
        let previewProfiles: camera.Profile
        if (!previewProfilesArray || previewProfilesArray.length <= 0) {
            console.error(`${TAG} createPreviewOutput previewProfilesArray error}`)
            previewProfiles = {
                format: 1,
                size: {
                    width: 640,
                    height: 480
                }
            }
        } else {
            console.info(`${TAG} createPreviewOutput previewProfile length ${previewProfilesArray.length}`)
            previewProfiles = previewProfilesArray[0]
        }
        console.info(`${TAG} createPreviewOutput previewProfile[0] ${JSON.stringify(previewProfiles)}`)
        try {
            this.mPreviewOutput = await this.mCameraManager.createPreviewOutput(previewProfiles, id
)
            console.info(`${TAG} createPreviewOutput success`)
            // 监听预览帧开始
            this.mPreviewOutput.on('frameStart', () => {
                console.info(`${TAG} createPreviewOutput camera frame Start`)
                callback.onFrameStart()
            })
            this.mPreviewOutput.on('frameEnd', () => {
                console.info(`${TAG} createPreviewOutput camera frame End`)
                callback.onFrameEnd()
            })
            this.mPreviewOutput.on('error', (error) => {
                console.error(`${TAG} createPreviewOutput error: ${error}`)
            })
        } catch (err) {
            console.error(`${TAG} failed to createPreviewOutput ${err}`)
        }
    }
(5)拍照输出流
说明: CameraManager.createPhotoOutput()可以创建拍照输出对象 PhotoOutput,PhotoOutput继承CameraOutput 在拍照会话中使用的输出信息,支持拍照、判断是否支持镜像拍照、释放资源、监听拍照开始、拍照帧输出捕获、拍照结束等能力。
代码如下:
/**
     * 创建拍照输出流
     */
    public async createPhotoOutput(functionCallback: FunctionCallBack) {
        console.info(`${TAG} createPhotoOutput`)
        if (!this.mCameraManager) {
            console.error(`${TAG} createPhotoOutput mCameraManager is null`)
            return
        }
        // 通过宽、高、图片格式、容量创建ImageReceiver实例
        const receiver: image.ImageReceiver = image.createImageReceiver(Resolution.DEFAULT_WIDTH, Resolution.DEFAULT_HEIGHT, image.ImageFormat.JPEG, 8)
        const imageId: string = await receiver.getReceivingxxxxaceId()
        console.info(`${TAG} createPhotoOutput imageId: ${imageId}`)
        let cameraOutputCap = await this.mCameraManager.getSupportedOutputCapability(this.mCurCameraDevice)
        console.info(`${TAG} createPhotoOutput cameraOutputCap ${cameraOutputCap}`)
        if (!cameraOutputCap) {
            console.error(`${TAG} createPhotoOutput getSupportedOutputCapability error}`)
            return
        }
        let photoProfilesArray = cameraOutputCap.photoProfiles
        let photoProfiles: camera.Profile
        if (!photoProfilesArray || photoProfilesArray.length <= 0) {
            // 使用自定义的配置
            photoProfiles = {
                format: 2000,
                size: {
                    width: 1280,
                    height: 960
                }
            }
        } else {
            console.info(`${TAG} createPhotoOutput photoProfile length ${photoProfilesArray.length}`)
            photoProfiles = photoProfilesArray[0]
        }
        console.info(`${TAG} createPhotoOutput photoProfile ${JSON.stringify(photoProfiles)}`)
        try {
            this.mPhotoOutput = await this.mCameraManager.createPhotoOutput(photoProfiles, id)
            console.info(`${TAG} createPhotoOutput mPhotoOutput success`)
            // 保存图片
            this.mSaveCameraAsset.saveImage(receiver, Resolution.THUMBNAIL_WIDTH, Resolution.THUMBNAIL_HEIGHT, this.mThumbnailGetter, functionCallback)
        } catch (err) {
            console.error(`${TAG} createPhotoOutput failed to createPhotoOutput ${err}`)
        }
    }
- this.mSaveCameraAsset.saveImage(),这里将保存拍照的图片进行封装—SaveCameraAsset.ts,后面会单独介绍。
(6)会话管理
说明: 通过CameraManager.createCaptureSession()可以创建相机的会话类,保存相机运行所需要的所有资源CameraInput、CameraOutput,并向相机设备申请完成相机拍照或录像功能。CaptureSession对象提供了开始配置会话、添加CameraInput到会话、添加CameraOutput到会话、提交配置信息、开始会话、停止会话、释放等能力。
代码如下:
public async createSession(id: string) {
        console.info(`${TAG} createSession`)
        console.info(`${TAG} createSession id ${id}}`)
        this.id= id

        this.mCaptureSession = await this.mCameraManager.createCaptureSession()
        console.info(`${TAG} createSession mCaptureSession ${this.mCaptureSession}`)

        this.mCaptureSession.on('error', (error) => {
            console.error(`${TAG} CaptureSession error ${JSON.stringify(error)}`)
        })
        try {
            await this.mCaptureSession?.beginConfig()
            await this.mCaptureSession?.addInput(this.mCameraInput)
            if (this.mPhotoOutput != null) {
                console.info(`${TAG} createSession addOutput PhotoOutput`)
                await this.mCaptureSession?.addOutput(this.mPhotoOutput)
            }
            await this.mCaptureSession?.addOutput(this.mPreviewOutput)
        } catch (err) {
            if (err) {
                console.error(`${TAG} createSession beginConfig fail err:${JSON.stringify(err)}`)
            }
        }
        try {
            await this.mCaptureSession?.commitConfig()
        } catch (err) {
            if (err) {
                console.error(`${TAG} createSession commitConfig fail err:${JSON.stringify(err)}`)
            }
        }
        try {
            await this.mCaptureSession?.start()
        } catch (err) {
            if (err) {
                console.error(`${TAG} createSession start fail err:${JSON.stringify(err)}`)
            }
        }
        console.info(`${TAG} createSession mCaptureSession start`)
    }
5、拍照
说明: 通过PhotoOutput.capture()可以实现拍照功能。
代码如下:
/**
     * 拍照
     */
    public async takePicture() {
        console.info(`${TAG} takePicture`)
        if (!this.mCaptureSession) {
            console.info(`${TAG} takePicture session is release`)
            return
        }
        if (!this.mPhotoOutput) {
            console.info(`${TAG} takePicture mPhotoOutput is null`)
            return
        }
        try {
            const photoCaptureSetting: camera.PhotoCaptureSetting = {
                quality: camera.QualityLevel.QUALITY_LEVEL_HIGH,
                rotation: camera.ImageRotation.ROTATION_0,
                location: {
                    latitude: 0,
                    longitude: 0,
                    altitude: 0
                },
                mirror: false
            }
            await this.mPhotoOutput.capture(photoCaptureSetting)
        } catch (err) {
            console.error(`${TAG} takePicture err:${JSON.stringify(err)}`)
        }
    }
6、保存图片 SaveCameraAsset
说明: SaveCameraAsset.ts主要用于保存拍摄的图片,即是调用拍照操作后,会触发图片接收监听器,在将图片的字节流进行写入本地文件操作。
代码如下:
/**
 * 保存相机拍照的资源
 */
import image from '@ohos.multimedia.image'
import mediaLibrary from '@ohos.multimedia.mediaLibrary'
import { FunctionCallBack } from '../model/CameraService'
import DateTimeUtil from '../utils/DateTimeUtil'
import fileIO from '@ohos.file.fs';
import ThumbnailGetter from '../model/ThumbnailGetter'
let photoUri: string // 图片地址
const TAG: string = 'SaveCameraAsset'
export default class SaveCameraAsset {
    private lastSaveTime: string = ''
    private saveIndex: number = 0
    constructor() {
    }
    public getPhotoUri(): string {
        console.info(`${TAG} getPhotoUri = ${photoUri}`)
        return photoUri
    }
    /**
     *  保存拍照图片
     * @param imageReceiver 图像接收对象
     * @param thumbWidth 缩略图宽度
     * @param thumbHeight 缩略图高度
     * @param callback 回调
     */
    public saveImage(imageReceiver: image.ImageReceiver, thumbWidth: number, thumbHeight: number, thumbnailGetter :ThumbnailGetter, callback: FunctionCallBack) {
        console.info(`${TAG} saveImage`)
        const mDateTimeUtil = new DateTimeUtil()
        const fileKeyObj = mediaLibrary.FileKey
        const mediaType = mediaLibrary.MediaType.IMAGE
        let buffer = new ArrayBuffer(4096)
        const media = mediaLibrary.getMediaLibrary(globalThis.cameraAbilityContext) // 获取媒体库实例
        // 接收图片回调
        imageReceiver.on('imageArrival', async () => {
            console.info(`${TAG} saveImage ImageArrival`)
            // 使用当前时间命名
            const displayName = this.checkName(`IMG_${mDateTimeUtil.getDate()}_${mDateTimeUtil.getTime()}`) + '.jpg'
            console.info(`${TAG} displayName = ${displayName}}`)
            imageReceiver.readNextImage((err, imageObj: image.Image) => {
                if (imageObj === undefined) {
                    console.error(`${TAG} saveImage failed to get valid image error = ${err}`)
                    return
                }
                // 根据图像的组件类型从图像中获取组件缓存 4-JPEG类型
                imageObj.getComponent(image.ComponentType.JPEG, async (errMsg, imgComponent) => {
                    if (imgComponent === undefined) {
                        console.error(`${TAG} getComponent failed to get valid buffer error = ${errMsg}`)
                        return
                    }
                    if (imgComponent.byteBuffer) {
                        console.info(`${TAG} getComponent imgComponent.byteBuffer ${imgComponent.byteBuffer}`)
                        buffer = imgComponent.byteBuffer
                    } else {
                        console.info(`${TAG} getComponent imgComponent.byteBuffer is undefined`)
                    }
                    await imageObj.release()
                })
            })
            let publicPath:string = await media.getPublicDirectory(mediaLibrary.DirectoryType.DIR_CAMERA)
            console.info(`${TAG} saveImage publicPath = ${publicPath}`)
            //  创建媒体资源 返回提供封装文件属性
            const dataUri : mediaLibrary.FileAsset = await media.createAsset(mediaType, displayName, publicPath)
            // 媒体文件资源创建成功,将拍照的数据写入到媒体资源
            if (dataUri !== undefined) {
                photoUri = dataUri.uri
                console.info(`${TAG} saveImage photoUri: ${photoUri}`)
                const args = dataUri.id.toString()
                console.info(`${TAG} saveImage id: ${args}`)
                //  通过ID查找媒体资源
                const fetchOptions:mediaLibrary.MediaFetchOptions = {
                    selections : `${fileKeyObj.ID} = ?`,
                    selectionArgs : [args]
                }
                console.info(`${TAG} saveImage fetchOptions: ${JSON.stringify(fetchOptions)}`)
                const fetchFileResult = await media.getFileAssets(fetchOptions)
                const fileAsset = await fetchFileResult.getAllObject() // 获取文件检索结果中的所有文件资
                if (fileAsset != undefined) {
                    fileAsset.forEach((dataInfo) => {
                        dataInfo.open('Rw').then((fd) => { // RW是读写方式打开文件 获取fd
                            console.info(`${TAG} saveImage dataInfo.open called. fd: ${fd}`)
                            // 将缓存图片流写入资源
                            fileIO.write(fd, buffer).then(() => {
                                console.info(`${TAG} saveImage fileIO.write called`)
                                dataInfo.close(fd).then(() => {
                                    console.info(`${TAG} saveImage dataInfo.close called`)
                                    // 获取资源缩略图
                                    thumbnailGetter.getThumbnailInfo(thumbWidth, thumbHeight, photoUri).then((thumbnail => {
                                        if (thumbnail === undefined) {
                                            console.error(`${TAG} saveImage getThumbnailInfo undefined`)
                                            callback.onCaptureFailure()
                                        } else {
                                            console.info(`${TAG} photoUri: ${photoUri} PixelBytesNumber: ${thumbnail.getPixelBytesNumber()}`)
                                            callback.onCaptureSuccess(thumbnail, photoUri)
                                        }
                                    }))
                                }).catch(error => {
                                    console.error(`${TAG} saveImage close is error ${JSON.stringify(error)}`)
                                })
                            })
                        })
                    })
                } else {
                    console.error(`${TAG} saveImage fileAsset: is null`)
                }
            } else {
                console.error(`${TAG} saveImage photoUri is null`)
            }
        })
    }
    /**
     * 检测文件名称
     * @param fileName 文件名称
     * 如果同一时间有多张图片,则使用时间_index命名
     */
    private checkName(fileName: string): string {
        if (this.lastSaveTime == fileName) {
            this.saveIndex++
            return `${fileName}_${this.saveIndex}`
        }
        this.lastSaveTime = fileName
        this.saveIndex = 0
        return fileName
    }
}
7、获取缩略图
说明: 主要通过获取当前媒体库中根据时间排序,获取最新的图片并缩放图片大小后返回。
代码如下:
/**
     * 获取缩略图
     * @param callback
     */
    public getThumbnail(callback: FunctionCallBack) {
        console.info(`${TAG} getThumbnail`)
        this.mThumbnailGetter.getThumbnailInfo(Resolution.THUMBNAIL_WIDTH, Resolution.THUMBNAIL_HEIGHT).then((thumbnail) => {
            console.info(`${TAG} getThumbnail thumbnail = ${thumbnail}`)
            callback.thumbnail(thumbnail)
        })
    }
(1)ThumbnailGetter.ts
说明: 实现获取缩略图的对象。
代码如下:
/**
 * 缩略图处理器
 */
import mediaLibrary from '@ohos.multimedia.mediaLibrary';
import image from '@ohos.multimedia.image';
const TAG: string = 'ThumbnailGetter'
export default class ThumbnailGetter {
    public async getThumbnailInfo(width: number, height: number, uri?: string): Promise<image.PixelMap | undefined> {
        console.info(`${TAG} getThumbnailInfo`)
        // 文件关键信息
        const fileKeyObj = mediaLibrary.FileKey
        // 获取媒体资源公共路径
        const media: mediaLibrary.MediaLibrary = mediaLibrary.getMediaLibrary(globalThis.cameraAbilityContext)
        let publicPath: string = await media.getPublicDirectory(mediaLibrary.DirectoryType.DIR_CAMERA)
        console.info(`${TAG} publicPath = ${publicPath}`)
        let fetchOptions: mediaLibrary.MediaFetchOptions = {
            selections: `${fileKeyObj.RELATIVE_PATH}=?`, // 检索条件 RELATIVE_PATH-相对公共目录的路径
            selectionArgs: [publicPath] // 检索条件值
        }
        if (uri) {
            fetchOptions.uri = uri // 文件的URI
        } else {
            fetchOptions.order = fileKeyObj.DATE_ADDED + ' DESC'
        }
        console.info(`${TAG} getThumbnailInfo fetchOptions :  ${JSON.stringify(fetchOptions)}}`)
        const fetchFileResult = await media.getFileAssets(fetchOptions) // 文件检索结果集
        const count = fetchFileResult.getCount()
        console.info(`${TAG} count = ${count}`)
        if (count == 0) {
            return undefined
        }
        // 获取结果集合中的最后一张图片
        const lastFileAsset = await fetchFileResult.getFirstObject()
        if (lastFileAsset == null) {
            console.error(`${TAG} getThumbnailInfo lastFileAsset is null`)
            return undefined
        }
        const thumbnailPixelMap = lastFileAsset.getThumbnail({
            width: width,
            height: height
        })
        console.info(`${TAG} getThumbnailInfo thumbnailPixelMap ${JSON.stringify(thumbnailPixelMap)}}`)
        return thumbnailPixelMap
    }
}
8、释放资源
说明: 在相机设备切换时,如前后置摄像头切换或者不同设备之间的摄像头切换时都需要先释放资源,再重新创建新的相机会话才可以正常运行,释放的资源包括:释放相机输入流、预览输出流、拍照输出流、会话。
代码如下:
/**
     * 释放相机输入流
     */
    public async releaseCameraInput() {
        console.info(`${TAG} releaseCameraInput`)
        if (this.mCameraInput) {
            try {
                await this.mCameraInput.release()
            } catch (err) {
                console.error(`${TAG} releaseCameraInput ${err}}`)
            }
            this.mCameraInput = null
        }
    }
/**
     * 释放预览输出流
     */
    public async releasePreviewOutput() {
        console.info(`${TAG} releasePreviewOutput`)
        if (this.mPreviewOutput) {
            await this.mPreviewOutput.release()
            this.mPreviewOutput = null
        }
    }
/**
     * 释放拍照输出流
     */
    public async releasePhotoOutput() {
        console.info(`${TAG} releasePhotoOutput`)
        if (this.mPhotoOutput) {
            await this.mPhotoOutput.release()
            this.mPhotoOutput = null
        }
    }
    public async releaseSession() {
        console.info(`${TAG} releaseSession`)
        if (this.mCaptureSession) {
            await this.mCaptureSession.stop()
            console.info(`${TAG} releaseSession stop`)
            await this.mCaptureSession.release()
            console.info(`${TAG} releaseSession release`)
            this.mCaptureSession = null
            console.info(`${TAG} releaseSession null`)
        }
    }
2、通过相机管理类型创建相机预览与拍照需要的输入流(createCameraInput)和输出流(createPreviewOutPut、createPhotoOutput),同时创建相关会话管理(createCaptureSession)
3、将输入流、输出流添加到会话中,并启动会话
4、拍照可以直接使用PhotoOutput.capture执行拍照,并将拍照结果保存到媒体
5、在退出相机应用时,需要注意释放相关的资源。
因为分布式相机的应用开发内容比较长,这篇只说到主控端相机设备预览与拍照功能,下一篇会将结合分布式相关内容完成主控端设备调用远程相机进行预览的功能。


