ClickHouse PaaS 云原生多租户平台(Altinity.Cloud)
官网:https://altinity.cloud
PaaS 架构概览
设计一个拥有云原生编排能力、支持多云环境部署、自动化运维、弹性扩缩容、故障自愈等特性,同时提供租户隔离、权限管理、操作审计等企业级能力的高性能、低成本的分布式中间件服务是真挺难的。
SaaS 模式交付给用户
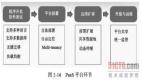
Sentry Snuba 事件大数据分析引擎架构概览
Snuba 是一个在 Clickhouse 基础上提供丰富数据模型、快速摄取消费者和查询优化器的服务。以搜索和提供关于 Sentry 事件数据的聚合引擎。
数据完全存储在 Clickhouse 表和物化视图中,它通过输入流(目前只有 Kafka 主题)摄入,可以通过时间点查询或流查询(订阅)进行查询。
文档:https://getsentry.github.io/snuba/architecture/overview.html
Kubernetes ClickHouse Operator 什么是 Kubernetes Operator? Kubernetes Operator 是一种封装、部署和管理 Kubernetes 应用的方法。我们使用 Kubernetes API(应用编程接口)和 kubectl 工具在 Kubernetes 上部署并管理 Kubernetes 应用。
Altinity Operator for ClickHouse Altinity:ClickHouse Operator 业界领先开源提供商。
Altinity:https://altinity.com/ GitHub:https://github.com/Altinity/clickhouse-operator Youtube:https://www.youtube.com/@Altinity 当然这种多租户隔离的 ClickHouse 中间件 PaaS 云平台,公司或云厂商几乎是不开源的。
RadonDB ClickHouse 云厂商(青云)基于 altinity-clickhouse-operator 定制的。对于快速部署生产集群做了些优化。
Helm + Operator 快速上云 ClickHouse 集群 云原生实验环境 VKE K8S Cluster,Vultr 托管集群(v1.23.14) Kubesphere v3.3.1 集群可视化管理,全栈的 Kubernetes 容器云 PaaS 解决方案。 Longhorn 1.14,Kubernetes 的云原生分布式块存储。 部署 clickhouse-operator 这里我们使用 RadonDB 定制的 Operator。
values.operator.yaml 定制如下两个参数: 复制 # operator 监控集群所有 namespace 的 clickhouse 部署
watchAllNamespaces: true
# 启用 operator 指标监控
enablePrometheusMonitor: true helm 部署 operator: 复制 cd vip- k8s- paas/ 10 - cloud- native- clickhouse
# 部署在 kube- system
helm install clickhouse- operator ./ clickhouse- operator - f values .operator .yaml - n kube- system
kubectl - n kube- system get po | grep clickhouse- operator
# clickhouse- operator- 6457 c6dcdd- szgpd 1 / 1 Running 0 3 m33s
kubectl - n kube- system get svc | grep clickhouse- operator
# clickhouse- operator- metrics ClusterIP 10.110 .129 .244 < none> 8888 / TCP 4 m18s
kubectl api- resources | grep clickhouse
# clickhouseinstallations chi clickhouse.radondb .com / v1 true ClickHouseInstallation
# clickhouseinstallationtemplates chit clickhouse.radondb .com / v1 true ClickHouseInstallationTemplate
# clickhouseoperatorconfigurations chopconf clickhouse.radondb .com / v1 true ClickHouseOperatorConfiguration1. 2. 3. 4. 5. 6. 7. 8. 9. 10. 11. 12. 13. 14. 15. 部署 clickhouse-cluster 这里我们使用 RadonDB 定制的 clickhouse-cluster helm charts。快速部署 2 shards + 2 replicas + 3 zk nodes 的集群。
values.cluster.yaml 定制: 复制 clickhouse:
clusterName: snuba- clickhouse- nodes
shardscount: 2
replicascount: 2
...
zookeeper:
install: true
replicas: 3 helm 部署 clickhouse-cluster: 复制 kubectl create ns cloud- clickhouse
helm install clickhouse ./ clickhouse- cluster - f values .cluster .yaml - n cloud- clickhouse
kubectl get po - n cloud- clickhouse
# chi- clickhouse- snuba- ck- nodes- 0 - 0 - 0 3 / 3 Running 5 ( 6 m13s ago) 16 m
# chi- clickhouse- snuba- ck- nodes- 0 - 1 - 0 3 / 3 Running 1 ( 5 m33s ago) 6 m23s
# chi- clickhouse- snuba- ck- nodes- 1 - 0 - 0 3 / 3 Running 1 ( 4 m58s ago) 5 m44s
# chi- clickhouse- snuba- ck- nodes- 1 - 1 - 0 3 / 3 Running 1 ( 4 m28s ago) 5 m10s
# zk- clickhouse- 0 1 / 1 Running 0 17 m
# zk- clickhouse- 1 1 / 1 Running 0 17 m
# zk- clickhouse- 2 1 / 1 Running 0 17 m借助 Operator 快速扩展 clickhouse 分片集群 使用如下命令,将 shardsCount 改为 3:
复制 kubectl edit chi/clickhouse -n cloud-clickhouse
查看 pods:
复制 kubectl get po -n cloud-clickhouse
# NAME READY STATUS RESTARTS AGE
# chi-clickhouse-snuba-ck-nodes-0-0-0 3/3 Running 5 (24m ago) 34m
# chi-clickhouse-snuba-ck-nodes-0-1-0 3/3 Running 1 (23m ago) 24m
# chi-clickhouse-snuba-ck-nodes-1-0-0 3/3 Running 1 (22m ago) 23m
# chi-clickhouse-snuba-ck-nodes-1-1-0 3/3 Running 1 (22m ago) 23m
# chi-clickhouse-snuba-ck-nodes-2-0-0 3/3 Running 1 (108s ago) 2m33s
# chi-clickhouse-snuba-ck-nodes-2-1-0 3/3 Running 1 (72s ago) 119s
# zk-clickhouse-0 1/1 Running 0 35m
# zk-clickhouse-1 1/1 Running 0 35m
# zk-clickhouse-2 1/1 Running 0 35m1. 2. 3. 4. 5. 6. 7. 8. 9. 10. 11. 12.
发现多出 chi-clickhouse-snuba-ck-nodes-2-0-0 与 chi-clickhouse-snuba-ck-nodes-2-1-0。分片与副本已自动由 Operator 新建。
小试牛刀 ReplicatedMergeTree+Distributed+Zookeeper 构建多分片多副本集群 连接 clickhouse 我们进入 Pod, 使用原生命令行客户端 clickhouse-client 连接。
复制 kubectl exec - it chi- clickhouse- snuba- ck- nodes- 0 - 0 - 0 - n cloud- clickhouse -- bash
kubectl exec - it chi- clickhouse- snuba- ck- nodes- 0 - 1 - 0 - n cloud- clickhouse -- bash
kubectl exec - it chi- clickhouse- snuba- ck- nodes- 1 - 0 - 0 - n cloud- clickhouse -- bash
kubectl exec - it chi- clickhouse- snuba- ck- nodes- 1 - 1 - 0 - n cloud- clickhouse -- bash
kubectl exec - it chi- clickhouse- snuba- ck- nodes- 2 - 0 - 0 - n cloud- clickhouse -- bash
kubectl exec - it chi- clickhouse- snuba- ck- nodes- 2 - 1 - 0 - n cloud- clickhouse -- bash 我们直接通过终端分别进入这 6 个 pod。然后进行测试:
复制 clickhouse- client --multiline -u username -h ip --password passowrd
# clickhouse- client - m创建分布式数据库 查看 system.clusters 复制 select * from system.clusters ; 2.创建名为 test 的数据库
复制 create database test on cluster 'snuba-ck-nodes' ;
# 删除:drop database test on cluster 'snuba-ck-nodes' ; 在各个节点查看,都已存在 test 数据库。 创建本地表(ReplicatedMergeTree) 建表语句如下: 在集群中各个节点 test 数据库中创建 t_local 本地表,采用 ReplicatedMergeTree 表引擎,接受两个参数:
zoo_path — zookeeper 中表的路径,针对表同一个分片的不同副本,定义相同路径。 '/clickhouse/tables/{shard}/test/t_local'
replica_name — zookeeper 中表的副本名称 复制 CREATE TABLE test.t_local on cluster 'snuba-ck-nodes'
(
EventDate DateTime ,
CounterID UInt32,
UserID UInt32
)
ENGINE = ReplicatedMergeTree( '/clickhouse/tables/{shard}/test/t_local' , '{replica}' )
PARTITION BY toYYYYMM( EventDate)
ORDER BY ( CounterID, EventDate, intHash32( UserID) )
SAMPLE BY intHash32( UserID) ; 宏(macros)占位符: 建表语句参数包含的宏替换占位符(如:{replica})。会被替换为配置文件里 macros 部分的值。
查看集群中 clickhouse 分片&副本节点 configmap:
复制 kubectl get configmap - n cloud- clickhouse | grep clickhouse
NAME DATA AGE
chi- clickhouse- common- configd 6 20 h
chi- clickhouse- common- usersd 6 20 h
chi- clickhouse- deploy- confd- snuba- ck- nodes- 0 - 0 2 20 h
chi- clickhouse- deploy- confd- snuba- ck- nodes- 0 - 1 2 20 h
chi- clickhouse- deploy- confd- snuba- ck- nodes- 1 - 0 2 20 h
chi- clickhouse- deploy- confd- snuba- ck- nodes- 1 - 1 2 20 h
chi- clickhouse- deploy- confd- snuba- ck- nodes- 2 - 0 2 19 h
chi- clickhouse- deploy- confd- snuba- ck- nodes- 2 - 1 2 19 h查看节点配置值:
复制 kubectl describe configmap chi- clickhouse- deploy- confd- snuba- ck- nodes- 0 - 0 - n cloud- clickhouse创建对应的分布式表(Distributed) 复制 CREATE TABLE test.t_dist on cluster 'snuba-ck-nodes'
(
EventDate DateTime ,
CounterID UInt32,
UserID UInt32
)
ENGINE = Distributed( 'snuba-ck-nodes' , test, t_local, rand( ) ) ;
# drop table test.t_dist on cluster 'snuba-ck-nodes' ; 这里,Distributed 引擎的所用的四个参数:
cluster - 服务为配置中的集群名(snuba-ck-nodes) database - 远程数据库名(test) table - 远程数据表名(t_local) sharding_key - (可选) 分片key(CounterID/rand()) 查看相关表,如:
复制 use test;
show tables;
# t_dist
# t_local通过分布式表插入几条数据:
复制 # 插入
INSERT INTO test.t_dist VALUES ( '2022-12-16 00:00:00' , 1 , 1 ) , ( '2023-01-01 00:00:00' , 2 , 2 ) , ( '2023-02-01 00:00:00' , 3 , 3 ) ; 任一节点查询数据:
复制 select * from test.t_dist ; 实战,为 Snuba 引擎提供 ClickHouse PaaS 拆解与分析 Sentry Helm Charts 在我们迁移到 Kubernetes Operator 之前,我们先拆解与分析下 sentry-charts 中自带的 clickhouse & zookeeper charts。
非官方 Sentry Helm Charts:
他的 Chart.yaml 如下:
复制 apiVersion: v2
appVersion: 22.11 .0
dependencies:
- condition: sourcemaps.enabled
name: memcached
repository: https: // charts.bitnami .com / bitnami
version: 6.1 .5
- condition: redis.enabled
name: redis
repository: https: // charts.bitnami .com / bitnami
version: 16.12 .1
- condition: kafka.enabled
name: kafka
repository: https: // charts.bitnami .com / bitnami
version: 16.3 .2
- condition: clickhouse.enabled
name: clickhouse
repository: https: // sentry- kubernetes.github .io / charts
version: 3.2 .0
- condition: zookeeper.enabled
name: zookeeper
repository: https: // charts.bitnami .com / bitnami
version: 9.0 .0
- alias: rabbitmq
condition: rabbitmq.enabled
name: rabbitmq
repository: https: // charts.bitnami .com / bitnami
version: 8.32 .2
- condition: postgresql.enabled
name: postgresql
repository: https: // charts.bitnami .com / bitnami
version: 10.16 .2
- condition: nginx.enabled
name: nginx
repository: https: // charts.bitnami .com / bitnami
version: 12.0 .4
description: A Helm chart for Kubernetes
maintainers:
- name: sentry- kubernetes
name: sentry
type: application
version: 17.9 .0 1. 2. 3. 4. 5. 6. 7. 8. 9. 10. 11. 12. 13. 14. 15. 16. 17. 18. 19. 20. 21. 22. 23. 24. 25. 26. 27. 28. 29. 30. 31. 32. 33. 34. 35. 36. 37. 38. 39. 40. 41. 42. 这个 sentry-charts 将所有中间件 helm charts 耦合依赖在一起部署,不适合 sentry 微服务 & 中间件集群扩展。更高级的做法是每个中间件拥有定制的 Kubernetes Operator(如:clickhouse-operator ) & 独立的 K8S 集群,形成中间件 PaaS 平台对外提供服务。
这里我们拆分中间件 charts 到独立的 namespace 或单独的集群运维。设计为:
ZooKeeper 命名空间:cloud-zookeeper-paas ClickHouse 命名空间:cloud-clickhouse-paas 独立部署 ZooKeeper Helm Chart 这里 zookeeper chart 采用的是 bitnami/zookeeper,他的仓库地址如下:
创建命名空间: 复制 kubectl create ns cloud- zookeeper- paas简单定制下 values.yaml: 复制 # 暴露下 prometheus 监控所需的服务
metrics:
containerPort: 9141
enabled: true
....
....
service:
annotations: { }
clusterIP: ""
disableBaseClientPort: false
externalTrafficPolicy: Cluster
extraPorts: [ ]
headless:
annotations: { }
publishNotReadyAddresses: true
loadBalancerIP: ""
loadBalancerSourceRanges: [ ]
nodePorts:
client: ""
tls: ""
ports:
client: 2181
election: 3888
follower: 2888
tls: 3181
sessionAffinity: None
type: ClusterIP1. 2. 3. 4. 5. 6. 7. 8. 9. 10. 11. 12. 13. 14. 15. 16. 17. 18. 19. 20. 21. 22. 23. 24. 25. 26. 27. 注意:在使用支持外部负载均衡器的云提供商的服务时,需设置 Sevice 的 type 的值为 "LoadBalancer", 将为 Service 提供负载均衡器。来自外部负载均衡器的流量将直接重定向到后端 Pod 上,不过实际它们是如何工作的,这要依赖于云提供商。
helm 部署: 复制 helm install zookeeper ./ zookeeper - f values .yaml - n cloud- zookeeper- paas集群内,可使用 zookeeper.cloud-zookeeper-paas.svc.cluster.local:2181 对外提供服务。
zkCli 连接 ZooKeeper: 复制 export POD_NAME= $( kubectl get pods --namespace cloud-zookeeper-paas -l "app.kubernetes.io/name=zookeeper,app.kubernetes.io/instance=zookeeper,app.kubernetes.io/compnotallow=zookeeper" -o jsnotallow="{.items[0].metadata.name}")
kubectl - n cloud- zookeeper- paas exec - it $POD_NAME -- zkCli.sh
# test
[ zk: localhost: 2181 ( CONNECTED) 0 ] ls /
[ zookeeper]
[ zk: localhost: 2181 ( CONNECTED) 1 ] ls / zookeeper
[ config, quota]
[ zk: localhost: 2181 ( CONNECTED) 2 ] quit
# 外部访问
# kubectl port- forward --namespace cloud-zookeeper-paas svc/zookeeper 2181: & zkCli.sh 127.0.0.1:2181 1. 2. 3. 4. 5. 6. 7. 8. 9. 10. 11. 12. 13. 查看 zoo.cfg 复制 kubectl - n cloud- zookeeper- paas exec - it $POD_NAME -- cat /opt/bitnami/zookeeper/conf/zoo.cfg 复制 # The number of milliseconds of each tick
tickTime= 2000
# The number of ticks that the initial
# synchronization phase can take
initLimit= 10
# The number of ticks that can pass between
# sending a request and getting an acknowledgement
syncLimit= 5
# the directory where the snapshot is stored.
# do not use / tmp for storage, / tmp here is just
# example sakes.
dataDir=/ bitnami/ zookeeper/ data
# the port at which the clients will connect
clientPort= 2181
# the maximum number of client connections.
# increase this if you need to handle more clients
maxClientCnxns= 60
#
# Be sure to read the maintenance section of the
# administrator guide before turning on autopurge.
#
# https: // zookeeper.apache .org / doc/ current/ zookeeperAdmin.html#sc_maintenance
#
# The number of snapshots to retain in dataDir
autopurge.snapRetainCount = 3
# Purge task interval in hours
# Set to "0" to disable auto purge feature
autopurge.purgeInterval = 0
## Metrics Providers
#
# https: // prometheus.io Metrics Exporter
metricsProvider.className = org.apache .zookeeper .metrics .prometheus .PrometheusMetricsProvider
#metricsProvider.httpHost = 0.0 .0 .0
metricsProvider.httpPort = 9141
metricsProvider.exportJvmInfo = true
preAllocSize= 65536
snapCount= 100000
maxCnxns= 0
recnotallow= false
quorumListenOnAllIPs= false
4 lw.commands .whitelist = srvr, mntr, ruok
maxSessinotallow= 40000
admin.serverPort = 8080
admin.enableServer = true
server.1 = zookeeper- 0 .zookeeper - headless.cloud - zookeeper- paas.svc .cluster .local : 2888 : 3888 ; 2181
server.2 = zookeeper- 1 .zookeeper - headless.cloud - zookeeper- paas.svc .cluster .local : 2888 : 3888 ; 2181
server.3 = zookeeper- 2 .zookeeper - headless.cloud - zookeeper- paas.svc .cluster .local : 2888 : 3888 ; 2181 1. 2. 3. 4. 5. 6. 7. 8. 9. 10. 11. 12. 13. 14. 15. 16. 17. 18. 19. 20. 21. 22. 23. 24. 25. 26. 27. 28. 29. 30. 31. 32. 33. 34. 35. 36. 37. 38. 39. 40. 41. 42. 43. 44. 45. 46. 47. 48. 独立部署 ClickHouse Helm Chart 这里 clickhouse chart 采用的是 sentry-kubernetes/charts 自己维护的一个版本:
这个自带的 clickhouse-charts 存在些问题,Service 部分需简单修改下允许配置 "type:LoadBalancer" or "type:NodePort"。
注意:在使用支持外部负载均衡器的云提供商的服务时,需设置 Sevice 的 type 的值为 "LoadBalancer", 将为 Service 提供负载均衡器。来自外部负载均衡器的流量将直接重定向到后端 Pod 上,不过实际它们是如何工作的,这要依赖于云提供商。
创建命名空间: 复制 kubectl create ns cloud- clickhouse- paas简单定制下 values.yaml: 注意上面 zoo.cfg 的 3 个 zookeeper 实例的地址:
复制 server.1 = zookeeper- 0 .zookeeper - headless.cloud - zookeeper- paas.svc .cluster .local : 2888 : 3888 ; 2181
server.2 = zookeeper- 1 .zookeeper - headless.cloud - zookeeper- paas.svc .cluster .local : 2888 : 3888 ; 2181
server.3 = zookeeper- 2 .zookeeper - headless.cloud - zookeeper- paas.svc .cluster .local : 2888 : 3888 ; 2181 复制 # 修改 zookeeper_servers
clickhouse:
configmap:
zookeeper_servers:
config:
- hostTemplate: 'zookeeper-0.zookeeper-headless.cloud-zookeeper-paas.svc.cluster.local'
index: clickhouse
port: "2181"
- hostTemplate: 'zookeeper-1.zookeeper-headless.cloud-zookeeper-paas.svc.cluster.local'
index: clickhouse
port: "2181"
- hostTemplate: 'zookeeper-2.zookeeper-headless.cloud-zookeeper-paas.svc.cluster.local'
index: clickhouse
port: "2181"
enabled: true
operation_timeout_ms: "10000"
session_timeout_ms: "30000"
# 暴露下 prometheus 监控所需的服务
metrics:
enabled: true 1. 2. 3. 4. 5. 6. 7. 8. 9. 10. 11. 12. 13. 14. 15. 16. 17. 18. 19. 20. 21. 当然这里也可以不用 Headless Service,因为是同一个集群的不同 namespace 的内部访问,所以也可简单填入 ClusterIP 类型 Sevice:
复制 # 修改 zookeeper_servers
clickhouse:
configmap:
zookeeper_servers:
config:
- hostTemplate: 'zookeeper.cloud-zookeeper-paas.svc.cluster.local'
index: clickhouse
port: "2181"
enabled: true
operation_timeout_ms: "10000"
session_timeout_ms: "30000"
# 暴露下 prometheus 监控所需的服务
metrics:
enabled: true 1. 2. 3. 4. 5. 6. 7. 8. 9. 10. 11. 12. 13. 14. 15. helm 部署: 复制 helm install clickhouse ./ clickhouse - f values .yaml - n cloud- clickhouse- paas连接 clickhouse 复制 kubectl - n cloud- clickhouse- paas exec - it clickhouse- 0 -- clickhouse-client --multiline --host="clickhouse-1.clickhouse-headless.cloud-clickhouse-paas" 验证集群 复制 show databases;
select * from system.clusters ;
select * from system.zookeeper where path = '/clickhouse' ; 当前 ClickHouse 集群的 ConfigMap kubectl get configmap -n cloud-clickhouse-paas | grep clickhouse
复制 clickhouse- config 1 28 h
clickhouse- metrica 1 28 h
clickhouse- users 1 28 hclickhouse-config(config.xml) 复制 < yandex>
< path>/ var/ lib/ clickhouse/</ path>
< tmp_path>/ var/ lib/ clickhouse/ tmp/</ tmp_path>
< user_files_path>/ var/ lib/ clickhouse/ user_files/</ user_files_path>
< format_schema_path>/ var/ lib/ clickhouse/ format_schemas/</ format_schema_path>
< include_from>/ etc/ clickhouse- server/ metrica.d / metrica.xml </ include_from>
< users_config> users.xml </ users_config>
< display_name> clickhouse</ display_name>
< listen_host> 0.0 .0 .0 </ listen_host>
< http_port> 8123 </ http_port>
< tcp_port> 9000 </ tcp_port>
< interserver_http_port> 9009 </ interserver_http_port>
< max_connections> 4096 </ max_connections>
< keep_alive_timeout> 3 </ keep_alive_timeout>
< max_concurrent_queries> 100 </ max_concurrent_queries>
< uncompressed_cache_size> 8589934592 </ uncompressed_cache_size>
< mark_cache_size> 5368709120 </ mark_cache_size>
< timezone> UTC</ timezone>
< umask> 022 </ umask>
< mlock_executable> false </ mlock_executable>
< remote_servers incl= "clickhouse_remote_servers" optinotallow= "true" />
< zookeeper incl= "zookeeper-servers" optinotallow= "true" />
< macros incl= "macros" optinotallow= "true" />
< builtin_dictionaries_reload_interval> 3600 </ builtin_dictionaries_reload_interval>
< max_session_timeout> 3600 </ max_session_timeout>
< default_session_timeout> 60 </ default_session_timeout>
< disable_internal_dns_cache> 1 </ disable_internal_dns_cache>
< query_log>
< database> system</ database>
< table > query_log</ table >
< partition_by> toYYYYMM( event_date) </ partition_by>
< flush_interval_milliseconds> 7500 </ flush_interval_milliseconds>
</ query_log>
< query_thread_log>
< database> system</ database>
< table > query_thread_log</ table >
< partition_by> toYYYYMM( event_date) </ partition_by>
< flush_interval_milliseconds> 7500 </ flush_interval_milliseconds>
</ query_thread_log>
< distributed_ddl>
< path>/ clickhouse/ task_queue/ ddl</ path>
</ distributed_ddl>
< logger>
< level> trace</ level>
< log>/ var/ log/ clickhouse- server/ clickhouse- server.log </ log>
< errorlog>/ var/ log/ clickhouse- server/ clickhouse- server.err .log </ errorlog>
< size> 1000 M</ size>
< count > 10 </ count >
</ logger>
</ yandex> 1. 2. 3. 4. 5. 6. 7. 8. 9. 10. 11. 12. 13. 14. 15. 16. 17. 18. 19. 20. 21. 22. 23. 24. 25. 26. 27. 28. 29. 30. 31. 32. 33. 34. 35. 36. 37. 38. 39. 40. 41. 42. 43. 44. 45. 46. 47. 48. 49. 50. 51. 52. 53. 54. 55. 56. clickhouse-metrica(metrica.xml) 复制 < yandex>
< zookeeper- servers>
< node index= "clickhouse" >
< host> zookeeper- 0 .zookeeper - headless.cloud - zookeeper- paas.svc .cluster .local </ host>
< port> 2181 </ port>
</ node>
< node index= "clickhouse" >
< host> zookeeper- 1 .zookeeper - headless.cloud - zookeeper- paas.svc .cluster .local </ host>
< port> 2181 </ port>
</ node>
< node index= "clickhouse" >
< host> zookeeper- 2 .zookeeper - headless.cloud - zookeeper- paas.svc .cluster .local </ host>
< port> 2181 </ port>
</ node>
< session_timeout_ms> 30000 </ session_timeout_ms>
< operation_timeout_ms> 10000 </ operation_timeout_ms>
< root></ root>
< identity></ identity>
</ zookeeper- servers>
< clickhouse_remote_servers>
< clickhouse>
< shard>
< replica>
< internal_replication> true </ internal_replication>
< host> clickhouse- 0 .clickhouse - headless.cloud - clickhouse- paas.svc .cluster .local </ host>
< port> 9000 </ port>
< user> default</ user>
< compression> true </ compression>
</ replica>
</ shard>
< shard>
< replica>
< internal_replication> true </ internal_replication>
< host> clickhouse- 1 .clickhouse - headless.cloud - clickhouse- paas.svc .cluster .local </ host>
< port> 9000 </ port>
< user> default</ user>
< compression> true </ compression>
</ replica>
</ shard>
< shard>
< replica>
< internal_replication> true </ internal_replication>
< host> clickhouse- 2 .clickhouse - headless.cloud - clickhouse- paas.svc .cluster .local </ host>
< port> 9000 </ port>
< user> default</ user>
< compression> true </ compression>
</ replica>
</ shard>
</ clickhouse>
</ clickhouse_remote_servers>
< macros>
< replica from_env= "HOSTNAME" ></ replica>
< shard from_env= "SHARD" ></ shard>
</ macros>
</ yandex> 1. 2. 3. 4. 5. 6. 7. 8. 9. 10. 11. 12. 13. 14. 15. 16. 17. 18. 19. 20. 21. 22. 23. 24. 25. 26. 27. 28. 29. 30. 31. 32. 33. 34. 35. 36. 37. 38. 39. 40. 41. 42. 43. 44. 45. 46. 47. 48. 49. 50. 51. 52. 53. 54. 55. 56. clickhouse-users(users.xml) Sentry Helm Charts 定制 接入 ClickHouse PaaS, 单集群多节点 我们简单修改 values.yml
禁用 sentry-charts 中的 clickHouse & zookeeper 复制 clickhouse:
enabled: false
zookeeper:
enabled: false 修改 externalClickhouse 复制 externalClickhouse:
database: default
host: "clickhouse.cloud-clickhouse-paas.svc.cluster.local"
httpPort: 8123
password: ""
singleNode: false
clusterName: "clickhouse"
tcpPort: 9000
username: default注意:
这里只是简单的集群内部接入 1 个多节点分片集群,而 Snuba 系统的设计是允许你接入多个 ClickHouse 多节点多分片多副本集群,将多个 Schema 分散到不同的集群,从而实现超大规模吞吐。因为是同一个集群的不同 namespace 的内部访问,所以这里简单填入类型为 ClusterIP Sevice 即可。 注意这里 singleNode 要设置成 false。因为我们是多节点,同时我们需要提供 clusterName:源码分析: 这将用于确定:以及确定来使用不同的 ClickHouse Table Engines 等。 当然,ClickHouse 本身是一个单独的技术方向,这里就不展开讨论了。 将运行哪些迁移(仅本地或本地和分布式表)
查询中的差异 - 例如是否选择了 _local 或 _dist 表
部署 复制 helm install sentry ./ sentry - f values .yaml - n sentry验证 _local 与 _dist 表以及 system.zookeeper 复制 kubectl - n cloud- clickhouse- paas exec - it clickhouse- 0 -- clickhouse-client --multiline --host="clickhouse-1.clickhouse-headless.cloud-clickhouse-paas"
show databases;
show tables;
select * from system.zookeeper where path = '/clickhouse' ;
高级部分 & 超大规模吞吐 接入 ClickHouse 多集群/多节点/多分片/多副本的中间件 PaaS 独立部署多套 VKE LoadBlancer+ VKE K8S Cluster + ZooKeeper-Operator + ClickHouse-Operator,分散 Schema 到不同的集群以及多节点分片。
分析 Snuba 系统设计 查看测试用例源码,了解系统设计与高阶配置
关于针对 ClickHouse 集群各个分片、副本之间的读写负载均衡、连接池等问题。Snuba 在系统设计、代码层面部分就已经做了充分的考虑以及优化。
关于 ClickHouse Operator 独立的多个云原生编排集群以及 Snuba 系统设计等高级部分会在 VIP 专栏直播课单独讲解。