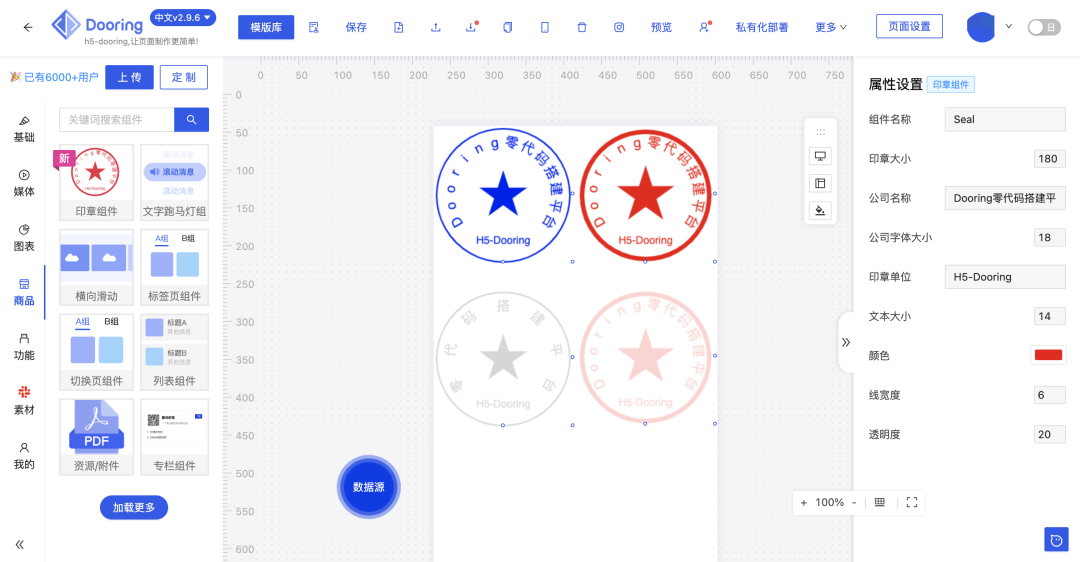
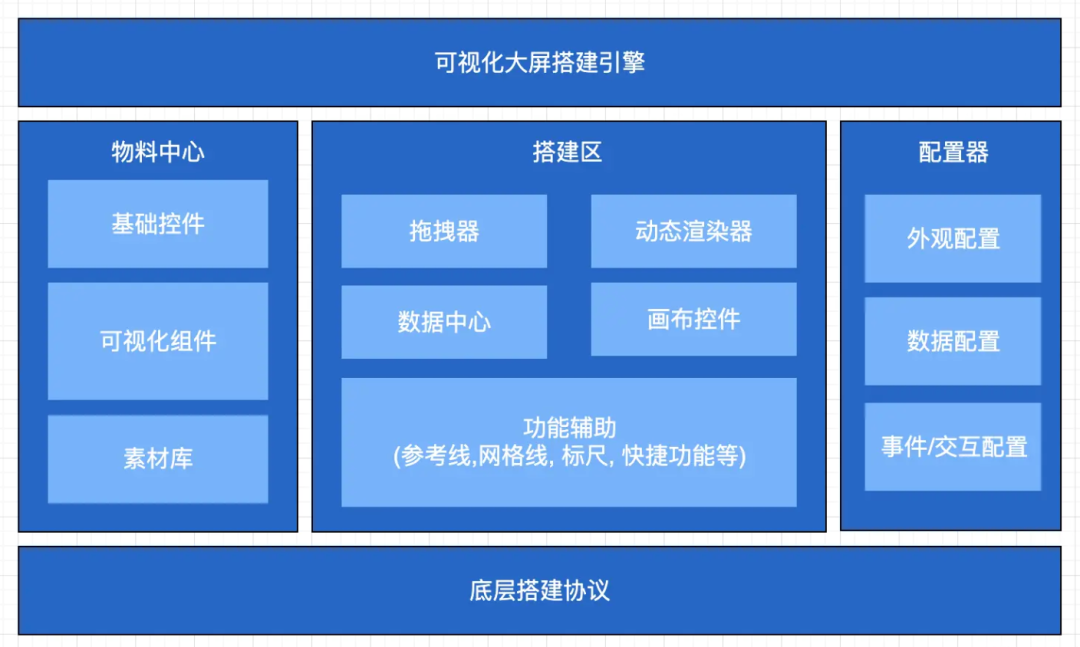
我们都知道任何低代码或者零代码搭建产品都非常注重底层搭建协议(schema), 这些产品通常会设计一套向上兼容且可扩展的 DSL 结构, 来实现页面元件的标准化配置,
今天继续和大家分享一下比较有意思的可视化印章组件的实现.
你将收获
低代码组件的基本设计模式 印章组件的设计原理(canvas相关) 如何快速将任意组件集成到低代码平台 低代码组件的基本设计模式 我们都知道任何低代码或者零代码搭建产品都非常注重底层搭建协议(schema), 这些产品通常会设计一套向上兼容且可扩展的 DSL 结构, 来实现页面元件的标准化配置, 并支持元件的向上扩展:
在设计 H5-Dooring 可视化搭建平台前, 我也参考了很多标准化软件数据协议, 给我启发最大的就是 ODATA 规范, 具体设计细节可以参考我之前的文章:
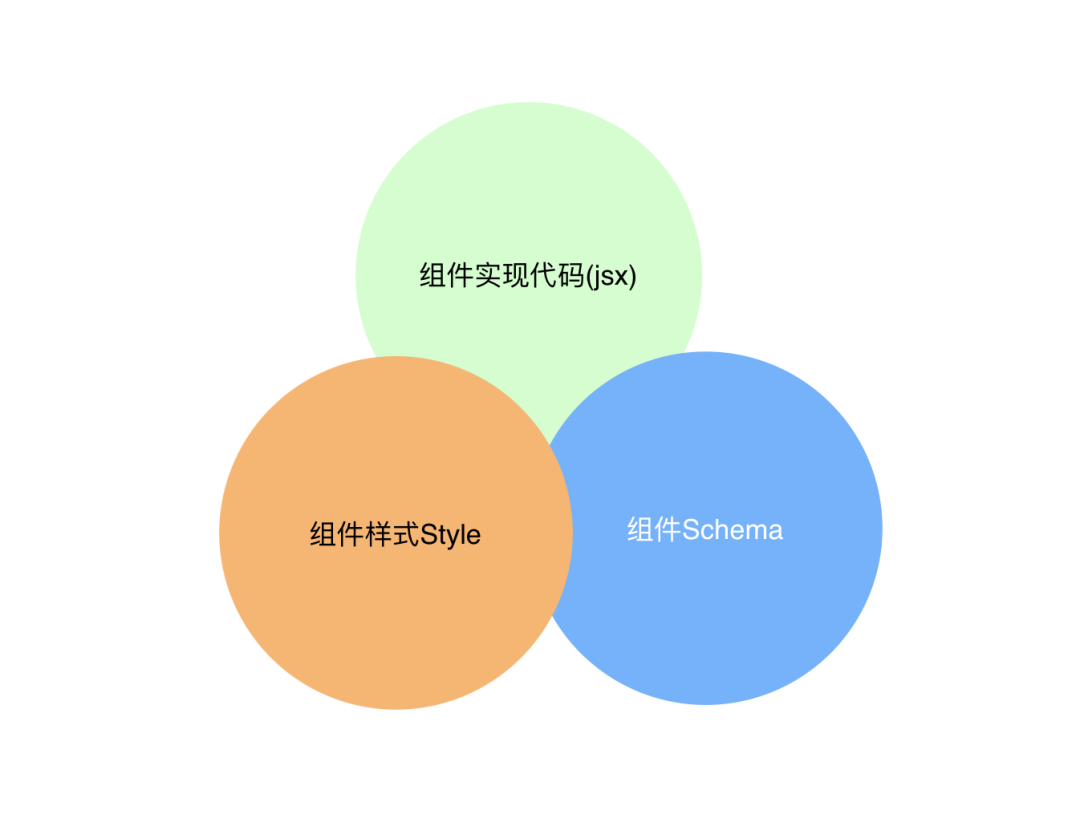
之所以要介绍低代码的 schema 设计, 是因为低代码组件的设计与开发需要依赖 schema 的定义, 为了满足低代码组件能被用户实时编辑, 其基本的组成类似如下:
我们只需要在写普通组件的基础上加一个 schema 文件即可, 这里以Dooring组件来举一个例子:
复制 // 组件代码tsx
import styles from './index.less' ;
import React, { memo, useState } from 'react' ;
import { IHeaderConfig } from './schema' ;
const Header = memo( ( props: IHeaderConfig) => {
const { cpName, bgColor, logo, height } = props;
return (
< header className= { styles.header } style= { { backgroundColor: bgColor, height: height + 'px' } } >
< div className= { styles.logo } >
H5- dooring
</ div>
</ header>
) ;
} ) ;
export default Header;
// 组件样式
.header {
box- sizing: content- box;
padding: 3 px 12 px;
background- color: #000;
.logo {
max- width: 160 px;
overflow: hidden;
img {
height: 100 % ;
object- fit: contain;
}
}
}
// 组件schema
const Header = {
editData: [
...baseConfig,
{
key: 'bgColor' ,
name: 背景色,
type: 'Color' ,
} ,
{
key: 'height' ,
name: 高,
type: 'Number' ,
} ,
{
key: 'logo' ,
name: 'logo' ,
type: 'Upload' ,
isCrop: false ,
cropRate: 1000 / 618 ,
}
] ,
config: {
...baseDefault,
bgColor: 'rgba(245,245,245,1)' ,
logo: [
{
uid: '001' ,
name: 'image.png' ,
status: 'done' ,
url: 'http://cdn.dooring.cn/dr/logo.ff7fc6bb.png' ,
} ,
] ,
height: 50 ,
} ,
} ;
export default Header; 1. 2. 3. 4. 5. 6. 7. 8. 9. 10. 11. 12. 13. 14. 15. 16. 17. 18. 19. 20. 21. 22. 23. 24. 25. 26. 27. 28. 29. 30. 31. 32. 33. 34. 35. 36. 37. 38. 39. 40. 41. 42. 43. 44. 45. 46. 47. 48. 49. 50. 51. 52. 53. 54. 55. 56. 57. 58. 59. 60. 61. 62. 63. 64. 65. 66. 67. 68. 69. 70. 71. 72. 73.
在初步了解了低代码组件的设计模式之后, 我们接下来就来实现一下低代码印章组件的实现.
印章组件的设计原理
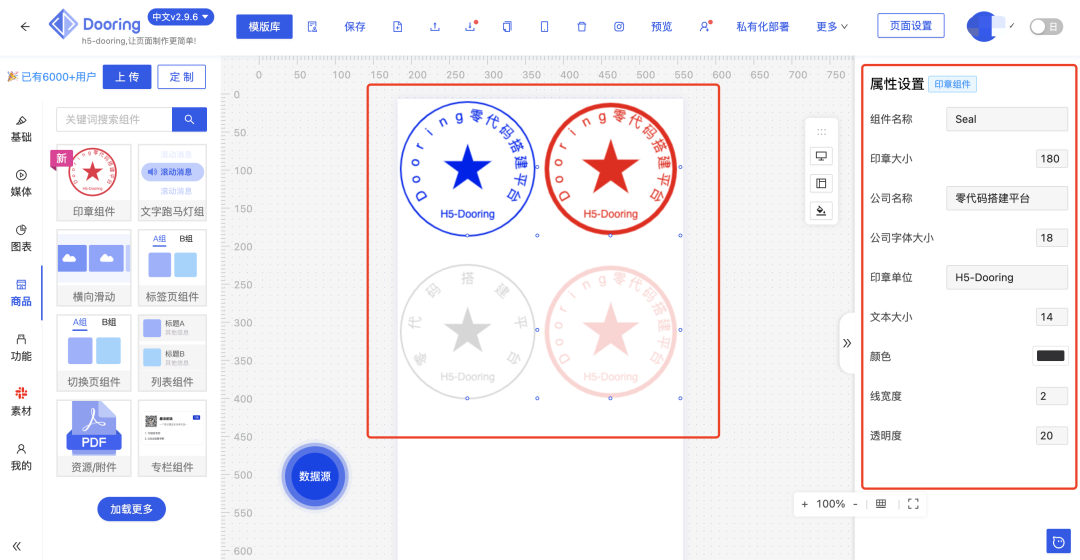
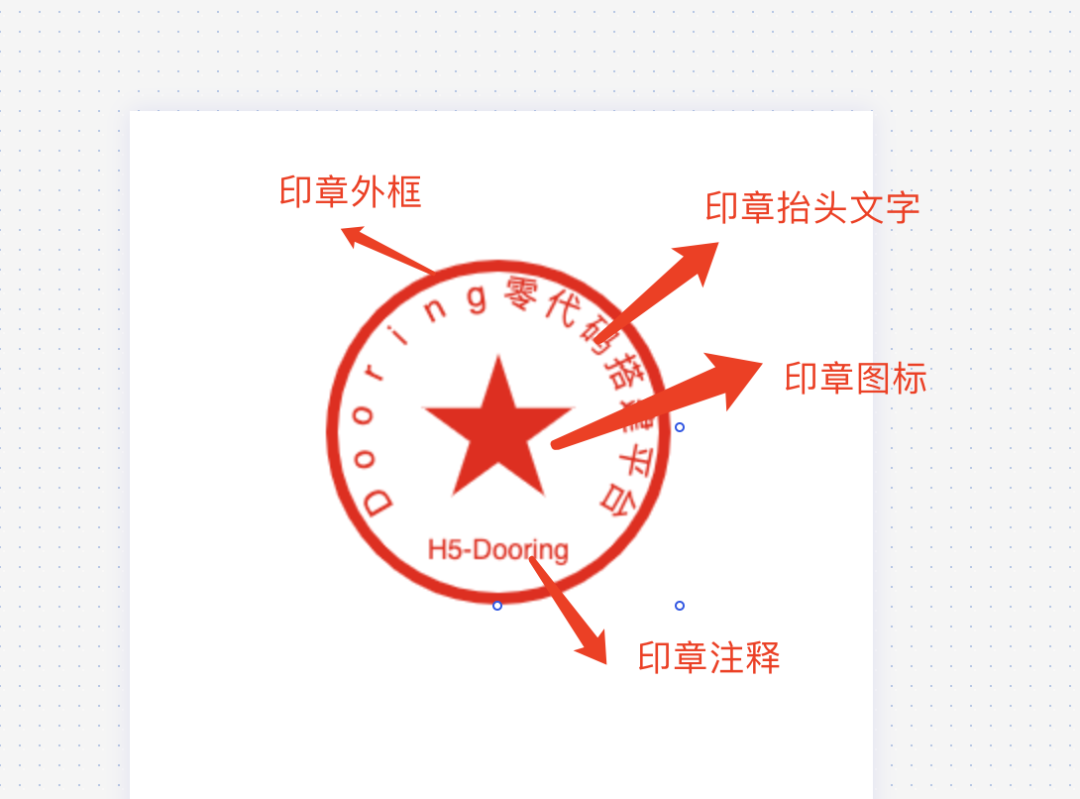
我们由上图可以看出, 一个印章组件包含如下几个部分:
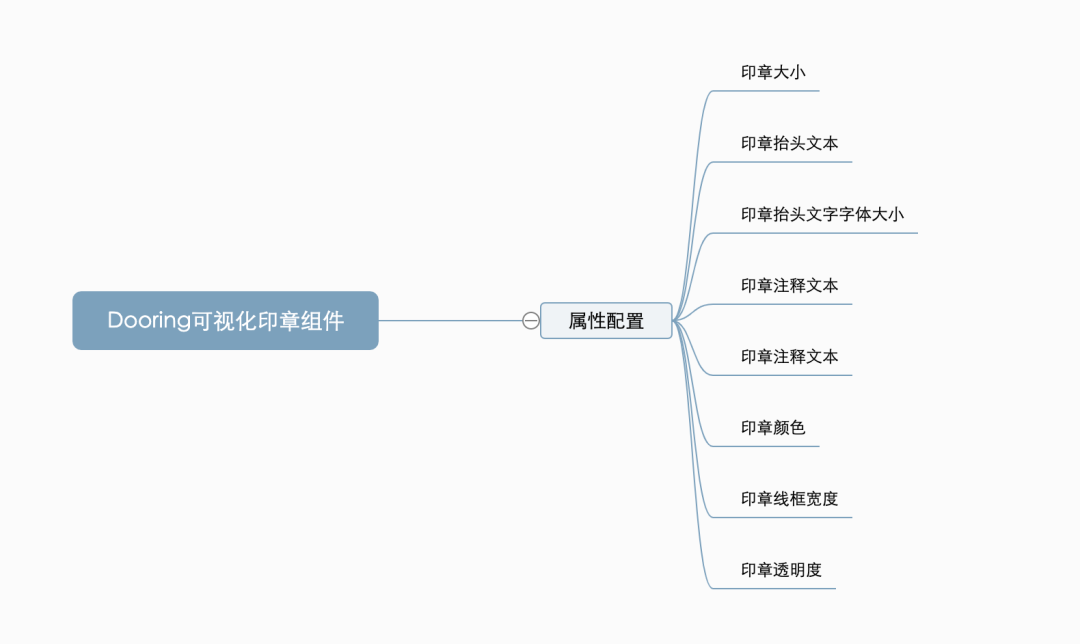
对于印章的绘制, 我们可以采用 canvas 或者 svg 来实现, 这里我采用 canvas 来实现, 首先我们需要定义组件可以对外暴露的属性, 以便在低代码平台中可以让用户来自定义, 这里我直接列出基本的配置:
接下来我们就来实现一下吧!
1. 绘制印章边框
复制 let canvas = dom;
let context = canvas.getContext ( '2d' ) as any;
// 初始化
canvas.width = w0;
canvas.height = w0;
// 绘制印章边框
let width= canvas.width / 2 ;
let height= canvas.height / 2 ;
context.lineWidth = lineWidth;
context.strokeStyle = color;
context.beginPath ( ) ;
context.arc ( width, height, width - lineWidth, 0 , Math.PI * 2 ) ;
context.stroke ( ) ; 1. 2. 3. 4. 5. 6. 7. 8. 9. 10. 11. 12. 13. 14. 15.
由上面代码可知我们用 canvas 的 arc 方法来创建一个圆形边框.
2. 绘制五角星
创建一个五角星形状. 该五角星的中心坐标为(x0, y0),中心到顶点的距离为 radius, rotate=0 时一个顶点在对称轴上
复制 function create5star( context: any, sx: number, sy: number, radius: number, color: string, rotato: number) {
context.save ( ) ;
context.fillStyle = color;
// 移动坐标原点
context.translate ( sx, sy) ;
// 旋转
context.rotate ( Math.PI + rotato) ;
// 创建路径
context.beginPath ( ) ;
let x = Math.sin ( 0 ) ;
let y= Math.cos ( 0 ) ;
let dig = Math.PI / 5 * 4 ;
for( let i = 0 ; i< 5 ; i++ ) {
// 画五角星的五条边
let x = Math.sin ( i* dig) ;
let y = Math.cos ( i* dig) ;
context.lineTo ( x* radius, y* radius) ;
}
context.closePath ( ) ;
context.stroke ( ) ;
context.fill ( ) ;
context.restore ( ) ;
} 1. 2. 3. 4. 5. 6. 7. 8. 9. 10. 11. 12. 13. 14. 15. 16. 17. 18. 19. 20. 21. 22. 23.
3. 绘制印章名称
复制 context.font = `${ fontSize} px Helvetica`;
// 设置文本的垂直对齐方式
context.textBaseline = 'middle' ;
// 设置文本的水平对对齐方式
context.textAlign = 'center' ;
context.lineWidth = 1 ;
context.fillStyle = color;
context.fillText ( name, width, height+ 60 ) ;
4. 绘制环形印章单位
复制 // 平移到此位置
context.translate ( width, height) ;
context.font = `${ componySize} px Helvetica`
let count = company.length ; // 字数
let angle = 4 * Math.PI / ( 3 * ( count - 1 ) ) ; // 字间角度
let chars = company.split ( "" ) ;
let c;
for ( let i = 0 ; i < count ; i++ ) {
// 需要绘制的字符
c = chars[ i] ;
if( i== 0 )
context.rotate ( 5 * Math.PI / 6 ) ;
else
context.rotate ( angle) ;
context.save ( ) ;
// 平移到此位置, 此时字和x轴垂直
context.translate ( 90 , 0 ) ;
// 旋转90度, 让字平行于x轴
context.rotate ( Math.PI / 2 ) ;
// 此点为字的中心点
context.fillText ( c, 0 , 20 ) ;
context.restore ( ) ;
} 1. 2. 3. 4. 5. 6. 7. 8. 9. 10. 11. 12. 13. 14. 15. 16. 17. 18. 19. 20. 21. 22. 23.
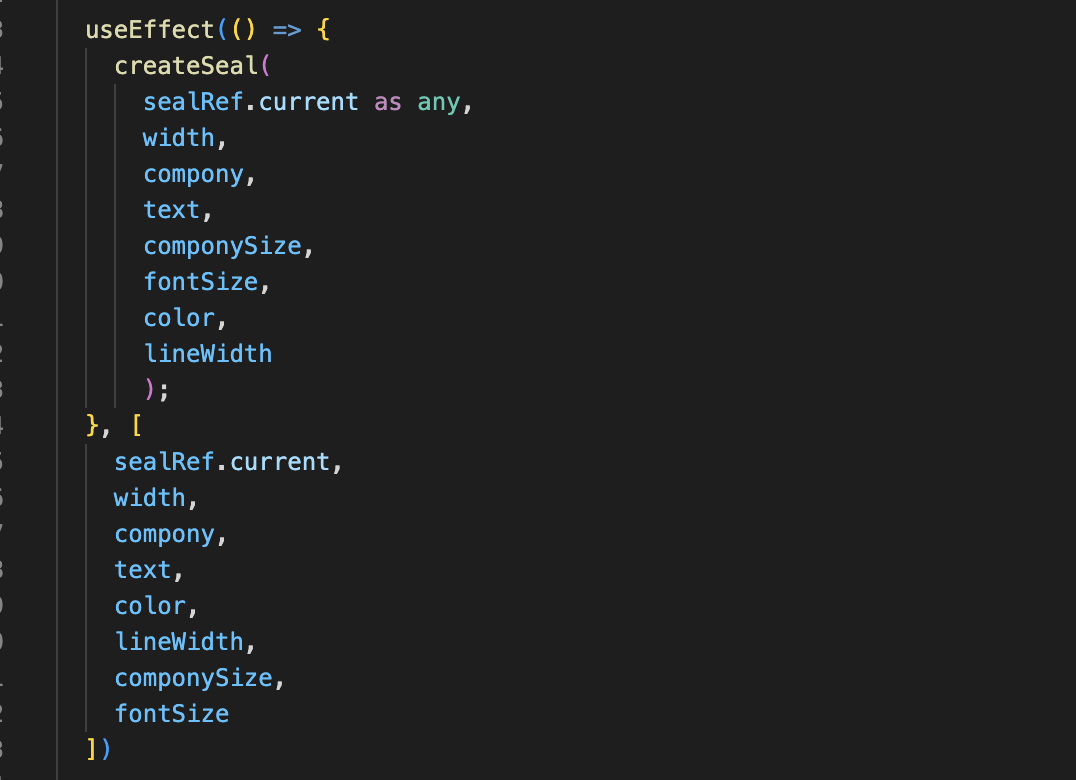
在基本的印章实现之后, 我们来接收属性配置:
对于低代码的 schema 配置, 这里以 H5-Dooring 的组件为例, 给大家分享一下:
复制 import {
IColorConfigType,
IDataListConfigType,
INumberConfigType,
ISelectConfigType,
TColorDefaultType,
ISwitchConfigType,
ITextConfigType,
TNumberDefaultType,
TTextDefaultType,
} from '@/core/FormComponents/types' ;
import { ICommonBaseType, baseConfig, baseDefault } from '../../common' ;
import intl from '@/utils/intl' ;
const t = intl( ) ;
export type TTextSelectKeyType = 'left' | 'right' | 'center' ;
export type TTextPosSelectKeyType = 'bottom' | 'top' ;
export type TTextFormatSelectKeyType = 'CODE128' | 'pharmacode'
export type TListEditData = Array<
IColorConfigType |
IDataListConfigType |
INumberConfigType |
ISelectConfigType< TTextSelectKeyType> |
ISelectConfigType< TTextPosSelectKeyType> |
ISelectConfigType< TTextFormatSelectKeyType> |
ISwitchConfigType |
ITextConfigType
> ;
export interface IListConfig extends ICommonBaseType {
width: TNumberDefaultType;
compony: TTextDefaultType;
componySize: TNumberDefaultType;
text : TTextDefaultType;
fontSize: TNumberDefaultType;
color: TColorDefaultType;
lineWidth: TNumberDefaultType;
opacity: TNumberDefaultType;
}
export interface IListSchema {
editData: TListEditData;
config: IListConfig;
}
const List: IListSchema = {
editData: [
...baseConfig,
{
key: 'width' ,
name: t( 'dr.attr.sealSize' ) ,
type: 'Number' ,
} ,
{
key: 'compony' ,
name: t( 'dr.attr.componyName' ) ,
type: 'Text' ,
} ,
{
key: 'componySize' ,
name: t( 'dr.attr.componySize' ) ,
type: 'Number' ,
} ,
{
key: 'text' ,
name: t( 'dr.attr.sealUnit' ) ,
type: 'Text' ,
} ,
{
key: 'fontSize' ,
name: t( 'dr.attr.fontSize' ) ,
type: 'Number' ,
} ,
{
key: 'color' ,
name: t( 'dr.attr.color' ) ,
type: 'Color' ,
} ,
{
key: 'lineWidth' ,
name: t( 'dr.attr.lineWidth' ) ,
type: 'Number' ,
} ,
{
key: 'opacity' ,
name: t( 'dr.attr.opacity' ) ,
type: 'Number' ,
} ,
] ,
config: {
...baseDefault,
cpName: 'Seal' ,
width: 180 ,
compony: 'Dooring零代码搭建平台' ,
componySize: 18 ,
text : 'H5-Dooring' ,
fontSize: 14 ,
color: 'rgba(240,0,0,1)' ,
lineWidth: 6 ,
opacity: 100
} ,
} ;
export default List; 1. 2. 3. 4. 5. 6. 7. 8. 9. 10. 11. 12. 13. 14. 15. 16. 17. 18. 19. 20. 21. 22. 23. 24. 25. 26. 27. 28. 29. 30. 31. 32. 33. 34. 35. 36. 37. 38. 39. 40. 41. 42. 43. 44. 45. 46. 47. 48. 49. 50. 51. 52. 53. 54. 55. 56. 57. 58. 59. 60. 61. 62. 63. 64. 65. 66. 67. 68. 69. 70. 71. 72. 73. 74. 75. 76. 77. 78. 79. 80. 81. 82. 83. 84. 85. 86. 87. 88. 89. 90. 91. 92. 93. 94. 95. 96. 97. 98. 99. 100. 101. 102. 103.
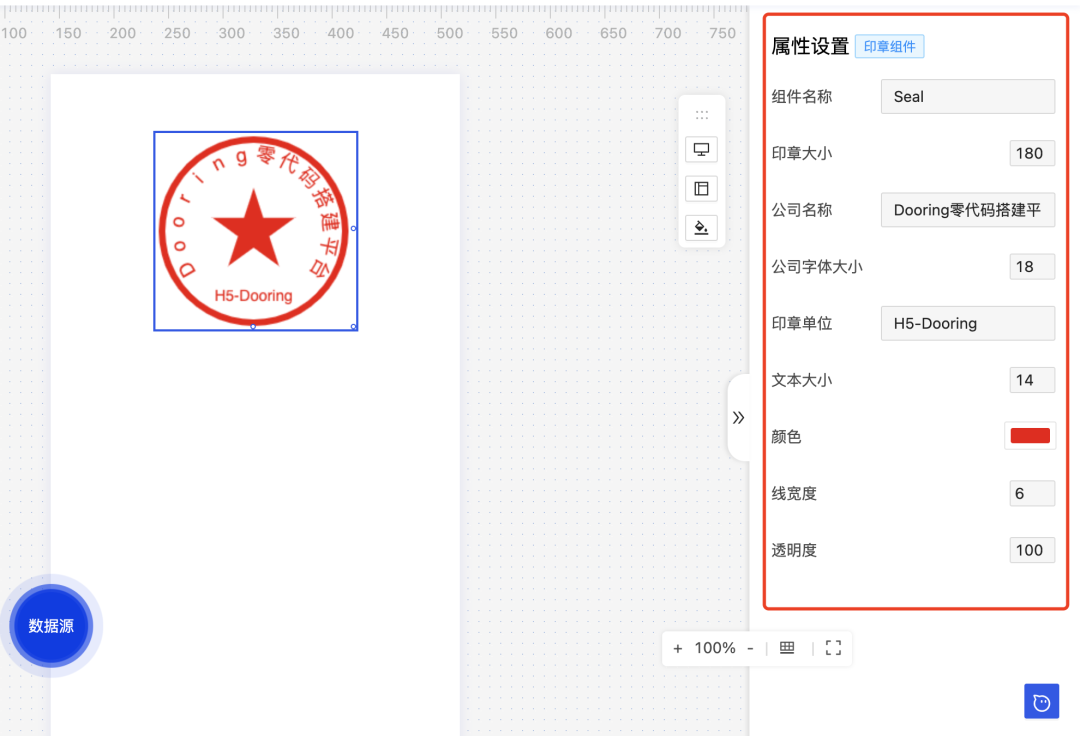
快速将任意组件集成到低代码平台 在上面的分析实现中我们可以发现, 只需要把普通组件按照属性对外暴露出来, 并按照 Dooring 的 schema 定义模式来描述出来, 普通组件就可以立马变成低代码组件, 并自动生成组件配置面板:
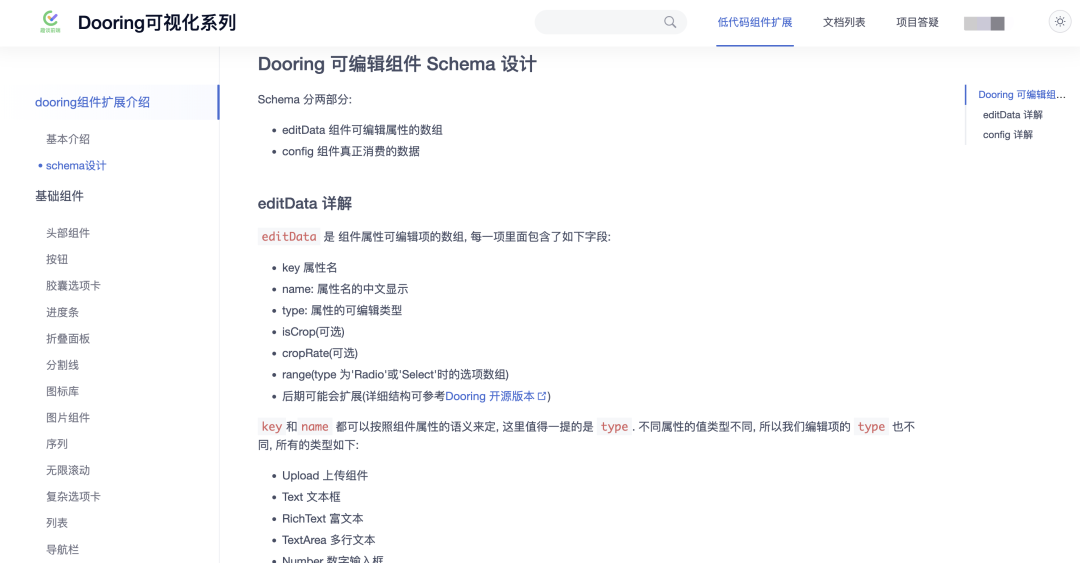
具体的 schema 描述我在文档中做了详细的介绍, 大家感兴趣可以参考一下:
