
前言
在项目开发中,经常会涉及到一个应用程序调用多个数据的情况。今天介绍一个SpringBoot+mybatis的多数据源的解决方案。
数据库准备
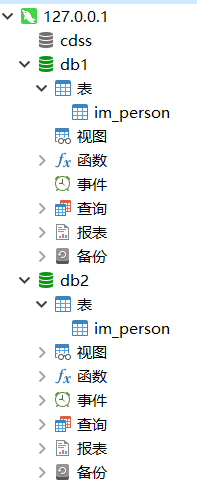
创建两个数据库,两个数据库都有Im_person表,两个表中无数据。
代码结构
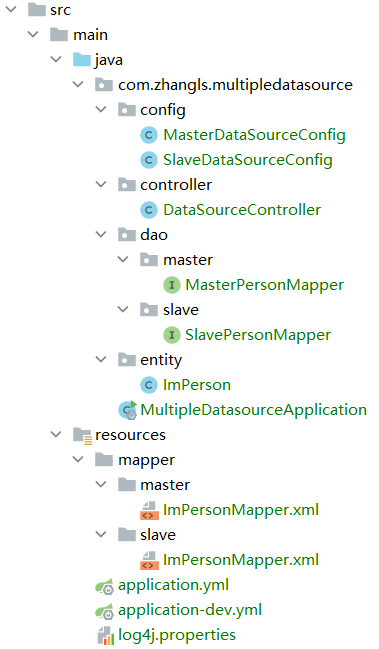
说明:我这里只是为了体现效果,就省略了service步骤。各位大牛开发,不喜勿喷,理解万岁,嘻嘻!!
- application.yml中配置两个数据源,配置如下:
master:
  datasource:
    type: com.alibaba.druid.pool.DruidDataSource
    driver-class-name: com.mysql.cj.jdbc.Driver
    url: jdbc:mysql://127.0.0.1:3306/db1?useUnicode=true&characterEncoding=utf-8&useSSL=false&allowMultiQueries=true&serverTimezone=GMT%2B8
    username: root
    password: 123456

slave:
  datasource:
    type: com.alibaba.druid.pool.DruidDataSource
    driver-class-name: com.mysql.cj.jdbc.Driver
    url: jdbc:mysql://127.0.0.1:3306/db2?useUnicode=true&characterEncoding=utf-8&useSSL=false&allowMultiQueries=true&serverTimezone=GMT%2B8
    username: root
password: 123456- 1.
- 2.
- 3.
- 4.
- 5.
- 6.
- 7.
- 8.
- 9.
- 10.
- 11.
- 12.
- 13.
- 14.
- 15.
2.SpringBoot多数据源配置类。
@Configuration
@MapperScan(basePackages = "com.zhangls.multipledatasource.dao.master", sqlSessionFactoryRef = "masterSqlSessionFactory")
public class MasterDataSourceConfig {
    @Value("${master.datasource.driver-class-name}")
    private String driverClassName;

    @Value("${master.datasource.url}")
    private String url;

    @Value("${master.datasource.username}")
    private String username;

    @Value("${master.datasource.password}")
    private String password;

    @Bean(name = "masterDataSource")
    @Primary
    public DataSource dataSource() {
        DruidDataSource dataSource = new DruidDataSource();
        dataSource.setDriverClassName(this.driverClassName);
        dataSource.setUrl(this.url);
        dataSource.setUsername(this.username);
        dataSource.setPassword(this.password);
        return dataSource;
    }

    @Bean(name = "masterSqlSessionFactory")
    @Primary
    public SqlSessionFactory sqlSessionFactory(@Qualifier("masterDataSource") DataSource dataSource) throws Exception {
        SqlSessionFactoryBean bean = new SqlSessionFactoryBean();
        bean.setDataSource(dataSource);
        ResourcePatternResolver resourceResolver = new PathMatchingResourcePatternResolver();
        List<String> mapperLocations = new ArrayList<>();
        mapperLocations.add("classpath*:/mapper/master/*.xml");
        List<Resource> resources = new ArrayList();
        if (mapperLocations != null) {
            for (String mapperLocation : mapperLocations) {
                try {
                    Resource[] mappers = resourceResolver.getResources(mapperLocation);
                    resources.addAll(Arrays.asList(mappers));
                } catch (IOException e) {
                    // ignore
                }
            }
        }

        bean.setMapperLocations(resources.toArray(new Resource[resources.size()]));
        return bean.getObject();
    }

    @Bean(name = "masterTransactionManager")
    @Primary
    public DataSourceTransactionManager transactionManager(@Qualifier("masterDataSource") DataSource dataSource) {
        return new DataSourceTransactionManager(dataSource);
    }

    @Bean(name = "masterSqlSessionTemplate")
    @Primary
    public SqlSessionTemplate testSqlSessionTemplate(
            @Qualifier("masterSqlSessionFactory") SqlSessionFactory sqlSessionFactory) throws Exception {
        return new SqlSessionTemplate(sqlSessionFactory);
    }
}- 1.
- 2.
- 3.
- 4.
- 5.
- 6.
- 7.
- 8.
- 9.
- 10.
- 11.
- 12.
- 13.
- 14.
- 15.
- 16.
- 17.
- 18.
- 19.
- 20.
- 21.
- 22.
- 23.
- 24.
- 25.
- 26.
- 27.
- 28.
- 29.
- 30.
- 31.
- 32.
- 33.
- 34.
- 35.
- 36.
- 37.
- 38.
- 39.
- 40.
- 41.
- 42.
- 43.
- 44.
- 45.
- 46.
- 47.
- 48.
- 49.
- 50.
- 51.
- 52.
- 53.
- 54.
- 55.
- 56.
- 57.
- 58.
- 59.
- 60.
- 61.
- 62.
- 63.
@Configuration
@MapperScan(basePackages = "com.zhangls.multipledatasource.dao.slave", sqlSessionFactoryRef = "slaveSqlSessionFactory")
public class SlaveDataSourceConfig {
    @Value("${slave.datasource.driver-class-name}")
    private String driverClassName;

    @Value("${slave.datasource.url}")
    private String url;

    @Value("${slave.datasource.username}")
    private String username;

    @Value("${slave.datasource.password}")
    private String password;

    @Bean(name = "slaveDataSource")
    public DataSource dataSource() {
        DruidDataSource dataSource = new DruidDataSource();
        dataSource.setDriverClassName(this.driverClassName);
        dataSource.setUrl(this.url);
        dataSource.setUsername(this.username);
        dataSource.setPassword(this.password);
        return dataSource;
    }

    @Bean(name = "slaveSqlSessionFactory")
    public SqlSessionFactory sqlSessionFactory(@Qualifier("slaveDataSource") DataSource dataSource) throws Exception {
        SqlSessionFactoryBean bean = new SqlSessionFactoryBean();
        bean.setDataSource(dataSource);
        bean.setMapperLocations(
                new PathMatchingResourcePatternResolver().getResources("classpath*:/mapper/slave/*.xml"));
        return bean.getObject();
    }

    @Bean(name = "slaveTransactionManager")
    public DataSourceTransactionManager transactionManager(@Qualifier("slaveDataSource") DataSource dataSource) {
        return new DataSourceTransactionManager(dataSource);
    }

    @Bean(name = "slaveSqlSessionTemplate")
    public SqlSessionTemplate testSqlSessionTemplate(
            @Qualifier("masterSqlSessionFactory") SqlSessionFactory sqlSessionFactory) throws Exception {
        return new SqlSessionTemplate(sqlSessionFactory);
    }
}- 1.
- 2.
- 3.
- 4.
- 5.
- 6.
- 7.
- 8.
- 9.
- 10.
- 11.
- 12.
- 13.
- 14.
- 15.
- 16.
- 17.
- 18.
- 19.
- 20.
- 21.
- 22.
- 23.
- 24.
- 25.
- 26.
- 27.
- 28.
- 29.
- 30.
- 31.
- 32.
- 33.
- 34.
- 35.
- 36.
- 37.
- 38.
- 39.
- 40.
- 41.
- 42.
- 43.
- 44.
- 45.
说明:两个数据的代码基本相同,不同的是要配置好扫描包的路径,以及mybatis的SQL文件的路径。所以不同的连接DAO和mapper文件要放在不同的文件夹,方便配置管理。
实现效果
以上的配置已经实现了多数据源的配置,下面实现一个功能。通过一个接口同时向两个库的两个表中导入不同的数据。
controller代码如下:
@RestController
public class DataSourceController {
    @Resource
    private MasterPersonMapper masterPersonMapper;
    @Resource
    private SlavePersonMapper slavePersonMapper;

    @GetMapping("/datasource")
    public String datasource() {
        ImPerson person1 = new ImPerson();
        person1.setPersonId("1");
        person1.setGender("男");
        person1.setBirthday(new Date());
        person1.setLocation("中国");
        masterPersonMapper.insertSelective(person1);

        ImPerson person2 = new ImPerson();
        person2.setPersonId("2");
        person2.setGender("女");
        person2.setBirthday(new Date());
        person2.setLocation("中国北京");
        slavePersonMapper.insertSelective(person2);
        return "导入成功";
    }
}- 1.
- 2.
- 3.
- 4.
- 5.
- 6.
- 7.
- 8.
- 9.
- 10.
- 11.
- 12.
- 13.
- 14.
- 15.
- 16.
- 17.
- 18.
- 19.
- 20.
- 21.
- 22.
- 23.
- 24.
- 25.
执行:
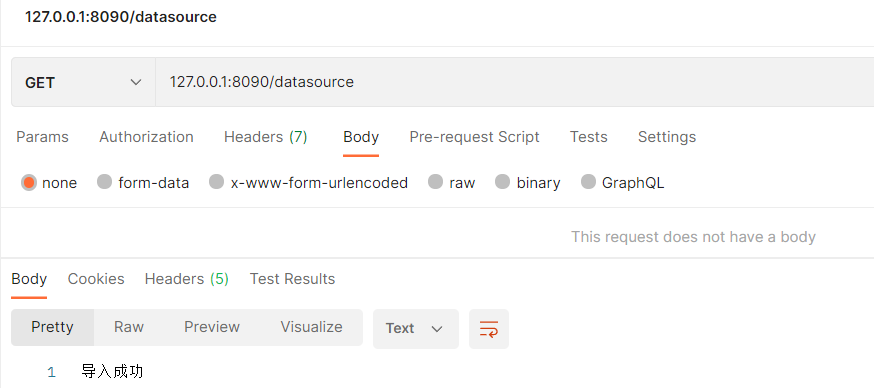
结果:
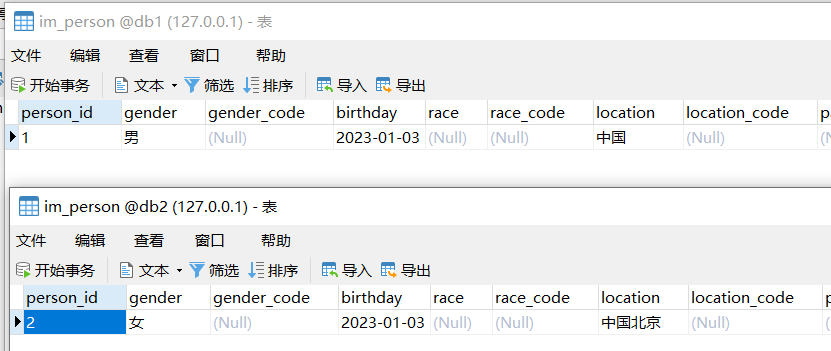
可以看到两个库中的两个表都导入了数据。