相信很多兄弟都知道 Vue3 的那些新特性,如基于 Proxy 的响应式系统、编译器优化、Composition-API 等等,但你知道 Vue3 中有哪些小细节是和 Vue2 不同的吗?
今天就给大家分享 Vue3 实战过程中,一些可能让你眼前一亮的小细节。用的好的话,不仅可以提升工作效率,同时也能提高程序运行的性能。话不多说,就是干!
作用域样式 style
全局选择器
在 Vue2 组件中,设置一个全局样式,我们通常是新建一个 <style> 标签,如:
<style scoped>
/* ... */
</style>

<style>
.red {
  color: red;
}
</style>
而在 Vue3 中,可以在作用域样式中使用 :global 这个伪类:
<style scoped>
/* .red 选择器将作用于全局 */
:global(.red) {
  color: red;
}
</style>
插槽选择器
默认情况下,作用域样式不会影响到 <slot/> 渲染出来的内容,因为它们被认为是父组件所持有并传递进来的。而使用 :slotted 伪类可以打破这种情况。
<template>
  <div class="child">
    <slot
  </div>
</template>

<style scoped>
/* .red 选择器将作用于 <slot /> 渲染出来的内容 */
:slotted(.red) {
  color: red;
}
</style>
深度选择器
Vue2 中样式穿透,一般是使用 ::v-deep 或 /deep/,而 Vue3 中我们可以使用 :deep 这个伪类:
<template>
<div class="parent">
  <ChildView
</div>
</template>

<style scoped>
/* .red 选择器将作用于 <ChildView /> 组件 */
.parent :deep(.red) {
  color: red;
}
</style>
细心的兄弟会发现,以上选择器的风格是统一的,都是使用伪类的方式来实现。这样书写起来更加优雅,同时也更加方便记忆。
style 中的 v-bind
组件的 <style> 内支持使用 v-bind 绑定动态的组件状态:
<script setup>
import { ref } from 'vue'

const color = ref('red')
</script>

<template>
  <p>hello</p>
</template>

<style scoped>p {
  color: v-bind('color');
}
</style>
既然可以绑定动态的组件状态,那么切换主题就变得非常简单了:
<script setup>
import { reactive } from 'vue'

const theme = reactive({})
setWhiteTheme()
function setWhiteTheme() {
  theme.fontColor = '#000'
  theme.backgroundColor = '#fff'
}
function setBlackTheme() {
  theme.fontColor = '#fff'
  theme.backgroundColor = '#000'
}
</script>

<template>
  <div class="main">
    <button @click="setWhiteTheme">白色主题</button>
    <button @click="setBlackTheme">黑色主题</button>
    <div class="content">
      <div>Hello Vue3!</div>
    </div>
  </div>
</template>

<style scoped>
.content {
  color: v-bind('theme.fontColor');
  background-color: v-bind('theme.backgroundColor');
}
</style>
虽然尤大大推荐使用 <script setup> ,但有时候还得用到普通的 <script> ,这时候我们可以混合起来使用。以下是用到普通 <script> 的场景:
- 声明无法在 <script setup> 中声明的选项,例如 inheritAttrs 或插件的自定义选项。
<script>
export default {
 inheritAttrs: false, // 禁止父组件传递过来的属性 “透传” 到子组件的根节点
 customOptions: {} // 插件的自定义选项
}
</script>

<script setup>
// ...
</script>
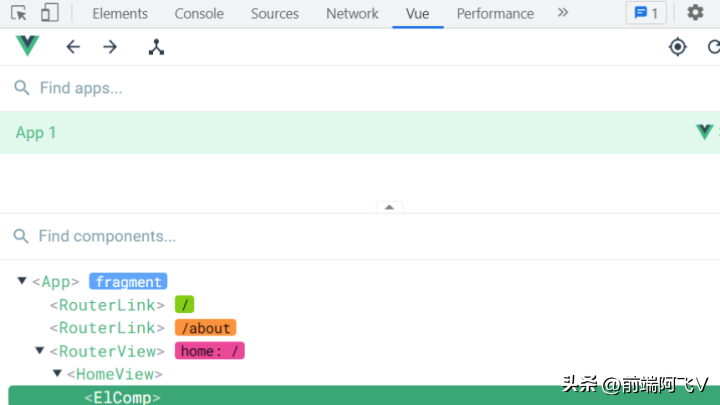
- 声明模块的具名导出。如果你想修改组件的名字,并且让它在 devtools 中生效,那么就要用到具名导出。
<!-- Comp.vue -->
<script>
export default {
 name: 'ElComp'
}
</script>

<template>
 <div>child comp</div>
</template>

<script setup>
// ...
</script>

效果如下:

这个功能平时用的少,但在封装组件时非常有用,可以让你少写不少代码。
- 运行只需要在模块作用域执行一次的副作用,或是创建单例对象。
<script>
// 在模块作用域下执行 (仅一次)
runSideEffectOnce()
</script>

<script setup>
// 在 setup() 作用域中执行 (每次组件实例被创建的时候都会执行)
</script>
v-model
Vue2 中组件的双向绑定采用的是 v-model 或 .snyc 修饰符,两种写法多少有点重复。Vue3 中统一使用 v-model 进行处理,并且可以和多个数据进行绑定,如 v-model:foo、v-model:bar 。
v-model 等价于 :model-value="someValue" 和 @update:model-value="someValue = $event"。
v-model:foo 等价于 :foo="someValue" 和 @update:foo="someValue = $event"。
下面就是一个父子组件之间双向绑定的例子:
<!-- 父组件 -->
<script setup>
import ChildView from './ChildView.vue'
import { ref } from 'vue'

const msg = ref('hello vue3!')
</script>

<template>
  <ChildView v-model="msg" />
</template>

<!-- 子组件 -->
<script setup>
defineProps(['modelValue'])
const emit = defineEmits(['update:modelValue'])
</script>

<template>
  <div @click="emit('update:modelValue', 'hi vue3!')">{{ modelValue }}</div>
</template>
子组件可以结合 input 使用:
<!-- 子组件 -->
<script setup>
defineProps(['modelValue'])
const emit = defineEmits(['update:modelValue'])
</script>

<template>
  <input :value="modelValue" @input="emit('update:modelValue', $event.target.value)" />
</template>
如果你觉得上面的模板比较繁琐,也可以结合 computed 一起使用:
<!-- 子组件 -->
<script setup>
import { computed } from 'vue'

const props = defineProps(['modelValue'])
const emit = defineEmits(['update:modelValue'])
const newValue = computed({
  get() {
    return props.modelValue
  },
  set(value) {
    emit('update:modelValue', value)
  }
})
</script>

<template>
  <input v-model="newValue" />
</template>
v-memo
v-memo 用来缓存一个模板的子树,在元素和组件上都可以使用。为了实现缓存,该指令需要传入一个固定长度的依赖值数组进行比较。如果数组里的每个值都与最后一次的渲染相同,那么整个子树的更新将被跳过。举例来说:
<div v-memo="[valueA, valueB]">
  ...
</div>
当组件重新渲染时,如果 valueA 和 valueB 的值都没有变化,那么这个 <div> 及其子项的所有更新都会被跳过。并且虚拟 DOM 的 vnode 创建也会被跳过,因为缓存的 vnode 可以被重新使用。
Vue3 已经做了静态标记,静态的元素或属性会跳过更新。那么 v-memo 的使用场景是什么呢?
v-memo 仅用于性能至上场景中的微小优化,最常见的情况可能是有助于渲染海量 v-for 列表 (长度超过 1000 的情况):
<div v-for="item in list" :key="item.id" v-memo="[item.id === selected]">
  <p>ID: {{ item.id }} - selected: {{ item.id === selected }}</p>
  <p>...more child nodes</p>
</div>
当组件的 selected 状态改变,默认会重新创建大量的 vnode,尽管绝大部分都跟之前是一模一样的。v-memo 用在这里本质上是在说“只有当该项的被选中状态改变时才需要更新”。这使得每个选中状态没有变的项能完全重用之前的 vnode 并跳过差异比较。注意这里 memo 依赖数组中并不需要包含 item.id,因为 Vue 也会根据 item 的 :key 进行判断。
注意:当搭配 v-for 使用 v-memo,确保两者都绑定在同一个元素上。v-memo 不能用在 v-for 内部使用。
teleport
<Teleport> 是一个内置组件,它可以将一个组件内部的一部分模板“传送”到该组件的 DOM 结构外层的位置去。
最常见的场景就是全屏的模态框。理想情况下,触发模态框的按钮和模态框是在同一个组件中,他们一起被渲染在 DOM 结构里很深的地方。这是一个简单模态框 <MyModal> 的实现:
<script setup>
import { ref } from 'vue'

const open = ref(false)
</script>

<template>
  <button @click="open = true">Open Modal</button>

  <div v-if="open" class="modal">
    <p>Hello from the modal!</p>
    <button @click="open = false">Close</button>
  </div>
</template>

<style scoped>
.modal {
  position: fixed;
  z-index: 999;
  top: 20%;
  left: 50%;
  width: 300px;
  margin-left: -150px;
}
</style>
使用这个 <MyModal> 组件时,会存在一些潜在问题:
- position: fixed 能够相对于浏览器窗口定位有一个条件,那就是不能有任何祖先元素设置了 transform、perspective 或者 filter 样式属性。也就是说如果我们想要用 CSS transform 为祖先节点 <div class="outer"> 设置动画,就会不小心破坏模态框的布局!
- 这个模态框的 z-index 受限于它的容器元素。如果有其他元素与 <div class="outer"> 重叠并有更高的 z-index,则它会覆盖住我们的模态框。
<Teleport> 提供了一个“传送”的方式来解决此类问题,让我们不再担心 DOM 结构的问题。我们来用 <Teleport> 改写一下 <MyModal>:
<button @click="open = true">Open Modal</button>

<Teleport to="body">
  <div v-if="open" class="modal">
    <p>Hello from the modal!</p>
    <button @click="open = false">Close</button>
  </div>
</Teleport>
<Teleport> 接收一个 to prop 来指定传送的目标。to 的值可以是一个 CSS 选择器字符串,也可以是一个 DOM 元素对象。这样就轻松解决了上述的潜在问题,是不是很简单?
小结
以上就是我在 Vue3 实战过程中遇到的小细节。如果你都掌握了,相信开发效率和程序的性能都会有一定的提升。如果你有其他的小细节或小技巧。


