什么是事件发射器(Event Emitter)?
朋友们,作为一名软件工程师,你一定用过Event Emitter,我们经常用它来处理跨组件的通信场景。
它触发了一个每个人都可以收听的事件,并且可以在事件触发时发送数据。
不同的库提供不同的实现,用于不同的目的,但基本思想是提供一个用于发布和订阅事件的框架。
你想知道它背后的魔力吗?本文将与你分享一个非常简单的解决方案来实现它。
我们一起来试试。
请用以下这个例子来玩一会儿。
<!DOCTYPE html>
<html lang="en">
  <head>
    <meta charset="UTF-8" />
    <meta http-equiv="X-UA-Compatible" content="IE=edge" />
    <meta name="viewport" content="width=device-width, initial-scale=1.0" />
    <title>Document</title>
    <style>
      html, body{
        width: 100%;
        height: 100%;
        display: flex;
        align-items: center;
        justify-content: center;
        flex-direction: column;
      }

      .box{
        padding-top: 30px;
      }
</style>
  </head>
  <body>
    <div class="buttons">
      <button>Please send me data</button>
      <button>Cut off contact</button>
    </div>
    <div class="box">
      The data you sent me is:
      <div class="data"></div>
    </div>
    <script>
      class EventEmitter {
        on = (eventName, callback) => window.addEventListener(eventName, callback, false)
        off = (eventName, callback) => window.removeEventListener(eventName, callback, false)
        emit = (eventName, data) => window.dispatchEvent(new CustomEvent(eventName, { detail: data }))
      }

      const emitter = new EventEmitter()
      const buttons = document.querySelectorAll('button')
      const $data = document.querySelector('.data')
      let count = 0

      const listentCallback = () => {
        $data.innerHTML = JSON.stringify(event.detail, null, 2)
      }

      emitter.on('event-fatfish', listentCallback)

      buttons[0].addEventListener('click', () => {
        count++
        emitter.emit('event-fatfish', { name: 'fatfish', count })
      })

      buttons[1].addEventListener('click', () => {
        emitter.off('event-fatfish', listentCallback)
      })
</script>
  </body>
</html>
- 1.
- 2.
- 3.
- 4.
- 5.
- 6.
- 7.
- 8.
- 9.
- 10.
- 11.
- 12.
- 13.
- 14.
- 15.
- 16.
- 17.
- 18.
- 19.
- 20.
- 21.
- 22.
- 23.
- 24.
- 25.
- 26.
- 27.
- 28.
- 29.
- 30.
- 31.
- 32.
- 33.
- 34.
- 35.
- 36.
- 37.
- 38.
- 39.
- 40.
- 41.
- 42.
- 43.
- 44.
- 45.
- 46.
- 47.
- 48.
- 49.
- 50.
- 51.
- 52.
- 53.
- 54.
- 55.
- 56.
- 57.
- 58.
- 59.
- 60.
- 61.
输出:

当你点击 Please send me data 按钮时,你会看到 count 的值越来越大,但是在你点击 Cut off contact 之后,它就不再变化了。
这个例子很简单,但足以说明有关 Event Emitter 的一切。
来,我们开始吧!
Event Emitter 只需几行代码就可以完成,这真是太神奇了。
class EventEmitter {
  on = (eventName, callback) => window.addEventListener(eventName, callback, false)
  off = (eventName, callback) => window.removeEventListener(eventName, callback, false)
  emit = (eventName, data) => window.dispatchEvent(new CustomEvent(eventName, { detail: data }))
}
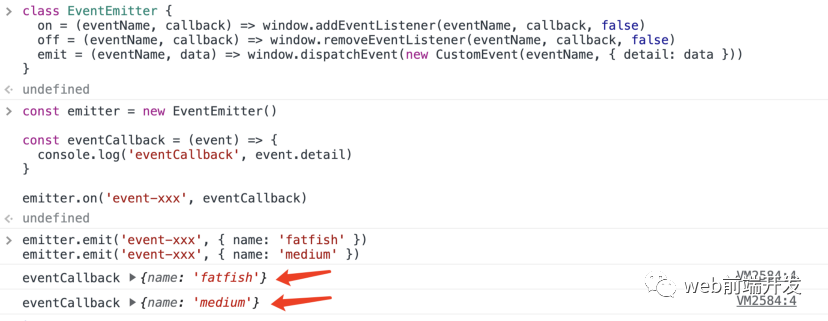
1. 监听事件
const emitter = new EventEmitter()
const eventCallback = (event) => {
  console.log('eventCallback', event.detail)
}

emitter.on('event-xxx', eventCallback)
2. 发布事件
eventCallback 将打印两次数据,因为我们两次发布了 event-xxx 事件。
emitter.emit('event-xxx', { name: 'fatfish' })
emitter.emit('event-xxx', { name: 'medium' })
3.解除事件
当我们解除 event-xxx 事件时,不再打印 medium 和 fatfish。
emitter.off('event-xxx', eventCallback)
emitter.emit('event-xxx', { name: 'medium and fatfish' })

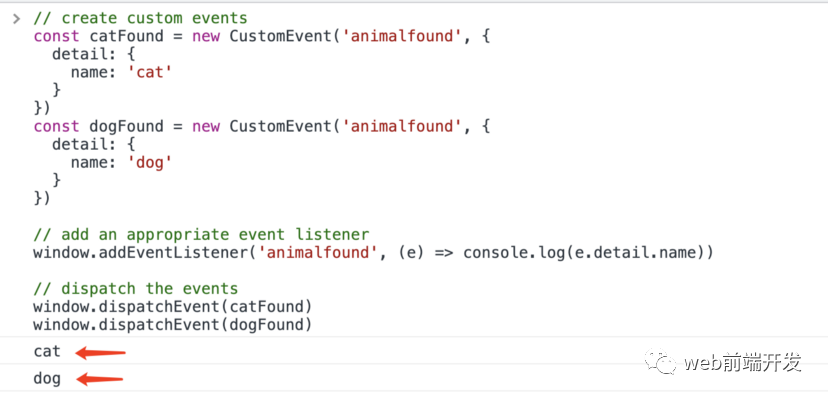
CustomEvent 是谜题的答案
实现 EventEmitter 的关键是 CustomEvent 和浏览器的事件机制,你可以从这里得到:https://developer.mozilla.org/en-US/docs/Web/API/CustomEvent/CustomEvent。
CustomEvent() 构造函数创建一个新的 CustomEvent 对象。——来自 MDN
// create custom events
const catFound = new CustomEvent('animalfound', {
  detail: {
    name: 'cat'
  }
})
const dogFound = new CustomEvent('animalfound', {
  detail: {
    name: 'dog'
  }
})
// add an appropriate event listener
window.addEventListener('animalfound', (e) => console.log(e.detail.name))
// dispatch the events
window.dispatchEvent(catFound)
window.dispatchEvent(dogFound)
- 1.
- 2.
- 3.
- 4.
- 5.
- 6.
- 7.
- 8.
- 9.
- 10.
- 11.
- 12.
- 13.
- 14.
- 15.
- 16.
实现事件发射器的另一种方法
虽然,这种方法很简单,但它依赖于浏览器环境,还有其他更好的解决方案吗?
class EventEmitter {
  constructor () {
    this.events = {}
  }
  on (evt, callback, ctx) {
    if (!this.events[ evt ]) {
      this.events[ evt ] = []
    }

    this.events[ evt ].push(callback)
    return this
  }

  emit (evt, ...payload) {
    const callbacks = this.events[ evt ]
    if (callbacks) {
      callbacks.forEach((cb) => cb.apply(this, payload))
    }
    return this
  }
  off (evt, callback) {
    // Cancel all subscribed events
    if (typeof evt === 'undefined') {
      delete this.events
    } else if (typeof evt === 'string') {
      // Delete the subscriber of the specified event
      if (typeof callback === 'function') {
        this.events[ evt ] = this.events[ evt ].filter((cb) => cb !== callback)
      } else {
        // Delete event directly
        delete this.events[ evt ]
      }
    }
    return this
  }
}
- 1.
- 2.
- 3.
- 4.
- 5.
- 6.
- 7.
- 8.
- 9.
- 10.
- 11.
- 12.
- 13.
- 14.
- 15.
- 16.
- 17.
- 18.
- 19.
- 20.
- 21.
- 22.
- 23.
- 24.
- 25.
- 26.
- 27.
- 28.
- 29.
- 30.
- 31.
- 32.
- 33.
- 34.
- 35.
- 36.
- 37.
const e1 = new EventEmitter()
const e1Callback = (name) => {
  console.log(name, 'e1Callback')
}
const e2Callback = (name, sex) => {
  console.log(name, 'e2Callback')
}
e1.on('evt1', e1Callback)
e1.on('evt2', e2Callback)
e1.emit('evt1', 'fatfish') // fatfish e1Callback
e1.emit('evt2', 'medium') // medium e2Callback
e1.off('evt1', e1Callback)
e1.emit('evt1', 'fatfish') // fatfish e1Callback will not be printed
e1.emit('evt2', 'medium') // medium e2Callback
- 1.
- 2.
- 3.
- 4.
- 5.
- 6.
- 7.
- 8.
- 9.
- 10.
- 11.
- 12.
- 13.
- 14.

写在最后
以上就是我今天跟你分享的关于事件发射器的全部内容,不知道你还有没有其他更好的实现方法?如果有的话,请记得在留言区跟我分享你的解决方案,在此,非常感谢。
看完今天内容,如果你觉得有用的话,请记得点赞我,关注我,并将这篇内容分享给你的朋友们,也许能够帮助到他。
最后,感谢你的阅读,编程愉快!