rollup在业务中基本很少会有接触到,通常在我们的业务中大部分接触的脚手架,或者自己搭建项目中,我们都是用webpack,无论是vue-cli,还是react-create-app他们都是基于webpack二次封装的脚手架,所以我们对rollup更陌生一点,本文是一篇关于rollup的学习笔记,希望看完在项目中有所思考和帮助。
在开始本文前,主要会从以下几点去认识了解rollup。
1、基础了解rollup打包不同模式,以及如何打包成不同模式的js。
2、以一个实际的例子,将工具库用rollup与gulp实现任务流打包,验证打包后的js是否ok,加深对rollup的使用。
npm 初始化一个基础的package.json。
局部安装rollup。
然后在当前目录下创建一个index.js。
在index.js中写入一点测试代码。
import b from './js/b.js'
// const a = require('./js/a.js');
const getName = () => {
   //  console.log('hello', a.name);
    console.log('hello', b.name);
};
getName();
npx运行局部命令
当你在当前项目安装rollup后,就可以用命令行npx执行rollup打包输出对应模式的bundle.js
// 将index.js打包输出成bundle.iife文件,iife模式
npx rollup index.js --file bundle-iife.js --format iife


// 将index.js打包输出成cjs模式
npx rollup index.js --file bundle-cjs.js --format cjs


// 将index.js打包输出成umd模式
npx rollup index.js --file bundle-umd.js --format umd
// es
npx rollup index.js --file bundle-es.js --format es
es打包后的代码是这样的,不过此时es6还未为编译成es5。
const name = 'Maic';
const age = 18;
var b = {
    name,
    age
};


// const a = require('./js/a.js');
const getName = () => {
    // console.log('hello', a.name);
    console.log('hello', b.name);
};
getName();
打包前的代码。
// const a = require('./js/a.js');
import b from './js/b.js'
const getName = () => {
    // console.log('hello', a.name);
    console.log('hello', b.name);
}
getName();
命令行可以输出对应文件,我们也可以用配置文件方式,因此你可以像webpack一样新建一个rollup.config.js这样的配置,内容也非常简单。
export default {
    input: 'index.js', // 入口文件
    output: {
        format: 'cjs', // cjs
        file: 'bundle.js' // 打包输出后文件名
    },
}
当我们指定配置文件时,package.json的 type要指定成module,当node版本大于13时,默认是以ES Module方式,所以要给了提示,要么在package.json文件中加入type: module,要么把配置文件的后缀名改成rollup.config.mjs。
"type": "module",
"scripts": {
        "build": "rollup -c rollup.config.js"
    },
Warning: To load an ES module, set "type": "module" in the package.json or use the .mjs extension.
(Use `node --trace-warnings ...` to show where the warning was created)
[!] RollupError: Node tried to load your configuration file as CommonJS even though it is likely an ES module. To resolve this, change the extension of your configuration to ".mjs", set "type": "module" in your package.json file or pass the "--bundleConfigAsCjs" flag.
es6转换成es5
在上面的例子中我们代码里有使用es6,但是打包后仍未转译,es6转es5主要依赖以下几个关键插件rollup-plugin-babel,@babel/preset-env,@babel/core插件。
在根目录下新建一个.babelrc.json,并依次安装npm i rollup-plugin-babel @babel/preset-env @babel/core --save-dev。
{
    "presets": [
        ["@babel/env", {"modules": false}]
    ]
}
在rollup.config.js中。
import commonjs from '@rollup/plugin-commonjs';
import babel from 'rollup-plugin-babel';
export default [
    {
        input: 'index.js',
        output: {
            format: 'cjs',
            file: 'bundle_cjs.js'
        },
        plugins: [commonjs(), babel({
            exclude: ['node_modules/**']
        })]
    },
]
这样配置后,es6就可以成功编译成es5了。
我们发现还有@rollup/plugin-commonjs插件,这个插件主要是编译cjs。
如果你的代码使用的是cjs,未编译前。
// import b from './js/b.js'
const a = require('./js/a.js');
const getName = () => {
    console.log('hello', a.name);
    // console.log('hello', b.name);
};
getName();
编译打包后;
'use strict';
var _01 = {};
var name = 'Web技术学苑';
var age = 18;
var a$1 = {
  name: name,
  age: age
};
var a = a$1;
var getName = function getName() {
  console.log('hello', a.name);
};
getName();
module.exports = _01;
rollup默认就是esModule方式,所以你会看到你配置的输出文件都是export default方式输出的。
当我们简单的了解一些rollup的知识后,我们尝试打包一个我们自己写的工具库试一试。
rollup打包一个工具库
在很早之前写过一篇关于webpack打包工具库,可以参考这篇文章webpack5构建一个通用的组件库,今天用rollup实现一个webpack5打包一样的功能,对应文章源码参考nice_utils。
准备基础库
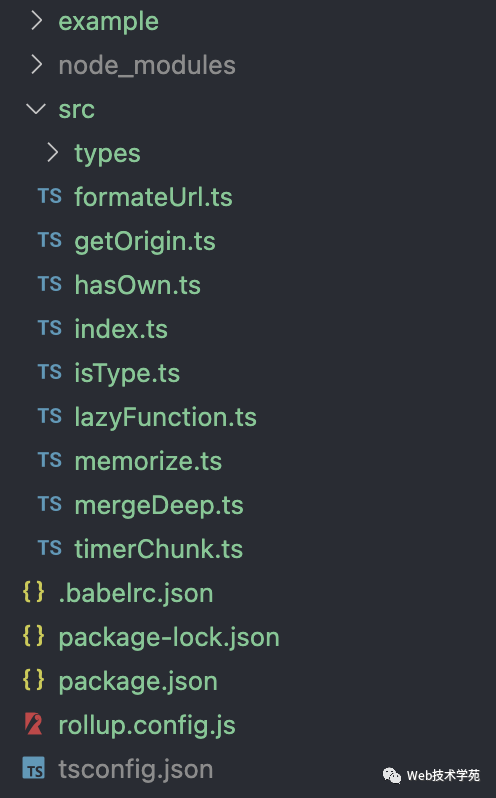
首先我们把nice_utils[1]仓库下拷贝出src目录。
目录大概就是下面这样。

因为项目是支持ts的所以也需要安装typescript。
执行以下命令,然后初始化tsconfig.json。
npm i typescript --save-dev


npx tsc --init
npx tsc --init主要是默认生成ts配置文件。
{
    "compilerOptions": {
      "baseUrl": ".",
      "outDir": "dist",
      "sourceMap": true,
      "target": "es5",
      "module": "ESNext",
      "moduleResolution": "node",
      "newLine": "LF",
      "strict": true,
      "allowJs": true,
      "noImplicitAny": false,
      "noImplicitThis": false,
      "noUnusedLocals": true,
      "experimentalDecorators": true,
      "resolveJsonModule": true,
      "esModuleInterop": true,
      "removeComments": false,
      "jsx": "preserve",
      "lib": ["esnext", "dom", "dom.iterable"],
    },
  }
这里注意一点lib配置需要加上dom.iterable,不加这个会打包编译报错,因为我们的工具函数里有用到entries迭代器,所以lib上需要加上这个,默认生成的配置会比较多,关键的几个,特别注意lib,target,jsx即可。
rollup.config.js
在根目录下新建rollup.config.js。
import path, { dirname } from 'path';
import { fileURLToPath } from 'url'
import commonjs from '@rollup/plugin-commonjs';
import babel from 'rollup-plugin-babel';
import alias from '@rollup/plugin-alias';
import ts from 'rollup-plugin-typescript2';


const resolve = (p) => {
    return path.resolve(dirname(fileURLToPath(import.meta.url)), p)
};
const builds = {
    'runtime-cjs-prod': {
        entry: resolve('src/index.ts'),
        dest: name => `dist/${name}.js`,
        format: 'cjs',
        env: 'production',
        external: []
    },
    'runtime-esm-prd': {
        entry: resolve('src/index.ts'),
        dest: name => `dist/${name}.js`,
        format: 'esm',
        env: 'production',
        external: []
    },
    'runtime-umd-prd': {
        entry: resolve('src/index.ts'),
        dest: name => `dist/${name}.js`,
        format: 'umd',
        env: 'production',
        external: []
    }
}
const getConfig = (name) => {
    const opts = builds[name];
    const config = {
        input: opts.entry,
        external: opts.external,
        plugins: [
            commonjs(),
            babel(),
            // 设置全局路径别名
            alias({
                entries: {
                    'src': resolve('src'),
                }
            }),
            ts({
                tsconfig: resolve('./tsconfig.json')
            })
        ].concat(opts.plugins, []),
        output: {
            file: opts.dest(name),
            format: opts.format,
            name: opts.name || 'Nice_utils',
        }
    }
    return config;
}


export default Object.keys(builds).map(getConfig)
以上一段代码看似好长,但实际上输出的就是一个数组配置,本质上就是输出。
export default [
    {
        input: '',
        dest: '',
        format: 'cjs',
        env: 'production',
        external: []
    }
    ...
]
我们注意到resolve这个方法有些特殊,主要是获取路径,我们以前可能不会这么做,我们会path.resove(__dirname, p),因为此时rollup是默认ESModule所以,__dirname就会报错,__dirname只有在cjs中才可以正确使用,所以这里只是换了一种方式,但实际上的作用并没有发生变化。
import path, { dirname } from 'path';
import { fileURLToPath } from 'url'
const resolve = (p) => {
    return path.resolve(dirname(fileURLToPath(import.meta.url)), p)
};
const builds = {
    'runtime-cjs-prod': {
        entry: resolve('src/index.ts'),
        dest: name => `dist/${name}.js`,
        format: 'cjs',
        env: 'production',
        external: []
    },
    ...
}
最后我们在package.json中配置打包命令。
{
    "name": "02",
    "version": "1.0.0",
    "description": "",
    "main": "index.js",
    "type": "module",
    "scripts": {
        "test": "echo \"Error: no test specified\" && exit 1",
        "build": "rollup -c rollup.config.js"
    },
    "keywords": [],
    "author": "",
    "license": "ISC",
    "devDependencies": {
        "@babel/core": "^7.19.6",
        "@babel/preset-env": "^7.19.4",
        "@rollup/plugin-alias": "^4.0.2",
        "@rollup/plugin-commonjs": "^23.0.2",
        "@types/node": "^18.11.6",
        "rollup": "^3.2.3",
        "rollup-plugin-babel": "^4.4.0",
        "rollup-plugin-typescript2": "^0.34.1",
        "typescript": "^4.8.4"
    }
}
顺带我们看下,我们使用到的一些插件,注意@types/node必须要安装,不安装就会提示需要安装此插件。

并且我们看到了es6转es5所需要的@babel/core,@babel/preset-env以及rollup-plugin-babel,还有@rollup/plugin-commonjs,这个插件会将内部模块中如果有用到cjs会给我们转译成es6,因为在浏览器是不识别require这样的关键字的。
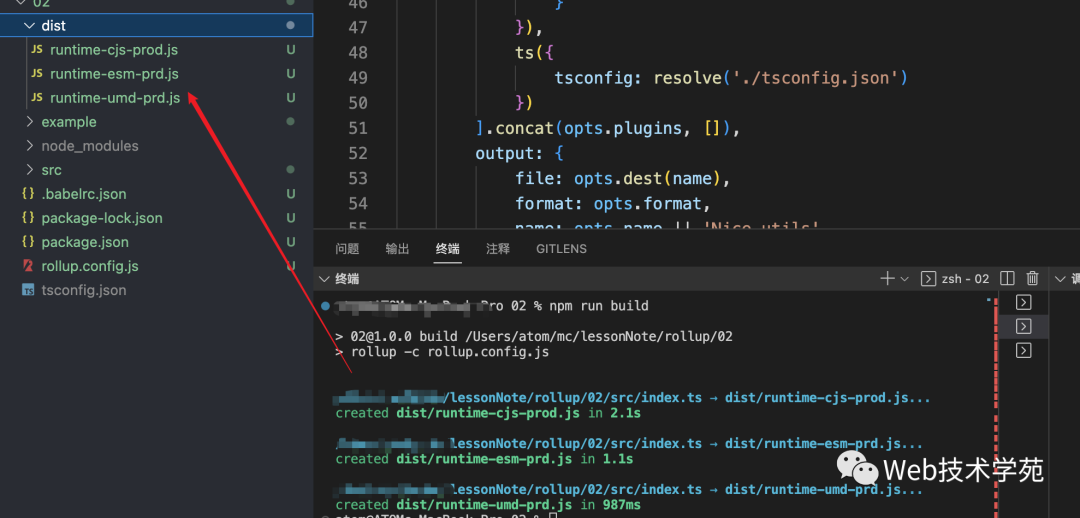
当我们运行npm run build时。

测试打包后的js
我们新建了一个example文件,在该目录下新建一个index.html。
<!DOCTYPE html>
<html lang="en">
  <head>
    <meta charset="UTF-8" />
    <meta http-equiv="X-UA-Compatible" content="IE=edge" />
    <meta name="viewport" content="width=device-width, initial-scale=1.0" />
    <title>example</title>
  </head>
  <body>
    <div id="app"></div>
    <script src="../dist/runtime-umd-prd.js"></script>
  </body>
</html>
我们需要借助一个类似webpack-dev-server的第三方插件才行,这里我们结合gulp与browser-sync两个插件。
我们新建一个gulpfile.js文件。
// gulpfile.js
import browserSync from 'browser-sync';
import gulp from 'gulp';
import { rollup } from 'rollup';
import { builds, getConfig } from './config.js';


const buildTask = (keyName) => {
    gulp.task('build', () => {
        const { input, output, plugins } = getConfig(keyName);
        return rollup({
            input,
            plugins
        })
            .then(bundle => {
                return bundle.write({
                    ...output,
                    sourcemap: true
                });
            });
    });
}
const devServer = () => {
    const server = browserSync.create();
    const defaultOption = {
        port: '8081', //设置端口
        open: true,  // 自动打开浏览器
        files: `src/*`, // 当dist文件下有改动时,会自动刷新页面
        server: {
            baseDir: '.' // 基于当前根目录
        },
        serveStatic: ['.', './example'],
    }
    gulp.task('server', () => {
        server.init(defaultOption)
    })
}
const start = async () => {
    const keyName = Object.keys(builds)[2]; // 输出umd模式
    await buildTask(keyName);
    await devServer();
}
start();
我们所用到的就是gulp,并结合rollup打包我们的仓库代码。
在引入的config.js主要是把之前的相关配置提了出去。
// config.js
import path, { dirname } from 'path';
import { fileURLToPath } from 'url'
import commonjs from '@rollup/plugin-commonjs';
import babel from 'rollup-plugin-babel';
import alias from '@rollup/plugin-alias';
import ts from 'rollup-plugin-typescript2';
export const resolve = (p) => {
    return path.resolve(dirname(fileURLToPath(import.meta.url)), p)
};
export const builds = {
    'runtime-cjs-prod': {
        entry: resolve('src/index.ts'),
        dest: name => `dist/${name}.js`,
        format: 'cjs',
        env: 'production',
        external: [],
        plugins: []
    },
    'runtime-esm-prd': {
        entry: resolve('src/index.ts'),
        dest: name => `dist/${name}.js`,
        format: 'esm',
        env: 'production',
        external: [],
        plugins: []
    },
    'runtime-umd-prd': {
        entry: resolve('src/index.ts'),
        dest: name => `dist/${name}.js`,
        format: 'umd',
        env: 'production',
        external: [],
        plugins: []
    }
}
export const getConfig = (name) => {
    const opts = builds[name];
    const config = {
        input: opts.entry,
        external: opts.external,
        plugins: [
            commonjs(),
            babel(),
            // 设置全局路径别名
            alias({
                entries: {
                    'src': resolve('src'),
                }
            }),
            ts({
                tsconfig: resolve('./tsconfig.json')
            })
        ].concat(opts.plugins, []),
        output: {
            file: opts.dest(name),
            format: opts.format,
            name: opts.name || 'Nice_utils',
        }
    }
    return config;
}
最后我们在package.json添加运行命令。
"scripts": {
    "test": "echo \"Error: no test specified\" && exit 1",
    "build": "rollup -c rollup.config.js",
    "server": "gulp build && gulp server"
},
注意我们server实际上有两个任务,所以必须要依次执行两个任务才行。
当我们运行npm run server时,就会打包,并同时打开浏览器。

OK了,证明我们打包后的js就生效了。
总结
了解rollup[2]的基础使用,对于工具库来说,rollup打包比起webpack配置要简单得多,但是远远没有webpack的生态强大,两者比较使用起来rollup比webpack要简单得多,我们也可以参考学习vue2[3]源码,vue2源码是如何通过rollup打包的。
以一个简单的例子结合gulp配和rollup打包对应不同模式的js,从而加深对rollup的理解。
本文示例code example[4]。
参考资料
[1]nice_utils: https://github.com/maicFir/nice_utils
[2]rollup: https://rollupjs.org/guide/en/
[3]vue2: https://github.com/vuejs/vue
[4]code example: https://github.com/maicFir/lessonNote/tree/master/rollup/02


