
大家好,我是 华仔, 又跟大家见面了。
今天主要聊聊 「Kafka 客户端消息缓存架构设计」,深度剖析下消息是如何进行缓存的。
认真读完这篇文章,我相信你会对 Kafka 客户端缓存架构的源码有更加深刻的理解。
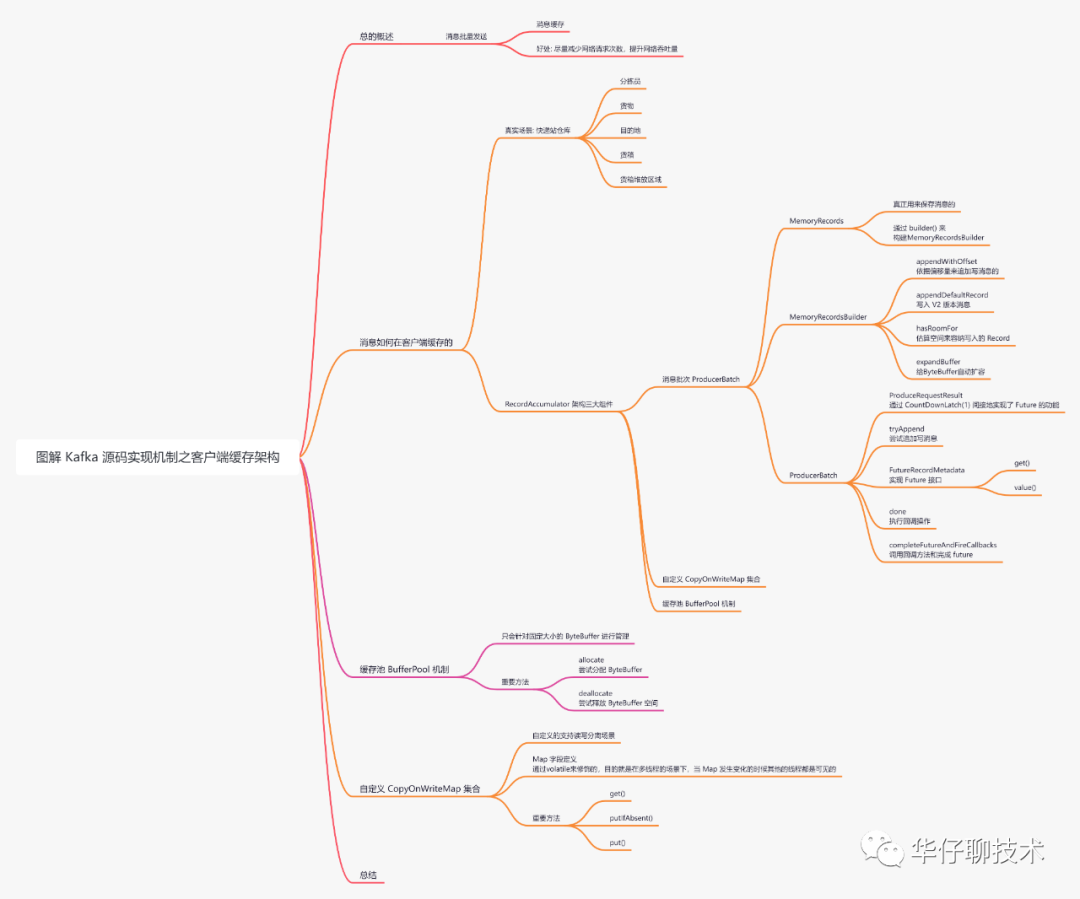
一、总体概述
通过场景驱动的方式,当被发送消息通过网络请求封装、NIO多路复用器监听网络读写事件并进行消息网络收发后,回头来看看消息是如何在客户端缓存的?
大家都知道 Kafka 是一款超高吞吐量的消息系统,主要体现在「异步发送」、「批量发送」、「消息压缩」。
跟本篇相关的是「批量发送」即生产者会将消息缓存起来,等满足一定条件后,Sender 子线程再把消息批量发送给 Kafka Broker。
这样好处就是「尽量减少网络请求次数,提升网络吞吐量」。
为了方便大家理解,所有的源码只保留骨干。
二、消息如何在客户端缓存的
既然是批量发送,那么消息肯定要进行缓存的,那消息被缓存在哪里呢?又是如何管理的?
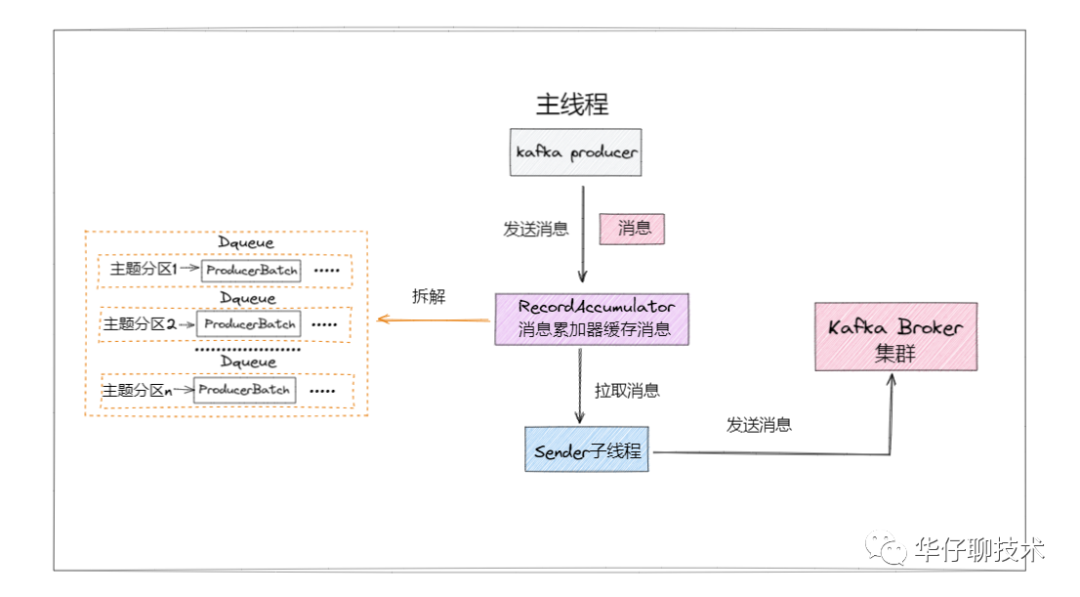
通过下面简化流程图可以看出,待发送消息主要被缓存在 RecordAccumulator 里。
我以一个真实生活场景类比解说一下会更好理解。
既然说 RecordAccumulator 像一个累积消息的仓库,就拿快递仓库类比。
上图是一个快递仓库,堆满了货物。可以看到分拣员把不同目的地的包裹放入对应目的地的货箱,每装满一箱就放置在对应的区域。
那么分拣员就是指 RecordAccumulator,而货箱以及各自所属的堆放区域,就是 RecordAccumulator 中缓存消息的地方。所有封箱的都会等待 sender 来取货发送出去。
如果你看懂了上图,就大概理解了 RecordAccumulator 的架构设计和运行逻辑。
总结下仓库里有什么:
- 分拣员
- 货物
- 目的地
- 货箱
- 堆放区域
记住这些概念,都会体现在源码里,流程如下图所示:
从上面图中可以看出:
- 至少有一个业务主线程和一个 sender 线程同时操作 RecordAccumulator,所以它必须是线程安全的。
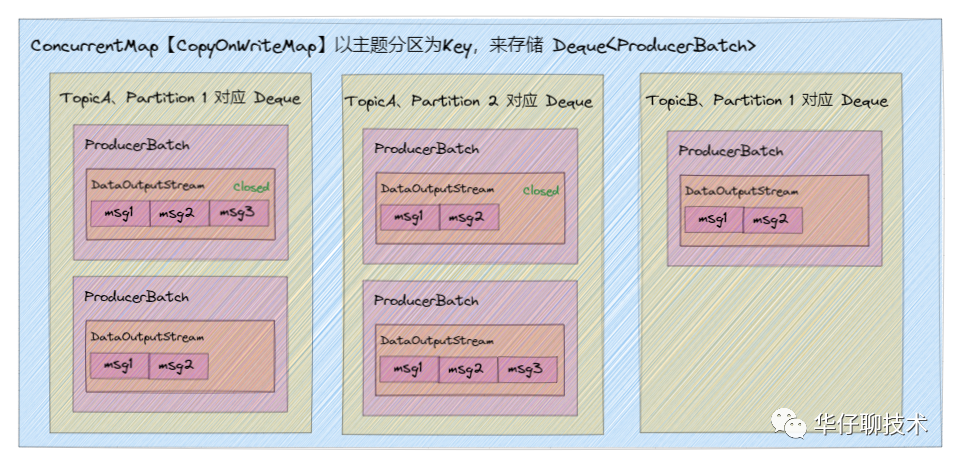
- 在它里面有一个 ConcurrentMap 集合「Kafka 自定义的 CopyOnWriteMap」。key:TopicPartiton, value:Deque<ProducerBatch>,即以主题分区为单元,把消息以 ProducerBatch 为单位累积缓存,多个 ProducerBatch 保存在 Deque 队列中。当 Deque 中最新的 batch 不能容纳消息时,就会创建新的 batch 来继续缓存,并将其加入 Deque。
- 通过 ProducerBatch 进行缓存数据,为了减少频繁申请销毁内存造成 Full GC 问题,Kafka 设计了经典的「缓存池 BufferPool 机制」。
综上可以得出 RecordAccumulator 类中有三个重要的组件:「消息批次 ProducerBatch」、「自定义 CopyOnWriteMap」、「缓存池 BufferPool 机制」。
由于篇幅原因,RecordAccumulator 类放到下篇来讲解。
先来看看 ProducerBatch,它是消息缓存及发送消息的最小单位。
通过调用关系可以看出,ProducerBatch 依赖 MemoryRecordsBuilder,而 MemoryRecordsBuilder 依赖 MemoryRecords 构建,所以 「MemoryRecords 才是真正用来保存消息的地方」。
1、MemoryRecords
import java.nio.ByteBuffer;
public class MemoryRecords extends AbstractRecords {
  public static MemoryRecordsBuilder builder(..){

        return builder(...);
  }

  public static MemoryRecordsBuilder builder(
    ByteBuffer buffer,
    // 消息版本
    byte magic,
    // 消息压缩类型
    CompressionType compressionType,
    // 时间戳
    TimestampType timestampType,
    // 基本位移
    long baseOffset,
    // 日志追加时间
    long logAppendTime,
    // 生产者id
    long producerId,
    // 生产者版本
    short producerEpoch,
    // 批次序列号
    int baseSequence,
    boolean isTransactional,
    // 是否是控制类的批次
    boolean isControlBatch,
    // 分区leader的版本
    int partitionLeaderEpoch) {

        return new MemoryRecordsBuilder(...);
  }
}
该类比较简单,通过 builder 方法可以看出依赖 ByteBuffer 来存储消息。MemoryRecordsBuilder 类的构建是通过 MemoryRecords.builder() 来初始化的。
来看看 MemoryRecordsBuilder 类的实现。
2、MemoryRecordBuilder
public class MemoryRecordsBuilder implements AutoCloseable {
    private static final DataOutputStream CLOSED_STREAM = new DataOutputStream(new OutputStream() {

        public void write(int b) {
            throw new ...;
        }
    });
    private final TimestampType timestampType;
    private final CompressionType compressionType;
    private final ByteBufferOutputStream bufferStream;
    private final byte magic;
    private final int initialPosition;
    private final long baseOffset;
    private final long logAppendTime;
    private final boolean isControlBatch;
    private final int partitionLeaderEpoch;
    private final int writeLimit;
    private final int batchHeaderSizeInBytes;
    private float estimatedCompressionRatio = 1.0F;
    private DataOutputStream appendStream;
    private boolean isTransactional;
    private long producerId;
    private short producerEpoch;
    private int baseSequence;
    private int uncompressedRecordsSizeInBytes = 0;
    private int numRecords = 0;
    private float actualCompressionRatio = 1;
    private long maxTimestamp = RecordBatch.NO_TIMESTAMP;
    private long offsetOfMaxTimestamp = -1;
    private Long lastOffset = null;
    private Long firstTimestamp = null;
    private MemoryRecords builtRecords;
从该类属性字段来看比较多,这里只讲2个关于字节流的字段。
- CLOSED_STREAM:当关闭某个 ByteBuffer 也会把它对应的写操作输出流设置为 CLOSED_STREAM,目的就是防止再向该 ByteBuffer 写数据,否则就抛异常。
- bufferStream:首先 MemoryRecordsBuilder 依赖 ByteBuffer 来完成消息存储。它会将 ByteBuffer 封装成 ByteBufferOutputStream 并实现了 Java NIO 的 OutputStream,这样就可以按照流的方式写数据了。同时 ByteBufferOutputStream 提供了自动扩容 ByteBuffer 能力。
来看看它的初始化构造方法。
public MemoryRecordsBuilder(ByteBuffer buffer,...) {
    this(new ByteBufferOutputStream(buffer), ...);
}
public MemoryRecordsBuilder(
    ByteBufferOutputStream bufferStream,
    ...
    int writeLimit) {
        ....
        this.initialPosition = bufferStream.position();
        this.batchHeaderSizeInBytes = AbstractRecords.recordBatchHeaderSizeInBytes(magic, compressionType);
        bufferStream.position(initialPosition + batchHeaderSizeInBytes);
        this.bufferStream = bufferStream;
        this.appendStream = new DataOutputStream(compressionType.wrapForOutput(this.bufferStream, magic));
    }
}
从构造函数可以看出,除了基本字段的赋值之外,会做以下3件事情:
- 根据消息版本、压缩类型来计算批次 Batch 头的大小长度。
- 通过调整 bufferStream 的 position,使其跳过 Batch 头部位置,就可以直接写入消息了。
- 对 bufferStream 增加压缩功能。
看到这里,挺有意思的,不知读者是否意识到这里涉及到 「ByteBuffer」、「bufferStream」 、「appendStream」。
三者的关系是通过「装饰器模式」实现的,即 bufferStream 对 ByteBuffer 装饰实现扩容功能,而 appendStream 又对 bufferStream 装饰实现压缩功能。

来看看它的核心方法。
(1)appendWithOffset()
public Long append(long timestamp, ByteBuffer key, ByteBuffer value, Header[] headers) {
   return appendWithOffset(nextSequentialOffset(), timestamp, key, value, headers);
}
private long nextSequentialOffset() {
  return lastOffset == null ? baseOffset : lastOffset + 1;
}
private Long appendWithOffset(
  long offset,
  boolean isControlRecord,
  long timestamp,
  ByteBuffer key,
  ByteBuffer value,
  Header[] headers) {
    try {
        if (isControlRecord != isControlBatch)
            throw new ...;
        if (lastOffset != null && offset <= lastOffset)
            throw new ...;
        if (timestamp < 0 && timestamp != RecordBatch.NO_TIMESTAMP)
           throw new ...;
        if (magic < RecordBatch.MAGIC_VALUE_V2 && headers != null && headers.length > 0)
           throw new ...;
        if (firstTimestamp == null)
           firstTimestamp = timestamp;
        if (magic > RecordBatch.MAGIC_VALUE_V1)         {
            appendDefaultRecord(offset, timestamp, key, value, headers);
            return null;
        } else {
            return appendLegacyRecord(offset, timestamp, key, value, magic);
        }
    } catch (IOException e) {

    }
}
该方法主要用来根据偏移量追加写消息,会根据消息版本来写对应消息,但需要明确的是 ProducerBatch 对标 V2 版本。
来看看 V2 版本消息写入逻辑。
private void appendDefaultRecord(
  long offset,
  long timestamp,
  ByteBuffer key,
  ByteBuffer value,
  Header[] headers) throws IOException {
    ensureOpenForRecordAppend();
    int offsetDelta = (int) (offset - baseOffset);
    long timestampDelta = timestamp - firstTimestamp;
    int sizeInBytes = DefaultRecord.writeTo(appendStream, offsetDelta, timestampDelta, key, value, headers);
    recordWritten(offset, timestamp, sizeInBytes);
}
private void ensureOpenForRecordAppend() {
    if (appendStream == CLOSED_STREAM)
        throw new ...;
}
private void recordWritten(long offset, long timestamp, int size) {
  ....
  numRecords += 1;
  uncompressedRecordsSizeInBytes += size;
  lastOffset = offset;
  if (magic > RecordBatch.MAGIC_VALUE_V0 && timestamp > maxTimestamp) {
      maxTimestamp = timestamp;
      offsetOfMaxTimestamp = offset;
  }
}
该方法主要用来写入 V2 版本消息的,主要做以下5件事情:
- 检查是否可写:判断 appendStream 状态是否为 CLOSED_STREAM,如果不是就可写,否则抛异常。
- 计算本次要写入多少偏移量。
- 计算本次写入和第一次写的时间差。
- 按照 V2 版本格式写入 appendStream 流中,并返回压缩前的消息大小。
- 成功后更新 RecordBatch 的元信息。
(2)hasRoomFor()
public boolean hasRoomFor(long timestamp, ByteBuffer key, ByteBuffer value, Header[] headers) {
    if (isFull())
        return false;
    if (numRecords == 0)
        return true;
    final int recordSize;
    if (magic < RecordBatch.MAGIC_VALUE_V2) {
        recordSize = Records.LOG_OVERHEAD + LegacyRecord.recordSize(magic, key, value);
    } else {
        int nextOffsetDelta = lastOffset == null ? 0 : (int) (lastOffset - baseOffset + 1);
        ...
        recordSize = DefaultRecord.sizeInBytes(nextOffsetDelta, timestampDelta, key, value, headers);
    }
    return this.writeLimit >= estimatedBytesWritten() + recordSize;
}
public boolean isFull() {
      return appendStream == CLOSED_STREAM ||
      (this.numRecords > 0 && this.writeLimit <= estimatedBytesWritten());
}
该方法主要用来估计当前 MemoryRecordsBuilder 是否还有空间来容纳要写入的 Record,会在下面 ProducerBatch.tryAppend() 里面调用。
最后来看看小节开始提到的自动扩容功能。
(3)expandBuffer()
public class ByteBufferOutputStream extends OutputStream {
   private static final float REALLOCATION_FACTOR = 1.1f;
   private final int initialCapacity;
   private final int initialPosition;
   public void ensureRemaining(int remainingBytesRequired) {
     if (remainingBytesRequired > buffer.remaining())
     expandBuffer(remainingBytesRequired);
  }
  private void expandBuffer(int remainingRequired) {
    int expandSize = Math.max((int) (buffer.limit() * REALLOCATION_FACTOR), buffer.position() + remainingRequired);
    ByteBuffer temp = ByteBuffer.allocate(expandSize);
    int limit = limit();
    buffer.flip();
    temp.put(buffer);
    buffer.limit(limit);
    buffer.position(initialPosition);
    buffer = temp;
  }
}
该方法主要用来判断是否需要扩容 ByteBuffer 的,即当写入字节数大于 buffer 当前剩余字节数就开启扩容,扩容需要做以下3件事情:
- 评估需要多少空间: 在「扩容空间」、「真正需要多少字节」之间取最大值,此处通过「扩容因子」来计算主要是因为扩容是需要消耗系统资源的,如果每次都按实际数据大小来进行分配空间,会浪费不必要的系统资源。
- 申请新的空间:根据扩容多少申请新的 ByteBuffer,然后将原来的 ByteBuffer 数据拷贝进去,对应源码步骤:「3 - 7」。
- 最后将引用指向新申请的 ByteBuffer。
接下来看看 ProducerBatch 的实现。
3、ProducerBatch
public final class ProducerBatch {
    private enum FinalState { ABORTED, FAILED, SUCCEEDED }
    final long createdMs;
    final TopicPartition topicPartition;
    final ProduceRequestResult produceFuture;
    private final List<Thunk> thunks = new ArrayList<>();
    private final MemoryRecordsBuilder recordsBuilder;
    private final AtomicInteger attempts = new AtomicInteger(0);
    private final boolean isSplitBatch;
    private final AtomicReference<FinalState> finalState = new AtomicReference<>(null);
    int recordCount;
    int maxRecordSize;
    private long lastAttemptMs;
    private long lastAppendTime;
    private long drainedMs;
    private boolean retry;
}
public ProducerBatch(TopicPartition tp, MemoryRecordsBuilder recordsBuilder, long createdMs, boolean isSplitBatch) {
    ...
    this.produceFuture = new ProduceRequestResult(topicPartition);
    ...
}
一个 ProducerBatch 会存放一条或多条消息,通常把它称为「批次消息」。
先来看看几个重要字段:
- topicPartition:批次对应的主题分区,当前 ProducerBatch 中缓存的 Record 都会发送给该 TopicPartition。
- produceFuture:请求结果的 Future,通过 ProduceRequestResult 类实现。
- thunks:Thunk 对象集合,用来存储消息的 callback 和每个 Record 关联的 Feture 响应数据。
- recordsBuilder:封装 MemoryRecords 对象,用来存储消息的 ByteBuffer。
- attemps:batch 的失败重试次数,通过 AtomicInteger 提供原子操作来进行 Integer 的使用,适合高并发情况下的使用。
- isSplitBatch:是否是被分裂的批次,因单个消息过大导致一个 ProducerBatch 存不下,被分裂成多个 ProducerBatch 来存储的情况。
- drainedMs:Sender 子线程拉取批次的时间。
- retry:如果 ProducerBatch 中的数据发送失败,则会重新尝试发送。
在构造函数中,有个重要的依赖组件就是 「ProduceRequestResult」,而它是「异步获取消息生产结果的类」,简单剖析下。
(1)ProduceRequestResult 类
public class ProduceRequestResult {
    private final CountDownLatch latch = new CountDownLatch(1);
    private final TopicPartition topicPartition;
    private volatile Long baseOffset = null;
    public ProduceRequestResult(TopicPartition topicPartition) {
        this.topicPartition = topicPartition;
    }
    public void done() {
        if (baseOffset == null)
            throw new ...;
        this.latch.countDown();
    }
    public void await() throws InterruptedException {
        latch.await();
    }
    public boolean await(long timeout, TimeUnit unit) throws InterruptedException {
        return latch.await(timeout, unit);
    }
}
该类通过 CountDownLatch(1) 间接地实现了 Future 功能,并让其他所有线程都在这个锁上等待,此时只需要调用一次 countDown() 方法就可以让其他所有等待的线程同时恢复执行。
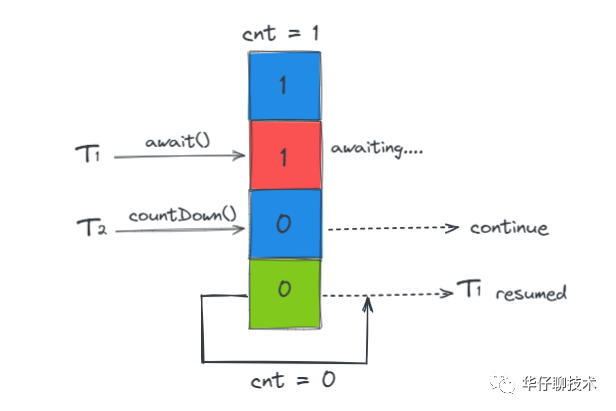
当 Producer 发送消息时会间接调用「ProduceRequestResult.await」,此时线程就会等待服务端的响应。当服务端响应时调用「ProduceRequestResult.done」,该方法调用了「CountDownLatch.countDown」唤醒了阻塞在「CountDownLatch.await」上的主线程。这些线程后续可以通过 ProduceRequestResult 的 error 字段来判断本次请求成功还是失败。
接下来看看 ProducerBatch 类的重要方法。
(2) tryAppend()
public FutureRecordMetadata tryAppend(long timestamp, byte[] key, byte[] value, Header[] headers, Callback callback, long now) {
    if (!recordsBuilder.hasRoomFor(timestamp, key, value, headers)) {
        return null;
    } else {
        Long checksum = this.recordsBuilder.append(timestamp, key, value, headers);
        this.maxRecordSize = Math.max(this.maxRecordSize, AbstractRecords.estimateSizeInBytesUpperBound(magic(),recordsBuilder.compressionType(), key, value, headers));
        ...
        FutureRecordMetadata future = new FutureRecordMetadata(this.produceFuture, this.recordCount,timestamp, checksum,key == null ? -1 : key.length,value == null ? -1 : value.length, Time.SYSTEM);
        thunks.add(new Thunk(callback, future));
        this.recordCount++;
        return future;
    }
}
该方法主要用来尝试追加写消息的,主要做以下6件事情:
- 通过 MemoryRecordsBuilder 的 hasRoomFor()检查当前 ProducerBatch 是否还有足够的空间来存储此次写入的 Record。
- 调用 MemoryRecordsBuilder.append() 方法将 Record 追加到 ByteBuffer 中。
- 创建 FutureRecordMetadata 对象,底层继承了 Future 接口,对应此次 Record 的发送。
- 将 Future 和消息的 callback 回调封装成 Thunk 对象,放入 thunks 集合中。
- 更新 Record 记录数。
- 返回 FutureRecordMetadata。
可以看出该方法只是让 Producer 主线程完成了消息的缓存,并没有实现真正的网络发送。
接下来简单看看 FutureRecordMetadata,它实现了 JDK 中 concurrent 的 Future 接口。除了维护 ProduceRequestResult 对象外还维护了 relativeOffset 等字段,其中 relativeOffset 用来记录对应 Record 在 ProducerBatch 中的偏移量。
该类有2个值得注意的方法,get() 和 value()。
public RecordMetadata get(long timeout, TimeUnit unit) throws InterruptedException, ExecutionException, TimeoutException {
    ...
    boolean occurred = this.result.await(timeout, unit);
    ...
    return valueOrError();
}
RecordMetadata valueOrError() throws ExecutionException {
    ...
    return value();
}
该方法主要依赖 ProduceRequestResult 的 CountDown 来实现阻塞等待,最后调用 value() 返回 RecordMetadata 对象。
RecordMetadata value() {
    ...
    return new RecordMetadata(
      result.topicPartition(),
      ...);
}
private long timestamp() {
    return result.hasLogAppendTime() ? result.logAppendTime() : createTimestamp;
}
该方法主要通过各种参数封装成 RecordMetadata 对象返回。
了解了 ProducerBatch 是如何写入数据的,我们再来看看 done() 方法。当 Producer 收到 Broker 端「正常」|「超时」|「异常」|「关闭生产者」等响应都会调用 ProducerBatch 的 done()方法。
(3)done()
public boolean done(long baseOffset, long logAppendTime, RuntimeException exception) {
    final FinalState tryFinalState = (exception == null) ? FinalState.SUCCEEDED : FinalState.FAILED;
    ....
    if (this.finalState.compareAndSet(null, tryFinalState)) {
        completeFutureAndFireCallbacks(baseOffset, logAppendTime, exception);
        return true;
    }
    ....
    return false;
}
该方法主要用来是否可以执行回调操作,即当收到该批次响应后,判断批次 Batch 最终状态是否可以执行回调操作。
(4)completeFutureAndFireCallbacks()
private void completeFutureAndFireCallbacks(long baseOffset, long logAppendTime, RuntimeException exception) {
  produceFuture.set(baseOffset, logAppendTime, exception);
  for (Thunk thunk : thunks) {
      try {
          if (exception == null) {
           RecordMetadata metadata = thunk.future.value();
           if (thunk.callback != null)
             thunk.callback.onCompletion(metadata, null);
          } else {
              if (thunk.callback != null)
                  thunk.callback.onCompletion(null, exception);
          }
      }
      ....
  }
  produceFuture.done();
}
该方法主要用来调用回调方法和完成 future,主要做以下3件事情:
- 更新 ProduceRequestResult 中的相关字段,包括基本位移、消息追加的时间、异常。
- 遍历 thunks 集合,触发每个 Record 的 Callback 回调。
- 调用底层 CountDownLatch.countDown()方法,阻塞在其上的主线程。
至此我们已经讲解了 ProducerBatch 「如何缓存消息」、「如何处理响应」、「如何处理回调」三个最重要方法。
通过一张图来描述下缓存消息的存储结构:
接下来看看 Kafka 生产端最经典的 「缓冲池架构」。
三、客户端缓存池架构设计
为什么客户端需要缓存池这个经典架构设计呢?
主要原因就是频繁的创建和释放 ProducerBatch 会导致 Full GC 问题,所以 Kafka 针对这个问题实现了一个非常优秀的机制,就是「缓存池 BufferPool 机制」。即每个 Batch 底层都对应一块内存空间,这个内存空间就是专门用来存放消息,用完归还就行。
接下来看看缓存池的源码设计。
1、BufferPoolx
public class BufferPool { private final long totalMemory; private final int poolableSize; private final ReentrantLock lock; private final Deque<ByteBuffer> free; private final Deque<Condition> waiters; private long nonPooledAvailableMemory; public BufferPool(long memory, int poolableSize, Metrics metrics, Time time, String metricGrpName) { ... this.totalMemory = memory; this.nonPooledAvailableMemory = memory; }}
x
public class BufferPool { private final long totalMemory; private final int poolableSize; private final ReentrantLock lock; private final Deque<ByteBuffer> free; private final Deque<Condition> waiters; private long nonPooledAvailableMemory; public BufferPool(long memory, int poolableSize, Metrics metrics, Time time, String metricGrpName) { ... this.totalMemory = memory; this.nonPooledAvailableMemory = memory; }}先来看看上面几个重要字段:
- totalMemory:整个 BufferPool 内存大小「buffer.memory」,默认是32M。
- poolableSize:池化缓存池一块内存块的大小「batch.size」,默认是16k。
- lock:当有多线程并发分配和回收 ByteBuffer 时,为了保证线程的安全,使用锁来控制并发。
- free:池化的 free 队列,其中缓存了指定大小的 ByteBuffer 对象。
- waiters:阻塞线程对应的 Condition 队列,当有申请不到足够内存的线程时,为了等待其他线程释放内存而阻塞等待,对应的 Condition 对象会进入该队列。
- nonPooledAvailableMemory:非池化可用内存。
可以看出它只会针对固定大小「poolableSize 16k」的 ByteBuffer 进行管理,ArrayDeque 的初始化大小是16,此时 BufferPool 的状态如下图:
接下来看看 BufferPool 的重要方法。
(1)allocate()
public ByteBuffer allocate(int size, long maxTimeToBlockMs) throws InterruptedException {
  if (size > this.totalMemory)
      throw new IllegalArgumentException("Attempt to allocate " + size + " bytes, but there is a hard limit of "+ this.totalMemory + " on memory allocations.");
  ByteBuffer buffer = null;
  this.lock.lock();
  if (this.closed) {
      this.lock.unlock();
      throw new KafkaException("Producer closed while allocating memory");
  }
  ....
  try {
      if (size == poolableSize && !this.free.isEmpty())
      return this.free.pollFirst();
      int freeListSize = freeSize() * this.poolableSize;

      if (this.nonPooledAvailableMemory + freeListSize >= size) {
          freeUp(size);
          this.nonPooledAvailableMemory -= size;
      } else {
          int accumulated = 0;
          Condition moreMemory = this.lock.newCondition();
          try {
              long remainingTimeToBlockNs = TimeUnit.MILLISECONDS.toNanos(maxTimeToBlockMs);
              this.waiters.addLast(moreMemory);
              while (accumulated < size) {
                  ....
                  try {
                   waitingTimeElapsed = !moreMemory.await(remainingTimeToBlockNs, TimeUnit.NANOSECONDS);
                  } finally {
                      ....
                  }
                  ....
                  if (accumulated == 0 && size == this.poolableSize && !this.free.isEmpty()) {
                    buffer = this.free.pollFirst();
                    accumulated = size;
                  } else {
                      freeUp(size - accumulated);
                      int got = (int) Math.min(size - accumulated, this.nonPooledAvailableMemory);
                      this.nonPooledAvailableMemory -= got;
                      accumulated += got;
                  }
              }
              accumulated = 0;
          } finally {
              this.nonPooledAvailableMemory += accumulated;
              this.waiters.remove(moreMemory);
          }
      }
  } finally {
      try {
          if (!(this.nonPooledAvailableMemory == 0 && this.free.isEmpty()) && !this.waiters.isEmpty())

           this.waiters.peekFirst().signal();
      } finally {

          lock.unlock();
      }
  }
  if (buffer == null)
      return safeAllocateByteBuffer(size);
  else
      return buffer;
}
private ByteBuffer safeAllocateByteBuffer(int size) {
  boolean error = true;
  try {
      ByteBuffer buffer = allocateByteBuffer(size);
      error = false;
      return buffer;
  } finally {
    if (error) {
        this.lock.lock();
        try {
            this.nonPooledAvailableMemory += size;
            if (!this.waiters.isEmpty())

                this.waiters.peekFirst().signal();
        } finally {

            this.lock.unlock();
        }
    }
  }
}
protected ByteBuffer allocateByteBuffer(int size) {
    return ByteBuffer.allocate(size);
}
private void freeUp(int size) {
    while (!this.free.isEmpty() && this.nonPooledAvailableMemory < size)
        this.nonPooledAvailableMemory += this.free.pollLast().capacity();
}
该方法主要用来尝试分配 ByteBuffer,这里分4种情况说明下:
情况1:申请16k且free缓存池有可用内存
此时会直接从 free 缓存池中获取队首的 ByteBuffer 分配使用,用完后直接将 ByteBuffer 放到 free 缓存池的队尾中,并调用 clear() 清空数据,以便下次重复使用。
情况2:申请16k且free缓存池无可用内存
此时 free 缓存池无可用内存,只能从非池化可用内存中获取16k内存来分配,用完后直接将 ByteBuffer 放到 free 缓存池的队尾中,并调用 clear() 清空数据,以便下次重复使用。
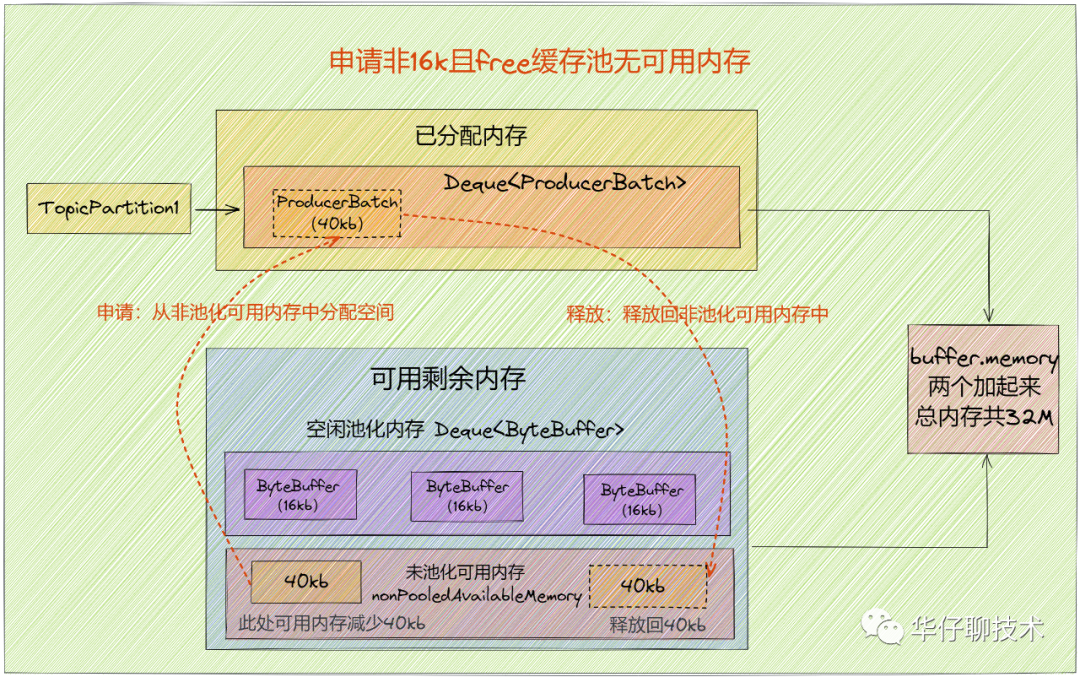
情况3:申请非16k且free缓存池无可用内存
此时 free 缓存池无可用内存,且申请的是非16k,只能从非池化可用内存(空间够分配)中获取一部分内存来分配,用完后直接将申请到的内存空间释放到非池化可用内存中,后续会被 GC 掉。
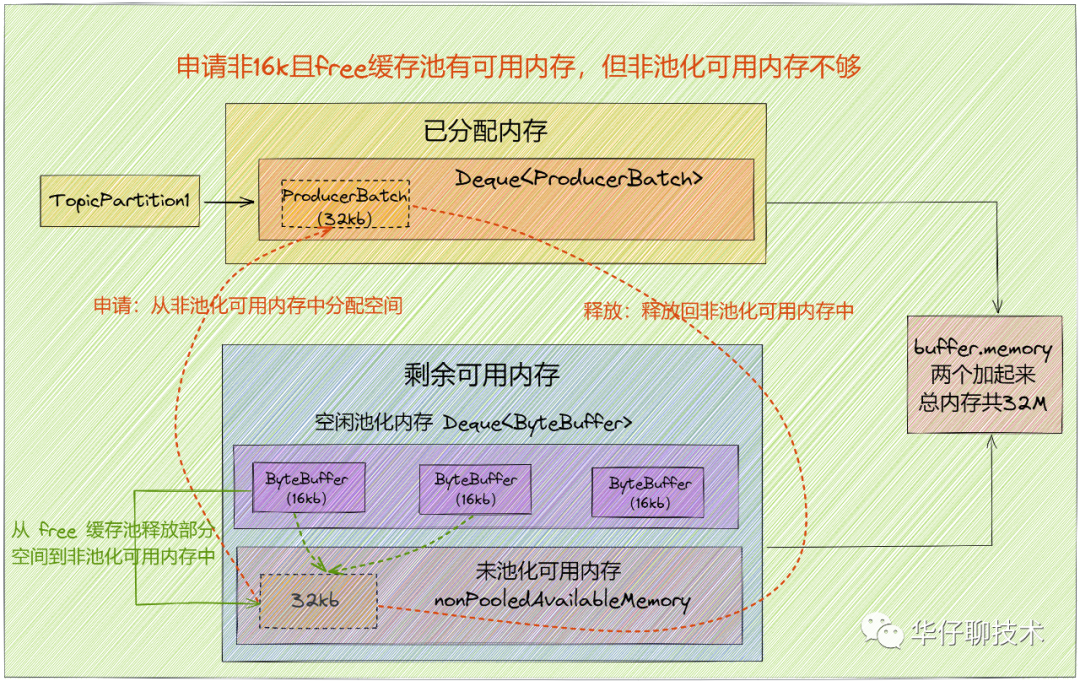
情况4:申请非16k且free缓存池有可用内存,但非池化可用内存不够
此时 free 缓存池有可用内存,但申请的是非16k,先尝试从 free 缓存池中将 ByteBuffer 释放到非池化可用内存中,直到满足申请内存大小(size),然后从非池化可用内存获取对应内存大小来分配,用完后直接将申请到的内存空间释放到到非池化可用内存中,后续会被 GC 掉。
(2)deallocate()
public void deallocate(ByteBuffer buffer, int size) {
    lock.lock();
    try {
        if (size == this.poolableSize && size == buffer.capacity()) {
            buffer.clear();
            this.free.add(buffer);
        } else {
            this.nonPooledAvailableMemory += size;
        }
        Condition moreMem = this.waiters.peekFirst();
        if (moreMem != null)
            moreMem.signal();
    } finally {
        lock.unlock();
    }
}
该方法主要用来尝试释放 ByteBuffer 空间,主要做以下几件事情:
- 先加锁,保证线程安全。
- 如果待释放的 size 大小为16k,则直接放入 free 队列中。
- 否则由 JVM GC 来回收 ByteBuffer 并增加 nonPooledAvailableMemory。
- 当有 ByteBuffer 回收了,唤醒 waiters 中的第一个阻塞线程。
最后来看看 kafka 自定义的支持「读写分离场景」CopyOnWriteMap 的实现。
2、CopyOnWriteMap
通过 RecordAccumulator 类的属性字段中可以看到,CopyOnWriteMap 中 key 为主题分区,value 为向这个分区发送的 Deque<ProducerBatch> 队列集合。
我们知道生产消息时,要发送的分区是很少变动的,所以写操作会很少。大部分情况都是先获取分区对应的队列,然后将 ProducerBatch 放入队尾,所以读操作是很频繁的,这就是个典型的「读多写少」的场景。
所谓 「CopyOnWrite」 就是当写的时候会拷贝一份来进行写操作,写完了再替换原来的集合。
来看看它的源码实现。
public class CopyOnWriteMap<K, V> implements ConcurrentMap<K, V> {
    private volatile Map<K, V> map;
    public CopyOnWriteMap() {
        this.map = Collections.emptyMap();
    }
该类只有一个重要的字段 Map,是通过「volatile」来修饰的,目的就是在多线程的场景下,当 Map 发生变化的时候其他的线程都是可见的。
接下来看几个重要方法,都比较简单,但是实现非常经典。
(1)get()
public V get(Object k) {
    return map.get(k);
}
该方法主要用来读取集合中的队列,可以看到读操作并没有加锁,多线程并发读取的场景并不会阻塞,可以实现高并发读取。如果队列已经存在了就直接返回即可。
(2)putIfAbsent()
public synchronized V putIfAbsent(K k, V v) {
    if (!containsKey(k))
        return put(k, v);
    else
        return get(k);
}
public boolean containsKey(Object k) {
    return map.containsKey(k);
}
该方法主要用来获取或者设置队列,会被多个线程并发执行,通过「synchronized」来修饰可以保证线程安全的,除非队列不存在才会去设置。
(3)put()
public synchronized V put(K k, V v) {
    Map<K, V> copy = new HashMap<K, V>(this.map);
    V prev = copy.put(k, v);
    this.map = Collections.unmodifiableMap(copy);
    return prev;
}
该方法主要用来设置队列的, put 时也是通过「synchronized」来修饰的,可以保证同一时间只有一个线程会来更新这个值。
那为什么说写操作不会阻塞读操作呢?
- 首先重新创建一个 HashMap 集合副本。
- 通过「volatile」写的方式赋值给对应集合里。
- 把新的集合设置成「不可修改的 map」,并赋值给字段 map。
这就实现了读写分离。对于 Producer 最最核心,会出现多线程并发访问的就是缓存池。因此这块的高并发设计相当重要。
四、总结
这里,我们一起来总结一下这篇文章的重点。
1、带你先整体的梳理了 Kafka 客户端消息批量发送的好处。
2、通过一个真实生活场景类比来带你理解 RecordAccumulator 内部构造,并且深度剖析了消息是如何在客户端缓存的,以及内部各组件实现原理。
3、带你深度剖析了 Kafka 客户端非常重要的 BufferPool 、CopyOnWriteMap 的实现原理。


