1、Form组件解决的问题
我们从官网摘下来一段Form代码,可以很清晰的看出一个简单的表单,主要是为了统一收集和校验组件的值。
<Form
     onFinish={(values) => {
       console.log('values', values)
     }}
   >
     <Form.Item
       label="Username"
       name="username"
       rules={[{ required: true, message: 'Please input your username!' }]}
     >
       <Input />
     </Form.Item>
     <Form.Item
       label="Password"
       name="password"
       rules={[{ required: true, message: 'Please input your password!' }]}
     >
       <Input.Password />
     </Form.Item>
     <Form.Item>
       <Button type="primary" htmlType="submit">
         Submit
       </Button>
     </Form.Item>
</Form>- 1.
- 2.
- 3.
- 4.
- 5.
- 6.
- 7.
- 8.
- 9.
- 10.
- 11.
- 12.
- 13.
- 14.
- 15.
- 16.
- 17.
- 18.
- 19.
- 20.
- 21.
- 22.
- 23.
- 24.
- 25.
那么它是如何做到统一收集和校验呢?原理很简单,只需要通过监听表单组件的onChange事件,获取表单项的 value,根据定义的校验规则对 value 进行检验,生成检验状态和检验信息,再通过setState驱动视图更新,展示组件的值以及校验信息即可。
2、Antd Form 是怎么实现的
要实现上面的方案需要解决这几个问题:
- 如何实时收集组件的数据?
- 如何对组件的数据进行校验?
- 如何更新组件的数据?
- 如何跨层级传递传递
- 表单提交
接下来我们就带着这几个问题,一起来一步步实现
3、目录结构

1659421573127.jpg
- src/index.tsx用于放测试代码
- src/components/Form文件夹用于存放Form组件信息
- interface.ts用于存放数据类型
- useForm存放数据仓库内容
- index.tsx导出Form组件相关
- FiledContext存放Form全局context
- Form外层组件
- Filed内层组件
4、数据类型定义
本项目采用ts来搭建,所以我们先定义数据类型;
// src/components/Form/interface.ts
export type StoreValue = any;
export type Store = Record<string, StoreValue>;
export type NamePath = string | number;
export interface Callbacks<Values = any> {
 onFinish?: (values: Values) => void;
}
export interface FormInstance<Values = any> {
 getFieldValue: (name: NamePath) => StoreValue;
 submit: () => void;
 getFieldsValue: () => Values;
 setFieldsValue: (newStore: Store) => void;
 setCallbacks: (callbacks: Callbacks) => void;
}- 1.
- 2.
- 3.
- 4.
- 5.
- 6.
- 7.
- 8.
- 9.
- 10.
- 11.
- 12.
- 13.
- 14.
5、数据仓库
因为我们的表单一定是各种各样不同的数据项,比如input、checkbox、radio等等,如果这些组件每一个都要自己管理自己的值,那组件的数据管理太杂乱了,我们做这个也就没什么必要性了。那要如何统一管理呢?其实就是我们自己定义一个数据仓库,在最顶层将定义的仓库操作和数据提供给下层。这样我们就可以在每层都可以操作数据仓库了。数据仓库的定义,说白了就是一些读和取的操作,将所有的操作都定义在一个文件,代码如下:
// src/components/Form/useForm.ts
import { useRef } from "react";
import type { Store, NamePath, Callbacks, FormInstance } from "./interface";
class FormStore {
private store: Store = {};
private callbacks: Callbacks = {};
getFieldsValue = () => {
return { this.store };
};
getFieldValue = (name: NamePath) => {
return this.store[name];
};
setFieldsValue = (newStore: Store) => {
this.store = {
this.store,
newStore,
};
};
setCallbacks = (callbacks: Callbacks) => {
this.callbacks = { this.callbacks, callbacks };
};
submit = () => {
const { onFinish } = this.callbacks;
if (onFinish) {
onFinish(this.getFieldsValue());
}
};
getForm = (): FormInstance => {
return {
getFieldsValue: this.getFieldsValue,
getFieldValue: this.getFieldValue,
setFieldsValue: this.setFieldsValue,
submit: this.submit,
setCallbacks: this.setCallbacks,
};
};
}- 1.
- 2.
- 3.
- 4.
- 5.
- 6.
- 7.
- 8.
- 9.
- 10.
- 11.
- 12.
- 13.
- 14.
- 15.
- 16.
- 17.
- 18.
- 19.
- 20.
- 21.
- 22.
- 23.
- 24.
- 25.
- 26.
- 27.
- 28.
- 29.
- 30.
- 31.
- 32.
- 33.
- 34.
- 35.
- 36.
- 37.
当然,数据仓库不能就这么放着,我们需要把里面的内容暴露出去。这里用ref来保存,来确保组件初次渲染和更新阶段用的都是同一个数据仓库实例;
// src/components/Form/useForm.ts
export default function useForm<Values = any>(
 form?: FormInstance<Values>
): [FormInstance<Values>] {
 const formRef = useRef<FormInstance>();
 if (!formRef.current) {
   if (form) {
     formRef.current = form;
   } else {
     const formStore = new FormStore();
     formRef!.current = formStore.getForm();
   }
 }
 return [formRef.current];
}- 1.
- 2.
- 3.
- 4.
- 5.
- 6.
- 7.
- 8.
- 9.
- 10.
- 11.
- 12.
- 13.
- 14.
- 15.
6、实时收集组件的数据
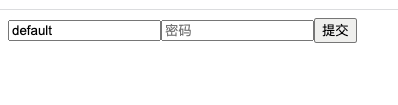
我们先来定义一下表单的结构,如下代码所示:
// src/index.tsx
import React from "react";
import Form, { Field } from "./components/Form";
const index: React.FC = () => {
 return (
   <Form
     onFinish={(values) => {
       console.log("values", values);
     }}
   >
     <Field name={"userName"}>
       <input placeholder="用户名" />
     </Field>
     <Field name={"password"}>
       <input placeholder="密码" />
     </Field>
     <button type="submit">提交</button>
   </Form>
 );
};
export default index;- 1.
- 2.
- 3.
- 4.
- 5.
- 6.
- 7.
- 8.
- 9.
- 10.
- 11.
- 12.
- 13.
- 14.
- 15.
- 16.
- 17.
- 18.
- 19.
- 20.
- 21.
定义了数据仓库,就要想办法在每一层都要拥有消费它的能力,所以这里在最顶层用context来跨层级数据传递。通过顶层的form将数据仓库向下传递,代码如下:
// src/components/Form/Form.tsx
import React from "react";
import FieldContext from "./FieldContext";
import useForm from "./useForm";
import type { Callbacks, FormInstance } from "./interface";
interface FormProps<Values = any> {
 form?: FormInstance<Values>;
 onFinish?: Callbacks<Values>["onFinish"];
}
const Form: React.FC<FormProps> = (props) => {
 const { children, onFinish, form } = props;
 const [formInstance] = useForm(form);
 formInstance.setCallbacks({ onFinish });
 return (
   <form
     onSubmit={(e) => {
       e.preventDefault();
       formInstance.submit();
     }}
   >
     <FieldContext.Provider value={formInstance}>
       {children}
     </FieldContext.Provider>
   </form>
 );
};
export default Form;- 1.
- 2.
- 3.
- 4.
- 5.
- 6.
- 7.
- 8.
- 9.
- 10.
- 11.
- 12.
- 13.
- 14.
- 15.
- 16.
- 17.
- 18.
- 19.
- 20.
- 21.
- 22.
- 23.
- 24.
- 25.
- 26.
- 27.
子组件来做存与取的操作。这里有个疑问,为什么不直接在input、radio这些组件上直接加入存取操作,非得在外面包一层Field(在正式的antd中是Form.Item)呢?这是因为需要在它基础的能力上扩展一些能力。
// src/components/Form/Field.tsx
import React, { ChangeEvent } from "react";
import FieldContext from "./FieldContext";
import type { NamePath } from "./interface";
const Field: React.FC<{ name: NamePath }> = (props) => {
 const { getFieldValue, setFieldsValue } = React.useContext(FieldContext);
 const { children, name } = props;
 const getControlled = () => {
   return {
     value: getFieldValue && getFieldValue(name),
     onChange: (e: ChangeEvent<HTMLInputElement>) => {
       const newValue = e?.target?.value;
       setFieldsValue?.({ [name]: newValue });
     },
   };
 };
 return React.cloneElement(children as React.ReactElement, getControlled());
};
export default Field;- 1.
- 2.
- 3.
- 4.
- 5.
- 6.
- 7.
- 8.
- 9.
- 10.
- 11.
- 12.
- 13.
- 14.
- 15.
- 16.
- 17.
- 18.
- 19.
这样我们就完成了数据收集以及保存的功能了。
很简单吧,我们来试一下onFinish操作!图片
接下来我们继续完善其他的功能。

7、完善组件渲染
我们来修改一下Form的代码,加入一条设置默认值:
// src/index.tsx
import React, { useEffect } from "react";
import Form, { Field, useForm } from "./components/Form";
const index: React.FC = () => {
 const [form] = useForm();
 // 新加入代码
 useEffect(() => {
   form.setFieldsValue({ username: "default" });
 }, []);
 return (
    // ...省略...
 );
};
export default index;- 1.
- 2.
- 3.
- 4.
- 5.
- 6.
- 7.
- 8.
- 9.
- 10.
- 11.
- 12.
- 13.
- 14.
来看一眼页面,发现我们设置的默认值并没有展示在表单中,但是我们提交的时候还是可以打印出数据的,证明我们的数据是已经存入到store中了,只是没有渲染到组件中,接下来我们需要做的工作就是根据store变化完成组件表单的响应功能。

我们在useForm中加入订阅和取消订阅功能代码;
// 订阅与取消订阅
 registerFieldEntities = (entity: FieldEntity) => {
   this.fieldEntities.push(entity);
   return () => {
     this.fieldEntities = this.fieldEntities.filter((item) => item !== entity);
     const { name } = entity.props;
     name && delete this.store[name];
   };
};- 1.
- 2.
- 3.
- 4.
- 5.
- 6.
- 7.
- 8.
- 9.
forceUpdate的作用是进行子组件更新;
// src/components/Form/Field.tsx
// ...省略...
const [, forceUpdate] = React.useReducer((x) => x + 1, 0);
 useLayoutEffect(() => {
   const unregister =
     registerFieldEntities &&
     registerFieldEntities({
       props,
       onStoreChange: forceUpdate,
     });
   return unregister;
 }, []);
// ...省略...- 1.
- 2.
- 3.
- 4.
- 5.
- 6.
- 7.
- 8.
- 9.
- 10.
- 11.
- 12.
- 13.
当然光是注册是不够的,我们需要在设置值的时候完成响应;
// src/components/Form/useForm.tsx
setFieldsValue = (newStore: Store) => {
this.store = {
this.store,
newStore,
};
// 新加入代码
// update Filed
this.fieldEntities.forEach((entity) => {
Object.keys(newStore).forEach((k) => {
if (k === entity.props.name) {
entity.onStoreChange();
}
});
});
};- 1.
- 2.
- 3.
- 4.
- 5.
- 6.
- 7.
- 8.
- 9.
- 10.
- 11.
- 12.
- 13.
- 14.
- 15.
- 16.
我们来看一下效果,发现组件已经将值更新啦;
8、加入校验功能
到现在为止,我们发现提交表单还没有校验功能。表单校验通过,则执行onFinish。表单校验的依据就是Field的rules,表单校验通过,则执行onFinish,失败则执行onFinishFailed。接下来我们来实现一个简单的校验。
修改代码结构
import React, { useEffect } from "react";
import Form, { Field, useForm } from "./components/Form";
const nameRules = { required: true, message: "请输入姓名!" };
const passworRules = { required: true, message: "请输入密码!" };
const index: React.FC = () => {
 const [form] = useForm();
 useEffect(() => {
   form.setFieldsValue({ username: "default" });
 }, []);
 return (
   <Form
     onFinish={(values) => {
       console.log("values", values);
     }}
     onFinishFailed={(err) => {
       console.log("err", err);
     }}
     form={form}
   >
     <Field name={"username"} rules={[nameRules]}>
       <input placeholder="用户名" />
     </Field>
     <Field name={"password"} rules={[passworRules]}>
       <input placeholder="密码" type="password" />
     </Field>
     <button type="submit">提交</button>
   </Form>
 );
};
export default index;- 1.
- 2.
- 3.
- 4.
- 5.
- 6.
- 7.
- 8.
- 9.
- 10.
- 11.
- 12.
- 13.
- 14.
- 15.
- 16.
- 17.
- 18.
- 19.
- 20.
- 21.
- 22.
- 23.
- 24.
- 25.
- 26.
- 27.
- 28.
- 29.
- 30.
添加validateField方法进行表单校验。注意:此版本校验只添加了required校验,后续小伙伴们可以根据自己的需求继续完善哦!
// src/components/Form/useForm.tsx
// ...省略...
validateField = () => {
   const err: any[] = [];
   this.fieldEntities.forEach((entity) => {
     const { name, rules } = entity.props;
     const value: NamePath = name && this.getFieldValue(name);
     let rule = rules?.length && rules[0];
     if (rule && rule.required && (value === undefined || value === "")) {
       name && err.push({ [name]: rule && rule.message, value });
     }
   });
   return err;
};- 1.
- 2.
- 3.
- 4.
- 5.
- 6.
- 7.
- 8.
- 9.
- 10.
- 11.
- 12.
- 13.
- 14.
我们只需要在form提交的时候判断一下就可以啦;
submit = () => {
   const { onFinish, onFinishFailed } = this.callbacks;
   // 调用校验方法
   const err = this.validateField();
   if (err.length === 0) {
     onFinish && onFinish(this.getFieldsValue());
   } else {
     onFinishFailed && onFinishFailed(err);
   }
};- 1.
- 2.
- 3.
- 4.
- 5.
- 6.
- 7.
- 8.
- 9.
- 10.
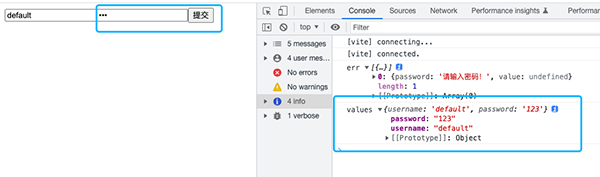
密码为空时的实现效果;

账号密码都不为空时的实现效果;
做到这里,我们已经基本实现了一个Antd Form表单了,但是细节功能还需要慢慢去完善,感兴趣的小伙伴们可以接着继续向下做!
9、总结
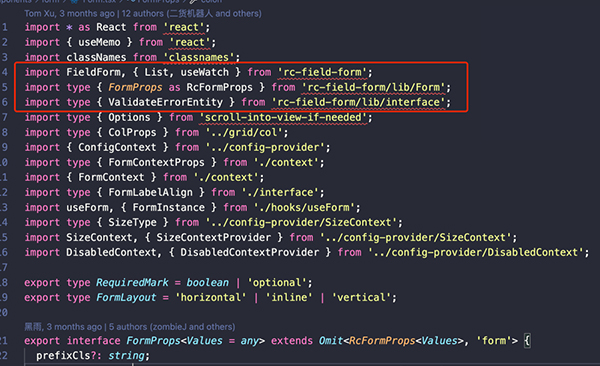
其实我们在看Antd Form源码的时候会发现它是基于rc-field-form来写的。所以想继续向下写的小伙伴可以下载rc-field-form源码,边学习边写,这样就可以事半功倍了,攻克源码!
本篇文章代码地址:https://github.com/linhexs/vite-react-ts-form