前面的文章给大家介绍 Spring 的重试机制的时候有提到过 Spring 有很多 @Enable 开头的注解,平时在使用的时候也没有注意过为什么会有这些注解,今天就给大家介绍一下。
@Enable 注解
首先我们先看一下有哪些常用的 @Enable 开头的注解,以及都是干什么用的。
- @EnableRetry:开启Spring 的重试功能;
- @EnableScheduling:开启Spring 的定时功能;
- @EnableAsync:开启Spring 的异步功能;
- @EnableAutoConfiguration:开启Spring 的自动装配功能;
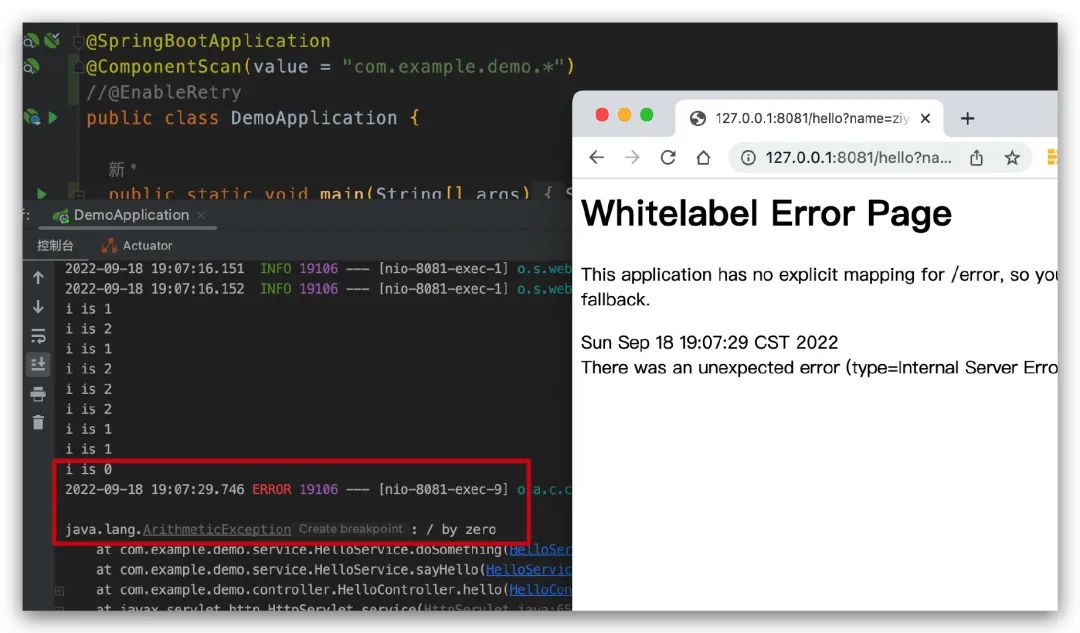
上面这几个是我们经常会用到和看到的,都知道在使用相应的功能的时候,如果没有配置上面的注解功能都是不生效的。以我们前面的文章的 Spring 重试为例,我们需要在启动类上面配置 @EnableRetry ,否则自动重试注解 @Retryable 是不会生效的,如下所示,没看过的可以去看下,Java 远程调用失败?如何优雅的进行重试?。

@Import 注解
那有的小伙伴就要问了,这个 @EnableRetry 注解到底有什么作用呢?不用这个注解就没办法了吗?
要知道这个注解有什么功效,我们可以点开看看源码,代码如下
package org.springframework.retry.annotation;

import java.lang.annotation.Documented;
import java.lang.annotation.ElementType;
import java.lang.annotation.Retention;
import java.lang.annotation.RetentionPolicy;
import java.lang.annotation.Target;

import org.springframework.context.annotation.EnableAspectJAutoProxy;
import org.springframework.context.annotation.Import;

@Target(ElementType.TYPE)
@Retention(RetentionPolicy.RUNTIME)
@EnableAspectJAutoProxy(proxyTargetClass = false)
@Import(RetryConfiguration.class)
@Documented
public @interface EnableRetry {

 boolean proxyTargetClass() default false;
}
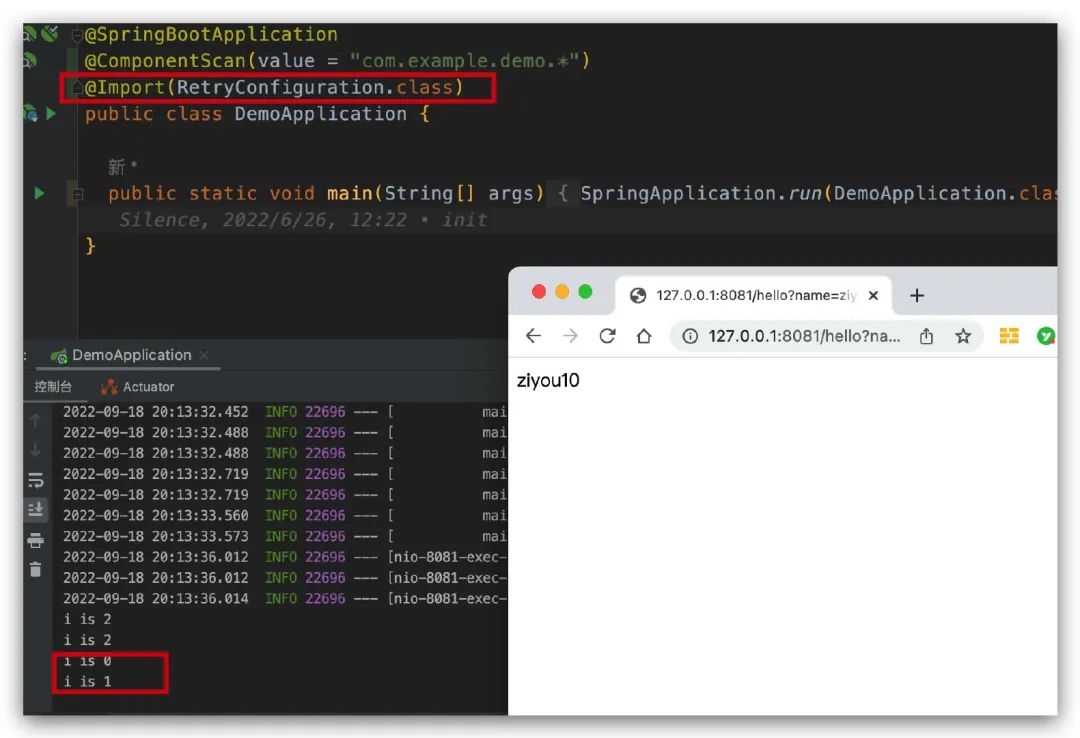
可以看到源码很简单,其中最有用的就一行 @Import(RetryConfiguration.class) ,我们可以尝试把这一行代码放到启动类上面看看效果,如下所示,可以看到项目可以正常启动,并且也还是有效果的,说明跟我们的 @EnableRetry 注解是一样的。

从上面的实验效果我们可以看到 @EnableRetry 注解其实就是对 @Import(RetryConfiguration.class) 的一个封装,同样的通过源码我们还可以看到 @EnableScheduling 注解就是对 @Import({SchedulingConfiguration.class}) 的一个封装。
@Target({ElementType.TYPE})
@Retention(RetentionPolicy.RUNTIME)
@Import({SchedulingConfiguration.class})
@Documented
public @interface EnableScheduling {
}
那如果在没有 @Enablexxx 注解的时候,我们直接通过 @Import 注解是可以这样写的,在一个 @Import 注解里面包含多个配置类,不过这种在配置类较多的场景下还是相对不够简洁的,因而才有了各自功能对应的 @Enable 注解。
package com.example.demo;

import org.springframework.boot.SpringApplication;
import org.springframework.boot.autoconfigure.SpringBootApplication;
import org.springframework.context.annotation.ComponentScan;
import org.springframework.context.annotation.Import;
import org.springframework.retry.annotation.RetryConfiguration;
import org.springframework.scheduling.annotation.SchedulingConfiguration;

@SpringBootApplication
@ComponentScan(value = "com.example.demo.*")
@Import({RetryConfiguration.class, SchedulingConfiguration.class})
public class DemoApplication {

  public static void main(String[] args) {
    SpringApplication.run(DemoApplication.class, args);
  }

}
为什么要使用 @Import 注解呢?
那么很多的小伙伴又要问了,为啥要通过使用 @Import 注解将配置类加载进来呢?在项目中的 Spring 上下文中不是能直接获取到吗?为此我们来实验一下,通过下面的代码我们看下是否能在 Spring 的容器中获取到 RetryConfiguration 的 Bean
package com.example.demo;

import org.springframework.boot.SpringApplication;
import org.springframework.boot.autoconfigure.SpringBootApplication;
import org.springframework.context.ConfigurableApplicationContext;
import org.springframework.context.annotation.ComponentScan;
import org.springframework.context.annotation.Import;
import org.springframework.retry.annotation.RetryConfiguration;
import org.springframework.scheduling.annotation.SchedulingConfiguration;

@SpringBootApplication
@ComponentScan(value = "com.example.demo.*")
//@Import({RetryConfiguration.class, SchedulingConfiguration.class})
public class DemoApplication {

  public static void main(String[] args) {

    ConfigurableApplicationContext applicationContext = SpringApplication.run(DemoApplication.class, args);
    Object bean = applicationContext.getBean("org.springframework.retry.annotation.RetryConfiguration");
    System.out.println(bean.toString());
  }
}
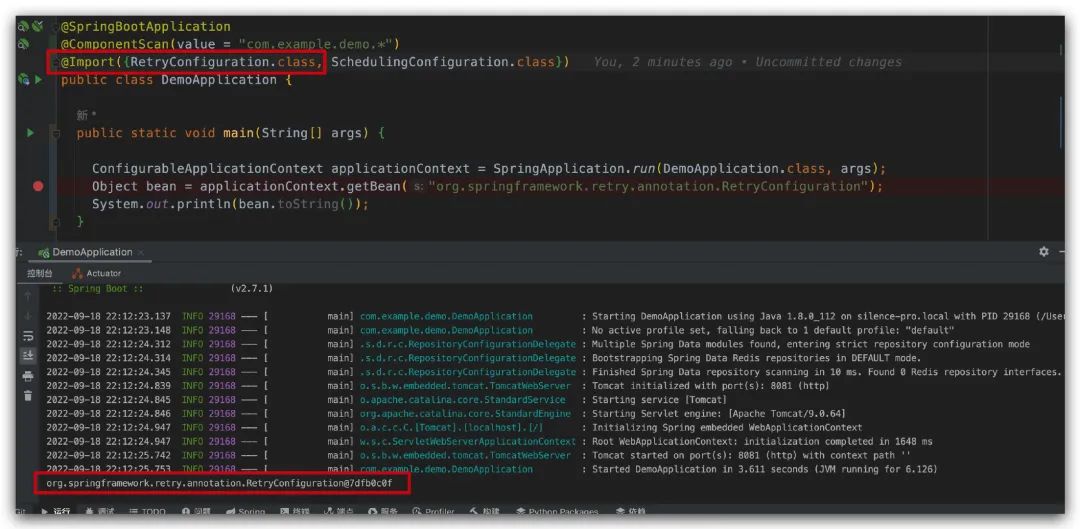
启动过后我们可以看到结果如下,提示我们在容器中找不到这个 bean,有点小伙伴会说是不是 bean 的名字写错了,其实并不是,紧接着我们再把注释的那一行放开再运行一下。


可以看到,这次我们成功的获取到了这个 Bean,这个实验就是告诉我们,其实在默认情况下,Spring 的容器中是找不到RetryConfiguration 这个 Bean 的,因此我们需要通过使用 @Import 注解,将该类加载到容器中。
那么为什么在容器中找不到这个 Bean 呢?
其实很简单,因为这个 Bean 跟我们当前环境的类是不是同一个包里面的,在项目启动的过程中并不会扫描到 RetryConfiguration 类所在的包,因此找不到是很正常的。
总结
上面通过 @EnableRetry 这个注解带大家了解了一下 Spring 的 @Enable 开头的注解的使用原理,相信大家对这些注解有了更深入的了解。简单来说就是因为我们要使用的很多类并不在我们项目所在的包下面,我们不能将所有的依赖包都进行扫描,也不不方便将所有的配置类都通过 @Import 的方式进行导入,而是让每个功能的项目包都提供一个 @Enable 开头的注解,我们直接启用注解就可以达到效果。
这种方式我们在平时的开发中也可以自己实现,实现一个自己的 @Enable 开头的注解来实现特定的功能。


