作者|户锐,单位:中国移动智慧家庭运营中心
Labs 导读
Android源码是基于Linux的开源操作系统,目前Android ROM开发的代码管理工具基本上是采用Git。由于Android代码非常复杂,Google将其划分为多个git repo,这样不仅可以避免一个repo的代码太多,还可以根据repo的功能将其分配给不同团队进行管控。为了对Android代码质量进行管控,Google采用了Gerrit进行coderview,并利用jenkins做代码静态检测和自动化验证,当然还有集成CI工具。目前中国移动智慧家庭运营中心AOS-RM项目已经部署自己的Gerrit服务器,Gerrit对AOS-RM项目代码质量管理起到了非常重要的作用。
作为Android ROM相关的开发者,有必要了解什么是Gerrit,Gerrit的工作流程是怎么样的,Gerrit服务器怎么搭建,以及如何将Android codebase导入自己的Gerrit服务器。接下来本文将为大家详细解答以上问题。
Part 01 Gerrit简介
Gerrit是Google为Android系统研发量身定制的一套免费开源的代码审核系统,使用网页界面。利用网页浏览器,同一个团队的软件开发者可以相互审阅彼此修改后的代码,决定是否提交,回退或是继续修改。它使用版本控制系统Git作为底层。目前Gerrit被广泛使用,与Android开发相关,尤其是做Android ROM开发的公司基本都使用Gerrit进行code review。根据统计使用Gerrit的top3领域是IOT,Software Development以及Big Data。
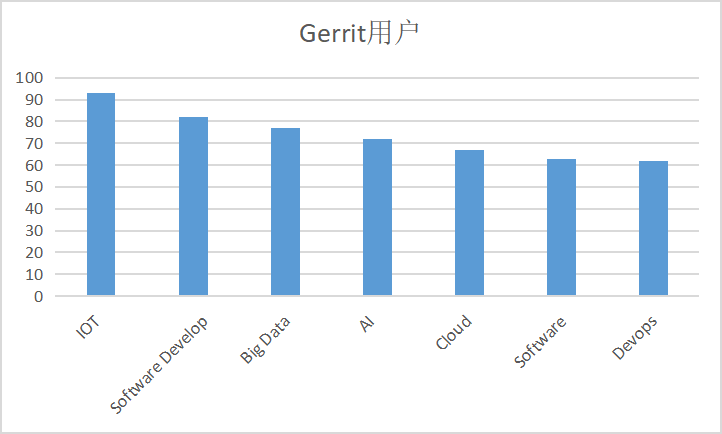
数据来源:https://www.slintel.com/tech/source-code-management/gerrit-market-share
Part 02 Gerrit的工作流程
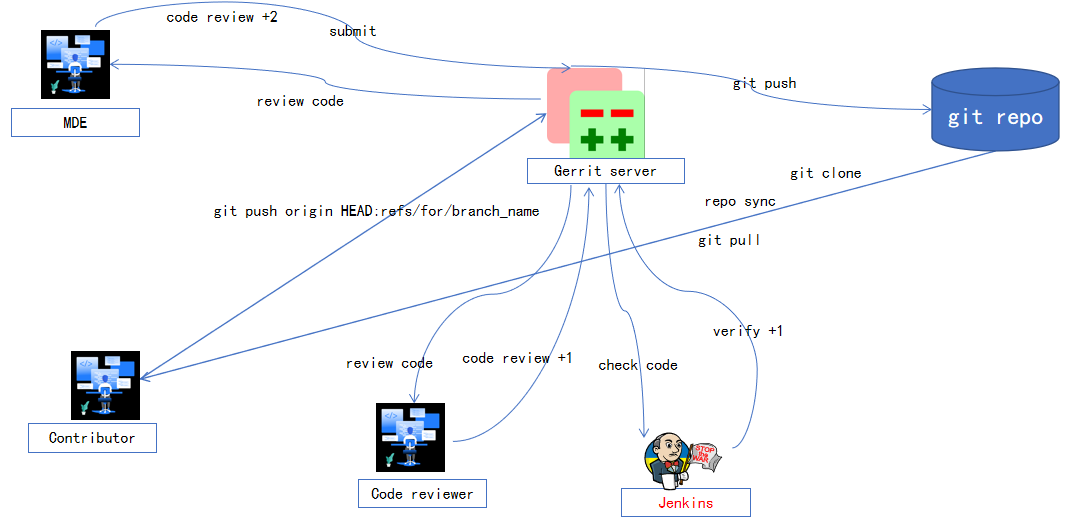
- 开发人员首先从git repo服务器上下载代码,首次下载Android codebase代码用git clone或者repo sync;
- 代码修改完毕并通过自我验证后以git push origin HEAD:refs/for/branch_name的方式提交到Gerrit上进行code review,其中branch_name需要根据实际情况修改为对应的分支名;
- Jenkins自动触发静态代码检查和编译,如果通过则verify+1,否则verify-1;
- Jenkins verify -1 后,根据提示修改代码,进入步骤2;
- Jenkins verify+1后,要求其他开发人员和MDE(模块owner,具有+2的权限)进行code review;
- 其他开发人员和MDE进行code review如果发现问题,则提出修改意见并-1,如果没有问题则+1和+2;
- 如果codereview有-1,则根据进行澄清或者根据意见修改,然后进入步骤2;
- 如果没有codereview -1,MDE点submit按钮,代码入库,流程完毕。
Part 03 Gerrit服务器搭建
3.1 安装git
sudo apt-get install git
3.2 安装jdk11
sudo apt install openjdk-11-jdk
3.3 安装gitweb
sudo apt-get install gitweb
3.4 Gerrit安装包下载
wget https://gerrit-releases.storage.googleapis.com/gerrit-3.5.1.wa
3.5 安装Gerrit(gerrit-3.5.0.1.war存放在~/gerrit目录下面)
cd ~/gerrit
mkdir review_site
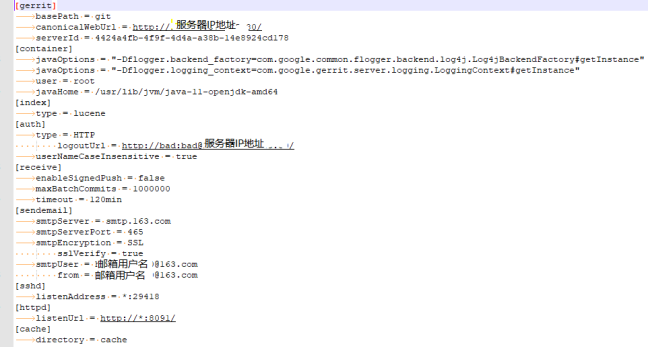
java -jar gerrit-3.5.0.1.war init -d ./review_site/  (可以都选择默认,然后修改config文件)
sudo vim /home/gerrit/review_site/etc/gerrit.config
发送邮件配置的密码保存在secure.config,发送邮件的密码是授权码
3.6 安装Apache
sudo apt-get install apache2
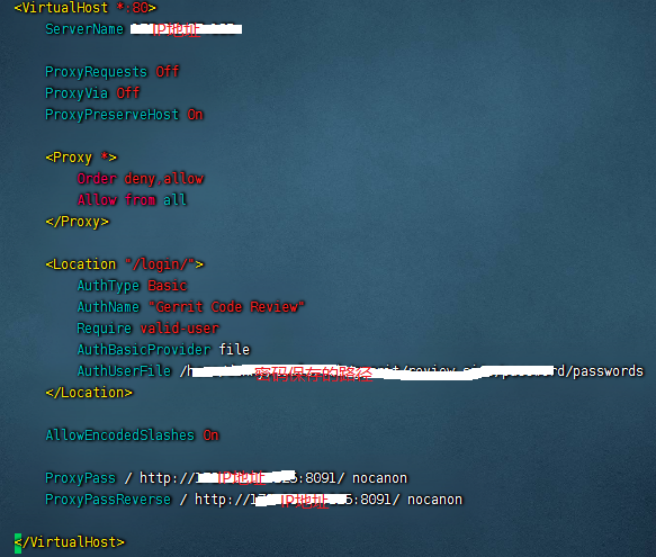
3.7 配置Apache
sudo vim /etc/apache2/httpd.conf 内容如下图
sudo vim /etc/apache2/ports.conf 加入 Listen 8081(如果80端口没有被占用,不用修改)
sudo vi /etc/apache2/apache2.conf  加入 Include httpd.conf
3.8 使能proxy module
sudo a2enmod proxy
sudo a2enmod proxy_http
sudo a2enmod proxy_balancer
sudo a2enmod lbmethod_byrequests
3.9 添加账户
htpasswd -b /xxx/passwords  account  xxxx
如果passwords文件不存在,第一次需要加-c,
htpasswd -c -b /xxxx/passwords  account xxxx
3.10 启动apache
sudo systemctl start apache2
sudo systemctl restart apache2
3.11 启动gerrit
/xxxx/bin/gerrit.sh start
/xxxx/bin/gerrit.sh restart
3.12 访问gerrit
http://IP地址:端口号/
Part 04 Android Codebase导入Gerrit
4.1 创建AOSP仓库
利用浏览器在Gerrit服务器上创建AOSP仓库,将Only server as parent for other repositories设置为True
4.2 下载Android Codebase(-u的参数根据实际情况做修改)
repo init -u https://android.googlesource.com/platform/manifest --mirror
repo sync
4.3 创建repo(将IP修改为自己的服务器IP地址)
4.3.1 循环创建repo
repo forall -c 'echo $REPO_PROJECT; ssh -p 29418 account@IP gerrit create-project --owner AOSP_account $REPO_PROJECT;
4.3.2 设置repo的parent
repo forall -c 'echo $REPO_PROJECT; ssh -p 29418 account@IP gerrit set-project-parent --parent AOSP $REPO_PROJECT;
4.3.3 将Codebase的代码push到Gerrit服务器
repo forall -c 'echo $REPO_PROJECT; git push
ssh://account@IP:29418/$REPO_PROJECT +refs/heads/* +refs/tags/*
Part 05 生成和定制manifest
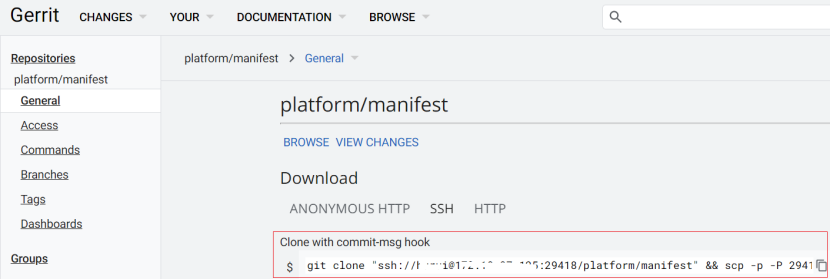
5.1clone一份platform/manifest仓库的代码
git clone "ssh://account@IP:29418/platform/manifest" && scp -p -P 29418 account@IP:hooks/commit-msg "manifest/.git/hooks/
5.2 将仓库中的manifest复制一份,并重命名
一定要设置review字段,否则repo sync后的代码不会产生change id

如果要增加自己特有的仓库,则增加一个project节点,并配置name,path和revision即可,最后将新的xml文件提交到gerrit服务器,完成review后merge到远程仓库。
Part 06 下载和上传代码
repo init -u ssh://account@IP:29418/platform/manifest.git -b branch_name --repo-url=ssh://account@IP:29418/repo.git -m  mymanifest.xml
repo sync -j4
Part 07 仓库权限配置
详细说明可以参考:
https://gerrit-documentation.storage.googleapis.com/Documentation/3.5.0/access-control.htm
配置中,需要根据实际情况进行修改,不同组对不同仓库具有不同的访问权限,切记不要开放对refs/*的push权限,否则开发人员可以跳过Gerrit,直接push到git服务器。


