概述
在复杂的分布式系统中,通常有诸多依赖。如果一个应用不能对来自依赖的故障进行隔离的话,那应用本身就有可能被拖垮。通常在高流量的网站中,某个后端一旦发生延迟,就有可能在短时间内导致所有的应用资源耗尽。
如:秒杀、618、双十一等场景,在某一时刻会有爆发式的网络流量进来,如果没有很好的网络流量限制,就会对整个服务产生影响,甚至导致整个应用崩溃,进而影响用户体验。
接下来的内容我们就探讨一下,如何应对上述问题。
Alibaba Sentinel 介绍
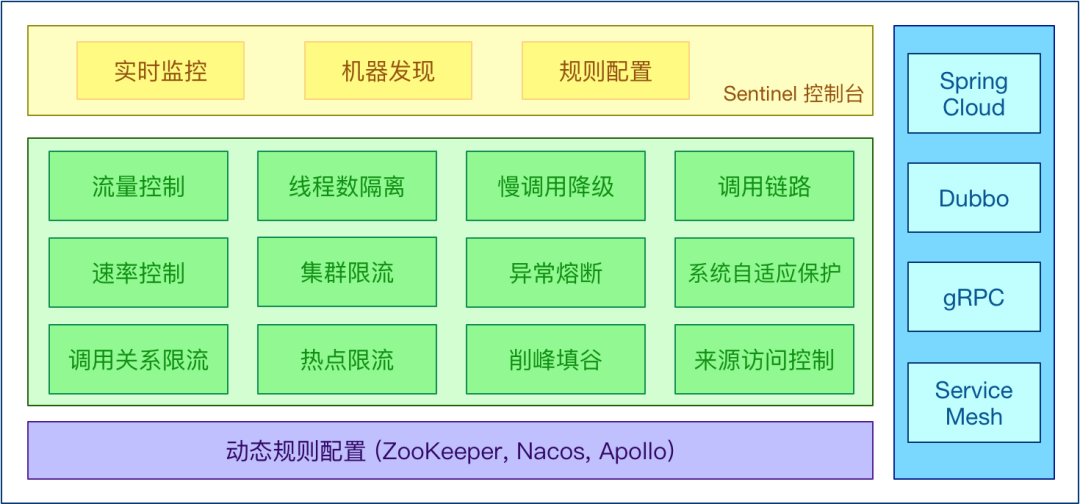
随着微服务的流行,服务和服务之间的稳定性、安全性变得也越来越重要。Sentinel 是阿里巴巴开源的一款面向分布式服务架构的流量控制组件,主要以流量为切入点,从流量控制、熔断降级、系统自适应保护等多个维度来帮助您保障微服务的稳定性。
Sentinel 具有以下特性:
- 丰富的应用场景:
Sentinel 承接了阿里巴巴近 10 年的双十一大促流量的核心场景,例如秒杀(即突发流量控制在系统容量可以承受的范围)、消息削峰填谷、集群流量控制、实时熔断下游不可用应用等。
- 完备的实时监控:
Sentinel 同时提供实时的监控功能。您可以在控制台中看到接入应用的单台机器秒级数据,甚至 500 台以下规模的集群的汇总运行情况。
- 广泛的开源生态:
Sentinel 提供开箱即用的与其他开源框架/库的整合模块,例如与 Spring Cloud、Dubbo、gRPC 整合只需要引入相应的依赖并进行简单的配置即可快速地接入 Sentinel。
完善的 SPI 扩展点:
Sentinel 提供简单易用、完善的 SPI 扩展接口。您可以通过实现扩展接口来快速地定制逻辑。例如定制规则管理、适配动态数据源等。
熔断降级
1、什么是熔断降级
除了流量控制以外,降低调用链路中的不稳定资源也是 Sentinel 的使命之一。由于调用关系的复杂性,如果调用链路中的某个资源出现了不稳定,最终会导致请求发生堆积。这个问题和 Hystrix 里面描述的问题是一样的。
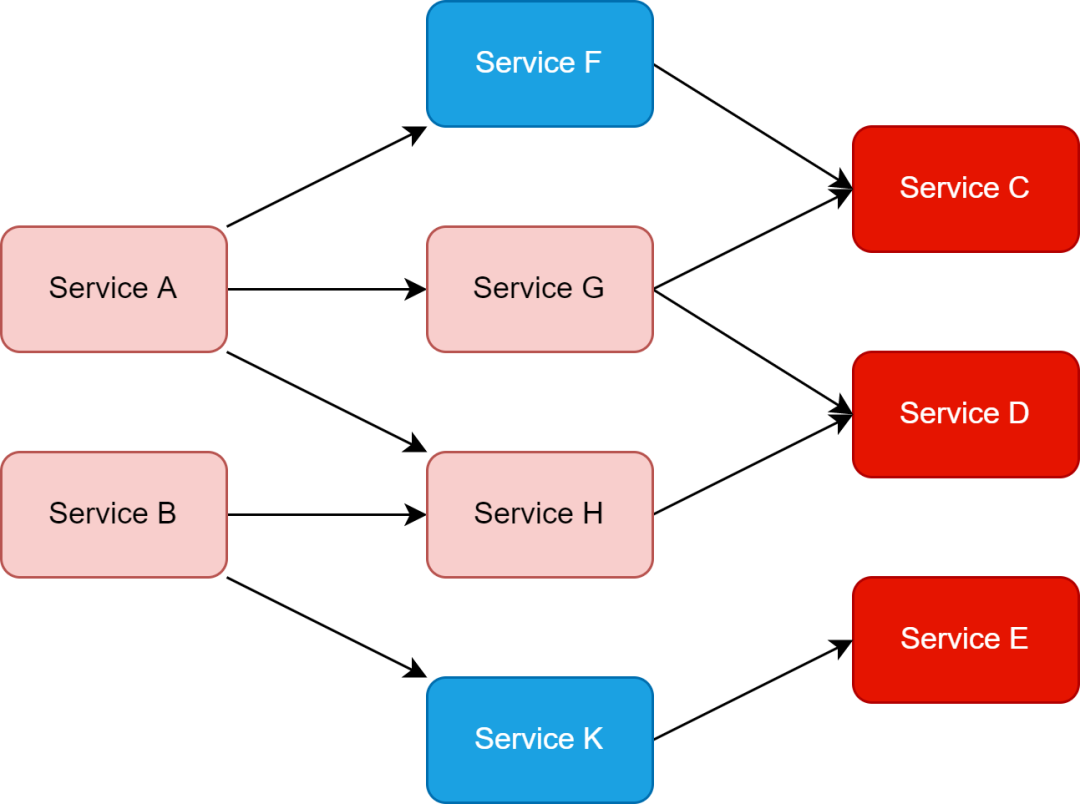
Sentinel 和 Hystrix 的原则是一致的: 当调用链路中某个资源出现不稳定,例如,表现为 timeout,异常比例升高的时候,则对这个资源的调用进行限制,并让请求快速失败,避免影响到其它资源,以至于最后产生雪崩的效应。
2、熔断降级设计理念
在限制的手段上,Sentinel 和 Hystrix 采取了完全不一样的方法。Hystrix 通过线程池的方式,来对依赖(在我们的概念中对应资源)进行了隔离。这样做的好处是资源和资源之间做到了最彻底的隔离。缺点是除了增加了线程切换的成本,还需要预先给各个资源做线程池大小的分配。
Sentinel 对这个问题采取了两种手段:
通过并发线程数进行限制
和资源池隔离的方法不同,Sentinel 通过限制资源并发线程的数量,来减少不稳定资源对其它资源的影响。这样不但没有线程切换的损耗,也不需要您预先分配线程池的大小。当某个资源出现不稳定的情况下,例如响应时间变长,对资源的直接影响就是会造成线程数的逐步堆积。当线程数在特定资源上堆积到一定的数量之后,对该资源的新请求就会被拒绝。堆积的线程完成任务后才开始继续接收请求。
通过响应时间对资源进行降级
除了对并发线程数进行控制以外,Sentinel 还可以通过响应时间来快速降级不稳定的资源。当依赖的资源出现响应时间过长后,所有对该资源的访问都会被直接拒绝,直到过了指定的时间窗口之后才重新恢复。
系统负载保护
Sentinel 同时提供系统维度的自适应保护能力(https://sentinelguard.io/zh-cn/docs/system-adaptive-protection.html)。防止雪崩,是系统防护中重要的一环。当系统负载较高的时候,如果还持续让请求进入,可能会导致系统崩溃,无法响应。
在集群环境下,网络负载均衡会把本应这台机器承载的流量转发到其它的机器上去。如果这个时候其它的机器也处在一个边缘状态的时候,这个增加的流量就会导致这台机器也崩溃,最后导致整个集群不可用。
针对这个情况,Sentinel 提供了对应的保护机制,让系统的入口流量和系统的负载达到一个平衡,保证系统在能力范围之内处理最多的请求。
Sentinel 是如何工作的
Sentinel 的主要工作机制如下:
- 对主流框架提供适配或者显示的 API,来定义需要保护的资源,并提供设施对资源进行实时统计和调用链路分析。
- 根据预设的规则,结合对资源的实时统计信息,对流量进行控制。同时,Sentinel 提供开放的接口,方便您定义及改变规则。
- Sentinel 提供实时的监控系统,方便您快速了解目前系统的状态。
在接下来的章节中,我们将演示如何对 Sentinel 进行配置,以达到对我们的微服务进行保护。
Sentinel 配置实战
Sentinel 分为两个部分:Sentinel Dashboard 和 Sentinel 客户端。
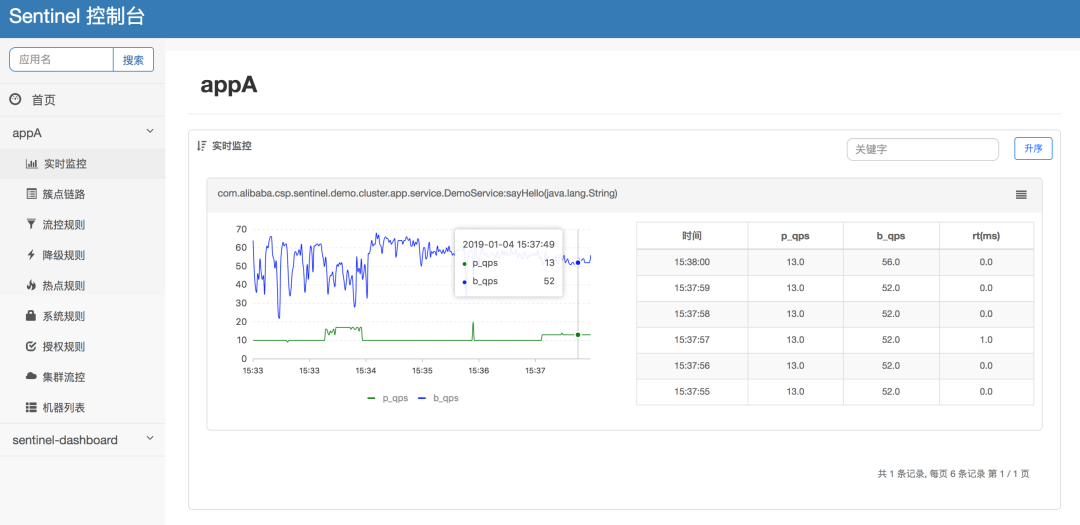
- Sentinel Dashboard:Sentinel Dashboard 是 Sentinel 配套的可视化控制台与监控仪表盘套件,它支持节点发现,以及健康情况管理、监控(单机和集群)、规则管理和推送的功能。Sentinel Dashboard 是基于 Spring Boot 开发的 WEB 应用,目前最新版本为 1.8.4。
- Sentinel 客户端:Sentinel 客户端需要集成在 Spring Boot 微服务应用中,用于接收来自 Dashboard 配置的各种规则,并通过 Spring MVC Interceptor 拦截器技术实现应用限流、熔断保护。
部署 Sentinel Dashboard
访问:https://github.com/alibaba/Sentinel/releases,下载最新版 Sentinel Dashboard。
wget -c https://github.com/alibaba/Sentinel/releases/download/1.8.4/sentinel-dashboard-1.8.4.jar- 1.
利用下面的命令启动 Dashboard。
java -jar -Dserver.port=18080 sentinel-dashboard-1.8.4.jar- 1.
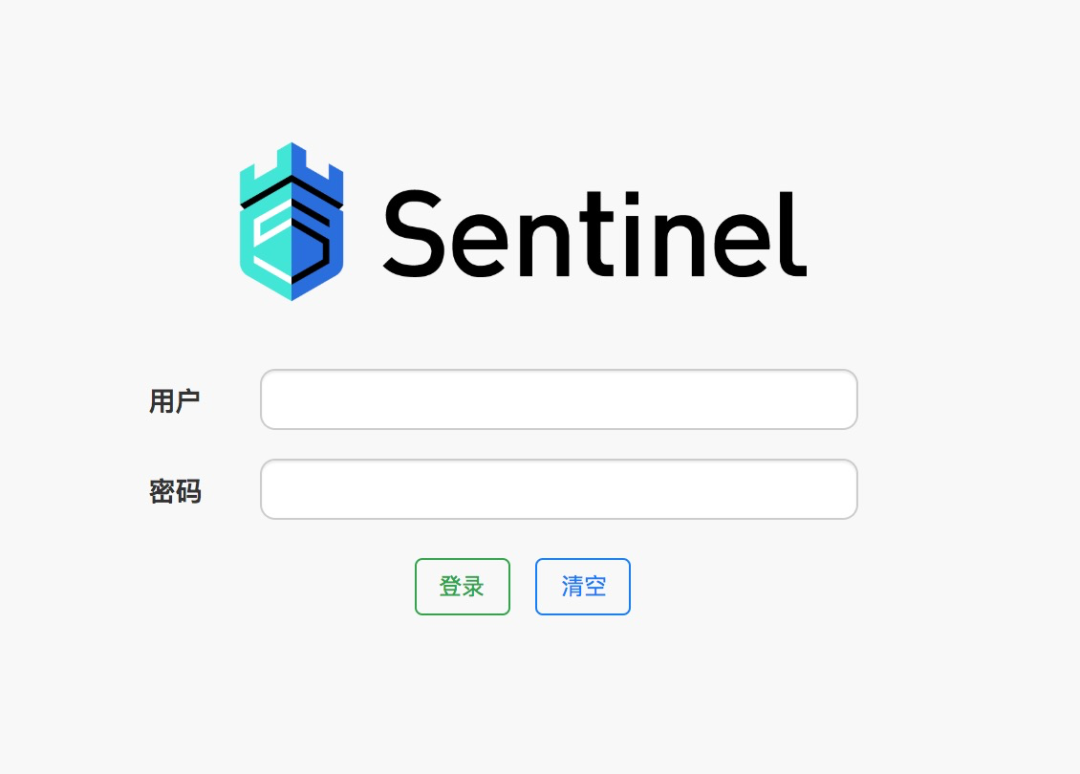
这个命令的含义是启动 Sentinel Dashboard 应用,Sentinel Dashboard 会监听 18080 端口实现与微服务的通信。同时我们可以访问下面的网址查看 Sentinel Dashboard 的 UI 界面,浏览器打开 http://127.0.0.1:18080,默认的用户名、密码为 sentinel/sentinel,便可进入 Dashboard。

微服务引入 Sentinel 客户端
第一步,利用 Spring Initializr 向导(https://start.spring.io/ 或 https://start.aliyun.com/)或 IDE,创建 micro-service 工程,pom.xml 增加以下三项依赖。
<dependency>
    <groupId>com.alibaba.cloud</groupId>
    <artifactId>spring-cloud-starter-alibaba-nacos-discovery</artifactId>
</dependency>
<dependency>
    <groupId>com.alibaba.cloud</groupId>
    <artifactId>spring-cloud-starter-alibaba-sentinel</artifactId>
</dependency>
<dependency>
    <groupId>org.springframework.boot</groupId>
    <artifactId>spring-boot-starter-actuator</artifactId>
</dependency>- 1.
- 2.
- 3.
- 4.
- 5.
- 6.
- 7.
- 8.
- 9.
- 10.
- 11.
- 12.
第二步,配置 Nacos 与 Sentinel 客户端。
spring:
  application:
    name: micro-service
  cloud:
    sentinel:
      transport:
        dashboard: 127.0.0.1:18080
      eager: true
    nacos:
      server-addr: localhost:8848
      username: nacos
      password: nacos
server:
  port: 80
management:
  endpoints:
    web:
      exposure:
include: '*'- 1.
- 2.
- 3.
- 4.
- 5.
- 6.
- 7.
- 8.
- 9.
- 10.
- 11.
- 12.
- 13.
- 14.
- 15.
- 16.
- 17.
- 18.
- 19.
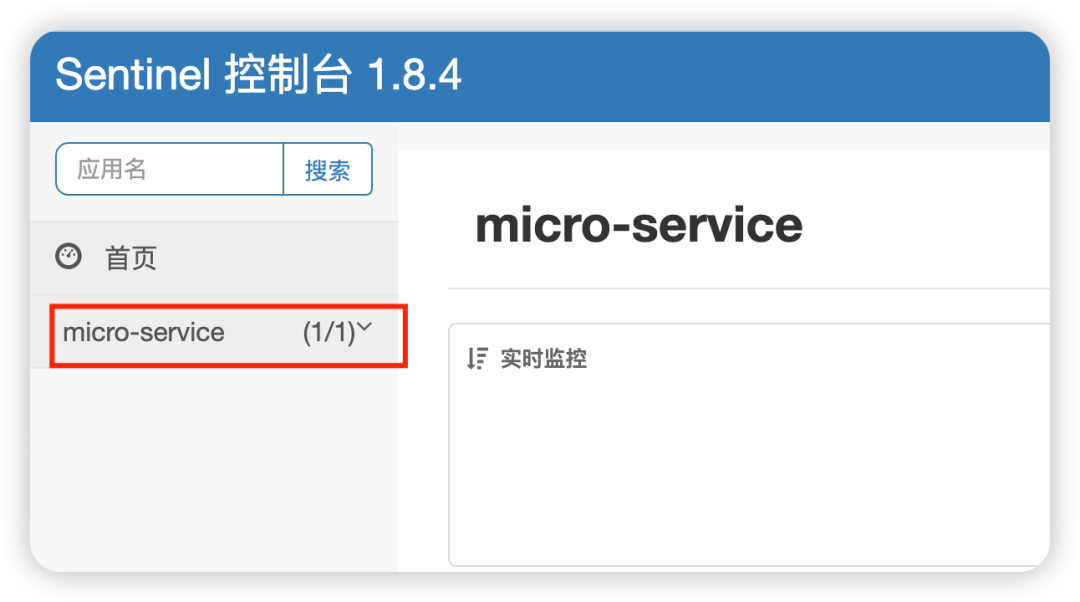
第三步,验证配置。访问下面网址,在 Sentinel Dashboard 左侧看到 micro-service 服务出现,则代表 Sentinel 客户端与 Dashboard 已经完成通信。
在确认 micro-service 与 Dashboard 通信成功后,使用 curl 命令试着访问一下:
for i in {1..50}; do curl http://localhost:8080/api/nacosConfig; sleep 0.1; done- 1.
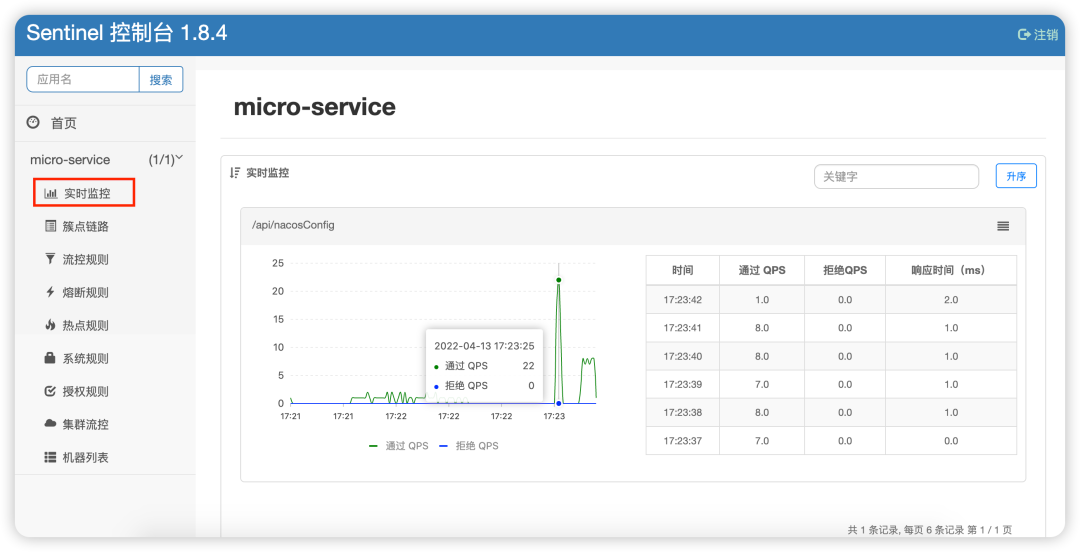
接下来我们看看 Dashboard,这时已经有了一些监控数据了:
下面我们通过 Dashboard 配置 micro-service 应用的限流规则,来体验下 Sentinel 的用法。
通过 Sentinel Dashboard 配置限流规则
第一步,在 micro-service 服务中,增加 NacosConfigTestController 类,用于演示 Sentinel 限流规则。
`package cn.lavenliu.springboot.cruddemo.controller;
import org.springframework.beans.factory.annotation.Value;
import org.springframework.web.bind.annotation.GetMapping;
import org.springframework.web.bind.annotation.RequestMapping;
import org.springframework.web.bind.annotation.RestController;
("/api")
public class NacosConfigTestController {
("${url.name}")
private String name;
("${url.address}")
private String address;
("/nacosConfig")
public String nacosConfig() {
return "name: " + name + "; address: " + address;
}
}- 1.
- 2.
- 3.
- 4.
- 5.
- 6.
- 7.
- 8.
- 9.
- 10.
- 11.
- 12.
- 13.
- 14.
- 15.
- 16.
- 17.
启动 micro-service,访问 http://localhost:8080/api/nacosConfig,无论访问多少次,都可以看到正常的信息。
➜  springdemo git:(master) ✗ for i in {1..50}; do curl -w "\n" http://localhost:8080/api/nacosConfig; sleep 0.1; done
name: tyun; address: www.tyun.cn
......
name: tyun; address: www.tyun.cn
name: tyun; address: www.tyun.cn- 1.
- 2.
- 3.
- 4.
- 5.
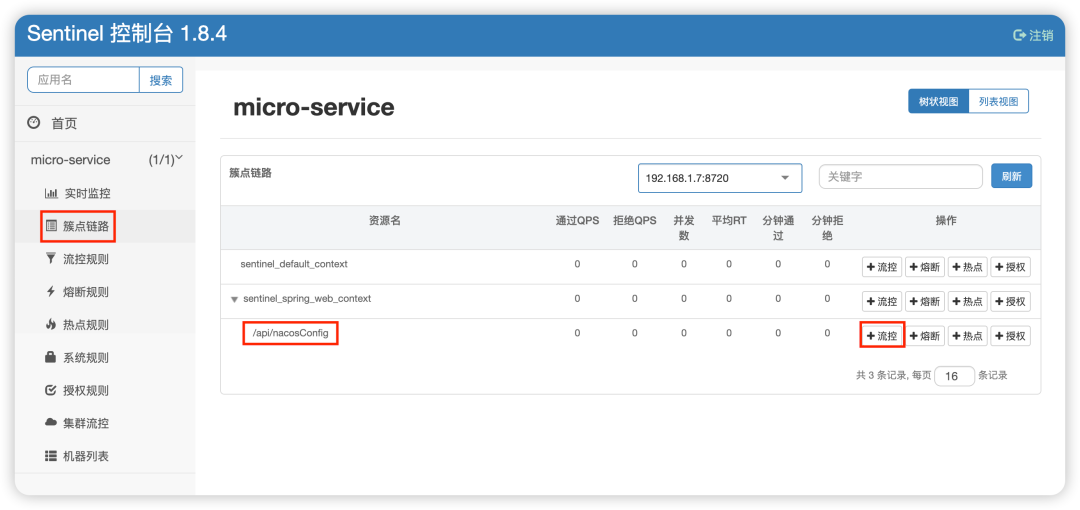
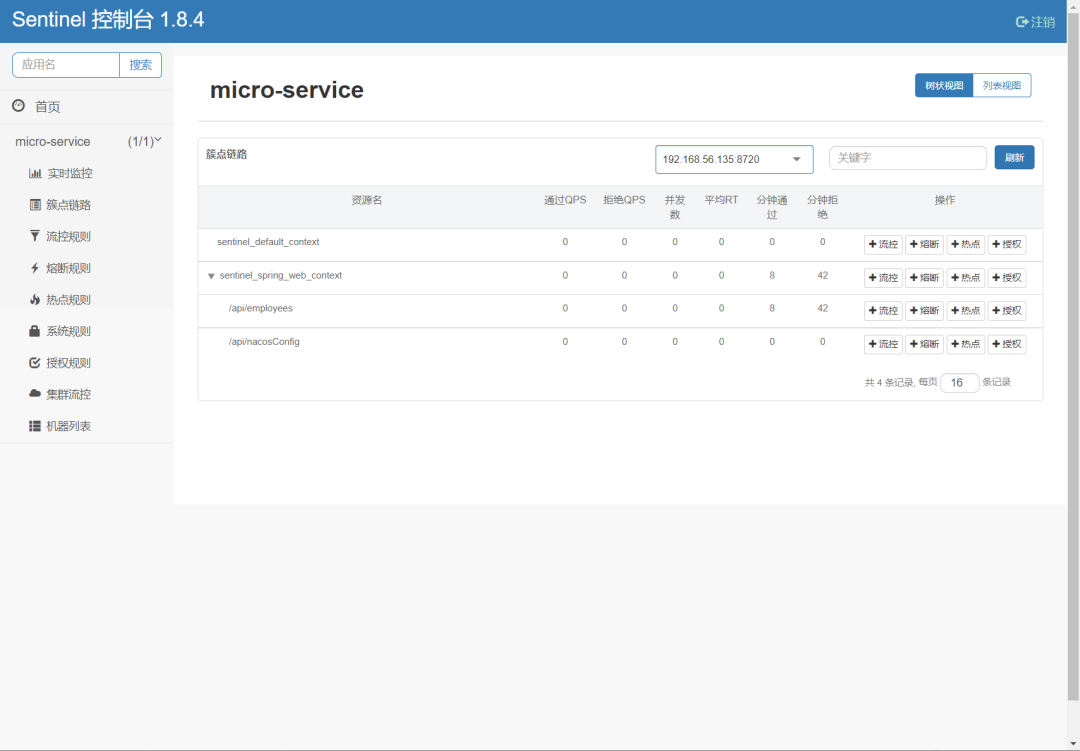
第二步,访问 Sentinel Dashboard 配置限流规则。在左侧找到"簇点链路",右侧定位到 /api/nacosConfig,点击后面的“流控”按钮。
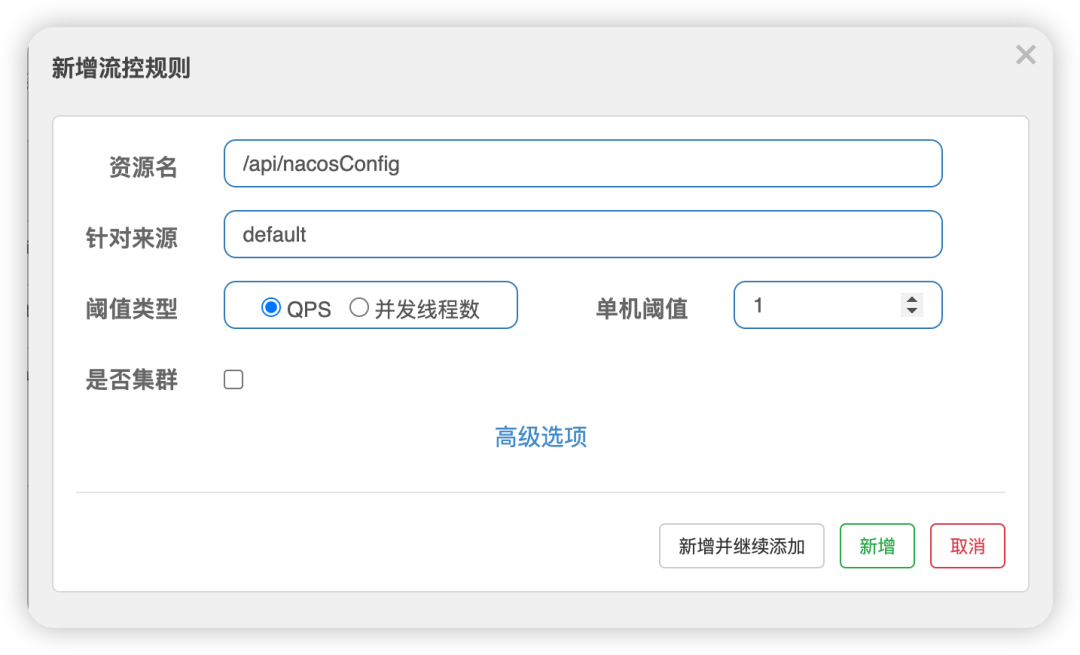
在弹出界面,按下图进行配置,其含义为 /api/nacosConfig 接口每秒钟只允许 1QPS 访问,超出的请求直接服务降级返回异常。最后点击“新增”完成规则设置。

此时针对 /api/nacosConfig 接口的流控规则已生效,可以在“流控规则”的界面上看到。


第三步,验证流控效果。使用 curl 重新访问 http://localhost:8080/api/nacosConfig,如下:
➜ springdemo git:(master) ✗ for i in {1..50}; do curl -w "\n" http://localhost:8080/api/nacosConfig; sleep 0.6; done
name: tyun; address: www.tyun.cn
Blocked by Sentinel (flow limiting)
name: tyun; address: www.tyun.cn
......
name: tyun; address: www.tyun.cn- 1.
- 2.
- 3.
- 4.
- 5.
- 6.
第一次访问时会出现 “name: tyun; address: www.tyun.cn” 文本代表处理成功。同一秒内再次访问便会出现 “Blocked by Sentinel (flow limiting)”,代表服务已被限流降级。行文至此,我们已经利用 Sentinel 对微服务接口实施了初步的限流降级控制。
在 Sentinel Dashboard 中“簇点链路”,找到需要限流的 URI,点击“+流控”进入流控设置。sentinel-dashboard 基于懒加载模式,如果在簇点链路没有找到对应的 URI,需要先访问下这个功能的功能后对应的 URI 便会出现。

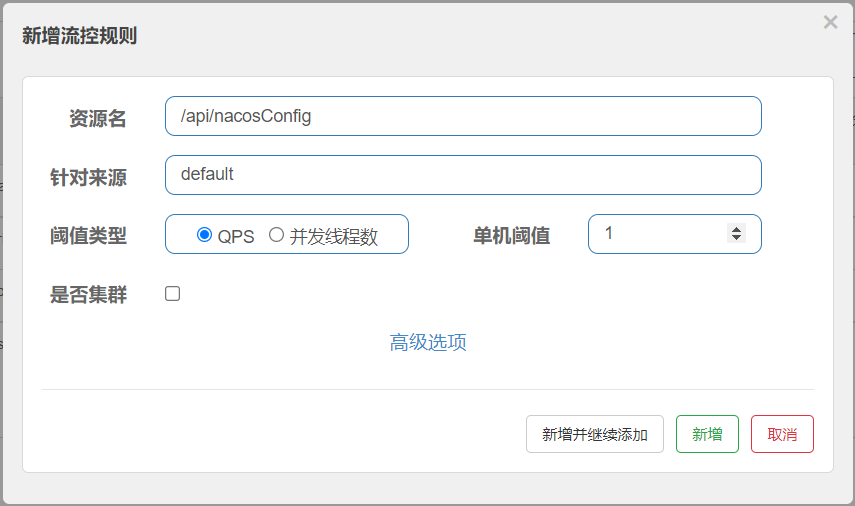
流控规则项目说明主要有以下几点。
资源名:要流控的 URI,在 Sentinel 中 URI 被称为“资源”。
针对来源:默认 default 代表所有来源,可以针对某个微服务或者调用者单独设置。
阈值类型:是按每秒访问数量(QPS)还是并发数(线程数)进行流控。
单机阈值:具体限流的数值是多少。
下图为默认流控规则:
点击对话框中的“高级选项”,就会出现更为详细的设置项。
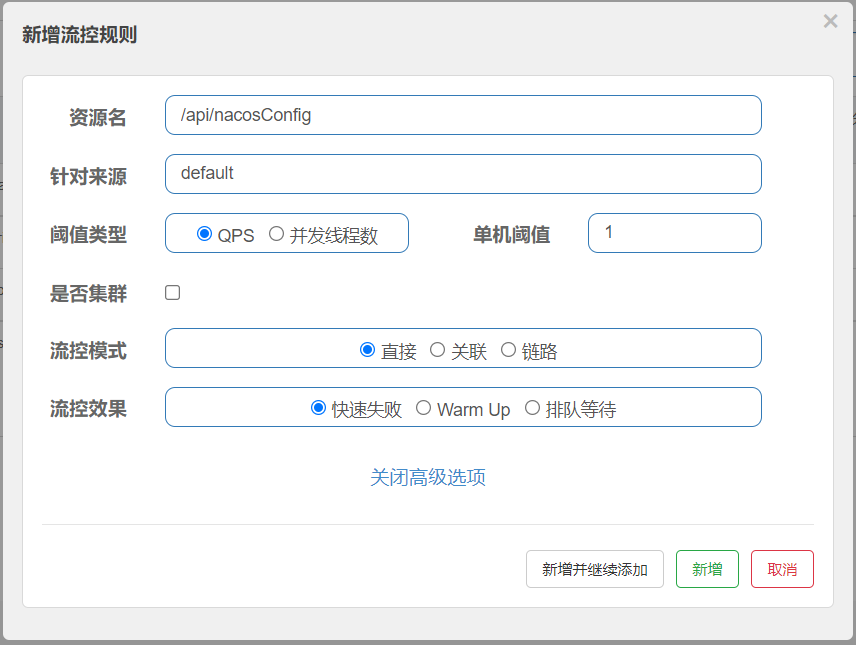
其中流控模式是指采用什么方式进行流量控制。Sentinel 支持三种模式:直接、关联、链路,下面我们分别看看这三种模式。
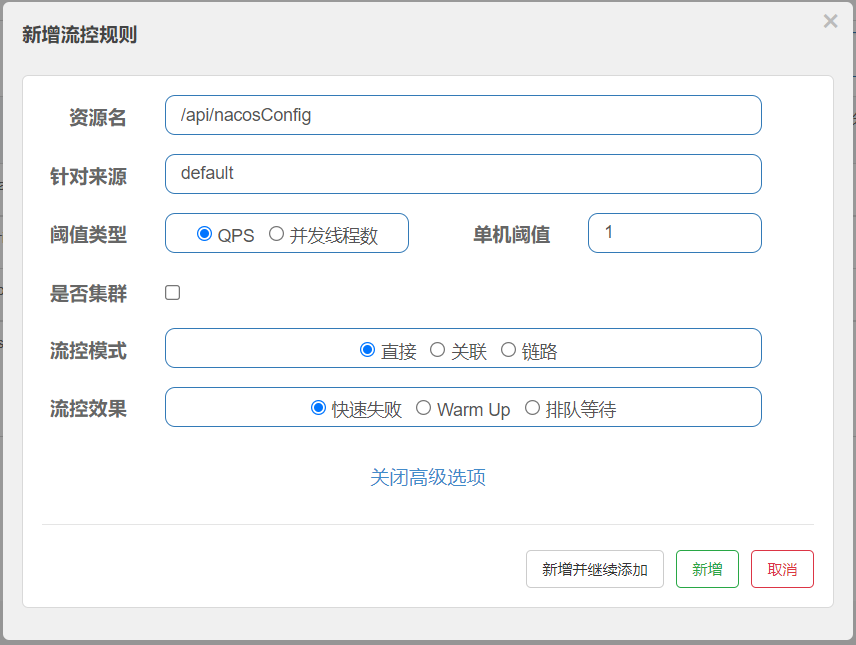
直接模式
以下图为例,当 /api/nacosConfig 接口 QPS 超过 1个时限流,浏览器会出现 “Blocked by Sentinel”。

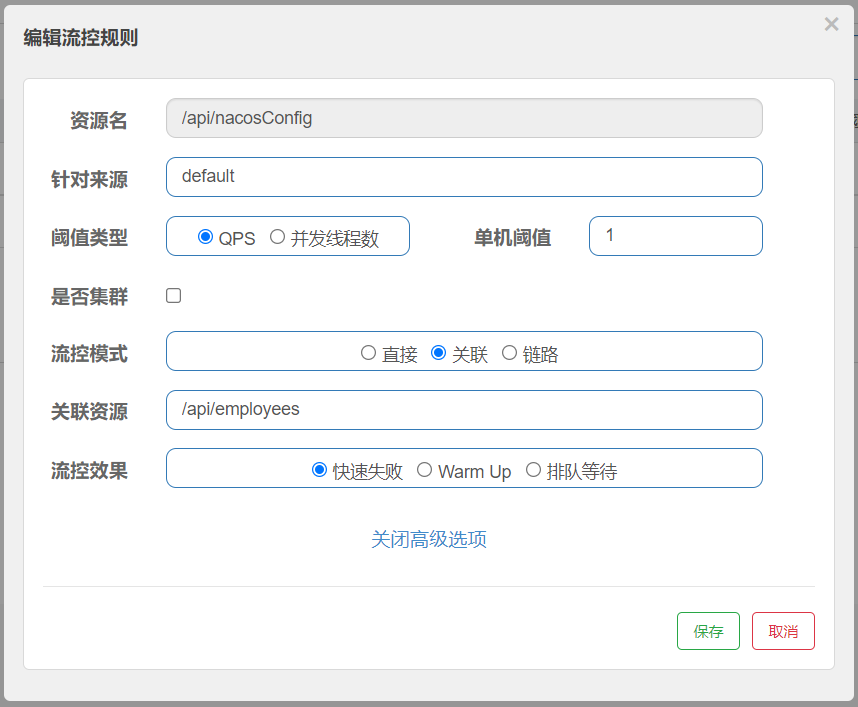
关联模式
如下图所示,当同 /api/nacosConfig 接口关联的 /api/employees 接口 QPS 超过 1 时,再次访问 /api/nacosConfig 接口便会响应 “Blocked by Sentinel”。

链路模式
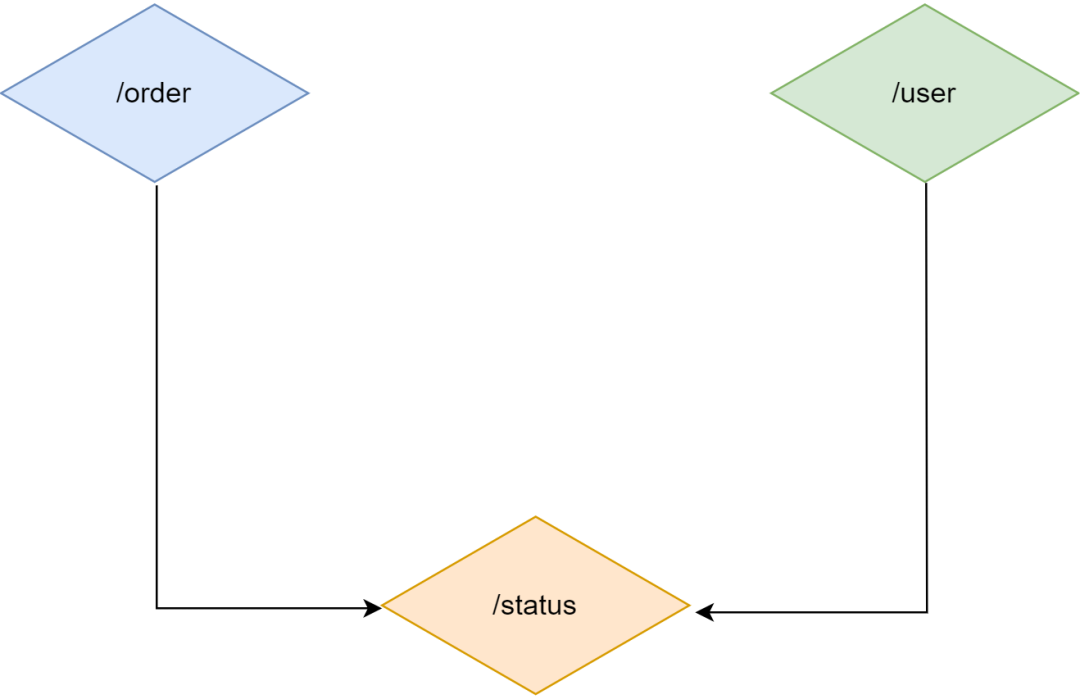
链路模式相对复杂,我们以一个例子进行说明:假设有一个买菜服务,买菜者下单之后,代码会依次执行订单创建 -> 减少库存 -> 第三方支付 -> 消息通知方法。这些方法像链表一样从前向后依次执行,这种执行的链表被称为调用链路,而链路模式限流就是为此而设计。以下图为例,在某个微服务中 /status 接口,会被 /order 接口调用;在另一个业务,/status 接口也会被 /user 接口调用。

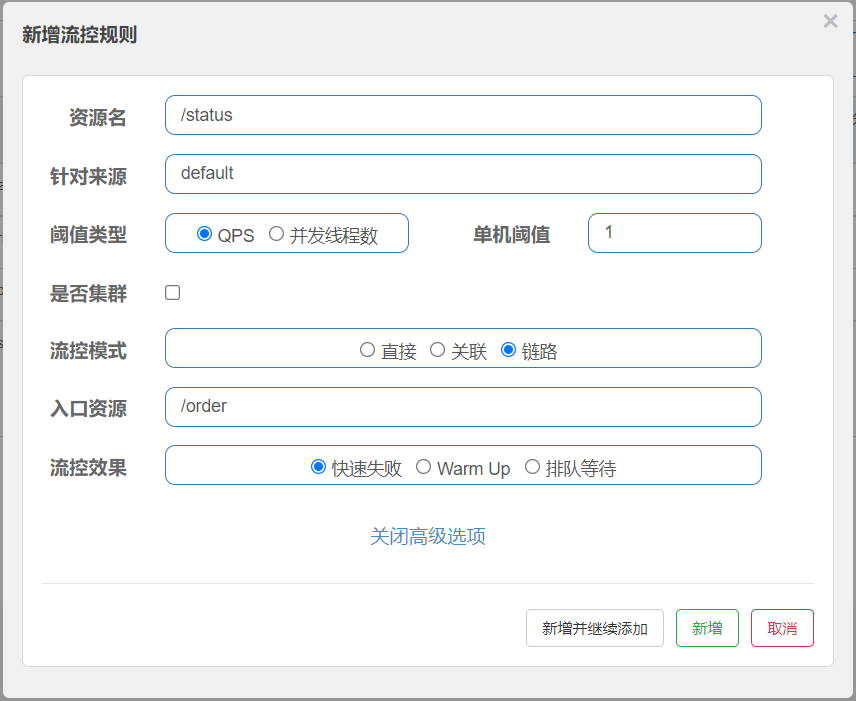
但如果按下图配置,将入口资源设为 “/order”,则只会针对 /order 接口的调用链路生效。当访问 /order 接口的 QPS 超过 1 时,/status 接口就会被限流。而另一条链路从 /user 接口到 /status 接口的链路则不会受到任何影响。链路模式与关联模式最大的区别是 /order 接口与 /status 接口必须是在同一个调用链路中才会限流,而关联模式是任意两个资源只要设置关联就可以进行限流。
介绍完了直接、关联、链路三种流控模式,下面我们一起看一看高级选项中的“流控效果”。流控效果是指在达到流控条件后,对当前请求如何进行处理。流控效果有三种:快速失败、Warm UP(预热)、排队等待。
快速失败:
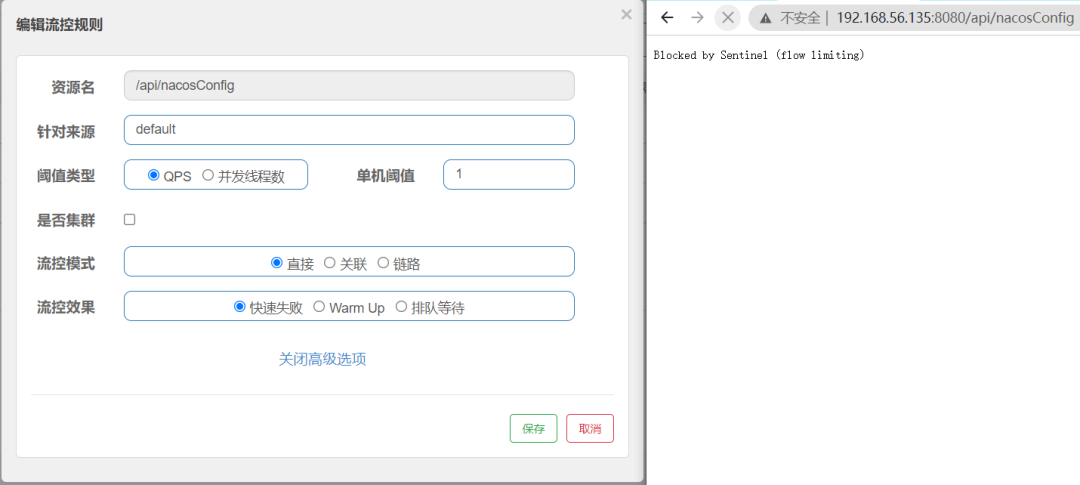
当流量达到限流阈值后,直接返回响应并抛出 BlockException,快速失败是最常用的处理形式。如下图所示,当 /api/nacosConfig 接口每秒 QPS 超过 1 时,可以直接抛出 “Blocked By Sentinel (flow limiting)” 异常。
Warm Up(预热):
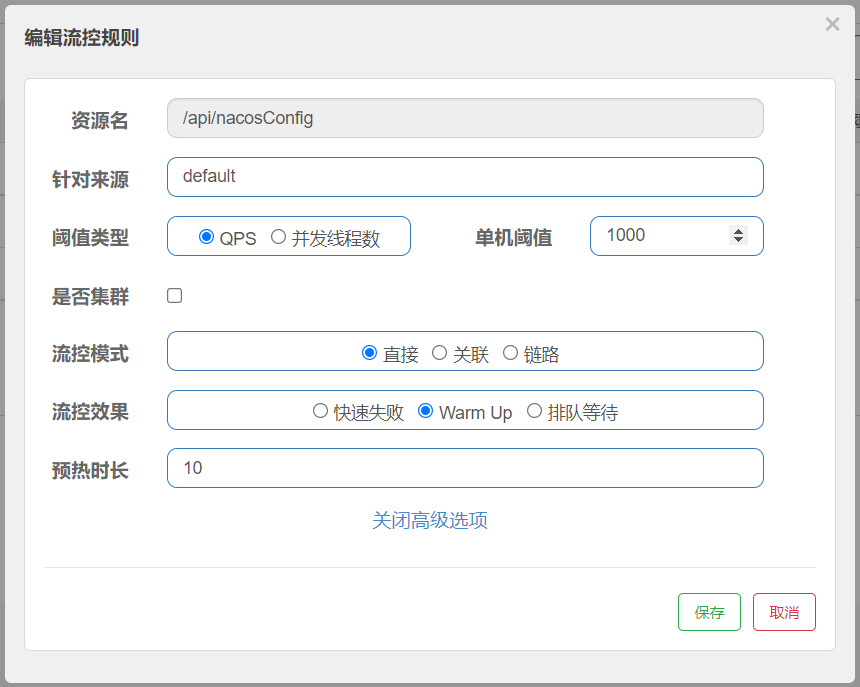
Warm Up 用于应对瞬时大并发流量冲击。当遇到突发大流量 Warm Up 会缓慢拉升阈值限制,预防系统瞬时崩溃,这期间超出阈值的访问处于队列等待状态,并不会立即抛出 BlockException。
如下图所示,/api/nacosConfig 接口平时单机阈值 QPS 处于低水位:默认为 1000/3 (冷加载因子)≈333,当瞬时大流量进来,10 秒钟内将 QPS 阈值逐渐拉升至 1000,为系统留出缓冲时间,预防突发性系统崩溃。
排队等待:
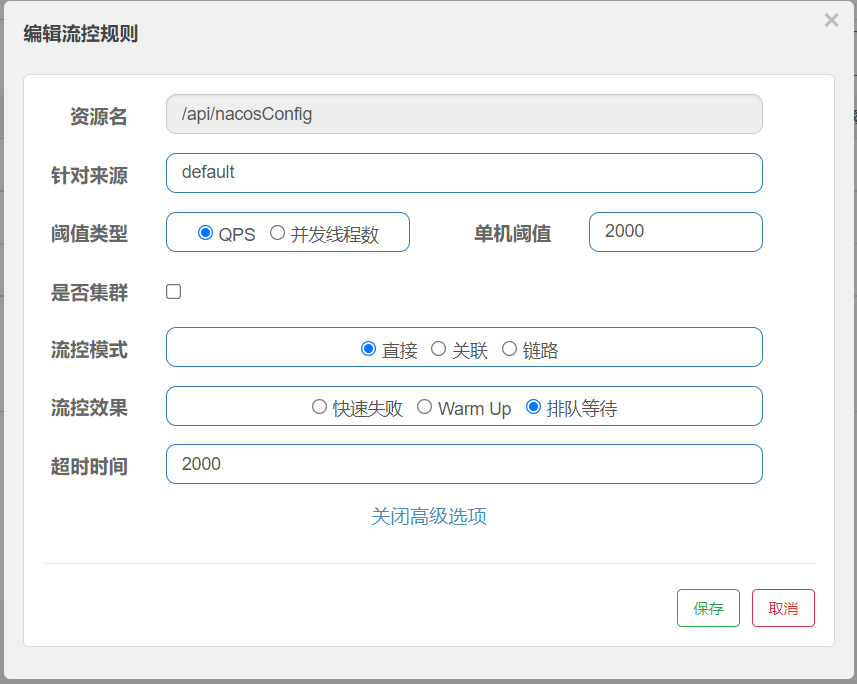
排队等待是采用匀速放行的方式对请求进行处理。如下所示:
介绍了上述三种流控效果,接下来我们一起看看 Sentinel 的熔断降级策略。
通过 Sentinel Dashboard 配置熔断
Sentinel Dashboard 可以设置三种不同的熔断模式:慢调用比例、异常比例、异常数,下面我们分别介绍:
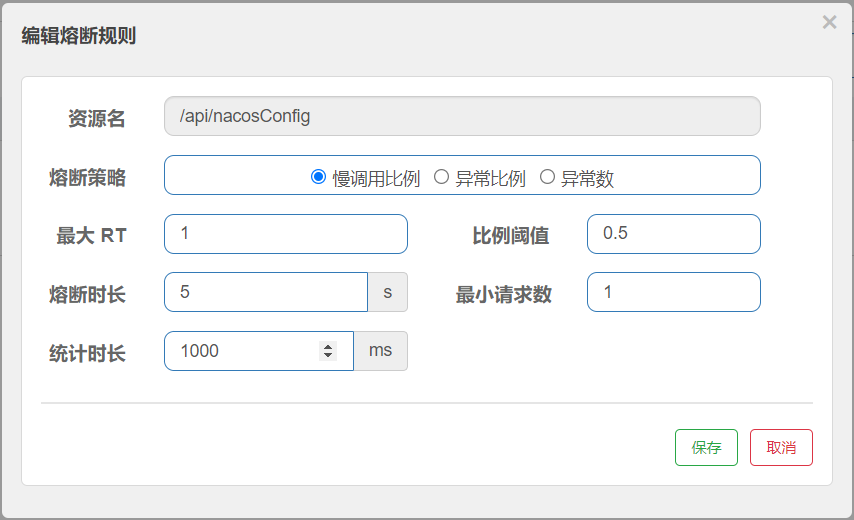
- 慢调用比例 (SLOW_REQUEST_RATIO):选择以慢调用比例作为阈值,需要设置允许的慢调用 RT(即最大的响应时间),请求的响应时间大于该值则统计为慢调用。当单位统计时长(statIntervalMs)内请求数目大于设置的最小请求数目,并且慢调用的比例大于阈值,则接下来的熔断时长内请求会自动被熔断。经过熔断时长后熔断器会进入探测恢复状态(HALF-OPEN 状态),若接下来的一个请求响应时间小于设置的慢调用 RT 则结束熔断,若大于设置的慢调用 RT 则会再次被熔断。

- 异常比例:当单位统计时长(statIntervalMs)内请求数目大于设置的最小请求数目,并且异常的比例大于阈值,则接下来的熔断时长内请求会自动被熔断。经过熔断时长后熔断器会进入探测恢复状态(HALF-OPEN 状态),若接下来的一个请求成功完成(没有错误)则结束熔断,否则会再次被熔断。异常比率的阈值范围是[0.0, 1.0],代表 0% - 100%。
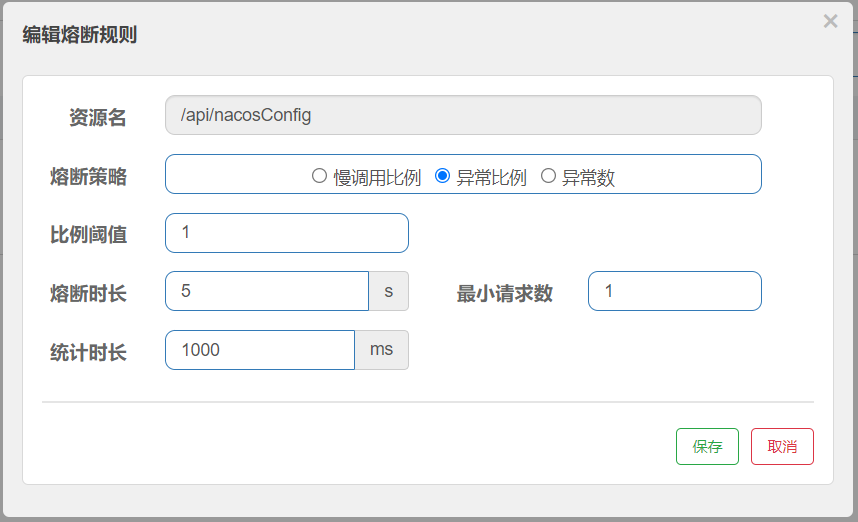
- 异常数 (ERROR_COUNT):当单位统计时长内的异常数目超过阈值之后会自动进行熔断。经过熔断时长后熔断器会进入探测恢复状态(HALF-OPEN 状态),若接下来的一个请求成功完成(没有错误)则结束熔断,否则会再次被熔断。
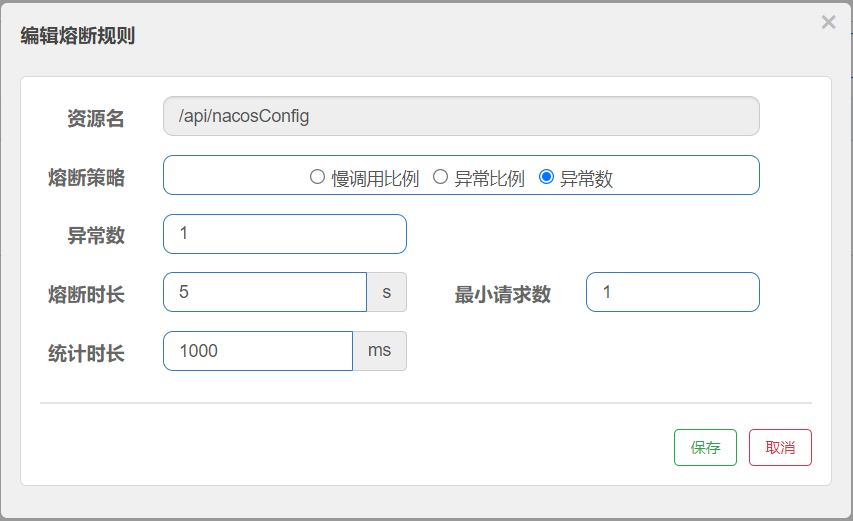

以上就是三种熔断模式的介绍,熔断相对流控配置比较简单,只需要设置熔断检查开启条件与触发熔断条件即可。接下来我们重启一下微服务,看看有什么效果?如下图所示:
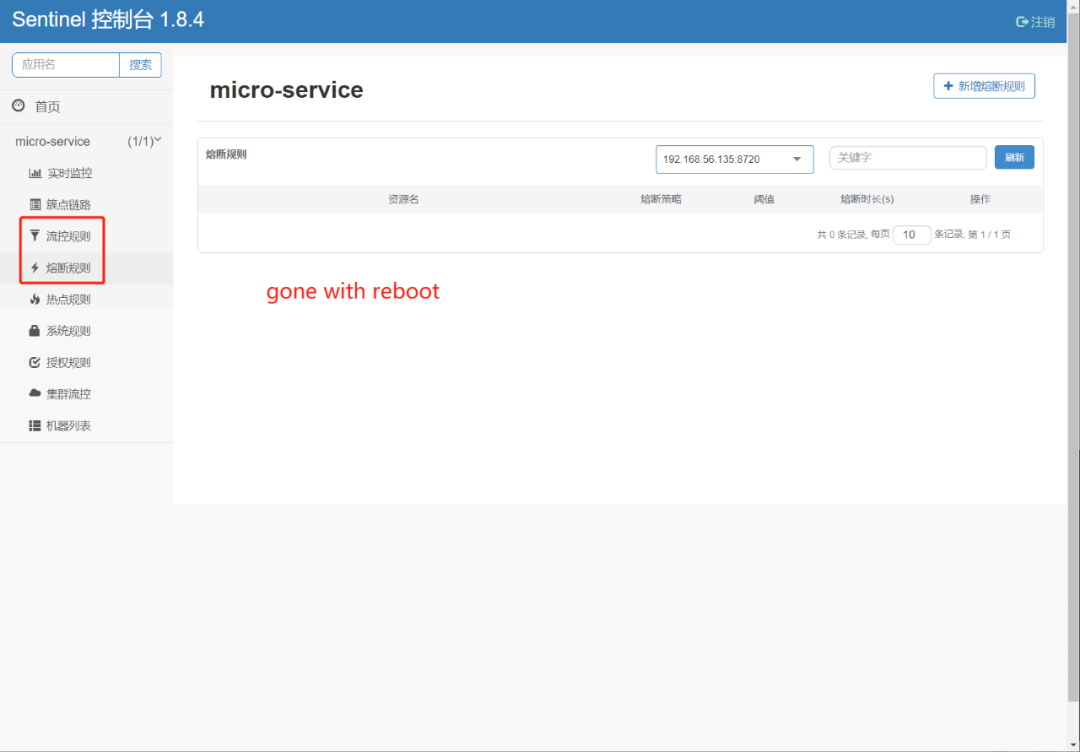
前面我们创建的流控规则及熔断规则哪里去了?为什么已重启微服务就不见了?接下来我们就一起看看这个问题。
Sentinel 与 Nacos 整合实现规则持久化
上面的规则配置,都是存在内存中的。即如果应用重启,这个规则就会丢失。我们可以通过实现 DataSource 接口的方式,来自定义规则的存储数据源。通常我们的建议有:
- 整合动态配置系统,如 ZooKeeper、Nacos、Apollo 等,动态地实时刷新配置规则。
- 结合 RDBMS、NoSQL、VCS 等来实现该规则。
- 配合 Sentinel Dashboard 使用。
当微服务重启以后所有的配置规则都会丢失,其中的根源是默认微服务将 Sentinel 的规则保存在 JVM 内存中,当应用重启后 JVM 内存销毁,规则就会丢失。
接下来我们通过一个实例介绍 Sentinel 与 Nacos 的整合,把 Sentinel 的规则持久化到 Nacos 中。
项目准备
首先,我们快速构建演示工程 micro-service。
添加依赖
利用 Spring Initializr 向导创建 micro-service 工程,pom.xml 增加以下三项依赖。
<dependency>
    <groupId>com.alibaba.cloud</groupId>
    <artifactId>spring-cloud-starter-alibaba-nacos-discovery</artifactId>
</dependency>
<dependency>
    <groupId>com.alibaba.cloud</groupId>
    <artifactId>spring-cloud-starter-alibaba-sentinel</artifactId>
</dependency>- 1.
- 2.
- 3.
- 4.
- 5.
- 6.
- 7.
- 8.
配置 Nacos 与 Sentinel 客户端
server:
port: 8080
spring:
application:
name: micro-service
datasource:
url: jdbc:mysql://localhost:3306/employee_directory?useSSL=false&serverTimezone=UTC
username: employee
password: employEE!#123
cloud:
sentinel:
transport:
dashboard: 127.0.0.1:18080
eager: true
nacos:
discovery:
server-addr: localhost:8848
username: nacos
password: nacos
url:
name: tyun
address: www.tyun.cn
management:
endpoints:
web:
exposure:
include: '*'- 1.
- 2.
- 3.
- 4.
- 5.
- 6.
- 7.
- 8.
- 9.
- 10.
- 11.
- 12.
- 13.
- 14.
- 15.
- 16.
- 17.
- 18.
- 19.
- 20.
- 21.
- 22.
- 23.
- 24.
- 25.
- 26.
- 27.
演示代码
package cn.lavenliu.springboot.cruddemo.controller;
import org.springframework.web.bind.annotation.GetMapping;
import org.springframework.web.bind.annotation.RequestMapping;
import org.springframework.web.bind.annotation.RestController;
import cn.lavenliu.springboot.cruddemo.service.SentinelDemoService;
("/api")
public class SentinelDemoController {
private SentinelDemoService sentinelDemoService;
("/flowControl")
public String testFlowRule() {
return new String("创建成功");
}
}- 1.
- 2.
- 3.
- 4.
- 5.
- 6.
- 7.
- 8.
- 9.
- 10.
- 11.
- 12.
- 13.
- 14.
启动 micro-service,访问 http://localhost:8080/flowControl,如果出现如下所示,说明 micro-service 服务启动成功。
package cn.lavenliu.springboot.cruddemo.controller;
import org.springframework.web.bind.annotation.GetMapping;
import org.springframework.web.bind.annotation.RequestMapping;
import org.springframework.web.bind.annotation.RestController;
import cn.lavenliu.springboot.cruddemo.service.SentinelDemoService;
("/api")
public class SentinelDemoController {
private SentinelDemoService sentinelDemoService;
("/flowControl")
public String testFlowRule() {
return new String("创建成功");
}
}- 1.
- 2.
- 3.
- 4.
- 5.
- 6.
- 7.
- 8.
- 9.
- 10.
- 11.
- 12.
- 13.
- 14.
完整的代码放在了 Github 上面:https://github.com/TyunTech/spring-cloud-alibaba-sentinel-nacos-demo.git
流控规则持久化
工程创建完成,下面我们将 Sentinel 接入 Nacos 配置中心。
新增依赖
在 pom.xml 新增 sentinel-datasource-nacos 依赖。
<dependency>
    <groupId>com.alibaba.csp</groupId>
    <artifactId>sentinel-datasource-nacos</artifactId>
</dependency>- 1.
- 2.
- 3.
- 4.
sentinel-datasource-nacos 是 Sentinel 为 Nacos 扩展的数据源模块,允许将规则数据存储在 Nacos 配置中心,在微服务启动时利用该模块 Sentinel 会自动在 Nacos下载对应的规则数据。
Nacos 中加载规则
在 Nacos 的 micro-service-dev.yml 配置中增加 Nacos下载规则,在原有的 Sentinel 配置下新增 datasource 选项。如下:
server:
port: 8080
spring:
application:
name: micro-service
datasource:
url: jdbc:mysql://localhost:3306/employee_directory?useSSL=false&serverTimezone=UTC
username: employee
password: employEE!#123
cloud:
sentinel:
transport:
dashboard: 127.0.0.1:18080
eager: true
datasource:
flow:
nacos:
server-addr: ${spring.cloud.nacos.server-addr}
dataId: ${spring.application.name}-flow-rules
groupId: DEFAULT_GROUP
rule-type: flow
username: nacos
password: nacos
nacos:
server-addr: localhost:8848
username: nacos
password: nacos
url:
name: tyun
address: www.tyun.cn
management:
endpoints:
web:
exposure:
include: '*'- 1.
- 2.
- 3.
- 4.
- 5.
- 6.
- 7.
- 8.
- 9.
- 10.
- 11.
- 12.
- 13.
- 14.
- 15.
- 16.
- 17.
- 18.
- 19.
- 20.
- 21.
- 22.
- 23.
- 24.
- 25.
- 26.
- 27.
- 28.
- 29.
- 30.
- 31.
- 32.
- 33.
- 34.
- 35.
通过这一份配置,微服务在启动时就会自动从 Nacos 配置中心 DEFAULT_GROUP 分组下载 data-id 为 micro-service-flow-rules 的配置信息,并将其作为流控规则。
新增流控配置
在 Nacos 配置中心页面,新增 data-id 为 micro-service-flow-rules 的配置项。
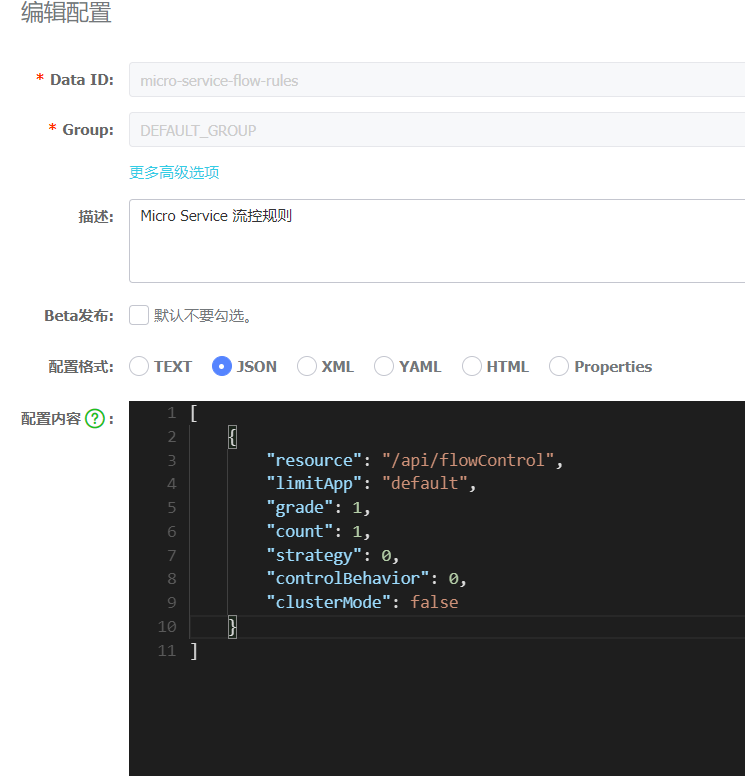
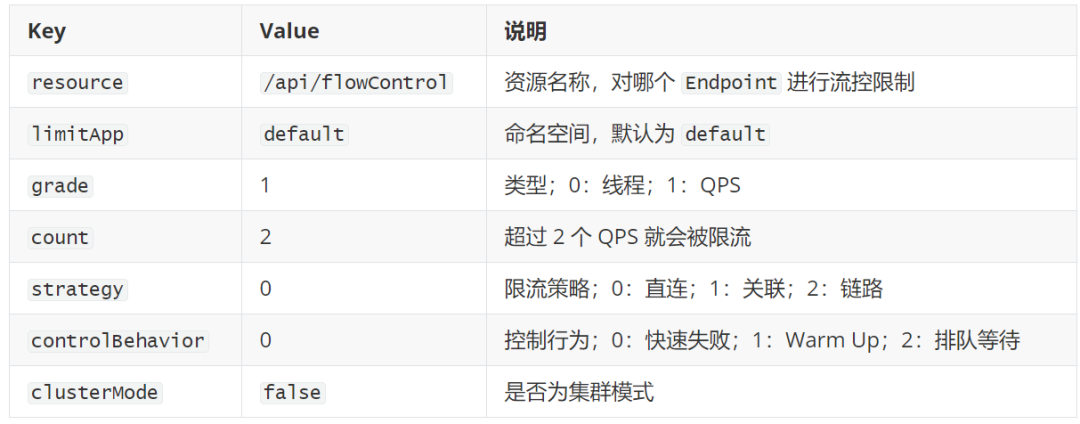
这里 data-id 与 groups 与微服务应用的配置保持对应,最核心的配置内容采用 JSON 格式进行书写,我们来看下这段流控规则:
[
    {
        "resource": "/api/flowControl",
        "limitApp": "default",
        "grade": 1,
        "count": 2,
        "strategy": 0,
        "controlBehavior": 0,
        "clusterMode": false
    }
]- 1.
- 2.
- 3.
- 4.
- 5.
- 6.
- 7.
- 8.
- 9.
- 10.
- 11.
关于上述 Key 的含义如下:
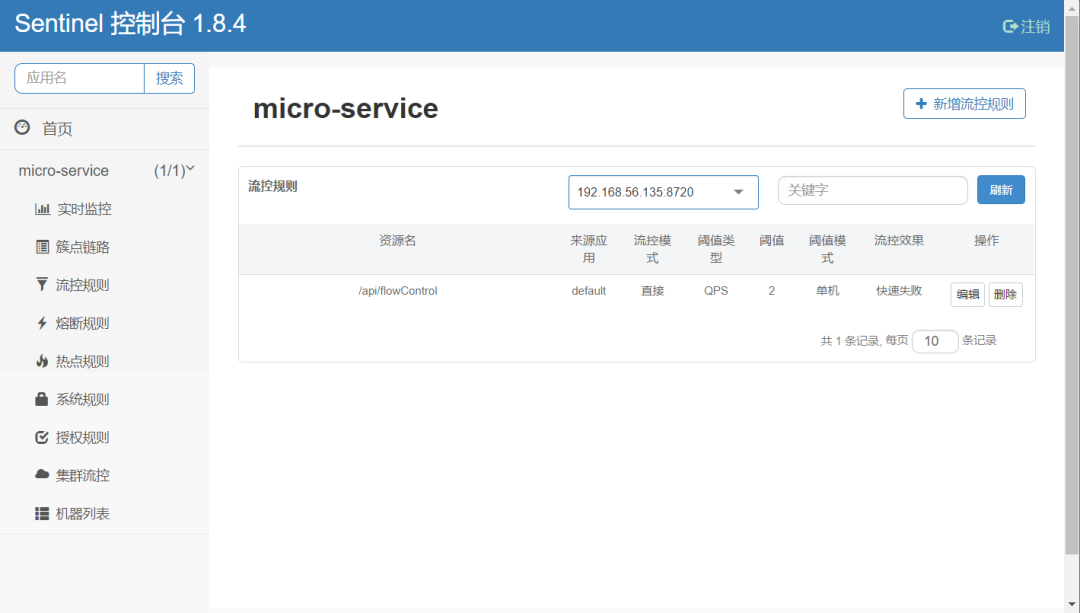
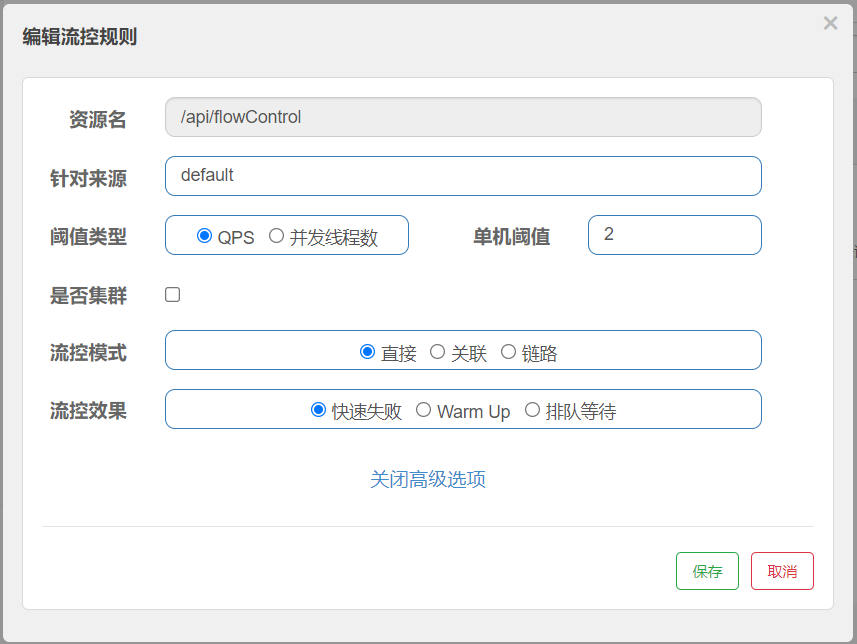
其实上面的 JSON 配置,会生成如下 Dashboard 中的配置:

最后,我们启动应用来验证流控效果。使用 curl 访问 http://localhost:8080/api/flowControl:
[root alibaba]# for i in {1..50}; do curl -w "\n" http://localhost:8080/api/flowControl; sleep 0.1; done
创建成功
创建成功
Blocked by Sentinel (flow limiting)
Blocked by Sentinel (flow limiting)
Blocked by Sentinel (flow limiting)
Blocked by Sentinel (flow limiting)
创建成功
创建成功
Blocked by Sentinel (flow limiting)
Blocked by Sentinel (flow limiting)
Blocked by Sentinel (flow limiting)
Blocked by Sentinel (flow limiting)
Blocked by Sentinel (flow limiting)
Blocked by Sentinel (flow limiting)
创建成功
创建成功
Blocked by Sentinel (flow limiting)
Blocked by Sentinel (flow limiting)
Blocked by Sentinel (flow limiting)
Blocked by Sentinel (flow limiting)
Blocked by Sentinel (flow limiting)
创建成功
创建成功
Blocked by Sentinel (flow limiting)
Blocked by Sentinel (flow limiting)
Blocked by Sentinel (flow limiting)
Blocked by Sentinel (flow limiting)
Blocked by Sentinel (flow limiting)
创建成功
创建成功
Blocked by Sentinel (flow limiting)
Blocked by Sentinel (flow limiting)
Blocked by Sentinel (flow limiting)
Blocked by Sentinel (flow limiting)
Blocked by Sentinel (flow limiting)
Blocked by Sentinel (flow limiting)
创建成功
创建成功
Blocked by Sentinel (flow limiting)
Blocked by Sentinel (flow limiting)
Blocked by Sentinel (flow limiting)
Blocked by Sentinel (flow limiting)
Blocked by Sentinel (flow limiting)
创建成功
创建成功
Blocked by Sentinel (flow limiting)
Blocked by Sentinel (flow limiting)
Blocked by Sentinel (flow limiting)
Blocked by Sentinel (flow limiting)
Blocked by Sentinel (flow limiting)
[root alibaba]#- 1.
- 2.
- 3.
- 4.
- 5.
- 6.
- 7.
- 8.
- 9.
- 10.
- 11.
- 12.
- 13.
- 14.
- 15.
- 16.
- 17.
- 18.
- 19.
- 20.
- 21.
- 22.
- 23.
- 24.
- 25.
- 26.
- 27.
- 28.
- 29.
- 30.
- 31.
- 32.
- 33.
- 34.
- 35.
- 36.
- 37.
- 38.
- 39.
- 40.
- 41.
- 42.
- 43.
- 44.
- 45.
- 46.
- 47.
- 48.
- 49.
- 50.
- 51.
- 52.
我们每 0.1 秒就发起一次请求,可以看到 Sentinel 已经限流了,会出现 “Blocked by Sentinel (flow limiting)” 的错误信息,说明流控规则已生效。接下来我们再来验证能否自动推送新规则,将 Nacos 配置中心中流控规则 count 选项改为 1。
[
    {
        "resource": "/api/flowControl",
        "limitApp": "default",
        "grade": 1,
        "count": 1,
        "strategy": 0,
        "controlBehavior": 0,
        "clusterMode": false
    }
]- 1.
- 2.
- 3.
- 4.
- 5.
- 6.
- 7.
- 8.
- 9.
- 10.
- 11.
这时可以看到应用也有相应的日志信息:
2022-04-28 12:53:40.379 INFO 18327 --- [-localhost_8848] c.a.n.client.config.impl.ClientWorker : [fixed-localhost_8848] [polling-resp] config changed. dataId=micro-service-flow-rules, group=DEFAULT_GROUP
2022-04-28 12:53:40.379 INFO 18327 --- [-localhost_8848] c.a.n.client.config.impl.ClientWorker : get changedGroupKeys:[micro-service-flow-rules+DEFAULT_GROUP]
2022-04-28 12:53:40.405 INFO 18327 --- [-localhost_8848] c.a.n.client.config.impl.ClientWorker : [fixed-localhost_8848] [data-received] dataId=micro-service-flow-rules, group=DEFAULT_GROUP, tenant=null, md5=2e4c95b045fbc027c1d3b71199f263b9, content=[
{
"resource": "/api/flowControl",
"limitApp": "default",
"grade": 1,
..., type=json
2022-04-28 12:53:40.405 INFO 18327 --- [-localhost_8848] c.a.nacos.client.config.impl.CacheData : [fixed-localhost_8848] [notify-listener] time cost=0ms in ClientWorker, dataId=micro-service-flow-rules, group=DEFAULT_GROUP, md5=2e4c95b045fbc027c1d3b71199f263b9, listener=com.alibaba.csp.sentinel.datasource.nacos.NacosDataSource$1
2022-04-28 12:53:40.406 INFO 18327 --- [update-thread-1] c.a.nacos.client.config.impl.CacheData : [fixed-localhost_8848] [notify-ok] dataId=micro-service-flow-rules, group=DEFAULT_GROUP, md5=2e4c95b045fbc027c1d3b71199f263b9, listener=com.alibaba.csp.sentinel.datasource.nacos.NacosDataSource$1- 1.
- 2.
- 3.
- 4.
- 5.
- 6.
- 7.
- 8.
- 9.
- 10.
当新规则发布后,micro-service 控制台会立即收到下面的日志,说明新的流控规则即时生效。再次进行访问进行验证:
[root alibaba]# for i in {1..50}; do curl -w "\n" http://localhost:8080/api/flowControl; sleep 0.1; done
创建成功
Blocked by Sentinel (flow limiting)
Blocked by Sentinel (flow limiting)
Blocked by Sentinel (flow limiting)
Blocked by Sentinel (flow limiting)
Blocked by Sentinel (flow limiting)
创建成功
Blocked by Sentinel (flow limiting)
Blocked by Sentinel (flow limiting)
Blocked by Sentinel (flow limiting)
Blocked by Sentinel (flow limiting)
Blocked by Sentinel (flow limiting)
Blocked by Sentinel (flow limiting)
Blocked by Sentinel (flow limiting)
创建成功
Blocked by Sentinel (flow limiting)
Blocked by Sentinel (flow limiting)
Blocked by Sentinel (flow limiting)
Blocked by Sentinel (flow limiting)
Blocked by Sentinel (flow limiting)
Blocked by Sentinel (flow limiting)
创建成功
Blocked by Sentinel (flow limiting)
Blocked by Sentinel (flow limiting)
Blocked by Sentinel (flow limiting)
Blocked by Sentinel (flow limiting)
Blocked by Sentinel (flow limiting)
Blocked by Sentinel (flow limiting)
创建成功
Blocked by Sentinel (flow limiting)
Blocked by Sentinel (flow limiting)
Blocked by Sentinel (flow limiting)
Blocked by Sentinel (flow limiting)
Blocked by Sentinel (flow limiting)
Blocked by Sentinel (flow limiting)
创建成功
Blocked by Sentinel (flow limiting)
Blocked by Sentinel (flow limiting)
Blocked by Sentinel (flow limiting)
Blocked by Sentinel (flow limiting)
Blocked by Sentinel (flow limiting)
Blocked by Sentinel (flow limiting)
Blocked by Sentinel (flow limiting)
创建成功
Blocked by Sentinel (flow limiting)
Blocked by Sentinel (flow limiting)
Blocked by Sentinel (flow limiting)
Blocked by Sentinel (flow limiting)
Blocked by Sentinel (flow limiting)
Blocked by Sentinel (flow limiting)- 1.
- 2.
- 3.
- 4.
- 5.
- 6.
- 7.
- 8.
- 9.
- 10.
- 11.
- 12.
- 13.
- 14.
- 15.
- 16.
- 17.
- 18.
- 19.
- 20.
- 21.
- 22.
- 23.
- 24.
- 25.
- 26.
- 27.
- 28.
- 29.
- 30.
- 31.
- 32.
- 33.
- 34.
- 35.
- 36.
- 37.
- 38.
- 39.
- 40.
- 41.
- 42.
- 43.
- 44.
- 45.
- 46.
- 47.
- 48.
- 49.
- 50.
- 51.
至此,我们已经完成了 Sentinel 的规则并持久化到 Nacos 中。关于更多 Sentinel 的用法可以参考官方文档。
附录
目前已经有很多公司选择了 Spring Cloud Alibaba 开源组件进行开发,我们这里顺便介绍下 Spring Cloud Alibaba 的组成及其与 Spring Cloud 的对比。让大家对此有更多的选择。
Spring Cloud Alibaba 简介
我们先来简单了解下什么是 Spring Cloud Alibaba?Spring Cloud Alibaba 是由一些阿里巴巴的开源组件和云产品组成的。
Spring Cloud Alibaba 致力于提供微服务开发的一站式解决方案。此项目包含开发分布式应用微服务的必需组件,方便开发者通过 Spring Cloud 编程模型轻松使用这些组件来开发分布式应用服务。
依托 Spring Cloud Alibaba,我们只需要添加一些注解和少量配置,就可以将 Spring Cloud 应用接入阿里微服务解决方案,通过阿里中间件来迅速搭建分布式应用系统。
技术选型推荐
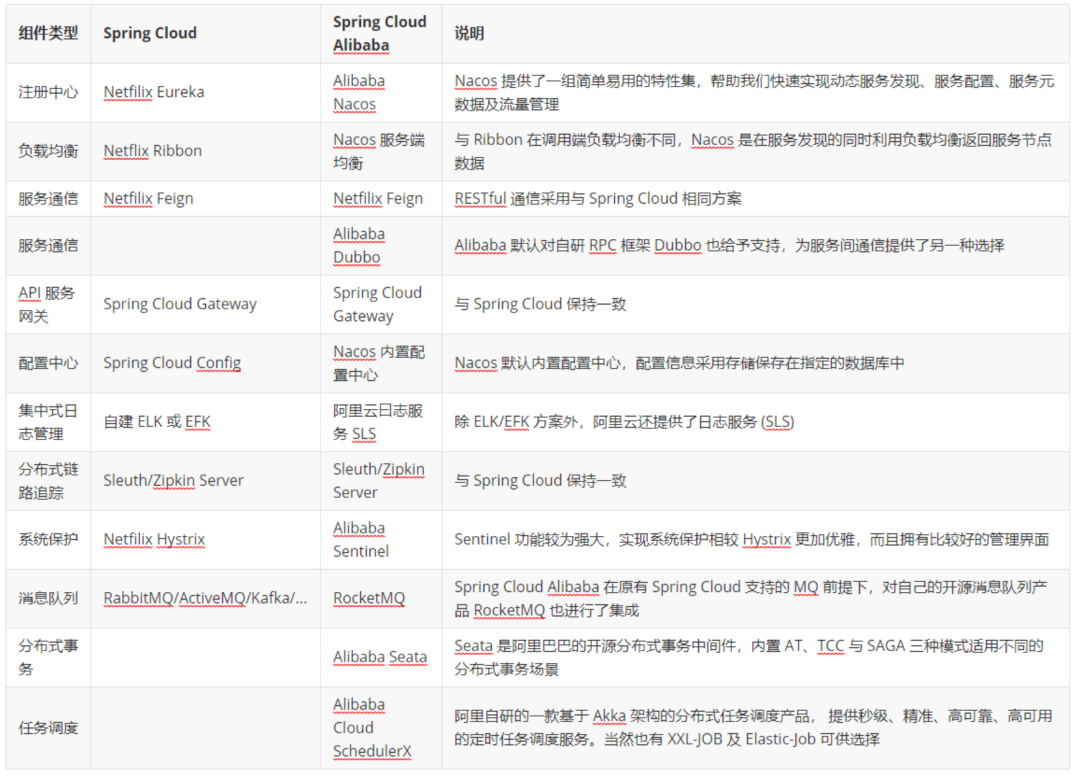
在下面的表格中,我们总结了使用 Spring Cloud 来构建微服务架构时可以使用哪些组件,为大家做技术选型提供一个参考:
